
目录
初识
什么是并发
并发在生活中随处可见,边走路边说话,边听歌边写代码。计算机术语中的”并发”,指的是在单个系统里同时执行多个独立的活动,而不是顺序的一个接一个的执行。对于单核CPU来说,在某个时刻只可能处理一个任务,但它却不是完全执行完一个任务再执行一个下一任务,而是一直在任务间切换,每个任务完成一点就去执行下一个任务,看起来就像任务在并行发生,虽然不是严格的同时执行多个任务,但是我们仍然称之为并发(concurrency)。真正的并发是在在多核CPU上,能够真正的同时执行多个任务,称为硬件并发(hardware concurrency)。
并发并非没有代价,在单核CPU并发执行两个任务需要付出上下文切换的时间代价。如下图:

假设A和B两个任务都被分成10个大小相等的块,单核CPU交替的执行两个任务,每次执行其中一块,其花费的时间并不是先完成A任务再玩成B任务所花费时间的两倍,而是要更多。这是因为系统从一个任务切换到另一个任务需要执行一次上下文切换,这是需要时间的(图中的灰色块)。上下文切换需要操作系统为当前运行的任务保存CPU的状态和指令指针,算出要切换到哪个任务,并为要切换的任务重新加载处理器状态。然后将新任务的指令和数据载入到缓存中。
并发的方式
多进程并发
将应用程序分为多个独立的、单线程的进程,他们可以同时运行。进程内部实现原理比较复杂,这里就不多说了。

这些独立的进程可以通过常规的进程间通信机制进行通信,如管道、信号、消息队列、共享内存、存储映射I/O、信号量、套接字等。
缺点:
- 进程间通信较为复杂,速度相对线程间的通信更慢。
- 启动进程的开销比线程大,使用的系统资源也更多。
优点:
- 进程间通信的机制相对于线程更加安全。
- 能够很容易的将一台机器上的多进程程序部署在不同的机器上(如果通信机制选取的是套接字的话)。
多线程并发
线程很像轻量级的进程,但是一个进程中的所有线程都共享相同的地址空间,线程间的大部分数据都可以共享。线程间的通信一般都通过共享内存来实现。

优点:
- 由于可以共享数据,多线程间的通信开销比进程小的多。
- 线程启动的比进程快,占用的资源更少。
缺点:
- 共享数据太过于灵活,为了维护正确的共享,代码写起来比较复杂。
- 无法部署在分布式系统上。
为什么使用并发
主要原因有两个:任务拆分和提高性能。
任务拆分
在编写软件的时候,将相关的代码放在一起,将无关的代码分开,这是一个好主意,这样能够让程序更加容易理解和测试。将程序划分成不同的任务,每个线程执行一个任务或者多个任务,可以将整个程序的逻辑变得更加简单。
提高性能
在两种情况下,并发能够提高性能。
- 任务并行(task parallelism):将一个单个任务分成若干个部分各自并行运行,从而降低运行时间。虽然听起来很简单,但其实是一个相当复杂的过程,设想假如各个部分之间存在很多以来,一个部分的执行需要使用到另一个任务的执行结果,这个时候并不能很好的并行完成。
- 数据并行(data parallelism):每个线程在不同的数据部分上执行相同的操作。
多线程库简介
C++98标准中并没有线程库的存在,而在C++11中终于提供了多线程的标准库,提供了管理线程、保护共享数据、线程间同步操作、原子操作等类。
多线程库对应的头文件是#include <thread>,类名为std::thread。
一个简单的串行程序如下:
#include <iostream>
#include <thread>

void function_1() {
    std::cout << "I'm function_1()" << std::endl;
}

int main() {
    function_1();
    return 0;
} 这是一个典型的单线程的单进程程序,任何程序都是一个进程,main()函数就是其中的主线程,单个线程都是顺序执行。
将上面的程序改造成多线程程序其实很简单,让function_1()函数在另外的线程中执行:
#include <iostream>
#include <thread>

void function_1() {
    std::cout << "I'm function_1()" << std::endl;
}

int main() {
    std::thread t1(function_1);
    // do other things
    t1.join();
    return 0;
}
分析:
- 首先,构建一个
std::thread对象t1,构造的时候传递了一个参数,这个参数是一个函数,这个函数就是这个线程的入口函数,函数执行完了,整个线程也就执行完了。 - 线程创建成功后,就会立即启动,并没有一个类似
start的函数来显式的启动线程。 - 一旦线程开始运行, 就需要显式的决定是要等待它完成(join),或者分离它让它自行运行(detach)。注意:只需要在
std::thread对象被销毁之前做出这个决定。这个例子中,对象t1是栈上变量,在main函数执行结束后就会被销毁,所以需要在main函数结束之前做决定。 - 这个例子中选择了使用
t1.join(),主线程会一直阻塞着,直到子线程完成,join()函数的另一个任务是回收该线程中使用的资源。
线程对象和对象内部管理的线程的生命周期并不一样,如果线程执行的快,可能内部的线程已经结束了,但是线程对象还活着,也有可能线程对象已经被析构了,内部的线程还在运行。
假设t1线程是一个执行的很慢的线程,主线程并不想等待子线程结束就想结束整个任务,直接删掉t1.join()是不行的,程序会被终止(析构t1的时候会调用std::terminate,程序会打印terminate called without an active exception)。
与之对应,我们可以调用t1.detach(),从而将t1线程放在后台运行,所有权和控制权被转交给C++运行时库,以确保与线程相关联的资源在线程退出后能被正确的回收。参考UNIX的守护进程(daemon process)的概念,这种被分离的线程被称为守护线程(daemon threads)。线程被分离之后,即使该线程对象被析构了,线程还是能够在后台运行,只是由于对象被析构了,主线程不能够通过对象名与这个线程进行通信。例如:
#include <iostream>
#include <thread>

void function_1() {
    //延时500ms 为了保证test()运行结束之后才打印
    std::this_thread::sleep_for(std::chrono::milliseconds(500));
    std::cout << "I'm function_1()" << std::endl;
}

void test() {
    std::thread t1(function_1);
    t1.detach();
    // t1.join();
    std::cout << "test() finished" << std::endl;
}

int main() {
    test();
    //让主线程晚于子线程结束
    std::this_thread::sleep_for(std::chrono::milliseconds(1000)); //延时1s
    return 0;
}

// 使用 t1.detach()时
// test() finished
// I'm function_1()

// 使用 t1.join()时
// I'm function_1()
// test() finished
分析:
- 由于线程入口函数内部有个
500ms的延时,所以在还没有打印的时候,test()已经执行完成了,t1已经被析构了,但是它负责的那个线程还是能够运行,这就是detach()的作用。 - 如果去掉
main函数中的1s延时,会发现什么都没有打印,因为主线程执行的太快,整个程序已经结束了,那个后台线程被C++运行时库回收了。 - 如果将
t1.detach()换成t1.join(),test函数会在t1线程执行结束之后,才会执行结束。
一旦一个线程被分离了,就不能够再被join了。如果非要调用,程序就会崩溃,可以使用joinable()函数判断一个线程对象能否调用join()。
void test() {
    std::thread t1(function_1);
    t1.detach();

    if(t1.joinable())
        t1.join();

    assert(!t1.joinable());
}
理解线程类的构造函数
构造函数的参数
std::thread类的构造函数是使用可变参数模板实现的,也就是说,可以传递任意个参数,第一个参数是线程的入口函数,而后面的若干个参数是该函数的参数。
第一参数的类型并不是c语言中的函数指针(c语言传递函数都是使用函数指针),在c++11中,增加了可调用对象(Callable Objects)的概念,总的来说,可调用对象可以是以下几种情况:
- 函数指针
- 重载了
operator()运算符的类对象,即仿函数 lambda表达式(匿名函数)std::function
函数指针
// 普通函数 无参
void function_1() {
}

// 普通函数 1个参数
void function_2(int i) {
}

// 普通函数 2个参数
void function_3(int i, std::string m) {
}

std::thread t1(function_1);
std::thread t2(function_2, 1);
std::thread t3(function_3, 1, "hello");

t1.join();
t2.join();
t3.join();
实验的时候还发现一个问题,如果将重载的函数作为线程的入口函数,会发生编译错误!编译器搞不清楚是哪个函数,如下面的代码:
// 普通函数 无参
void function_1() {
}

// 普通函数 1个参数
void function_1(int i) {
}
std::thread t1(function_1);
t1.join();
// 编译错误
/*
C:\Users\Administrator\Documents\untitled\main.cpp:39:
error: no matching function for call to 'std::thread::thread(<unresolved overloaded function type>)'
     std::thread t1(function_1);
                              ^
*/
仿函数
// 仿函数
class Fctor {
public:
    // 具有一个参数
    void operator() () {

    }
};
Fctor f;
std::thread t1(f);
// std::thread t2(Fctor()); // 编译错误
std::thread t3((Fctor())); // ok
std::thread t4{Fctor()}; // ok 一个仿函数类生成的对象,使用起来就像一个函数一样,比如上面的对象f,当使用f()时就调用operator()运算符。所以也可以让它成为线程类的第一个参数,如果这个仿函数有参数,同样的可以写在线程类的后几个参数上。
而t2之所以编译错误,是因为编译器并没有将Fctor()解释为一个临时对象,而是将其解释为一个函数声明,编译器认为你声明了一个函数,这个函数不接受参数,同时返回一个Factor对象。解决办法就是在Factor()外包一层小括号(),或者在调用std::thread的构造函数时使用{},这是c++11中的新的同意初始化语法。
但是,如果重载的operator()运算符有参数,就不会发生上面的错误。
匿名函数
std::thread t1([](){
    std::cout << "hello" << std::endl;
});

std::thread t2([](std::string m){
    std::cout << "hello " << m << std::endl;
}, "world");
std::function
class A{
public:
    void func1(){
    }

    void func2(int i){
    }
    void func3(int i, int j){
    }
};

A a;
std::function<void(void)> f1 = std::bind(&A::func1, &a);
std::function<void(void)> f2 = std::bind(&A::func2, &a, 1);
std::function<void(int)> f3 = std::bind(&A::func2, &a, std::placeholders::_1);
std::function<void(int)> f4 = std::bind(&A::func3, &a, 1, std::placeholders::_1);
std::function<void(int, int)> f5 = std::bind(&A::func3, &a, std::placeholders::_1, std::placeholders::_2);

std::thread t1(f1);
std::thread t2(f2);
std::thread t3(f3, 1);
std::thread t4(f4, 1);
std::thread t5(f5, 1, 2);
传值还是引用
先提出一个问题:如果线程入口函数的的参数是引用类型,在线程内部修改该变量,主线程的变量会改变吗?
代码如下:
#include <iostream>
#include <thread>
#include <string>

// 仿函数
class Fctor {
public:
    // 具有一个参数 是引用
    void operator() (std::string& msg) {
        msg = "wolrd";
    }
};


int main() {
    Fctor f;
    std::string m = "hello";
    std::thread t1(f, m);

    t1.join();
    std::cout << m << std::endl;
    return 0;
}

// vs下: 最终是:"hello"
// g++编译器: 编译报错 事实上,该代码使用g++编译会报错,而使用vs2015并不会报错,但是子线程并没有成功改变外面的变量m。
我是这么认为的:std::thread类,内部也有若干个变量,当使用构造函数创建对象的时候,是将参数先赋值给这些变量,所以这些变量只是个副本,然后在线程启动并调用线程入口函数时,传递的参数只是这些副本,所以内部怎么操作都是改变副本,而不影响外面的变量。g++可能是比较严格,这种写法可能会导致程序发生严重的错误,索性禁止了。
而如果可以想真正传引用,可以在调用线程类构造函数的时候,用std::ref()包装一下。如下面修改后的代码:
std::thread t1(f, std::ref(m)); 然后vs和g++都可以成功编译,而且子线程可以修改外部变量的值。
当然这样并不好,多个线程同时修改同一个变量,会发生数据竞争。
同理,构造函数的第一个参数是可调用对象,默认情况下其实传递的还是一个副本。
#include <iostream>
#include <thread>
#include <string>

class A {
public:
    void f(int x, char c) {}
    int g(double x) {return 0;}
    int operator()(int N) {return 0;}
};

void foo(int x) {}

int main() {
    A a;
    std::thread t1(a, 6); // 1. 调用的是 copy_of_a()
    std::thread t2(std::ref(a), 6); // 2. a()
    std::thread t3(A(), 6); // 3. 调用的是 临时对象 temp_a()
    std::thread t4(&A::f, a, 8, 'w'); // 4. 调用的是 copy_of_a.f()
    std::thread t5(&A::f, &a, 8, 'w'); //5.  调用的是 a.f()
    std::thread t6(std::move(a), 6); // 6. 调用的是 a.f(), a不能够再被使用了
    t1.join();
    t2.join();
    t3.join();
    t4.join();
    t5.join();
    t6.join();
    return 0;
} 对于线程t1来说,内部调用的线程函数其实是一个副本,所以如果在函数内部修改了类成员,并不会影响到外面的对象。只有传递引用的时候才会修改。所以在这个时候就必须想清楚,到底是传值还是传引用!
线程对象只能移动不可复制
线程对象之间是不能复制的,只能移动,移动的意思是,将线程的所有权在std::thread实例间进行转移。
void some_function();
void some_other_function();
std::thread t1(some_function);
// std::thread t2 = t1; // 编译错误
std::thread t2 = std::move(t1); //只能移动 t1内部已经没有线程了
t1 = std::thread(some_other_function); // 临时对象赋值 默认就是移动操作
std::thread t3;
t3 = std::move(t2); // t2内部已经没有线程了
t1 = std::move(t3); // 程序将会终止,因为t1内部已经有一个线程在管理了
竞争条件与互斥锁
竞争条件
并发代码中最常见的错误之一就是竞争条件(race condition)。而其中最常见的就是数据竞争(data race),从整体上来看,所有线程之间共享数据的问题,都是修改数据导致的,如果所有的共享数据都是只读的,就不会发生问题。但是这是不可能的,大部分共享数据都是要被修改的。
而c++中常见的cout就是一个共享资源,如果在多个线程同时执行cout,你会发发现很奇怪的问题:
#include <iostream>
#include <thread>
#include <string>
using namespace std;

// 普通函数 无参
void function_1() {
    for(int i=0; i>-100; i--)
        cout << "From t1: " << i << endl;
}

int main()
{
    std::thread t1(function_1);

    for(int i=0; i<100; i++)
        cout << "From main: " << i << endl;

    t1.join();
    return 0;
}
你有很大的几率发现打印会出现类似于From t1: From main: 64这样奇怪的打印结果。cout是基于流的,会先将你要打印的内容放入缓冲区,可能刚刚一个线程刚刚放入From t1:,另一个线程就执行了,导致输出变乱。而c语言中的printf不会发生这个问题。
使用互斥元保护共享数据
解决办法就是要对cout这个共享资源进行保护。在c++中,可以使用互斥锁std::mutex进行资源保护,头文件是#include <mutex>,共有两种操作:锁定(lock)与解锁(unlock)。将cout重新封装成一个线程安全的函数:
#include <iostream>
#include <thread>
#include <string>
#include <mutex>
using namespace std;

std::mutex mu;
// 使用锁保护
void shared_print(string msg, int id) {
    mu.lock(); // 上锁
    cout << msg << id << endl;
    mu.unlock(); // 解锁
}

void function_1() {
    for(int i=0; i>-100; i--)
        shared_print(string("From t1: "), i);
}

int main()
{
    std::thread t1(function_1);

    for(int i=0; i<100; i++)
        shared_print(string("From main: "), i);

    t1.join();
    return 0;
}
修改完之后,运行可以发现打印没有问题了。但是还有一个隐藏着的问题,如果mu.lock()和mu.unlock()之间的语句发生了异常,会发生什么?unlock()语句没有机会执行!导致导致mu一直处于锁着的状态,其他使用shared_print()函数的线程就会阻塞。
解决这个问题也很简单,使用c++中常见的RAII技术,即获取资源即初始化(Resource Acquisition Is Initialization)技术,这是c++中管理资源的常用方式。简单的说就是在类的构造函数中创建资源,在析构函数中释放资源,因为就算发生了异常,c++也能保证类的析构函数能够执行。我们不需要自己写个类包装mutex,c++库已经提供了std::lock_guard类模板,使用方法如下:
void shared_print(string msg, int id) {
    //构造的时候帮忙上锁,析构的时候释放锁
    std::lock_guard<std::mutex> guard(mu);
    //mu.lock(); // 上锁
    cout << msg << id << endl;
    //mu.unlock(); // 解锁
} 可以实现自己的std::lock_guard,类似这样:
class MutexLockGuard
{
 public:
  explicit MutexLockGuard(std::mutex& mutex)
    : mutex_(mutex)
  {
    mutex_.lock();
  }

  ~MutexLockGuard()
  {
    mutex_.unlock();
  }

 private:
  std::mutex& mutex_;
};
为保护共享数据精心组织代码
上面的std::mutex互斥元是个全局变量,他是为shared_print()准备的,这个时候,我们最好将他们绑定在一起,比如说,可以封装成一个类。由于cout是个全局共享的变量,没法完全封装,就算你封装了,外面还是能够使用cout,并且不用通过锁。下面使用文件流举例:
#include <iostream>
#include <thread>
#include <string>
#include <mutex>
#include <fstream>
using namespace std;

std::mutex mu;
class LogFile {
    std::mutex m_mutex;
    ofstream f;
public:
    LogFile() {
        f.open("log.txt");
    }
    ~LogFile() {
        f.close();
    }
    void shared_print(string msg, int id) {
        std::lock_guard<std::mutex> guard(mu);
        f << msg << id << endl;
    }
};

void function_1(LogFile& log) {
    for(int i=0; i>-100; i--)
        log.shared_print(string("From t1: "), i);
}

int main()
{
    LogFile log;
    std::thread t1(function_1, std::ref(log));

    for(int i=0; i<100; i++)
        log.shared_print(string("From main: "), i);

    t1.join();
    return 0;
}
上面的LogFile类封装了一个mutex和一个ofstream对象,然后shared_print函数在mutex的保护下,是线程安全的。使用的时候,先定义一个LogFile的实例log,主线程中直接使用,子线程中通过引用传递过去(也可以使用单例来实现),这样就能保证资源被互斥锁保护着,外面没办法使用但是使用资源。
但是这个时候还是得小心了!用互斥元保护数据并不只是像上面那样保护每个函数,就能够完全的保证线程安全,如果将资源的指针或者引用不小心传递出来了,所有的保护都白费了!要记住一下两点:
-
不要提供函数让用户获取资源。
std::mutex mu;
class LogFile {
    std::mutex m_mutex;
    ofstream f;
public:
    LogFile() {
        f.open("log.txt");
    }
    ~LogFile() {
        f.close();
    }
    void shared_print(string msg, int id) {
        std::lock_guard<std::mutex> guard(mu);
        f << msg << id << endl;
    }
    // Never return f to the outside world
    ofstream& getStream() {
        return f;  //never do this !!!
    }
};
2.不要资源传递给用户的函数。
class LogFile {
    std::mutex m_mutex;
    ofstream f;
public:
    LogFile() {
        f.open("log.txt");
    }
    ~LogFile() {
        f.close();
    }
    void shared_print(string msg, int id) {
        std::lock_guard<std::mutex> guard(mu);
        f << msg << id << endl;
    }
    // Never return f to the outside world
    ofstream& getStream() {
        return f;  //never do this !!!
    }
    // Never pass f as an argument to user provided function
    void process(void fun(ostream&)) {
        fun(f);
    }
};
以上两种做法都会将资源暴露给用户,造成不必要的安全隐患。
接口设计中也存在竞争条件
STL中的stack类是线程不安全的,于是你模仿着想写一个属于自己的线程安全的类Stack。于是,你在push和pop等操作得时候,加了互斥锁保护数据。但是在多线程环境下使用使用你的Stack类的时候,却仍然有可能是线程不安全的,why?
假设你的Stack类的接口如下:
class Stack
{
public:
    Stack() {}
    void pop(); //弹出栈顶元素
    int& top(); //获取栈顶元素
    void push(int x);//将元素放入栈
private:
    vector<int> data;
    std::mutex _mu; //保护内部数据
}; 类中的每一个函数都是线程安全的,但是组合起来却不是。加入栈中有9,3,8,6共4个元素,你想使用两个线程分别取出栈中的元素进行处理,如下所示:
   Thread A                Thread B
int v = st.top(); // 6
                      int v = st.top(); // 6
st.pop(); //弹出6
                      st.pop(); //弹出8
                      process(v);//处理6
process(v); //处理6
可以发现在这种执行顺序下, 栈顶元素被处理了两遍,而且多弹出了一个元素8,导致`8没有被处理!这就是由于接口设计不当引起的竞争。解决办法就是将这两个接口合并为一个接口!就可以得到线程安全的栈。
class Stack
{
public:
    Stack() {}
    int& pop(); //弹出栈顶元素并返回
    void push(int x);//将元素放入栈
private:
    vector<int> data;
    std::mutex _mu; //保护内部数据
};

//下面这样使用就不会发生问题
int v = st.pop(); // 6
process(v); 但是注意:这样修改之后是线程安全的,但是并不是异常安全的,这也是为什么STL中栈的出栈操作分解成了两个步骤的原因。(为什么不是异常安全的还没想明白。。)
所以,为了保护共享数据,还得好好设计接口才行。
死锁(Dead Lock)
死锁
如果你将某个mutex上锁了,却一直不释放,另一个线程访问该锁保护的资源的时候,就会发生死锁,这种情况下使用lock_guard可以保证析构的时候能够释放锁,然而,当一个操作需要使用两个互斥元的时候,仅仅使用lock_guard并不能保证不会发生死锁,如下面的例子:
#include <iostream>
#include <thread>
#include <string>
#include <mutex>
#include <fstream>
using namespace std;

class LogFile {
    std::mutex _mu;
    std::mutex _mu2;
    ofstream f;
public:
    LogFile() {
        f.open("log.txt");
    }
    ~LogFile() {
        f.close();
    }
    void shared_print(string msg, int id) {
        std::lock_guard<std::mutex> guard(_mu);
        std::lock_guard<std::mutex> guard2(_mu2);
        f << msg << id << endl;
        cout << msg << id << endl;
    }
    void shared_print2(string msg, int id) {
        std::lock_guard<std::mutex> guard(_mu2);
        std::lock_guard<std::mutex> guard2(_mu);
        f << msg << id << endl;
        cout << msg << id << endl;
    }
};

void function_1(LogFile& log) {
    for(int i=0; i>-100; i--)
        log.shared_print2(string("From t1: "), i);
}

int main()
{
    LogFile log;
    std::thread t1(function_1, std::ref(log));

    for(int i=0; i<100; i++)
        log.shared_print(string("From main: "), i);

    t1.join();
    return 0;
}
运行之后,你会发现程序会卡住,这就是发生死锁了。程序运行可能会发生类似下面的情况:
Thread A              Thread B
_mu.lock()          _mu2.lock()
   //死锁               //死锁
_mu2.lock()         _mu.lock()
解决办法有很多:
1.可以比较mutex的地址,每次都先锁地址小的,如:
if(&_mu < &_mu2){
    _mu.lock();
    _mu2.unlock();
}
else {
    _mu2.lock();
    _mu.lock();
}
2.使用层次锁,将互斥锁包装一下,给锁定义一个层次的属性,每次按层次由高到低的顺序上锁。
这两种办法其实都是严格规定上锁顺序,只不过实现方式不同。
c++标准库中提供了std::lock()函数,能够保证将多个互斥锁同时上锁。
std::lock(_mu, _mu2); 同时,lock_guard也需要做修改,因为互斥锁已经被上锁了,那么lock_guard构造的时候不应该上锁,只是需要在析构的时候释放锁就行了,使用std::adopt_lock表示无需上锁:
std::lock_guard<std::mutex> guard(_mu2, std::adopt_lock);
std::lock_guard<std::mutex> guard2(_mu, std::adopt_lock);
完整代码如下:
#include <iostream>
#include <thread>
#include <string>
#include <mutex>
#include <fstream>
using namespace std;

class LogFile {
    std::mutex _mu;
    std::mutex _mu2;
    ofstream f;
public:
    LogFile() {
        f.open("log.txt");
    }
    ~LogFile() {
        f.close();
    }
    void shared_print(string msg, int id) {
        std::lock(_mu, _mu2);
        std::lock_guard<std::mutex> guard(_mu, std::adopt_lock);
        std::lock_guard<std::mutex> guard2(_mu2, std::adopt_lock);
        f << msg << id << endl;
        cout << msg << id << endl;
    }
    void shared_print2(string msg, int id) {
        std::lock(_mu, _mu2);
        std::lock_guard<std::mutex> guard(_mu2, std::adopt_lock);
        std::lock_guard<std::mutex> guard2(_mu, std::adopt_lock);
        f << msg << id << endl;
        cout << msg << id << endl;
    }
};

void function_1(LogFile& log) {
    for(int i=0; i>-100; i--)
        log.shared_print2(string("From t1: "), i);
}

int main()
{
    LogFile log;
    std::thread t1(function_1, std::ref(log));

    for(int i=0; i<100; i++)
        log.shared_print(string("From main: "), i);

    t1.join();
    return 0;
}
总结一下,对于避免死锁,有以下几点建议:
-
建议尽量同时只对一个互斥锁上锁。
{
 std::lock_guard<std::mutex> guard(_mu2);
 //do something
    f << msg << id << endl;
}
{
 std::lock_guard<std::mutex> guard2(_mu);
 cout << msg << id << endl;
}
2.不要在互斥锁保护的区域使用用户自定义的代码,因为用户的代码可能操作了其他的互斥锁。
{
 std::lock_guard<std::mutex> guard(_mu2);
 user_function(); // never do this!!!
    f << msg << id << endl;
} 3.如果想同时对多个互斥锁上锁,要使用std::lock()。
4.给锁定义顺序(使用层次锁,或者比较地址等),每次以同样的顺序进行上锁。详细介绍可看C++并发编程实战。
unique_lock
互斥锁保证了线程间的同步,但是却将并行操作变成了串行操作,这对性能有很大的影响,所以我们要尽可能的减小锁定的区域,也就是使用细粒度锁。
这一点lock_guard做的不好,不够灵活,lock_guard只能保证在析构的时候执行解锁操作,lock_guard本身并没有提供加锁和解锁的接口,但是有些时候会有这种需求。看下面的例子。
class LogFile {
    std::mutex _mu;
    ofstream f;
public:
    LogFile() {
        f.open("log.txt");
    }
    ~LogFile() {
        f.close();
    }
    void shared_print(string msg, int id) {
        {
            std::lock_guard<std::mutex> guard(_mu);
            //do something 1
        }
        //do something 2
        {
            std::lock_guard<std::mutex> guard(_mu);
            // do something 3
            f << msg << id << endl;
            cout << msg << id << endl;
        }
    }

}; 上面的代码中,一个函数内部有两段代码需要进行保护,这个时候使用lock_guard就需要创建两个局部对象来管理同一个互斥锁(其实也可以只创建一个,但是锁的力度太大,效率不行),修改方法是使用unique_lock。它提供了lock()和unlock()接口,能记录现在处于上锁还是没上锁状态,在析构的时候,会根据当前状态来决定是否要进行解锁(lock_guard就一定会解锁)。上面的代码修改如下:
class LogFile {
    std::mutex _mu;
    ofstream f;
public:
    LogFile() {
        f.open("log.txt");
    }
    ~LogFile() {
        f.close();
    }
    void shared_print(string msg, int id) {

        std::unique_lock<std::mutex> guard(_mu);
        //do something 1
        guard.unlock(); //临时解锁

        //do something 2

        guard.lock(); //继续上锁
        // do something 3
        f << msg << id << endl;
        cout << msg << id << endl;
        // 结束时析构guard会临时解锁
        // 这句话可要可不要,不写,析构的时候也会自动执行
        // guard.ulock();
    }

}; 上面的代码可以看到,在无需加锁的操作时,可以先临时释放锁,然后需要继续保护的时候,可以继续上锁,这样就无需重复的实例化lock_guard对象,还能减少锁的区域。同样,可以使用std::defer_lock设置初始化的时候不进行默认的上锁操作:
void shared_print(string msg, int id) {
    std::unique_lock<std::mutex> guard(_mu, std::defer_lock);
    //do something 1

    guard.lock();
    // do something protected
    guard.unlock(); //临时解锁

    //do something 2

    guard.lock(); //继续上锁
    // do something 3
    f << msg << id << endl;
    cout << msg << id << endl;
    // 结束时析构guard会临时解锁
} 这样使用起来就比lock_guard更加灵活!然后这也是有代价的,因为它内部需要维护锁的状态,所以效率要比lock_guard低一点,在lock_guard能解决问题的时候,就是用lock_guard,反之,使用unique_lock。
后面在学习条件变量的时候,还会有unique_lock的用武之地。
另外,请注意,unique_lock和lock_guard都不能复制,lock_guard不能移动,但是unique_lock可以!
// unique_lock 可以移动,不能复制
std::unique_lock<std::mutex> guard1(_mu);
std::unique_lock<std::mutex> guard2 = guard1;  // error
std::unique_lock<std::mutex> guard2 = std::move(guard1); // ok

// lock_guard 不能移动,不能复制
std::lock_guard<std::mutex> guard1(_mu);
std::lock_guard<std::mutex> guard2 = guard1;  // error
std::lock_guard<std::mutex> guard2 = std::move(guard1); // error
条件变量(Condition Variable)
互斥锁std::mutex是一种最常见的线程间同步的手段,但是在有些情况下不太高效。
假设想实现一个简单的消费者生产者模型,一个线程往队列中放入数据,一个线程往队列中取数据,取数据前需要判断一下队列中确实有数据,由于这个队列是线程间共享的,所以,需要使用互斥锁进行保护,一个线程在往队列添加数据的时候,另一个线程不能取,反之亦然。用互斥锁实现如下:
#include <iostream>
#include <deque>
#include <thread>
#include <mutex>

std::deque<int> q;
std::mutex mu;

void function_1() {
    int count = 10;
    while (count > 0) {
        std::unique_lock<std::mutex> locker(mu);
        q.push_front(count);
        locker.unlock();
        std::this_thread::sleep_for(std::chrono::seconds(1));
        count--;
    }
}

void function_2() {
    int data = 0;
    while ( data != 1) {
        std::unique_lock<std::mutex> locker(mu);
        if (!q.empty()) {
            data = q.back();
            q.pop_back();
            locker.unlock();
            std::cout << "t2 got a value from t1: " << data << std::endl;
        } else {
            locker.unlock();
        }
    }
}
int main() {
    std::thread t1(function_1);
    std::thread t2(function_2);
    t1.join();
    t2.join();
    return 0;
}

//输出结果
//t2 got a value from t1: 10
//t2 got a value from t1: 9
//t2 got a value from t1: 8
//t2 got a value from t1: 7
//t2 got a value from t1: 6
//t2 got a value from t1: 5
//t2 got a value from t1: 4
//t2 got a value from t1: 3
//t2 got a value from t1: 2
//t2 got a value from t1: 1
可以看到,互斥锁其实可以完成这个任务,但是却存在着性能问题。
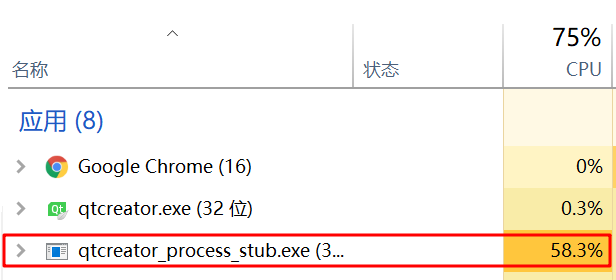
首先,function_1函数是生产者,在生产过程中,std::this_thread::sleep_for(std::chrono::seconds(1));表示延时1s,所以这个生产的过程是很慢的;function_2函数是消费者,存在着一个while循环,只有在接收到表示结束的数据的时候,才会停止,每次循环内部,都是先加锁,判断队列不空,然后就取出一个数,最后解锁。所以说,在1s内,做了很多无用功!这样的话,CPU占用率会很高,可能达到100%(单核)。如图:
解决办法之一是给消费者也加一个小延时,如果一次判断后,发现队列是空的,就惩罚一下自己,延时500ms,这样可以减小CPU的占用率。
void function_2() {
int data = 0;
while ( data != 1) {
std::unique_lock<std::mutex> locker(mu);
if (!q.empty()) {
data = q.back();
q.pop_back();
locker.unlock();
std::cout << "t2 got a value from t1: " << data << std::endl;
} else {
locker.unlock();
std::this_thread::sleep_for(std::chrono::milliseconds(500));
}
}
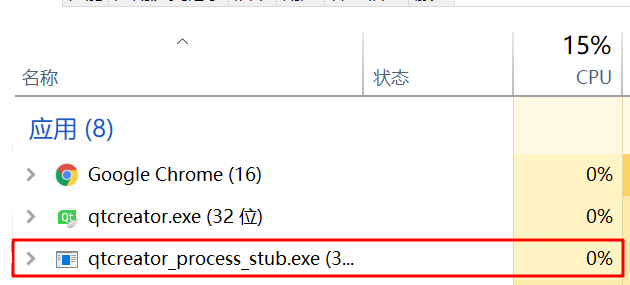
}如图:
然后困难之处在于,如何确定这个延时时间呢,假如生产者生产的很快,消费者却延时500ms,也不是很好,如果生产者生产的更慢,那么消费者延时500ms,还是不必要的占用了CPU。
这就引出了条件变量(condition variable),c++11中提供了#include <condition_variable>头文件,其中的std::condition_variable可以和std::mutex结合一起使用,其中有两个重要的接口,notify_one()和wait(),wait()可以让线程陷入休眠状态,在消费者生产者模型中,如果生产者发现队列中没有东西,就可以让自己休眠,但是不能一直不干活啊,notify_one()就是唤醒处于wait中的其中一个条件变量(可能当时有很多条件变量都处于wait状态)。那什么时刻使用notify_one()比较好呢,当然是在生产者往队列中放数据的时候了,队列中有数据,就可以赶紧叫醒等待中的线程起来干活了。
使用条件变量修改后如下:
#include <iostream>
#include <deque>
#include <thread>
#include <mutex>
#include <condition_variable>

std::deque<int> q;
std::mutex mu;
std::condition_variable cond;

void function_1() {
    int count = 10;
    while (count > 0) {
        std::unique_lock<std::mutex> locker(mu);
        q.push_front(count);
        locker.unlock();
        cond.notify_one();  // Notify one waiting thread, if there is one.
        std::this_thread::sleep_for(std::chrono::seconds(1));
        count--;
    }
}

void function_2() {
    int data = 0;
    while ( data != 1) {
        std::unique_lock<std::mutex> locker(mu);
        while(q.empty())
            cond.wait(locker); // Unlock mu and wait to be notified
        data = q.back();
        q.pop_back();
        locker.unlock();
        std::cout << "t2 got a value from t1: " << data << std::endl;
    }
}
int main() {
    std::thread t1(function_1);
    std::thread t2(function_2);
    t1.join();
    t2.join();
    return 0;
}
此时CPU的占用率也很低。

上面的代码有三个注意事项:
- 在
function_2中,在判断队列是否为空的时候,使用的是while(q.empty()),而不是if(q.empty()),这是因为wait()从阻塞到返回,不一定就是由于notify_one()函数造成的,还有可能由于系统的不确定原因唤醒(可能和条件变量的实现机制有关),这个的时机和频率都是不确定的,被称作伪唤醒,如果在错误的时候被唤醒了,执行后面的语句就会错误,所以需要再次判断队列是否为空,如果还是为空,就继续wait()阻塞。 - 在管理互斥锁的时候,使用的是
std::unique_lock而不是std::lock_guard,而且事实上也不能使用std::lock_guard,这需要先解释下wait()函数所做的事情。可以看到,在wait()函数之前,使用互斥锁保护了,如果wait的时候什么都没做,岂不是一直持有互斥锁?那生产者也会一直卡住,不能够将数据放入队列中了。所以,wait()函数会先调用互斥锁的unlock()函数,然后再将自己睡眠,在被唤醒后,又会继续持有锁,保护后面的队列操作。而lock_guard没有lock和unlock接口,而unique_lock提供了。这就是必须使用unique_lock的原因。 - 使用细粒度锁,尽量减小锁的范围,在
notify_one()的时候,不需要处于互斥锁的保护范围内,所以在唤醒条件变量之前可以将锁unlock()。
还可以将cond.wait(locker);换一种写法,wait()的第二个参数可以传入一个函数表示检查条件,这里使用lambda函数最为简单,如果这个函数返回的是true,wait()函数不会阻塞会直接返回,如果这个函数返回的是false,wait()函数就会阻塞着等待唤醒,如果被伪唤醒,会继续判断函数返回值。
void function_2() {
    int data = 0;
    while ( data != 1) {
        std::unique_lock<std::mutex> locker(mu);
        cond.wait(locker, [](){ return !q.empty();} );  // Unlock mu and wait to be notified
        data = q.back();
        q.pop_back();
        locker.unlock();
        std::cout << "t2 got a value from t1: " << data << std::endl;
    }
} 除了notify_one()函数,c++还提供了notify_all()函数,可以同时唤醒所有处于wait状态的条件变量。
参考资料
[c++11]多线程编程(一)——初识 – 简书 (jianshu.com)
[c++11]多线程编程(二)——理解线程类的构造函数 – 简书 (jianshu.com)
[c++11]多线程编程(三)——竞争条件与互斥锁 – 简书 (jianshu.com)
[c++11]多线程编程(四)——死锁(Dead Lock) – 简书 (jianshu.com)
[c++11]多线程编程(五)——unique_lock – 简书 (jianshu.com)
[c++11]多线程编程(六)——条件变量(Condition Variable) – 简书 (jianshu.com)
版权声明:本文内容由互联网用户自发贡献,该文观点仅代表作者本人。本站仅提供信息存储空间服务,不拥有所有权,不承担相关法律责任。如发现本站有涉嫌侵权/违法违规的内容, 请发送邮件至 举报,一经查实,本站将立刻删除。
文章由极客之音整理,本文链接:https://www.bmabk.com/index.php/post/100790.html

