
文章目录
一、ES的一些概念
elasticsearch是面向**文档(Document)**存储的,可以是数据库中的一条商品数据,一个订单信息。文档数据会被序列化为json格式后存储在elasticsearch中:
- 而json中的字段类(Field)似于数据库的列。
1.1索引和映射
索引(index),就是相同类型的文档的集合
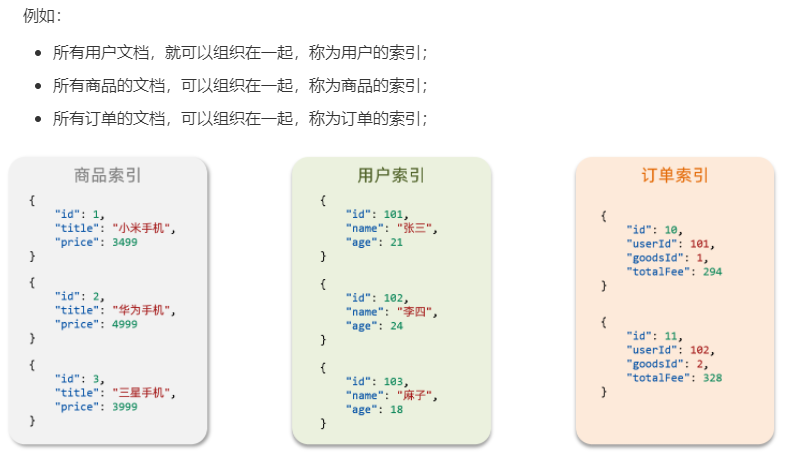
因此,我们可以把索引当做是数据库中的表。
数据库的表会有约束信息,用来定义表的结构、字段的名称、类型等信息。因此,索引库中就有映射(mapping),是索引中文档的字段约束信息,类似表的结构约束。
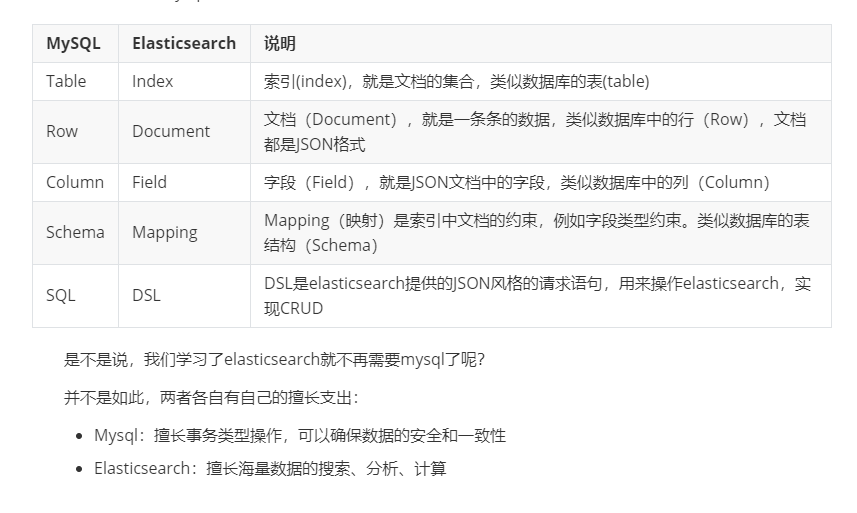
ELS与Mysql的对比
- 测试分词器
其中analyzer代表分词,选项有”ik_smart”;“ik_max_word”
POST /_analyze
{
  "text": "黑马程序员学java太好了",
   "analyzer": "ik_smart"
}
- 测试分词器的拓展,这个需要在其中的data文件中进行分词的设置
2.创建索引库:
2.1mapping映射属性
mapping是对索引库中文档的约束,常见的mapping属性包括:
- type:字段数据类型,常见的简单类型有:
- 字符串:text(可分词的文本)、keyword(精确值,例如:品牌、国家、ip地址)
- 数值:long、integer、short、byte、double、float、
- 布尔:boolean
- 日期:date
- 对象:object
- index:是否创建索引,默认为true
- analyzer:使用哪种分词器
- properties:该字段的子字段
2.2索引库的CRUD
这里使用Kibana编写DSL的方式来演示。
2.2.1创建索引库和映射
基本语法:
- 请求方式:PUT
- 请求路径:/索引库名,可以自定义
- 请求参数:mapping映射
格式:
PUT /索引库名称
{
  "mappings": {
    "properties": {
      "字段名":{
        "type": "text",
        "analyzer": "ik_smart"
      },
      "字段名2":{
        "type": "keyword",
        "index": "false"
      },
      "字段名3":{
        "properties": {
          "子字段": {
            "type": "keyword"
          }
        }
      },
      // ...略
    }
  }
}
- 示例:
PUT /heima
{
  "mappings": {
    "properties": {
      "info": {
        "type": "text",
        "analyzer": "ik_smart"
      },
      "email": {
        "type": "keyword",
        "index": false
      },
      "name": {
        "type": "object",
        "properties": {
          "firstName": {
            "type": "keyword"
          },
          "lastName": {
            "type": "keyword"
          }
        }
      }
    }
  }
}
2.2.2查询数据库:
基本语法**:
-
请求方式:GET
-
请求路径:/索引库名
-
请求参数:无
GET /heima
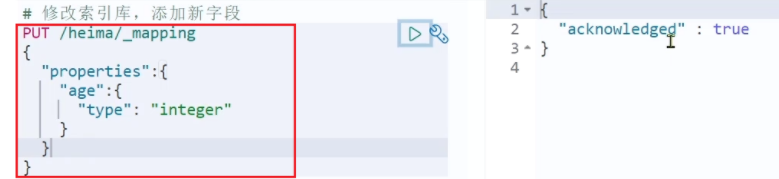
2.2.3修改索引库,添加新字段
倒排索引结构虽然不复杂,但是一旦数据结构改变(比如改变了分词器),就需要重新创建倒排索引,这简直是灾难。因此索引库一旦创建,无法修改mapping。
2.2.4.删除索引库
语法:**
-
请求方式:DELETE
-
请求路径:/索引库名
-
请求参数:无
**格式:
DELETE /索引库
# 修改索引库,添加新字段
PUT /heima/_mapping
{
  "properties":{
    "age":{
      "type":"integer"
    }
  }
}
2.2.5总结
索引库操作有哪些?
- 创建索引库:PUT /索引库名
- 查询索引库:GET /索引库名
- 删除索引库:DELETE /索引库名
- 修改字段:PUT /索引库名/_mapping
3.文档操作
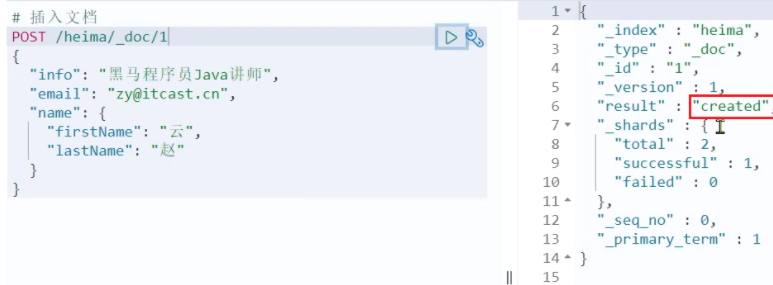
3.1.新增文档
语法:
POST /索引库名/_doc/文档id
{
    "字段1": "值1",
    "字段2": "值2",
    "字段3": {
        "子属性1": "值3",
        "子属性2": "值4"
    },
    // ...
}
示例:
POST /heima/_doc/1
{
  "info":"黑马程序元学java",
  "email":"645299910@qq.com",
  "name":{
    "firstName":"云",
    "lastName":"赵"
  }
}
响应:
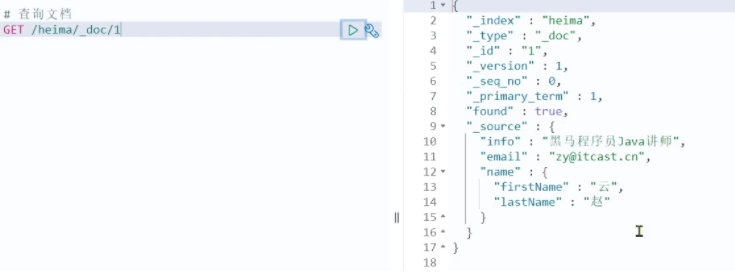
查询文档
GET /heima/_doc/1
3.3删除文档
删除使用DELETE请求,同样,需要根据id进行删除
语法:
DELETE /{索引库名}/_doc/id值

3.4修改文档

语法:
PUT /heima/_doc/1
{
    "info": "黑马程序员高级Java讲师",
    "email": "zy@itcast.cn",
    "name": {
        "firstName": "云",
        "lastName": "赵"
    }
}
3.4.2只修改Id匹配的文档中的部分字段
POST /heima/_update/1
{
  "doc": {
    "email": "ZhaoYun@itcast.cn"
  }
}
3.5总结
文档操作有哪些?
- 创建文档:post /索引/_doc/id
- 查询文档:GET/SUOYIN/_doc/id
- 修改文档:put/suoyin/_doc/id
- 删除文档:delete/suoyin/_doc/id
4 RestAPI–javaClient的操作文档
学习的是JAVA HighLevel Rest Client客户端API
4.0.1导入工程和数据
1.先导入课程的sql
CREATE TABLE `tb_hotel` (
  `id` bigint(20) NOT NULL COMMENT '酒店id',
  `name` varchar(255) NOT NULL COMMENT '酒店名称;例:7天酒店',
  `address` varchar(255) NOT NULL COMMENT '酒店地址;例:航头路',
  `price` int(10) NOT NULL COMMENT '酒店价格;例:329',
  `score` int(2) NOT NULL COMMENT '酒店评分;例:45,就是4.5分',
  `brand` varchar(32) NOT NULL COMMENT '酒店品牌;例:如家',
  `city` varchar(32) NOT NULL COMMENT '所在城市;例:上海',
  `star_name` varchar(16) DEFAULT NULL COMMENT '酒店星级,从低到高分别是:1星到5星,1钻到5钻',
  `business` varchar(255) DEFAULT NULL COMMENT '商圈;例:虹桥',
  `latitude` varchar(32) NOT NULL COMMENT '纬度;例:31.2497',
  `longitude` varchar(32) NOT NULL COMMENT '经度;例:120.3925',
  `pic` varchar(255) DEFAULT NULL COMMENT '酒店图片;例:/img/1.jpg',
  PRIMARY KEY (`id`)
) ENGINE=InnoDB DEFAULT CHARSET=utf8mb4;
4.0.2导入项目、
- application.yml
- 注意这里我用的mysql5.7如果是8,需要加上时区
server:
  port: 8089
spring:
  datasource:
    url: jdbc:mysql://localhost:3306/heima?useUnicode=true&characterEncoding=utf8&useSSL=false
    username: root
    password: 123456
    driver-class-name: com.mysql.jdbc.Driver
logging:
  level:
    cn.itcast: debug
  pattern:
    dateformat: MM-dd HH:mm:ss:SSS
mybatis-plus:
  configuration:
    map-underscore-to-camel-case: true
  type-aliases-package: cn.itcast.hotel.pojo
4.03mapping映射分析
创建索引库,最关键的是mapping映射,而mapping映射要考虑的信息包括:
- 字段名
- 字段数据类型
- 是否参与搜索
- 是否需要分词
- 如果分词,分词器是什么?
其中:
- 字段名、字段数据类型,可以参考数据表结构的名称和类型
- 是否参与搜索要分析业务来判断,例如图片地址,就无需参与搜索
- 是否分词呢要看内容,内容如果是一个整体就无需分词,反之则要分词
- 分词器,我们可以统一使用ik_max_word
来看下酒店数据的索引库结构:
这里有一个重点,对于经纬度,我们采用的是location,type是geo_point
PUT /hotel
{
  "mappings": {
    "properties": {
      "id": {
        "type": "keyword"
      },
      "name":{
        "type": "text",
        "analyzer": "ik_max_word",
        "copy_to": "all"
      },
      "address":{
        "type": "keyword",
        "index": false
      },
      "price":{
        "type": "integer"
      },
      "score":{
        "type": "integer"
      },
      "brand":{
        "type": "keyword",
        "copy_to": "all"
      },
      "city":{
        "type": "keyword",
        "copy_to": "all"
      },
      "starName":{
        "type": "keyword"
      },
      "business":{
        "type": "keyword"
      },
      "location":{
        "type": "geo_point"
      },
      "pic":{
        "type": "keyword",
        "index": false
      },
      "all":{
        "type": "text",
        "analyzer": "ik_max_word"
      }
    }
  }
}
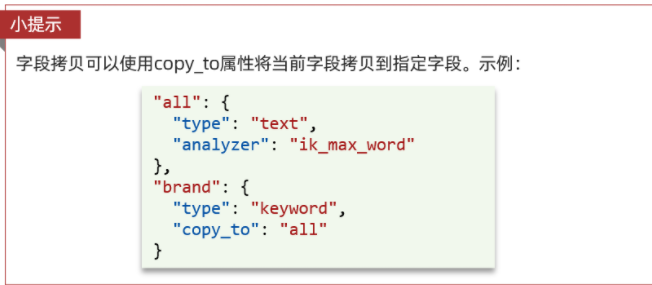
几个特殊字段说明:
- location:地理坐标,里面包含精度、纬度
- all:一个组合字段,其目的是将多字段的值 利用copy_to合并,提供给用户搜索


4.0.4初始化RestClient
在elasticsearch提供的API中,与elasticsearch一切交互都封装在一个名为RestHighLevelClient的类中,必须先完成这个对象的初始化,建立与elasticsearch的连接。
分为三步:
1)引入es的RestHighLevelClient依赖:
<dependency>
    <groupId>org.elasticsearch.client</groupId>
    <artifactId>elasticsearch-rest-high-level-client</artifactId>
</dependency>
2)因为SpringBoot默认的ES版本是7.6.2,所以我们需要覆盖默认的ES版本:
<properties>
    <java.version>1.8</java.version>
    <elasticsearch.version>7.12.1</elasticsearch.version>
</properties>
3)初始化RestHighLevelClient:
初始化的代码如下:
RestHighLevelClient client = new RestHighLevelClient(RestClient.builder(
        HttpHost.create("http://192.168.117.129:9200")
));
这里为了单元测试方便,我们创建一个测试类HotelIndexTest,然后将初始化的代码编写在@BeforeEach方法中:
package cn.itcast.hotel;

import org.apache.http.HttpHost;
import org.elasticsearch.client.RestHighLevelClient;
import org.junit.jupiter.api.AfterEach;
import org.junit.jupiter.api.BeforeEach;
import org.junit.jupiter.api.Test;

import java.io.IOException;

public class HotelIndexTest {
    private RestHighLevelClient client;

    @BeforeEach
    void setUp() {
        this.client = new RestHighLevelClient(RestClient.builder(
                HttpHost.create("http://192.168.150.101:9200")
        ));
    }

    @AfterEach
    void tearDown() throws IOException {
        this.client.close();
    }
}
4.1创建索引库
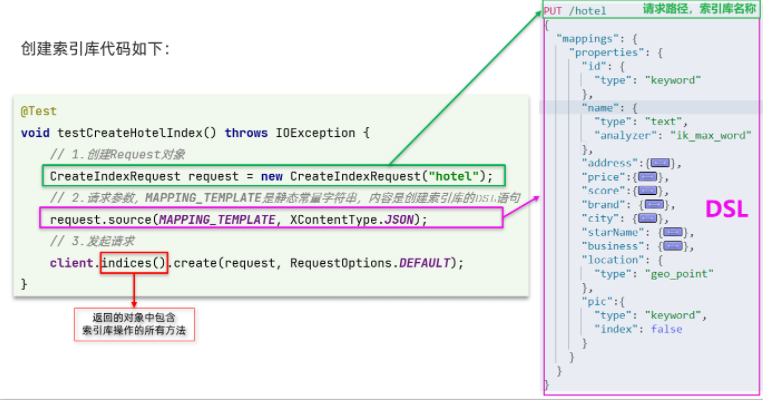
代码分为三步:
- 1)创建Request对象。因为是创建索引库的操作,因此Request是CreateIndexRequest。
- 2)添加请求参数,其实就是DSL的JSON参数部分。因为json字符串很长,这里是定义了静态字符串常量MAPPING_TEMPLATE,让代码看起来更加优雅。
- 3)发送请求,client.indices()方法的返回值是IndicesClient类型,封装了所有与索引库操作有关的方法。
4.1.2完整示例
在hotel-demo的cn.itcast.hotel.constants包下,创建一个类,定义mapping映射的JSON字符串常量:
package cn.itcast.hotel.constants;

public class HotelConstants {
    public static final String MAPPING_TEMPLATE = "{\n" +
            "  \"mappings\": {\n" +
            "    \"properties\": {\n" +
            "      \"id\": {\n" +
            "        \"type\": \"keyword\"\n" +
            "      },\n" +
            "      \"name\":{\n" +
            "        \"type\": \"text\",\n" +
            "        \"analyzer\": \"ik_max_word\",\n" +
            "        \"copy_to\": \"all\"\n" +
            "      },\n" +
            "      \"address\":{\n" +
            "        \"type\": \"keyword\",\n" +
            "        \"index\": false\n" +
            "      },\n" +
            "      \"price\":{\n" +
            "        \"type\": \"integer\"\n" +
            "      },\n" +
            "      \"score\":{\n" +
            "        \"type\": \"integer\"\n" +
            "      },\n" +
            "      \"brand\":{\n" +
            "        \"type\": \"keyword\",\n" +
            "        \"copy_to\": \"all\"\n" +
            "      },\n" +
            "      \"city\":{\n" +
            "        \"type\": \"keyword\",\n" +
            "        \"copy_to\": \"all\"\n" +
            "      },\n" +
            "      \"starName\":{\n" +
            "        \"type\": \"keyword\"\n" +
            "      },\n" +
            "      \"business\":{\n" +
            "        \"type\": \"keyword\"\n" +
            "      },\n" +
            "      \"location\":{\n" +
            "        \"type\": \"geo_point\"\n" +
            "      },\n" +
            "      \"pic\":{\n" +
            "        \"type\": \"keyword\",\n" +
            "        \"index\": false\n" +
            "      },\n" +
            "      \"all\":{\n" +
            "        \"type\": \"text\",\n" +
            "        \"analyzer\": \"ik_max_word\"\n" +
            "      }\n" +
            "    }\n" +
            "  }\n" +
            "}";
}
- 在hotel-demo中的HotelIndexTest测试类中,编写单元测试,实现创建索引:
@Test
void createHotelIndex() throws IOException {
    // 1.创建Request对象
    CreateIndexRequest request = new CreateIndexRequest("hotel");
    // 2.准备请求的参数:DSL语句
    request.source(MAPPING_TEMPLATE, XContentType.JSON);
    // 3.发送请求
    client.indices().create(request, RequestOptions.DEFAULT);
}
4.2删除索引库
与创建索引库相比:
- 请求方式从PUT变为DELTE
- 请求路径不变
- 无请求参数
所以代码的差异,注意体现在Request对象上。依然是三步走:
- 1)创建Request对象。这次是DeleteIndexRequest对象
- 2)准备参数。这里是无参
- 3)发送请求。改用delete方法
在hotel-demo中的HotelIndexTest测试类中,编写单元测试,实现删除索引:
@Test
void testDeleteHotelIndex() throws IOException {
    // 1.创建Request对象
    DeleteIndexRequest request = new DeleteIndexRequest("hotel");
    // 2.发送请求
    client.indices().delete(request, RequestOptions.DEFAULT);
}
4.3判断索引库是否存在
因此与删除的Java代码流程是类似的。依然是三步走:
- 1)创建Request对象。这次是GetIndexRequest对象
- 2)准备参数。这里是无参
- 3)发送请求。改用exists方法
@Test
void testExistsHotelIndex() throws IOException {
   // 1.创建Request对象
   GetIndexRequest request = new GetIndexRequest("hotel");
   // 2.发送请求
   boolean exists = client.indices().exists(request, RequestOptions.DEFAULT);
   // 3.输出
   System.err.println(exists ? "索引库已经存在!" : "索引库不存在!");
}
4.4.总结
JavaRestClient操作elasticsearch的流程基本类似。核心是client.indices()方法来获取索引库的操作对象。
索引库操作的基本步骤:
- 初始化RestHighLevelClient
- 创建XxxIndexRequest。XXX是Create、Get、Delete
- 准备DSL( Create时需要,其它是无参)
- 发送请求。调用RestHighLevelClient#indices().xxx()方法,xxx是create、exists、delete
5.RestClient文档
- 这里启动类,黑马老师有个bug
@MapperScan("cn.itcast.hotel.pojo.mapper")
@SpringBootApplication
public class HotelDemoApplication {

    public static void main(String[] args) {
        SpringApplication.run(HotelDemoApplication.class, args);
    }

}
为了与索引库操作分离,我们再次参加一个测试类,做两件事情:
- 初始化RestHighLevelClient
- 我们的酒店数据在数据库,需要利用IHotelService去查询,所以注入这个接口
@SpringBootTest
public class HotelDocumentTest {
    @Autowired
    private IHotelService hotelService;

    private RestHighLevelClient client;

    @BeforeEach
    void setUp() {
        this.client = new RestHighLevelClient(RestClient.builder(
                HttpHost.create("http://192.168.150.101:9200")
        ));
    }

    @AfterEach
    void tearDown() throws IOException {
        this.client.close();
    }
}
5.1新增文档
索引库实体类:
@Data
@TableName("tb_hotel")
public class Hotel {
    @TableId(type = IdType.INPUT) //主键
    private Long id;
    private String name;
    private String address;
    private Integer price;
    private Integer score;
    private String brand;
    private String city;
    private String starName;
    private String business;
    private String longitude;
    private String latitude;
    private String pic;
}
与我们的索引库结构存在差异:
- longitude和latitude需要合并为location
因此,我们需要定义一个新的类型,与索引库结构吻合:
其实也可以说是DTO类
package cn.itcast.hotel.pojo;

import lombok.Data;
import lombok.NoArgsConstructor;

@Data
@NoArgsConstructor
public class HotelDoc {
    private Long id;
    private String name;
    private String address;
    private Integer price;
    private Integer score;
    private String brand;
    private String city;
    private String starName;
    private String business;
    private String location;
    private String pic;

    public HotelDoc(Hotel hotel) {
        this.id = hotel.getId();
        this.name = hotel.getName();
        this.address = hotel.getAddress();
        this.price = hotel.getPrice();
        this.score = hotel.getScore();
        this.brand = hotel.getBrand();
        this.city = hotel.getCity();
        this.starName = hotel.getStarName();
        this.business = hotel.getBusiness();
        this.location = hotel.getLatitude() + ", " + hotel.getLongitude();
        this.pic = hotel.getPic();
    }
}
5.1.2语法说明
新增文档的DSL语句如下
POST /{索引库名}/_doc/1
{
    "name": "Jack",
    "age": 21
}
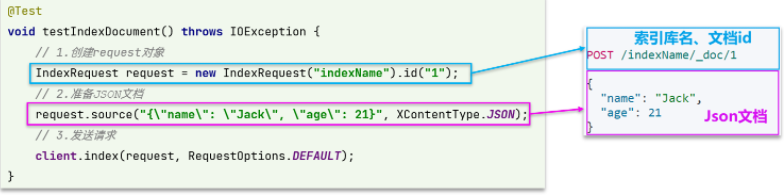
可以看到与创建索引库类似,同样是三步走:
- 1)创建Request对象
- 2)准备请求参数,也就是DSL中的JSON文档
- 3)发送请求
变化的地方在于,这里直接使用client.xxx()的API,不再需要client.indices()了。
5.1.3完整新增代码
我们导入酒店数据,基本流程一致,但是需要考虑几点变化:
- 酒店数据来自于数据库,我们需要先查询出来,得到hotel对象
- hotel对象需要转为HotelDoc对象
- HotelDoc需要序列化为json格式
因此,代码整体步骤如下:
- 1)根据id查询酒店数据Hotel
- 2)将Hotel封装为HotelDoc
- 3)将HotelDoc序列化为JSON
- 4)创建IndexRequest,指定索引库名和id
- 5)准备请求参数,也就是JSON文档
- 6)发送请求
在hotel-demo的HotelDocumentTest测试类中,编写单元测试:
@Test
void testAddDocument() throws IOException {
    // 1.根据id查询酒店数据
    Hotel hotel = hotelService.getById(61083L);
    // 2.转换为文档类型
    HotelDoc hotelDoc = new HotelDoc(hotel);
    // 3.将HotelDoc转json
    String json = JSON.toJSONString(hotelDoc);

    // 1.准备Request对象
    IndexRequest request = new IndexRequest("hotel").id(hotelDoc.getId().toString());
    // 2.准备Json文档
    request.source(json, XContentType.JSON);
    // 3.发送请求
    client.index(request, RequestOptions.DEFAULT);
}
5.2查询文档

可以看到,结果是一个JSON,其中文档放在一个`_source`属性中,因此解析就是拿到`_source`,反序列化为Java对象即可。

与之前类似,也是三步走:

- 1)准备Request对象。这次是查询,所以是GetRequest
- 2)发送请求,得到结果。因为是查询,这里调用client.get()方法
- 3)解析结果,就是对JSON做反序列化
5.2.2完整代码
在hotel-demo的HootelDocument测试类中,编写单元测试
@Test
void testGetDocumentById() throws IOException {
    // 1.准备Request
    GetRequest request = new GetRequest("hotel", "61082");
    // 2.发送请求,得到响应
    GetResponse response = client.get(request, RequestOptions.DEFAULT);
    // 3.解析响应结果
    String json = response.getSourceAsString();

    HotelDoc hotelDoc = JSON.parseObject(json, HotelDoc.class);
    System.out.println(hotelDoc);
}
5.4修改文档
修改我们讲过两种方式:
- 全量修改:本质是先根据id删除,再新增
- 增量修改:修改文档中的指定字段值
在RestClient的API中,全量修改与新增的API完全一致,判断依据是ID:
- 如果新增时,ID已经存在,则修改
- 如果新增时,ID不存在,则新增
这里不再赘述,我们主要关注增量修改。
代码示例如图:

与之前类似,也是三步走:
- 1)准备Request对象。这次是修改,所以是UpdateRequest
- 2)准备参数。也就是JSON文档,里面包含要修改的字段
- 3)更新文档。这里调用client.update()方法
@Test
void testUpdateDocument() throws IOException {
    // 1.准备Request
    UpdateRequest request = new UpdateRequest("hotel", "61083");
    // 2.准备请求参数
    request.doc(
        "price", "952",
        "starName", "四钻"
    );
    // 3.发送请求
    client.update(request, RequestOptions.DEFAULT);
}
5.5批量导入文档
案例需求:利用BulkRequest批量将数据库数据导入到索引库中。
步骤如下:
-
利用mybatis-plus查询酒店数据
-
将查询到的酒店数据(Hotel)转换为文档类型数据(HotelDoc)
-
利用JavaRestClient中的BulkRequest批处理,实现批量新增文档
-
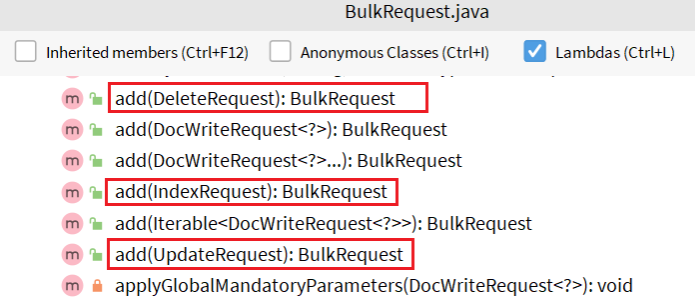
可以看到,能添加的请求包括: -
IndexRequest,也就是新增
-
UpdateRequest,也就是修改
-
DeleteRequest,也就是删除
因此Bulk中添加了多个IndexRequest,就是批量新增功能了。示例
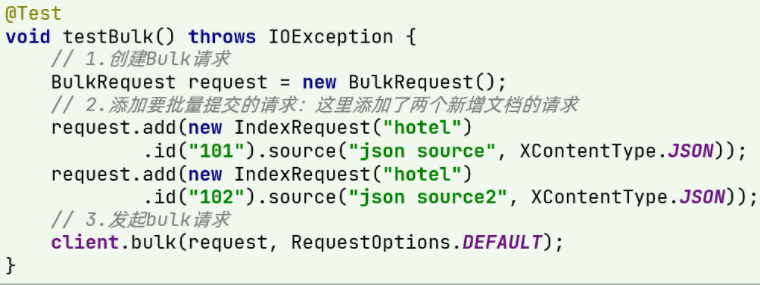
其实还是三步走:
- 1)创建Request对象。这里是BulkRequest
- 2)准备参数。批处理的参数,就是其它Request对象,这里就是多个IndexRequest
- 3)发起请求。这里是批处理,调用的方法为client.bulk()方法
我们在导入酒店数据时,将上述代码改造成for循环处理即可。
@Test
void testBulkRequest() throws IOException {
    // 批量查询酒店数据
    List<Hotel> hotels = hotelService.list();

    // 1.创建Request
    BulkRequest request = new BulkRequest();
    // 2.准备参数,添加多个新增的Request
    for (Hotel hotel : hotels) {
        // 2.1.转换为文档类型HotelDoc
        HotelDoc hotelDoc = new HotelDoc(hotel);
        // 2.2.创建新增文档的Request对象
        request.add(new IndexRequest("hotel")
                    .id(hotelDoc.getId().toString())
                    .source(JSON.toJSONString(hotelDoc), XContentType.JSON));
    }
    // 3.发送请求
    client.bulk(request, RequestOptions.DEFAULT);
}
6.操作文档的源码
package cn.itcast.hotel;

import cn.itcast.hotel.pojo.Hotel;
import cn.itcast.hotel.pojo.HotelDoc;
import cn.itcast.hotel.service.IHotelService;

import com.alibaba.fastjson.JSON;
import org.apache.http.HttpHost;
import org.elasticsearch.action.bulk.BulkRequest;
import org.elasticsearch.action.delete.DeleteRequest;
import org.elasticsearch.action.get.GetRequest;
import org.elasticsearch.action.get.GetResponse;
import org.elasticsearch.action.index.IndexRequest;
import org.elasticsearch.action.update.UpdateRequest;
import org.elasticsearch.client.RequestOptions;
import org.elasticsearch.client.RestClient;
import org.elasticsearch.client.RestHighLevelClient;
import org.elasticsearch.common.xcontent.XContentType;
import org.junit.jupiter.api.AfterEach;
import org.junit.jupiter.api.BeforeEach;
import org.junit.jupiter.api.Test;
import org.springframework.beans.factory.annotation.Autowired;
import org.springframework.boot.test.context.SpringBootTest;


import java.io.IOException;
import java.util.List;

@SpringBootTest
public class HotelDocumentTest {
    private RestHighLevelClient client;

    @Autowired
    private IHotelService hotelService;

    /**
     * 新增文档操作
     * 查询酒店:需要注意启动类处mapperscan老师错了,要加上pojo
     * application。yml中的mysql的url改成自己的
     * @throws IOException
     */
    @Test
    void testDocument() throws IOException {
        //根据id查询酒店数据
        Hotel hotel = hotelService.getById(61083L);
        //转换为文档类型
        HotelDoc hotelDoc = new HotelDoc(hotel);
        //1.准备request对象
        IndexRequest request = new IndexRequest("hotel").id(hotelDoc.getId().toString());
        //2.准备json对象
        request.source(JSON.toJSONString(hotelDoc), XContentType.JSON);
        client.index(request, RequestOptions.DEFAULT);
    }

    /**
     * 查询文档信息
     * @throws IOException
     */
    @Test
    void testGetDocument() throws IOException {
        //1.准备request
        GetRequest request = new GetRequest("hotel","61083");
        //2.准备得到response对象
        GetResponse response = client.get(request, RequestOptions.DEFAULT);
        //3.解析响应结果
        String json = response.getSourceAsString();
        HotelDoc doc = JSON.parseObject(json, HotelDoc.class);
        System.out.println(doc);
    }

    /**
     * 文档修改
     * @throws IOException
     */
    @Test
    void updateDocument() throws IOException {
        //1.准备request
        UpdateRequest request = new UpdateRequest("hotel", "61083");
        request.doc(
          "price","900"
        );
        //准备更新操作
        client.update(request, RequestOptions.DEFAULT);
    }

    /***
     * 文档删除
     * @throws IOException
     */
    @Test
    void deleteDocument() throws IOException {
        DeleteRequest request = new DeleteRequest("hotel", "61083");
        client.delete(request,RequestOptions.DEFAULT);
    }

    @Test
    void testListDocument() throws IOException {
        List<Hotel> hotels = hotelService.list();
        //批处理获得到的request
        BulkRequest request = new BulkRequest();
        for (Hotel hotel : hotels) {
            //将hotel变成文档
            HotelDoc hotelDoc = new HotelDoc(hotel);
            request.add(new IndexRequest("hotel")
                    .id(hotelDoc.getId().toString())
                    .source(JSON.toJSONString(hotelDoc),XContentType.JSON));
        }
        //调用批处理
        client.bulk(request,RequestOptions.DEFAULT);
    }

    //初始化
        @BeforeEach
        void setUp(){
            this.client = new RestHighLevelClient(RestClient.builder(
                    HttpHost.create("http://192.168.117.129:9200")
            ));
        }
        @AfterEach
        void tearDown() throws IOException {
            this.client.close();
        }


}
版权声明:本文内容由互联网用户自发贡献,该文观点仅代表作者本人。本站仅提供信息存储空间服务,不拥有所有权,不承担相关法律责任。如发现本站有涉嫌侵权/违法违规的内容, 请发送邮件至 举报,一经查实,本站将立刻删除。
文章由极客之音整理,本文链接:https://www.bmabk.com/index.php/post/102014.html

