
why
当微服务太多的时候,服务之间需要建立通信或一个服务的改变需要广播到所有其它服务,这时就需要有一个总线来承担对应的职责。
what
spring cloud bus 是通过轻量消息代理连接各个分布的节点,就类似于单体应用中常说的消息总线。主要作用是在一个或多个应用之间建立通信频道。
how
主要通过AMQP(Advanced Message Queuing Protocol)消息代理作为通道来实现消息通信。
应用场景
- 配置中心:当git仓库配置修改的时候,能够自动通知到所有服务重新拉取最新配置
- …
消息总线实现所有服务配置刷新
整体架构
开始之前,我们先来看下整体架构:
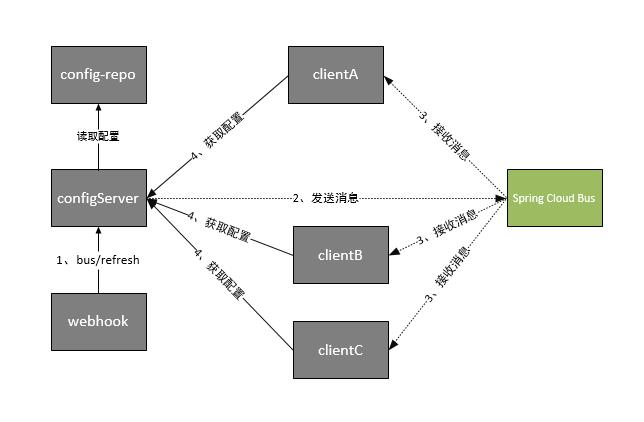
这时Spring Cloud Bus 做配置更新的步骤如下:
- 在git仓库提交代码,通过WebHook触发post请求给bus/refresh端点
- config-server接收到请求并发送给Spring Cloud Bus
- Spring Cloud Bus接收到消息后会广播给其它客户端config-client
- 其它config-client接收到通知后,会重新拉取config-server中的配置
- 最终全部客户端钧获取到最新配置
RabbitMQ的安装
参考:RabbitMQ在Windows环境下部署(简单有效)
动态刷新配置
使用Spring Config Bus需要配合Spring Cloud Config一起使用,结合上一篇文章的示例整合Spring Cloud Bus。Spring Cloud Config Demo(外部集中化配置管理示例)
config-server 添加消息总线支持
在pom.xml中添加依赖:
        <!--使用消息总线刷新配置时添加-->
        <dependency>
            <groupId>org.springframework.cloud</groupId>
            <artifactId>spring-cloud-starter-bus-amqp</artifactId>
        </dependency>
添加配置文件application-amqp.yml(主要是添加了RabbigMQ配置和暴露了刷新配置的Actuator端点):
server:
  port: 8904
spring:
  application:
    name: config-server
  cloud:
    config:
      server:
        git:
          uri: https://github.com/yousiqi/springcloud-config.git
          clone-on-start: true # 开启启动时直接从git获取配置
  rabbitmq: #rabbitmq相关配置
    host: localhost
    port: 5672
    username: guest
    password: guest
eureka:
  client:
    service-url:
      defaultZone: http://localhost:8001/eureka/
management:
  endpoints: #暴露bus刷新配置的端点
    web:
      exposure:
        include: 'bus-refresh'
config-client 添加消息总线支持
pom.xml中添加依赖:
        <!--使用消息总线刷新配置时添加-->
        <dependency>
            <groupId>org.springframework.cloud</groupId>
            <artifactId>spring-cloud-starter-bus-amqp</artifactId>
        </dependency>
添加配置文件bootstrap-amqp1.yml:
server:
  port: 9004
spring:
  application:
    name: config-client
  cloud:
    config:
      profile: dev #启用环境名称
      label: dev #分支名称
      name: config #配置文件名称
      discovery:
        enabled: true
        service-id: config-server
  rabbitmq: #rabbitmq相关配置
    host: localhost
    port: 5672
    username: guest
    password: guest
eureka:
  client:
    service-url:
      defaultZone: http://localhost:8001/eureka/
management:
  endpoints:
    web:
      exposure:
        include: 'refresh'
启动项目
-
启动eureka-server
-
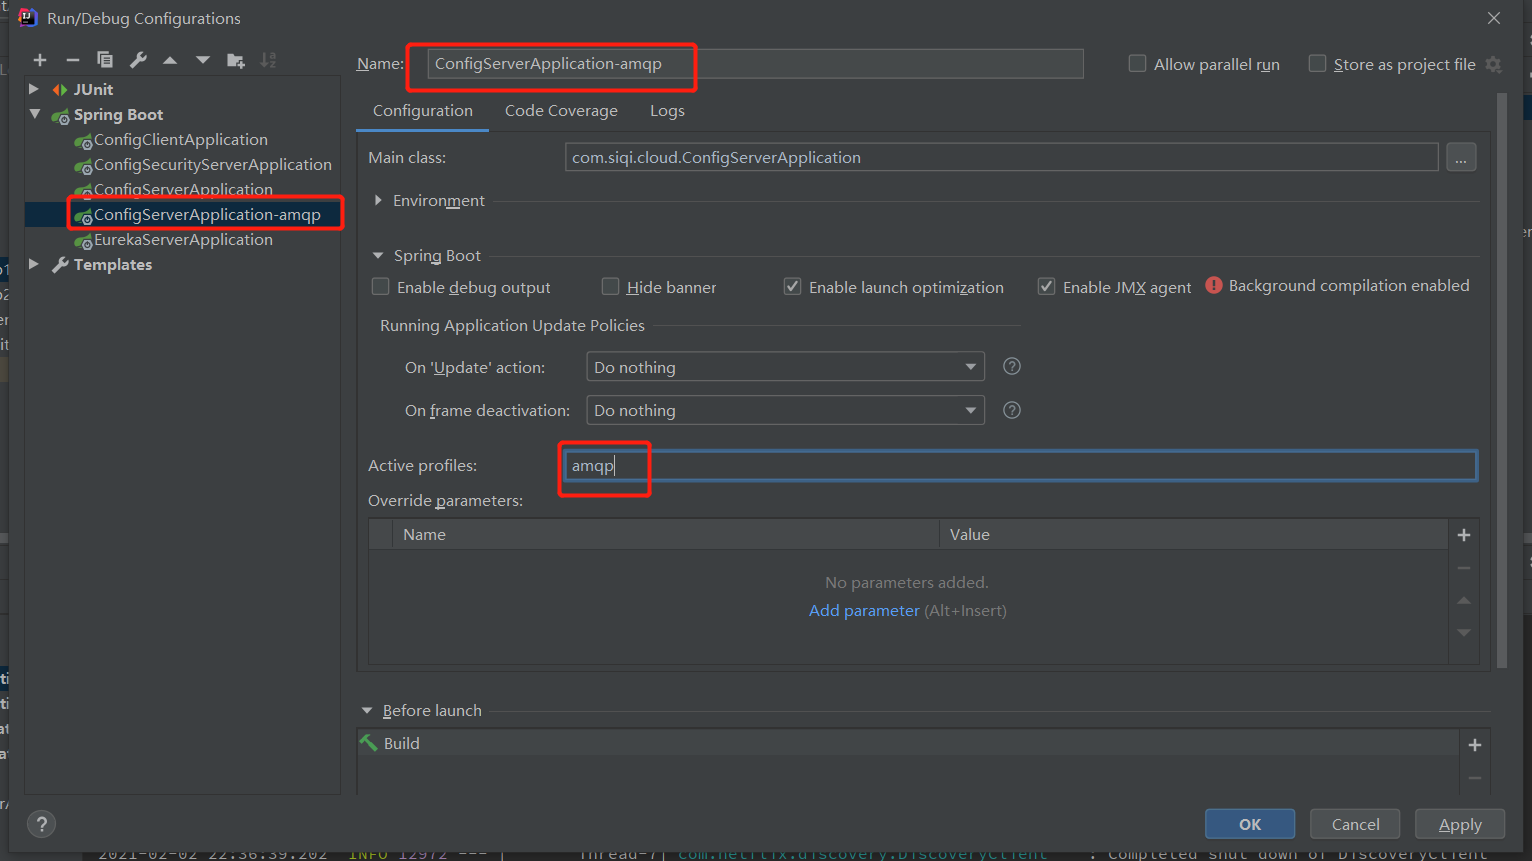
启动config-server,配置active profiles为amqp

-
启动config-client,配置active profiles为amqp1

-
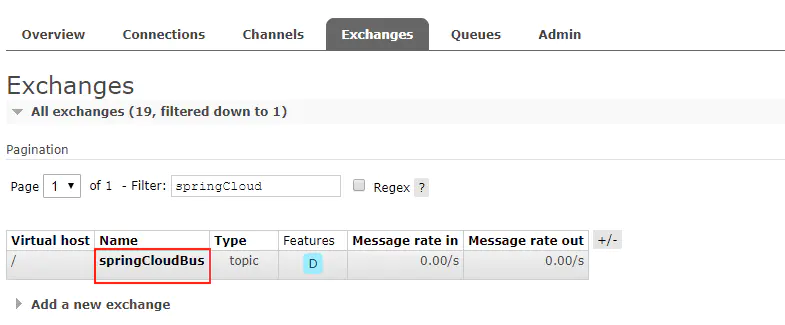
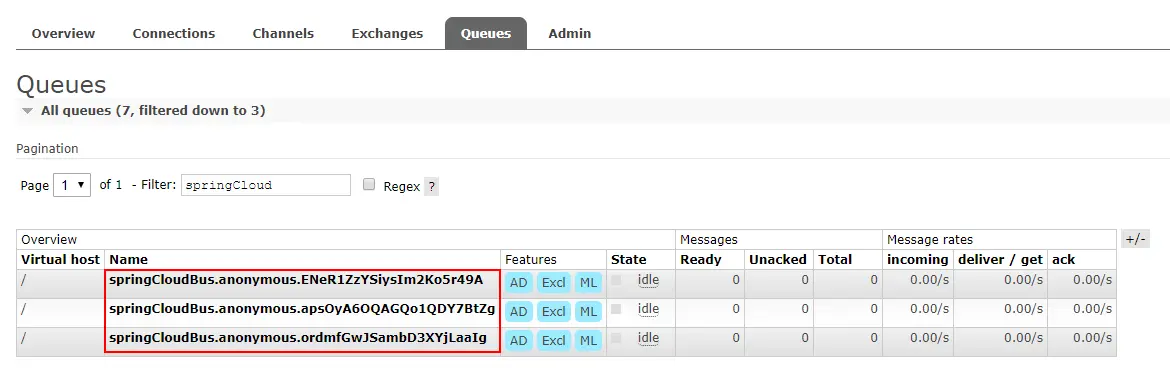
登录RabbigMQ控制台可以发现Spring Cloud Bus创建了一个SpringCloudBus的交换机和以 springCloudBus.anonymous开头的队列:
动态刷新配置演示
- 修改git仓库dev分支下的config-dev.yml文件
- 调用注册中心的接口刷新配置:POST:http://localhost:8904/actuator/bus-refresh
- 调用config-client测试接口验证配置是否更新:http://localhost:9004/configInfo
如果需要刷新指定的实例的配置可以使用一下格式刷新:
http://localhost:8904/actuator/bus-refresh/{destination}
我们这里以刷新运行在9004端口上的config-client为例:
http://localhost:8904/actuator/bus-refresh/config-client:9004
配合WebHook实现全自动刷新配置
WebHook是一个钩子函数,当修改仓库文件或push文件的时候,可以发送请求到WebHook的url,这里我们使用github来配置: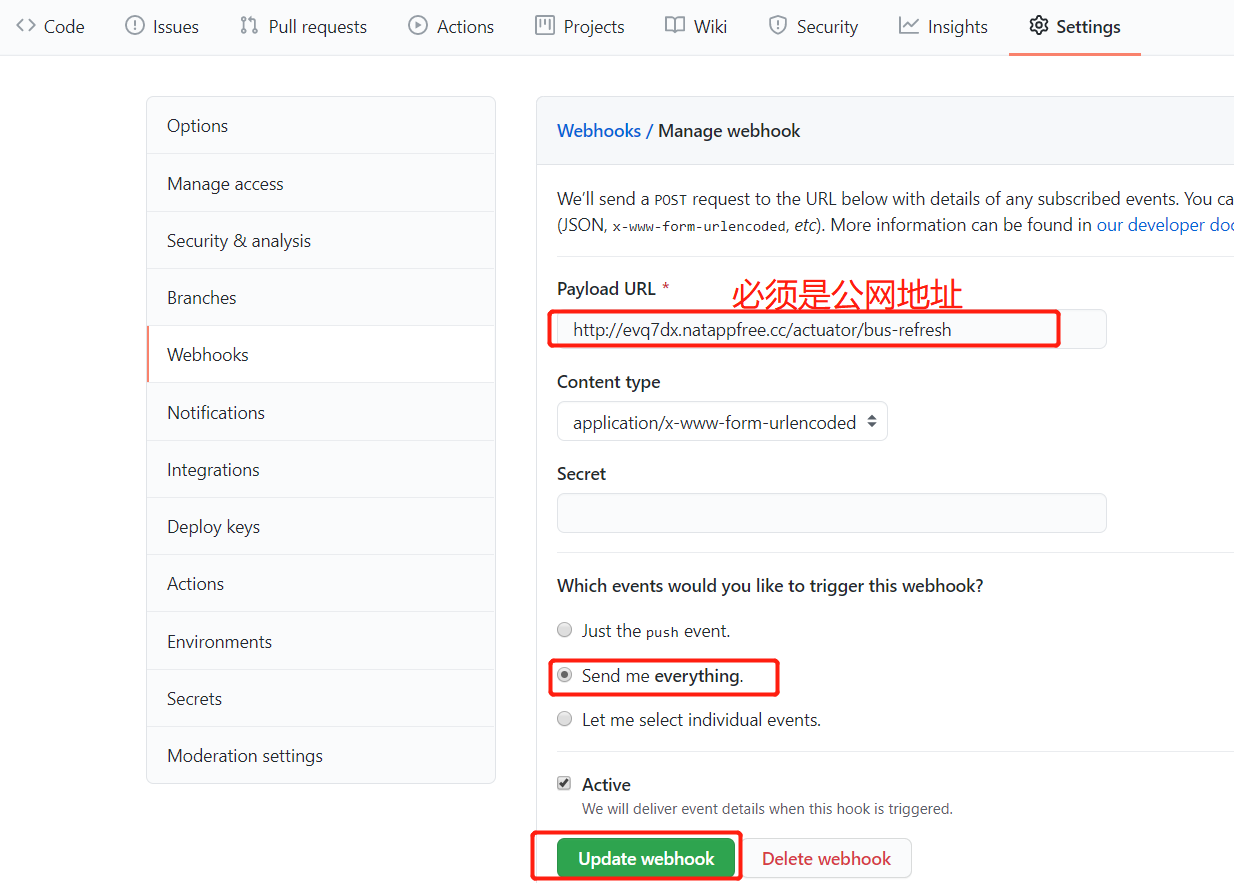
这里是将本地的http://localhost:8904/actuator/bus-refresh地址映射到了公网地址:http://evq7dx.natappfree.cc/actuator/bus-refresh,供WebHook进行调用,否则localhost无法被调用
通过以上的配置后,你再也不需要去手动刷新或启动项目了。当你在git仓库中修改了文件,自然会触发WebHook通知到config-server,然后发送消息到Spring Cloud Bus,Spring Cloud Bus会广播到其它的实例上,最终在不知不觉中完成了所有实例的配置刷新。
Other
版权声明:本文内容由互联网用户自发贡献,该文观点仅代表作者本人。本站仅提供信息存储空间服务,不拥有所有权,不承担相关法律责任。如发现本站有涉嫌侵权/违法违规的内容, 请发送邮件至 举报,一经查实,本站将立刻删除。
文章由极客之音整理,本文链接:https://www.bmabk.com/index.php/post/17823.html

