
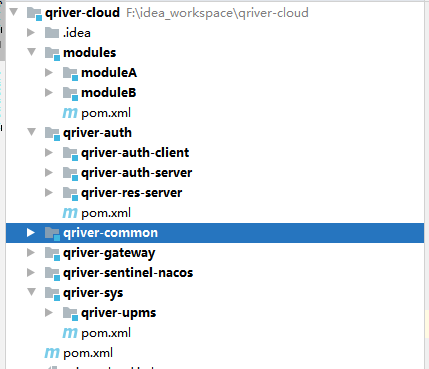
1、项目模块规划
- qriver-common 基础通用模块,通用代码,比如工具类、通用异常处理等。
- qriver-auth 权限模块,分为qriver-auth-server、qriver-res-auth和qriver-auth-client三个子模块
- qriver-auth-server 授权服务器
- qriver-res-auth 资源服务器,可以与授权服务器合并
- qriver-auth-client 需要授权的客户端的通用jar,在需要授权的客户端引入该jar包即可。
- qriver-sys 系统管理相关内容,规划系统管理、系统监控相关模块
- qriver-upms 系统管理,包括用户、权限、机构、字典等
- qriver-gateway 系统网关
- modules 业务模块
- moduleA 业务模块A
- moduleB 业务模块B

2、授权服务器
在《基于SpringSecurity OAuth2实现单点登录——入门示例和流程分析》这篇博文中,我们已经有了基于SpringSecurity OAuth2实现统一认证授权的“Hello World”体验,并从客户端角度出发,分析了请求的流转过程。这里,我们将在实际的项目中引入统一认证的逻辑,同时集成了注册中心(Nacos)和 网关(SpringCloud Gateway)等微服务组件。
2.1、依赖文件
在入门示例中,我们只是引入了spring-boot-starter-web 和 spring-cloud-starter-oauth2两个依赖,这里我们实现了登录页面的自定义、客户端信息的数据库管理、服务注册(nacos注册中心)、服务调用等,因为引入的依赖如下所示:
<dependencies>
        <dependency>
            <groupId>org.springframework.boot</groupId>
            <artifactId>spring-boot-starter-thymeleaf</artifactId>
        </dependency>
        <dependency>
            <groupId>org.springframework.boot</groupId>
            <artifactId>spring-boot-starter-web</artifactId>
        </dependency>
        <dependency>
            <groupId>org.springframework.cloud</groupId>
            <artifactId>spring-cloud-starter-oauth2</artifactId>
        </dependency>

        <!--引入Nacos的服务注册与发现依赖-->
        <dependency>
            <groupId>com.alibaba.cloud</groupId>
            <artifactId>spring-cloud-starter-alibaba-nacos-discovery</artifactId>
        </dependency>

        <dependency>
            <groupId>org.springframework.cloud</groupId>
            <artifactId>spring-cloud-starter-feign</artifactId>
            <version>1.4.7.RELEASE</version>
        </dependency>

        <!--json处理-->
        <dependency>
            <groupId>com.alibaba</groupId>
            <artifactId>fastjson</artifactId>
            <version>1.2.51</version>
        </dependency>
        <dependency>
            <groupId>org.springframework.boot</groupId>
            <artifactId>spring-boot-starter-jdbc</artifactId>
        </dependency>
        <dependency>
            <groupId>mysql</groupId>
            <artifactId>mysql-connector-java</artifactId>
            <scope>runtime</scope>
            <version>5.1.47</version>
        </dependency>
        <!--集成druid连接池-->
        <dependency>
            <groupId>com.alibaba</groupId>
            <artifactId>druid</artifactId>
            <version>1.1.11</version>
        </dependency>
    </dependencies>
2.2、授权服务器配置
我们创建了AuthorizationServerConfig配置类,用来配置授权服务器。该配置类继承了AuthorizationServerConfigurerAdapter类,提供了授权服务器的一些配置。同时通过注解@Configuration 和 @EnableAuthorizationServer 配置和启用授权服务器。
在该配置类中,主要注入了ClientDetailsService、AuthorizationServerTokenServices(包括TokenStore)和AuthorizationCodeServices等实例,同时把这些实例对象配置到了授权服务器上。具体实现如下:
/**
 * 授权服务器 配置
 */
@Configuration
@EnableAuthorizationServer
public class AuthorizationServerConfig extends AuthorizationServerConfigurerAdapter {

    @Resource
    public DruidDataSource dataSource;
    @Autowired
    private PasswordEncoder passwordEncoder;

    /**
     * 配置令牌端点的安全约束
     * @param security
     * @throws Exception
     */
    @Override
    public void configure(AuthorizationServerSecurityConfigurer security) throws Exception {
        security.checkTokenAccess("permitAll()")//Token 校验的端点,后续客户端验证Token使用
                .allowFormAuthenticationForClients()
                .passwordEncoder(passwordEncoder);
    }
    /**
     * 配置客户端的详细信息,客户端信息可以存储数据库、内存等地方
     * @param clients
     * @throws Exception
     */
    @Override
    public void configure(ClientDetailsServiceConfigurer clients) throws Exception {
        //基于数据库管理
        clients.withClientDetails(jdbcClientDetailsService());
    }
    /**
     * 配置令牌的访问端点和令牌服务
     * @param endpoints
     * @throws Exception
     */
    @Override
    public void configure(AuthorizationServerEndpointsConfigurer endpoints) throws Exception {
        endpoints.authorizationCodeServices(authorizationCodeServices())
                .tokenServices(tokenServices());
    }
    /**
     * 配置授权码的存储
     * @return
     */
    @Bean
    AuthorizationCodeServices authorizationCodeServices(){
        //return new InMemoryAuthorizationCodeServices();
        return new JdbcAuthorizationCodeServices(dataSource);
    }
    /**
     * Oauth2 客户端的管理
     * @return
     */
    @Bean
    public ClientDetailsService jdbcClientDetailsService() {
        // 基于 JDBC 实现,需要事先在数据库配置客户端信息
        return new JdbcClientDetailsService(dataSource);
    }
    /**
     * 配置Token存储方式
     * @return
     */
    @Bean
    TokenStore tokenStore(){
        //return new InMemoryTokenStore();
        return new JdbcTokenStore(dataSource);
    }
    /**
     * 配置 Token 的 管理对象
     * @return
     */
    @Bean
    AuthorizationServerTokenServices tokenServices(){
        DefaultTokenServices services = new DefaultTokenServices();
        services.setClientDetailsService(jdbcClientDetailsService());//配置客户端校验方式
        services.setReuseRefreshToken(true);//设置Token是否支持刷新
        services.setTokenStore(tokenStore());//设置Token的存储位置
        return services;
    }
}
2.3、授权服务的SpringSecurity相关配置
在SpringSecurity相关配置中,主要实现了自定义UserDetailsService、PasswordEncoder 和 HttpSecurity 的一些相关配置。其中,自定义UserDetailsService实现了用户信息的加载,PasswordEncoder 实例实现用户密码加解密,这里使用了明文(正式环境不建议使用),HttpSecurity 相关配置 配置了api的访问权限和自定义了登录页。
/**
 * Spring Security 配置
 */
@Configuration
public class QriverSecurityConfig extends WebSecurityConfigurerAdapter {

    @Autowired
    private QriverUserDetailsService userDetailsService;

    /**
     * 密码加密器
     * @return
     */
    @Bean
    PasswordEncoder passwordEncoder(){
        return NoOpPasswordEncoder.getInstance();
    }

    @Override
    public UserDetailsService userDetailsServiceBean() throws Exception {
        return userDetailsService;
    }
    @Override
    protected void configure(AuthenticationManagerBuilder auth) throws Exception {
        auth.userDetailsService(userDetailsServiceBean()).passwordEncoder(passwordEncoder());

    }
    /**
     * 配置 过滤器
     * @param http
     * @throws Exception
     */
    @Override
    protected void configure(HttpSecurity http) throws Exception {
        http.authorizeRequests()
                .antMatchers("/oauth/**").permitAll()
                .and().formLogin().loginPage("/login")
                .and().csrf().disable();
               // http.oauth2ResourceServer().opaqueToken();
    }
}
2.4、自定义UserDetailsService
自定义UserDetailsService实现类QriverUserDetailsService,是用来加载用户信息的。这里注入了UpmsFeignApiClient实例对象,该对象是基于Feign实现的从qriver-upms模块获取用户信息的实例。
QriverUserDetailsService 实现类,代码如下:
@Component("userDetailsService")
public class QriverUserDetailsService implements UserDetailsService {

    private Logger logger = LoggerFactory.getLogger(QriverUserDetailsService.class);

    @Autowired
    private UpmsFeignApiClient upmsFeignApiClient;

    /**
     * 根据username加载数据库中的用户,并构建UserDetails对象。
     * @param username
     * @return
     * @throws UsernameNotFoundException
     */
    @Override
    public UserDetails loadUserByUsername(String username) throws UsernameNotFoundException {
        Collection<GrantedAuthority> authorities = new ArrayList<>();
        String userInfo = upmsFeignApiClient.loadUserByUsername(username);
        JSONObject userJson = JSON.parseObject(userInfo);
        //String userRoles = upmsFeignApiClient.queryUserRoles(userJson.getString("username"));

        return new User(userJson.getString("username"), userJson.getString("password"),authorities);
    }
}
而UpmsFeignApiClient接口定义如下,实现从qriver-upms服务中获取用户信息。
@FeignClient(name="qriver-upms",url = "http://localhost:8888/")
public interface UpmsFeignApiClient {

    @GetMapping(value = "/upms/loadUserByUsername",consumes = "application/json")
    String loadUserByUsername(@RequestParam("username")String username);
    @GetMapping("/upms/queryUserRoles")
    String queryUserRoles(String userId);
}
2.5、启动类QriverAuthServerApplication、配置文件application.yml
配置文件application.yml中主要是定义了服务注册中心的地址和数据源相关信息,配置如下:
server:
  port: 8080
spring:
  application:
    name: qriver-auth-server
  datasource:
    type: com.alibaba.druid.pool.DruidDataSource
    driver-class-name: com.mysql.jdbc.Driver
    url: jdbc:mysql://localhost:3306/db_admin?useSSL=true&useUnicode=true&characterEncoding=utf-8&zeroDateTimeBehavior=convertToNull&serverTimezone=UTC
    username: root
    password: 123456
  cloud:
    nacos:
      discovery:
        server-addr: 192.168.1.231:8850 #1.168.1.87:8848
#日志(log4j2)
logging:
  config: classpath:logback.xml
启动类QriverAuthServerApplication中,主要通过注解启用了服务注册、服务调用等功能,实现如下:
@SpringBootApplication
@EnableDiscoveryClient
@EnableFeignClients
public class QriverAuthServerApplication {
    public static void main(String[] args) {
        SpringApplication.run(QriverAuthServerApplication.class, args);
    }
}
3、资源服务器
资源服务器的配置,和《基于SpringSecurity OAuth2实现单点登录——入门示例和流程分析》这篇博文中的配置类似,这里不再重复。
4、客户端通用模块 qriver-auth-client
客户端通用模块,该模块主要实现了客户端的通用配置,供不同业务模块直接引用。
4.1、依赖
<dependencies>
        <dependency>
            <groupId>org.springframework.boot</groupId>
            <artifactId>spring-boot-starter-web</artifactId>
        </dependency>

        <dependency>
            <groupId>org.springframework.boot</groupId>
            <artifactId>spring-boot-starter-oauth2-client</artifactId>
        </dependency>

        <dependency>
            <groupId>org.springframework.boot</groupId>
            <artifactId>spring-boot-starter-oauth2-resource-server</artifactId>
        </dependency>
    </dependencies>
4.2、配置文件application.yml
该配置文件是统一认证服务中,客户端的通用配置。这里需要注意的是:application.yml配置文件放到了resources/config目录下,不认会被覆盖不生效的。主要配置了校验token的地址。
spring:
  security:
    oauth2:
      resourceserver:
        opaquetoken:
          client-id: resource1
          client-secret: 123456
          introspection-uri: http://localhost:8080/oauth/check_token
4.3、配置类 AuthClientConfig
定义了通用的配置信息,在这里我们采用了opaqueToken的方式。
@Configuration
public class AuthClientConfig extends WebSecurityConfigurerAdapter {

    @Bean
    RestTemplate restTemplate(){
        return new RestTemplate();
    }

    /**
     * 配置 过滤器
     * @param http
     * @throws Exception
     */
    @Override
    protected void configure(HttpSecurity http) throws Exception {
        http.authorizeRequests()
                .anyRequest().authenticated()
                .and().csrf().disable();

        http.headers().frameOptions().disable();

        http.oauth2ResourceServer()
                .opaqueToken();
    }

    @Bean
    HttpFirewall httpFirewall() {
        StrictHttpFirewall firewall = new StrictHttpFirewall();
        firewall.setAllowUrlEncodedDoubleSlash(true);
        return firewall;
    }
}
5、业务模块moduleA、moduleB
和《基于SpringSecurity OAuth2实现单点登录——入门示例和流程分析》这篇博文中的配置类似,只需要把前面提到的qriver-auth-client依赖引入即可。然后去掉原来模块中的SpringSecurity相关配置即可。
6、统一网关
统一网关实现各业务模块的统一访问,除此之外,我们还需要增加token认证的相关逻辑,具体实现如下:
6.1、依赖
实现统一网关的依赖包括了服务发现的spring-cloud-starter-alibaba-nacos-discovery依赖、网关依赖spring-cloud-starter-gateway,同时为了增加oauth2鉴权相关功能,还需要增加spring-boot-starter-oauth2-client和spring-security-oauth2-resource-server等,具体如下:
<dependencies>
        <!--引入Nacos的服务注册与发现依赖-->
        <dependency>
            <groupId>com.alibaba.cloud</groupId>
            <artifactId>spring-cloud-starter-alibaba-nacos-discovery</artifactId>
        </dependency>

        <dependency>
            <groupId>org.springframework.cloud</groupId>
            <artifactId>spring-cloud-starter-gateway</artifactId>
        </dependency>

        <dependency>
            <groupId>org.springframework.boot</groupId>
            <artifactId>spring-boot-starter-oauth2-client</artifactId>
        </dependency>

        <dependency>
            <groupId>org.springframework.security</groupId>
            <artifactId>spring-security-oauth2-resource-server</artifactId>
        </dependency>

        <dependency>
            <groupId>org.projectlombok</groupId>
            <artifactId>lombok</artifactId>
            <version>1.18.22</version>
            <scope>provided</scope>
        </dependency>

        <dependency>
            <groupId>cn.hutool</groupId>
            <artifactId>hutool-all</artifactId>
            <version>5.7.16</version>
        </dependency>

    </dependencies>
6.2、配置文件
配置文件主要增加了根据服务自动配置网关映射、注册服务地址、oauth2鉴权配置等,具体代码如下:
server:
  port: 8100
  servlet:
    session:
      cookie:
        name: qriver-gateway
  tomcat:
    uri-encoding: UTF-8

spring:
  application:
    name: qriver-gateway
  security:
    oauth2:
      client:
        client:
          enable: true
        registration:
          qriver:
            provider: qriver
            clientId: resource1
            clientSecret: 123456
            authorizationGrantType: authorization_code
            redirectUri: "http://localhost:8100/login/oauth2/code/{registrationId}"
            scope: all
        provider:
          qriver:
            authorizationUri: http://localhost:8080/oauth/authorize
            tokenUri: http://localhost:8080/oauth/token
            userInfoUri: http://localhost:8081/user
            userNameAttribute: principal
  cloud:
    nacos:
      discovery:
        server-addr: 192.168.1.231:8850 #192.168.1.87:8848
    gateway:
      discovery:
        locator:
          enabled: true
          lower-case-service-id: true
logging:
  level:
    org:
      springframework:
        cloud:
          gateway: debug
6.3、配置类 ResourceServerConfig
这里主要增加了鉴权的相关配置,我们这里选择了通过oauth2Login()的方式进行OAuth2配置,主要可以实现当没有鉴权的时候,会跳转到授权服务上进行鉴权。
@Configuration
@EnableWebFluxSecurity
public class ResourceServerConfig {

    @Bean
    public SecurityWebFilterChain securityWebFilterChain(ServerHttpSecurity http) {

        http.oauth2Login();

        http.authorizeExchange()
                .pathMatchers("/static/**").permitAll()
                .anyExchange().authenticated()
                .and()
                .exceptionHandling()
                .accessDeniedHandler(accessDeniedHandler()) // 处理未授权
                .and().csrf().disable();

        http.cors().configurationSource(corsConfigurationSource());

        http.headers().frameOptions().disable();
        return http.build();
    }

    @Bean
    PasswordEncoder passwordEncoder(){
        return NoOpPasswordEncoder.getInstance();
    }

    /**
     * 自定义未授权响应
     */
    @Bean
    ServerAccessDeniedHandler accessDeniedHandler() {
        return (exchange, denied) -> {
            Mono<Void> mono = Mono.defer(() -> Mono.just(exchange.getResponse()))
                    .flatMap(response -> ResponseUtils.writeErrorInfo(response, ResultCode.ACCESS_UNAUTHORIZED));
            return mono;
        };
    }

    /**
     * 配置OAuth2AuthorizedClient管理器,供过滤器来获取token及刷新token
     * @param clientRegistrationRepository
     * @param serverOAuth2AuthorizedClientRepository
     * @return
     */
    @Bean
    public DefaultReactiveOAuth2AuthorizedClientManager authorizedClientManager(
            ReactiveClientRegistrationRepository clientRegistrationRepository,
            ServerOAuth2AuthorizedClientRepository serverOAuth2AuthorizedClientRepository) {

        ReactiveOAuth2AuthorizedClientProvider authorizedClientProvider =
                ReactiveOAuth2AuthorizedClientProviderBuilder.builder()
                        .authorizationCode()
                        .refreshToken()
                        .clientCredentials()
                        .password()
                        .build();

        DefaultReactiveOAuth2AuthorizedClientManager authorizedClientManager =
                new DefaultReactiveOAuth2AuthorizedClientManager(
                        clientRegistrationRepository, serverOAuth2AuthorizedClientRepository);

        authorizedClientManager.setAuthorizedClientProvider(authorizedClientProvider);

        return authorizedClientManager;
    }

    private CorsConfigurationSource corsConfigurationSource() {
        CorsConfigurationSource source =   new UrlBasedCorsConfigurationSource();
        CorsConfiguration corsConfiguration = new CorsConfiguration();
        corsConfiguration.addAllowedOrigin("*");    //同源配置,*表示任何请求都视为同源,若需指定ip和端口可以改为如“localhost:8080”,多个以“,”分隔;
        corsConfiguration.addAllowedHeader("*");//header,允许哪些header,本案中使用的是token,此处可将*替换为token;
        corsConfiguration.addAllowedMethod("*");    //允许的请求方法,PSOT、GET等
        ((UrlBasedCorsConfigurationSource) source).registerCorsConfiguration("/**",corsConfiguration); //配置允许跨域访问的url
        return source;
    }
}
6.4、 全局过滤器 SecurityGlobalFilter
全局过滤器除了可以实现在同一网关上实现限流、权限控制、解决跨域问题、负载均衡等问题外(这里暂时没有实现),这里主要增加了token中继的功能,保证了token可以通过网关在授权服务和各个业务服务之间进行有效的传递,具体实现如下:
@Component
public class SecurityGlobalFilter implements GlobalFilter, Ordered {

    private static final String SPRING_SECURITY_CONTEXT = "SPRING_SECURITY_CONTEXT";

    @Autowired
    private ServerOAuth2AuthorizedClientRepository serverOAuth2AuthorizedClientRepository;
    @Autowired
    private ReactiveOAuth2AuthorizedClientManager reactiveOAuth2AuthorizedClientManager;

    @Override
    public Mono<Void> filter(ServerWebExchange exchange, GatewayFilterChain chain) {
        // 获取session,通过session中SPRING_SECURITY_CONTEXT获取认证上下文
        ServerHttpRequest request = exchange.getRequest();
        return exchange.getSession().flatMap(webSession -> {
            Object object = webSession.getAttribute(SPRING_SECURITY_CONTEXT);
            if(object != null){
                // 根据认证上下文获取token
                SecurityContextImpl securityContext = (SecurityContextImpl)object;
                Authentication authentication = securityContext.getAuthentication();
                if(authentication != null){
                    return serverOAuth2AuthorizedClientRepository.loadAuthorizedClient("qriver",authentication,exchange).flatMap(oAuth2AuthorizedClient -> {
                        // 获取到的token如过期则重新刷新token,并重新保存oAuth2AuthorizedClient
                        Instant expire = oAuth2AuthorizedClient.getAccessToken().getExpiresAt();
                        Long mils = ChronoUnit.MILLIS.between(Instant.now(),expire);
                        if(mils <= 0){
                            // 刷新token
                            OAuth2AuthorizeRequest authorizeRequest = OAuth2AuthorizeRequest.withClientRegistrationId("hnzwdz")
                                    .principal(authentication)
                                    .attributes(attrs -> {
                                        attrs.put(ServerWebExchange.class.getName(), exchange);
                                    })
                                    .build();
                            return reactiveOAuth2AuthorizedClientManager.authorize(authorizeRequest)
                                    .flatMap(newOAuth2AuthorizedClient -> {
                                        // 保存OAuth2AuthorizedClient
                                        serverOAuth2AuthorizedClientRepository.removeAuthorizedClient("qriver",authentication,exchange);
                                        serverOAuth2AuthorizedClientRepository.saveAuthorizedClient(newOAuth2AuthorizedClient,authentication,exchange);
                                        // 设置发送请求的token头部,返回chain.filter
                                        if(!StringUtils.isEmpty(newOAuth2AuthorizedClient.getAccessToken().getTokenValue())){
                                            request.mutate().header("Authorization","Bearer " + newOAuth2AuthorizedClient.getAccessToken().getTokenValue());
                                        }
                                        return chain.filter(exchange.mutate().request(request).build());
                                    });
                        }else{
                            if(!StringUtils.isEmpty(oAuth2AuthorizedClient.getAccessToken().getTokenValue())){
                                request.mutate().header("Authorization","Bearer " + oAuth2AuthorizedClient.getAccessToken().getTokenValue());
                            }
                            return chain.filter(exchange.mutate().request(request).build());
                        }
                    });
                }
            }
            return chain.filter(exchange.mutate().request(request).build());
        });
    }

    @Override
    public int getOrder() {
        return 0;
    }
}
7、结束语
自此,我们已经基本上实现了统一认证中心的相关功能,这里我们是使用了Oauth2的opaqueToken方式实现token,这种方式每次都需要通过认证服务器进行验证token有效性,在Spring Security OAuth2 中,还提供了一种基于JWT的方式实现,后续我们将尝试使用JWT如何实现统一认证中心。
版权声明:本文内容由互联网用户自发贡献,该文观点仅代表作者本人。本站仅提供信息存储空间服务,不拥有所有权,不承担相关法律责任。如发现本站有涉嫌侵权/违法违规的内容, 请发送邮件至 举报,一经查实,本站将立刻删除。
文章由极客之音整理,本文链接:https://www.bmabk.com/index.php/post/68722.html

