
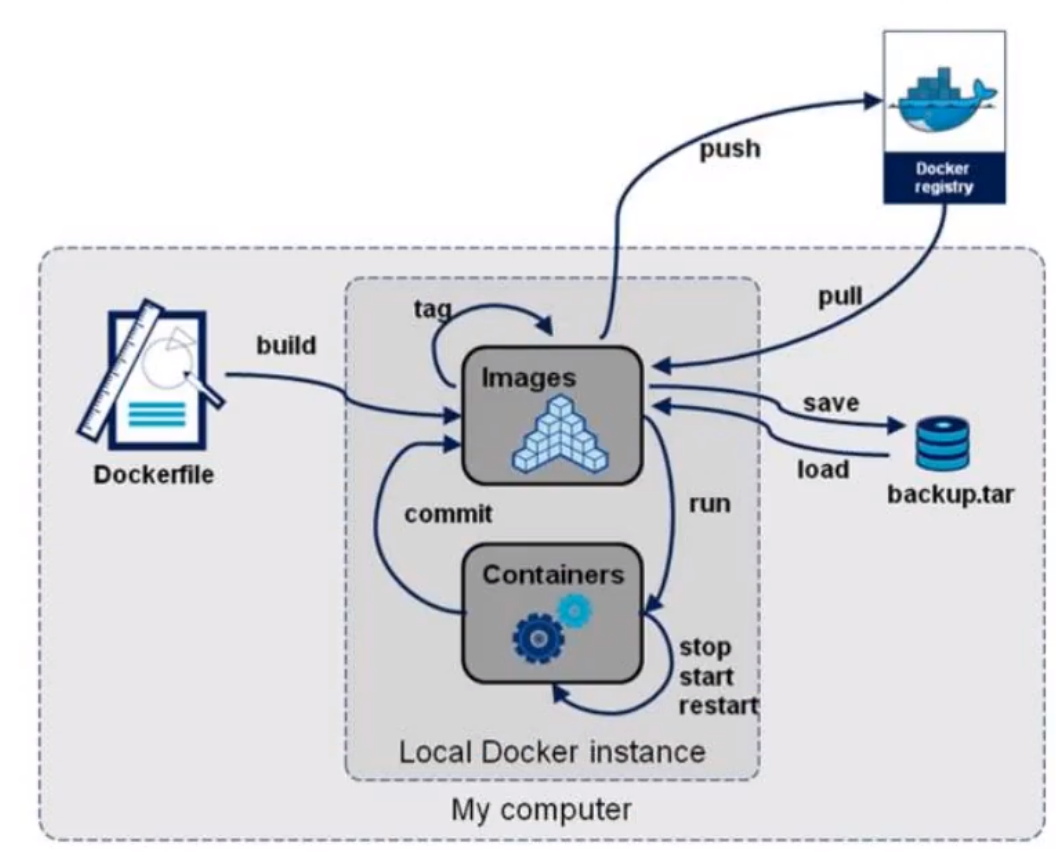
1、介绍
dockerfile是用来构建docker镜像的文件!命令参数脚本!
-
构建步骤:
1、 编写一个
dockerfile文件2、
docker build构建成为一个镜像3、
docker run运行镜像4、
docker push发布镜像(DockerHub 、阿里云仓库)


很多官方镜像都是基础包,很多功能没有,可以搭建自己的镜像!
2、构建过程
基础知识:
- 每个保留关键字(指令)都必须是
大写字母 - 从上到下顺序执行
#表示注释- 每一个指令都会创建提交一个新的镜像层,并提交!

- DockerFile是面向开发的,以后要发布项目,做镜像,就需要编写DockerFile文件,这个文件十分简单!
- Docker 镜像 逐渐成企业交付的标准,必须要掌握!
- DockerFile:构建文件,定义了一切的步骤,源代码
- DockerImages:通过DockerFile构建生成的镜像,最终发布和运行产品。
- Docker容器:容器就是镜像运行起来提供服务。
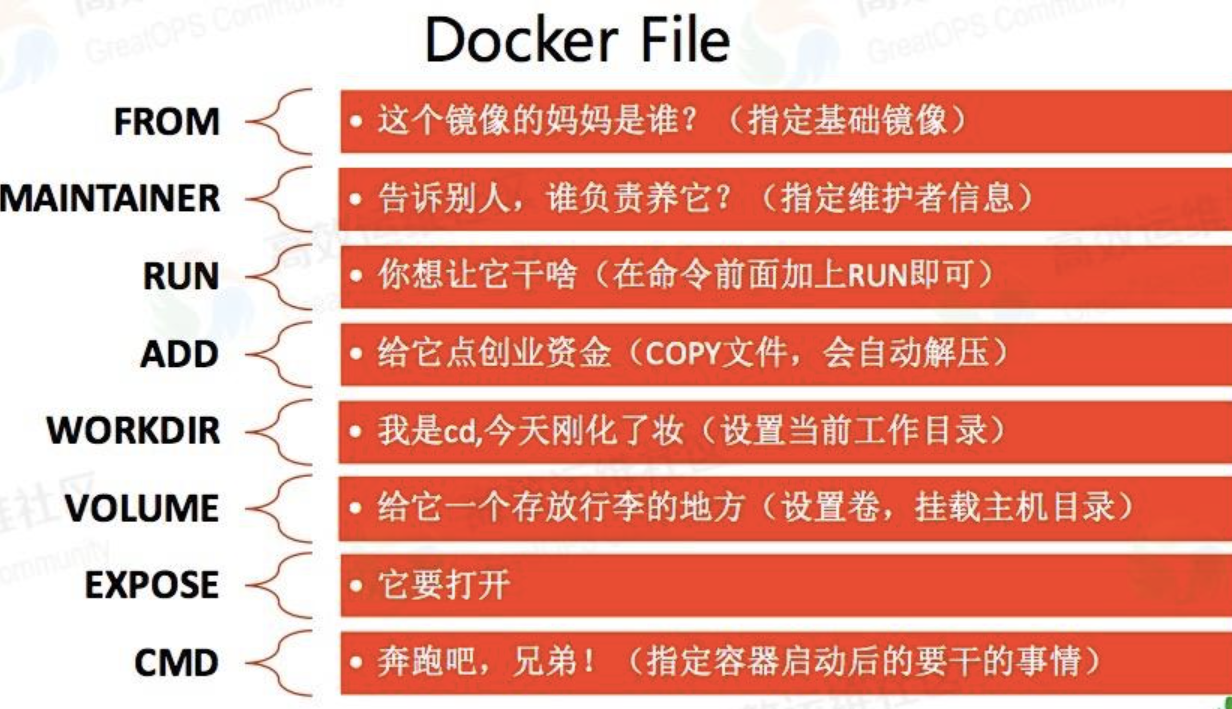
3、指令
FROM				# 基础镜像,一切从这里开始构建
MAINTAINER			# 镜像是谁写的, 姓名+邮箱
RUN					# 镜像构建的时候需要运行的命令
ADD					# 步骤,tomcat镜像,这个tomcat压缩包!添加内容 添加同目录
WORKDIR				# 镜像的工作目录
VOLUME				# 挂载的目录
EXPOSE				# 保留端口配置
CMD					# 指定这个容器启动的时候要运行的命令,只有最后一个会生效,可被替代。
ENTRYPOINT			# 指定这个容器启动的时候要运行的命令,可以追加命令
ONBUILD				# 当构建一个被继承 DockerFile,这个时候就会运行ONBUILD的指令,触发指令。
COPY				# 类似ADD,将我们文件拷贝到镜像中
ENV					# 构建的时候设置环境变量!如:mysql登录密码、JVM运行内存等
4、实战测试
1)创建 CentOS 镜像
在官方CentOS镜像基础上,添加 vim、net-tools 功能,生成一个新的镜像
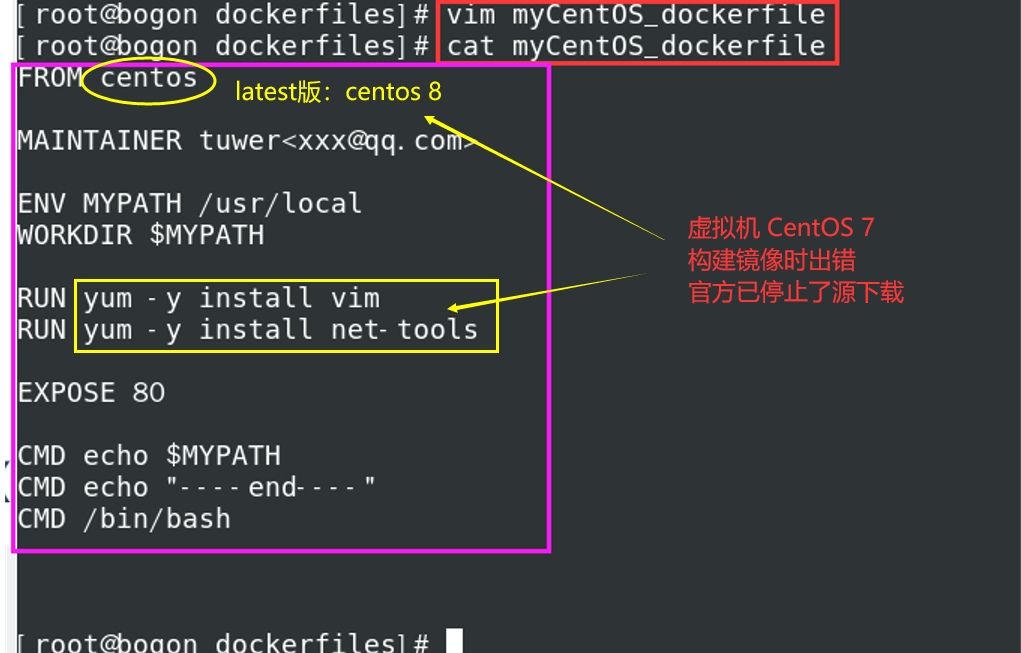
(1)编写Dockerfile文件
测试环境:
- 虚拟机:CentOS7
- 基础镜像:cenos7
- myCentOS_dockerfile
# Dockerfile文件
# vim myCentOS_dockerfile

# 基础镜像
FROM centos:centos7
# 作者信息
MAINTAINER tuwer<xxx@qq.com>
# 环境:启动后的工作目录
ENV MYPATH /usr/local
WORKDIR $MYPATH

# 启动后通过yum安装
# 添加 vim
RUN yum -y install vim
# 添加 net-tools
RUN yum -y install net-tools

# 端口配置
EXPOSE 80

# 启动后运行的命令
CMD echo $MYPATH
CMD echo "-----end----"
CMD /bin/bash


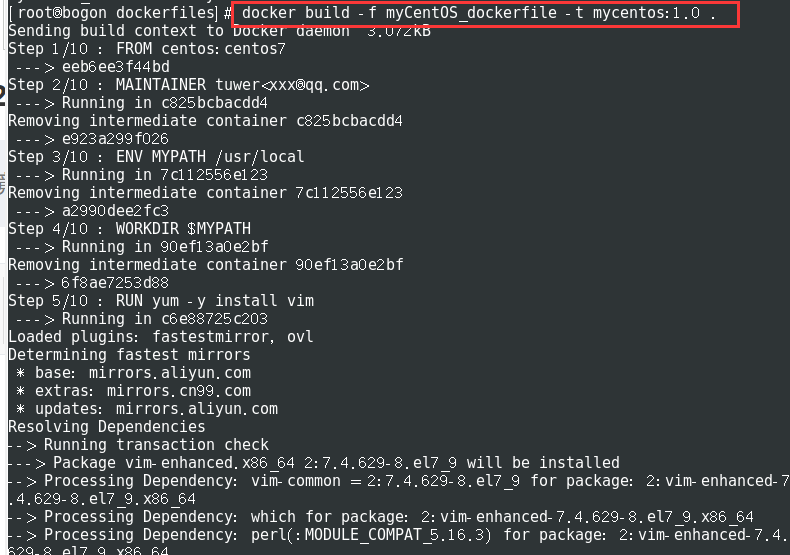
(2)构建镜像
镜像名称必须是小写;可以不指定版本信息;如:
mycentos构造前可以更换yum源,用centos7源;不换也可以
# 通过 myCentOS_dockerfile 文件构建镜像 myCentOS
docker build -f myCentOS_dockerfile -t mycentos:1.0 .


(3)Centos latest时yum出错
在CentOS7的虚拟机环境中,使用cenos latest镜像(8)作为基础镜像,yum时出错,官方源已下线;经过换源操作,仍然无法下载;分析原因可能是虚拟机版本与镜像不一致造成;以后有机会安装8虚似机时再测试
换源操作参考:

-
CentOS7 原生 CentOS-Base.repo
如果原生文件没有备份,可以由此恢复
# CentOS-Base.repo
#
# The mirror system uses the connecting IP address of the client and the
# update status of each mirror to pick mirrors that are updated to and
# geographically close to the client.  You should use this for CentOS updates
# unless you are manually picking other mirrors.
#
# If the mirrorlist= does not work for you, as a fall back you can try the
# remarked out baseurl= line instead.
#
#

[base]
name=CentOS-$releasever - Base
mirrorlist=http://mirrorlist.centos.org/?release=$releasever&arch=$basearch&repo=os&infra=$infra
#baseurl=http://mirror.centos.org/centos/$releasever/os/$basearch/
gpgcheck=1
gpgkey=file:///etc/pki/rpm-gpg/RPM-GPG-KEY-CentOS-7

#released updates
[updates]
name=CentOS-$releasever - Updates
mirrorlist=http://mirrorlist.centos.org/?release=$releasever&arch=$basearch&repo=updates&infra=$infra
#baseurl=http://mirror.centos.org/centos/$releasever/updates/$basearch/
gpgcheck=1
gpgkey=file:///etc/pki/rpm-gpg/RPM-GPG-KEY-CentOS-7

#additional packages that may be useful
[extras]
name=CentOS-$releasever - Extras
mirrorlist=http://mirrorlist.centos.org/?release=$releasever&arch=$basearch&repo=extras&infra=$infra
#baseurl=http://mirror.centos.org/centos/$releasever/extras/$basearch/
gpgcheck=1
gpgkey=file:///etc/pki/rpm-gpg/RPM-GPG-KEY-CentOS-7

#additional packages that extend functionality of existing packages
[centosplus]
name=CentOS-$releasever - Plus
mirrorlist=http://mirrorlist.centos.org/?release=$releasever&arch=$basearch&repo=centosplus&infra=$infra
#baseurl=http://mirror.centos.org/centos/$releasever/centosplus/$basearch/
gpgcheck=1
enabled=0
gpgkey=file:///etc/pki/rpm-gpg/RPM-GPG-KEY-CentOS-7
(3)测试运行
docker run -it mycentos:1.0


(4)history 查看镜像历史
docker history 镜像名称:版本 或 镜像ID

可以看到为了一个vim功能,增加了216M,不实用!
(5)CMD 和 ENTRYPOINT区别
CMD指定这个容器启动的时候要运行的命令,只有最后一个会生效,可被替代
# dockerfile
# ...
CMD ["ls","-a"]

# 想追加一个命令  -l 成为ls -al
$ docker run cmd-test:0.1 -l
docker: Error response from daemon: OCI runtime create failed: container_linux.go:349: starting container process caused "exec: \"-l\":
 executable file not found in $PATH": unknown.
ERRO[0000] error waiting for container: context canceled
# cmd的情况下,-l 替换了CMD["ls","-l"]。 -l 不是完整的命令,所有报错
ENTRYPOINT指定这个容器启动的时候要运行的命令,可以追加命令
# dockerfile文件
# ...
ENTRYPOINT ["ls","-a"]

# 想追加一个命令  -l 成为ls -al
# -l 命令,是直接拼接在ENTRYPOINT命令后面的:ls -al
$ docker run entrypoint-test:0.1 -l
total 56
drwxr-xr-x   1 root root 4096 May 16 06:32 .
drwxr-xr-x   1 root root 4096 May 16 06:32 ..
-rwxr-xr-x   1 root root    0 May 16 06:32 .dockerenv
lrwxrwxrwx   1 root root    7 May 11  2019 bin -> usr/bin
drwxr-xr-x   5 root root  340 May 16 06:32 dev
drwxr-xr-x   1 root root 4096 May 16 06:32 etc
drwxr-xr-x   2 root root 4096 May 11  2019 home
lrwxrwxrwx   1 root root    7 May 11  2019 lib -> usr/lib
lrwxrwxrwx   1 root root    9 May 11  2019 lib64 -> usr/lib64 ....
2)创建 Tomcat 镜像
(1)准备镜像资源
-
创建home/tuwer/tomcat目录
-
下载
apache-tomcat-9.0.58.tar.gz -
下载
jdk-8u60-linux-x64.tar.gz -
编写
README.txt

(2)编写dockerfile
Dockerfile
# 基础镜像 latest 8
FROM centos
# 作者信息
MAINTAINER tuwer<xxx@qq.com>
# 复制文件
COPY README.txt /usr/local
# 添加jdk,并自动解压至 /usr/local
ADD jdk-8u60-linux-x64.tar.gz /usr/local/
# 添加tomcat,并自动解压至 /usr/local
ADD apache-tomcat-9.0.58.tar.gz /usr/local/
# vim 省略
# RUN yum -y install vim

# 设置环境变量
#设置工作目录
ENV MYPATH /usr/local
WORKDIR $MYPATH
# JAVA_HOME
ENV JAVA_HOME /usr/local/jdk1.8.0_60
# CATALINA_HOME
ENV CATALINA_HOME /usr/local/apache-tomcat-9.0.58
# PATH  分隔符是:冒号
ENV PATH $PATH:$JAVA_HOME/bin:$CATALINA_HOME/lib

# 暴露的端口
EXPOSE 8080
# 默认命令
CMD /usr/local/apache-tomcat-9.0.58/bin/startup.sh && tail -F /usr/local/apache-tomcat-9.0.58/logs/catalina.out
(3)构建镜像
dockerfile 文件,使用官方默认名字
Dockerfile时,可以在构建时省略
# 默认命名 不用使用-f 指定文件
docker build -t mytomcat:0.1 .


(4)启动镜像
docker run -d -p 8080:8080 --name tomcat01 -v /home/tuwer/tomcat/test:/usr/local/apache-tomcat-9.0.58/webapps/test -v /home/tuwer/tomcat/tomcatlogs/:/usr/local/apache-tomcat-9.0.58/logs mytomcat:0.1
卷挂载:
-v /home/tuwer/tomcat/test:/usr/local/apache-tomcat-9.0.58/webapps/test-v /home/tuwer/tomcat/tomcatlogs/:/usr/local/apache-tomcat-9.0.58/logs


(5)访问测试

(6)发布项目
在宿主机的挂载目录下发布项目
- 添加
WEB-INF/web.xml和index.html
<?xml version="1.0" encoding="UTF-8"?>
<web-app xmlns="http://xmlns.jcp.org/xml/ns/javaee"
         xmlns:xsi="http://www.w3.org/2001/XMLSchema-instance"
         xsi:schemaLocation="http://xmlns.jcp.org/xml/ns/javaee http://xmlns.jcp.org/xml/ns/javaee/web-app_4_0.xsd"
         version="4.0">


</web-app>
<html>
<head>
    <title>Hello</title>
</head>
<body>
Hello World!
</body>
</html>

- 访问测试


5、发布
1)提交至Dockerhub
地址:https://hub.docker.com
- 先注册账号
docker login --help
Usage:  docker login [OPTIONS] [SERVER]

Log in to a Docker registry.
If no server is specified, the default is defined by the daemon.

Options:
  -p, --password string   Password
      --password-stdin    Take the password from stdin
  -u, --username string   Username

# 会发现push不上去,因为如果没有前缀的话默认是push到 官方的library
# 解决方法

# 第一种 build的时候添加你的dockerhub用户名,然后在push就可以放到自己的仓库了
docker build -t tuwer/mytomcat:0.1 .

# 第二种 使用docker tag #然后再次push
docker tag 容器id tuwer/mytomcat:1.0 #然后再次push

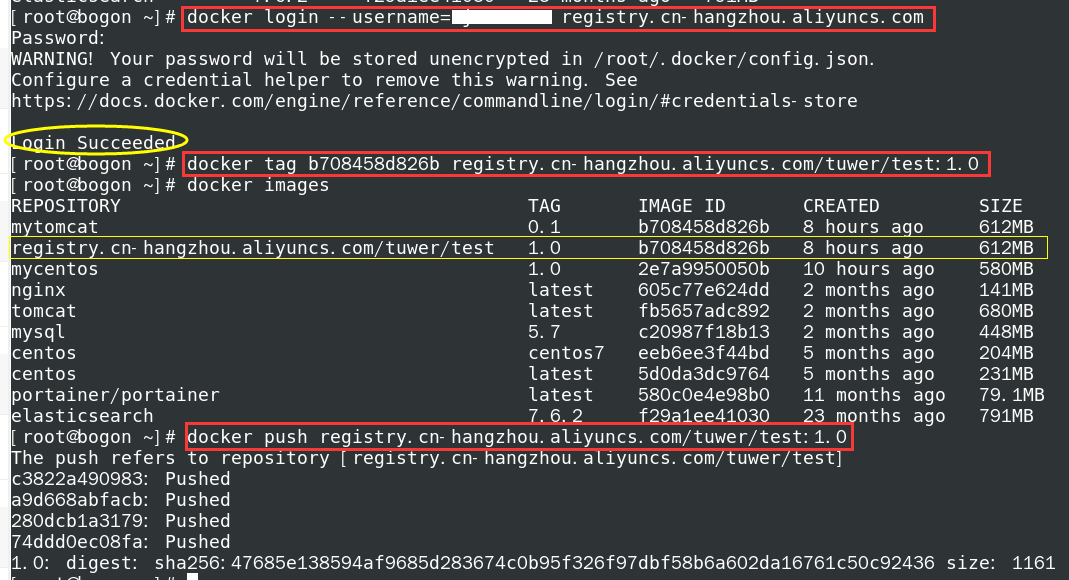
2)提交至阿里云
https://cr.console.aliyun.com/repository/
个人免费


# 登录阿里云Docker Registry
$ docker login --username=****** registry.cn-hangzhou.aliyuncs.com

# 从Registry中拉取镜像
$ docker pull registry.cn-hangzhou.aliyuncs.com/tuwer/test:[镜像版本号]

# 将镜像推送到Registry
$ docker login --username=****** registry.cn-hangzhou.aliyuncs.com
$ docker tag [ImageId] registry.cn-hangzhou.aliyuncs.com/tuwer/test:[镜像版本号]
$ docker push registry.cn-hangzhou.aliyuncs.com/tuwer/test:[镜像版本号]


6、总结
save
docker save -o /xxx/xxx.tar 镜像ID


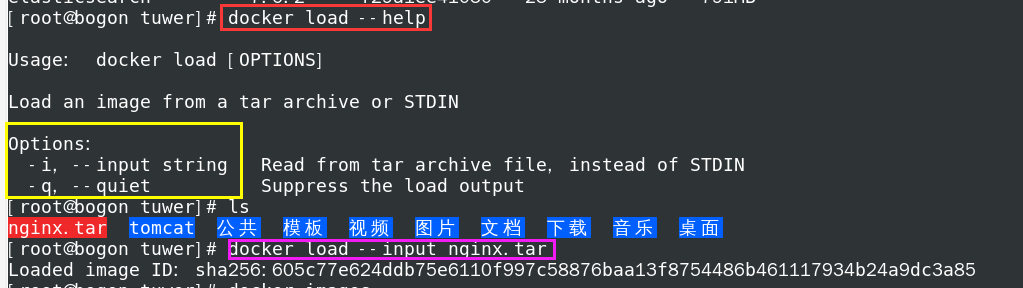
load
docker load --input /xxx/xxx.tar
版权声明:本文内容由互联网用户自发贡献,该文观点仅代表作者本人。本站仅提供信息存储空间服务,不拥有所有权,不承担相关法律责任。如发现本站有涉嫌侵权/违法违规的内容, 请发送邮件至 举报,一经查实,本站将立刻删除。
文章由极客之音整理,本文链接:https://www.bmabk.com/index.php/post/70430.html

