
安装
yum install libvirt virt-install qemu-kvm -y
介绍:
libvirt服务:管理kvm虚拟机的生命周期
cirt-install工具:创建虚拟机
qemu-kvm工具:使用qemu-img为虚拟机提供硬盘
qemu 软件纯模拟全虚拟化软件,特别慢
xen 性能好,需要使用专门的修改之后的内核,兼容性差
KVM 需要cpu支持虚拟化,基于内核,不需要使用专门的内核,兼容性好,性能较好
在windows 上安装TightVNC
tightvnc官网:http://www.tifhtvnc.com
vnc是一个跨平台的远程软件,安装kvm虚拟机系统的时候使用
启动libvirtd服务
systemctl start libvirtd.service
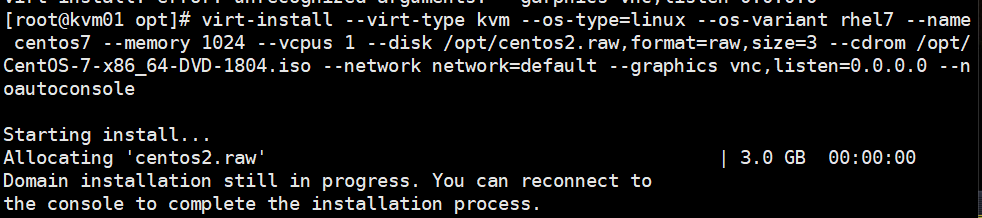
创建虚拟机
|
1 |
|
参数总结:
|
参数 |
参数说明 |
|
–virt-type HV_TYPE |
要使用的管理程序名称 (kvm, qemu, xen, …) |
|
–os-type |
系统类型 |
|
–os-variant DISTRO_VARIANT |
在客户机上安装的操作系统,例如:’fedora18’、’rhel6’、’winxp’ 等。 |
|
-n NAME, –name NAME |
客户机实例名称 |
|
–memory MEMORY |
配置客户机虚拟内存大小 |
|
–vcpus VCPUS |
配置客户机虚拟 CPU(vcpu) 数量。 |
|
–disk DISK |
指定存储的各种选项。 |
|
-cdrom CDROM |
光驱安装介质 |
|
-w NETWORK, –network NETWORK |
配置客户机网络接口。 |
|
–graphics GRAPHICS |
配置客户机显示设置。 |
|
虚拟化平台选项: |
|
|
-v, –hvm |
这个客户机应该是一个全虚拟化客户机 |
|
-p, –paravirt |
这个客户机应该是一个半虚拟化客户机 |
|
–container |
这个客户机应该是一个容器客户机 |
|
–virt-type HV_TYPE |
要使用的管理程序名称 (kvm, qemu, xen, …) |
|
–arch ARCH |
模拟 CPU 架构 |
|
–machine MACHINE |
机器类型为仿真类型 |
|
其它选项: |
|
|
–noautoconsole |
不要自动尝试连接到客户端控制台 |
|
–autostart |
主机启动时自动启动域。 |
|
–noreboot |
安装完成后不启动客户机。 |
|
通过 ” virt-install –help ” 获得命令帮助。 |
|
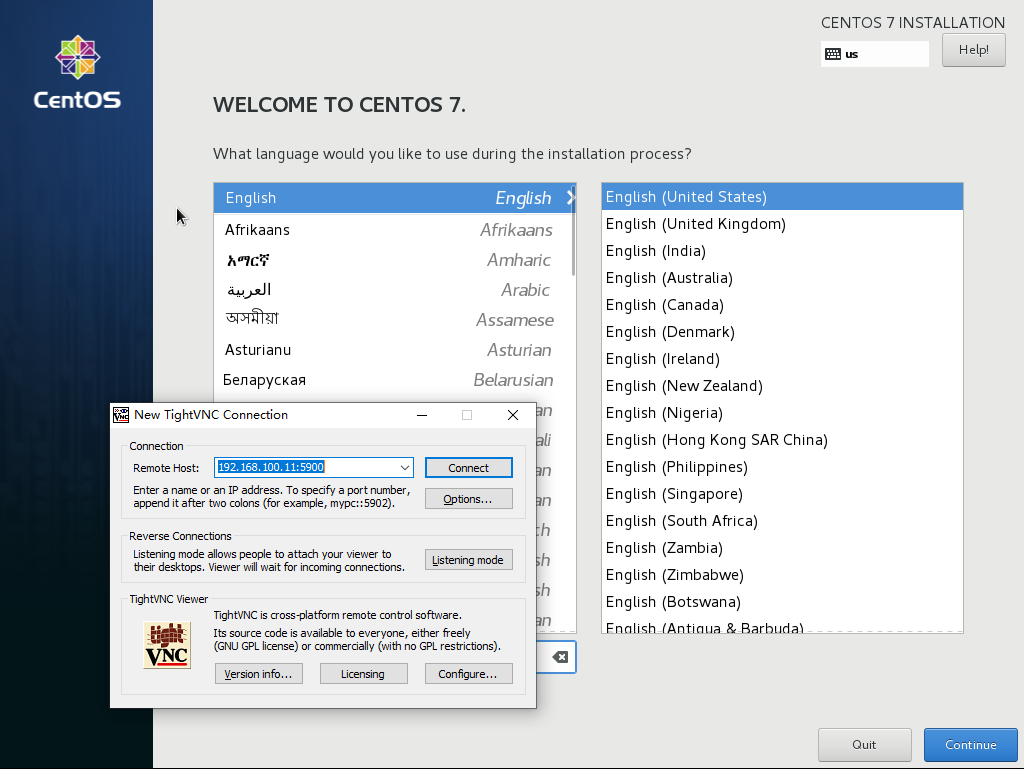
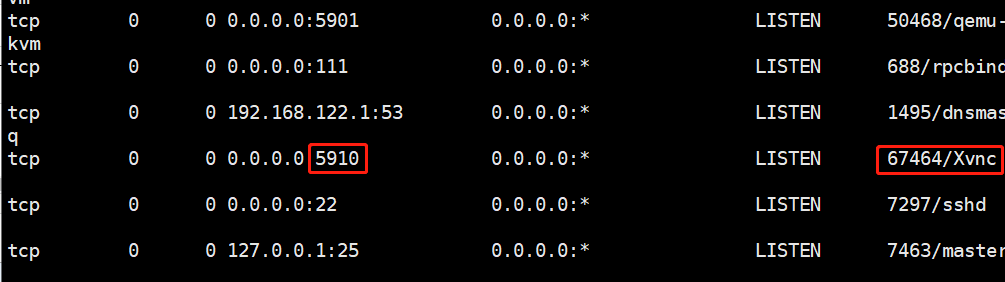
然后用vnc连接
导出配置dumpxml(备份)
删除undefine
推荐先destroy,后undefine
导入配置define
修改配置edit
重命名domrename(低版本不支持)
命令参数总结:
|
参数 |
参数说明 |
|
基础操作 |
|
|
list |
查看虚拟机列表,列出域 |
|
start |
启动虚拟机,开始一个(以前定义的)非活跃的域 |
|
shutdown |
关闭虚拟机,关闭一个域 |
|
destroy(危险) |
强制关闭虚拟机,销毁(停止)域 |
|
vncdisplay |
查询虚拟机vnc端口号 |
|
配置管理操作 |
|
|
dumpxml |
导出主机配置信息 |
|
undefine |
删除主机 |
|
define |
导入主机配置 |
|
domrename |
对虚拟机进行重命名 |
|
挂起与恢复 |
|
|
suspend |
挂起虚拟机 |
|
resume |
恢复虚拟机 |
|
自启动管理 |
|
|
autostart |
虚拟机开机启动 |
|
autostart –disable |
取消虚拟机开机启动 |
操作案例:
|
1 2 3 4 5 6 7 8 9 10 11 12 13 14 15 16 |
|
配置console登录
在clsn7虚拟机内操作(该操作仅限centos7):
[root@kvm01 ~]# grubby --update-kernel=ALL --args="console=ttyS0,115200n8"
[root@kvm01 ~]# reboot
# 115200n8:能显示虚拟机的启动过程
重启完成后,使用virsh console 连接虚拟机。

[root@kvm01 ~]# virsh console clsn7
连接到域 clsn7
换码符为 ^]
CentOS Linux 7 (Core)
clsn7 login: root
Password:
Last login: Mon Jan 22 12:24:48 from 192.168.122.1
[root@localhost ~]# w
 12:26:11 up 0 min,  1 user,  load average: 0.09, 0.03, 0.01
USER     TTY      FROM             LOGIN@   IDLE   JCPU   PCPU WHAT
root     ttyS0                     12:26    3.00s  0.02s  0.01s w

磁盘管理
查看当前虚拟机硬盘信息
|
1 2 3 4 5 6 7 8 9 |
|
raw转qcow2格式:
# 参数说明
[root@kvm data]# qemu-img  --help |grep convert
qemu-img convert [-f fmt] [-O output_fmt] filename  output_filename
转换原有磁盘格式
|
1 |
|
修改kvm虚拟机配置文件
|
1 2 3 4 5 6 7 8 9 10 11 12 13 14 15 |
|
删除原磁盘文件
[root@kvm opt]# rm -rf test.raw
KVM虚拟机添加硬盘
进入硬盘存放目录
[root@kvm ~]# cd /opt
增加硬盘空间
|
1 2 3 4 5 6 7 8 9 10 11 12 13 14 15 16 17 18 19 20 |
|
创建一块新的硬盘
[root@kvm opt]# qemu-img create -f qcow2 add.qcow2 1G
Formatting 'add.qcow2', fmt=qcow2 size=5368709120 encryption=off cluster_si
查看创建的硬盘信息

[root@kvm data]# qemu-img info add.qcow2
image: add.qcow2
file format: qcow2
virtual size: 5.0G (5368709120 bytes)
disk size: 196K
cluster_size: 65536
Format specific information:
    compat: 1.1
    lazy refcounts: false

快照管理
注意:raw格式的磁盘无法创建快照
创建快照
|
1 2 |
|
查看主机快照列表
|
1 2 3 4 |
|
查看快照信息
|
1 2 3 4 5 6 7 8 9 10 |
|
删除快照
|
1 |
|
kvm虚拟机克隆
1.克隆虚拟磁盘文件
cp test.qcow2 test01.qcow2
2.生成新的虚拟机配置文件(关机状态下修改)
name修改
uuid删除
disk路径修改
mac地址删除
总结:
复制一个虚拟机,需修改如 MAC 地址,名称等所有主机端唯一的配置。
虚拟机的内容并没有改变:virt-clone 不修改任何客户机系统内部的配置。
克隆命令:
|
1 2 3 4 |
|
参数说明:
参数说明:
|
参数 |
参数说明 |
|
–auto-clone |
从原始客户机配置中自动生成克隆名称和存储路径。 |
|
-o ORIGINAL_GUEST, –original ORIGINAL_GUEST |
原始客户机名称;必须为关闭或者暂停状态。 |
kvm虚拟机网络管理
1,首先将networkmanager关闭
|
1 |
|
2,设置桥接网络
|
1 |
|
3.查看网络配置文件
|
1 2 3 4 5 6 7 |
|
DEVICE=”br0″
ONBOOT=”yes”
TYPE=”Bridge”
BOOTPROTO=”none”
IPADDR=”192.168.100.11″
NETMASK=”255.255.255.0″
GATEWAY=”192.168.100.1″
IPV6INIT=”yes”
IPV6_AUTOCONF=”yes”
DHCPV6C=”no”
STP=”on”
DELAY=”0″
4,修改虚拟机网络配置
|
1 2 3 4 5 6 7 8 9 10 11 12 13 14 15 |
|
KVM热添加技术
1.热添加硬盘
创建一块硬盘
|
1 |
|
热添加硬盘
[root@kvm opt]# virsh attach-disk web01 /opt/add.qcow2 vdb --live --cache=none --subdriver=qcow2
# 成功附加磁盘
参数说明:
|
参数 |
参数说明 |
|
vdb |
新加硬盘 |
|
–live |
热添加 |
|
–subdriver |
驱动类型 |
调整已添加硬盘的大小
[root@kvm01 opt]# virsh --help |grep disk
    attach-disk                    #附加磁盘设备
    detach-disk                    #分离磁盘设备
将已挂载的磁盘卸载下来
[root@kvm01 opt]# virsh detach-disk web01  vdb
成功分离磁盘
调整磁盘大小
# 使用参数
[root@kvm01 opt]# qemu-img --help |grep resize resize [-q] filename [+ | -]size
添加硬盘完成之后在kvm虚拟机操作
格式化磁盘
[root@localhost ~]# mkfs.xfs /dev/vdb
挂载磁盘
[root@localhost ~]# mount /dev/vdb  /opt

[root@localhost ~]# df -h |grep /dev/vdb
/dev/vdb 6.0G 33M 1.0G 1% /opt
使用 xfs_growfs 刷新磁盘的信息
[root@localhost ~]# xfs_growfs --help
xfs_growfs: invalid option -- '-'
Usage: xfs_growfs [options] mountpoint

[root@localhost ~]# xfs_growfs  /opt
2.热添加网卡
|
1 |
|
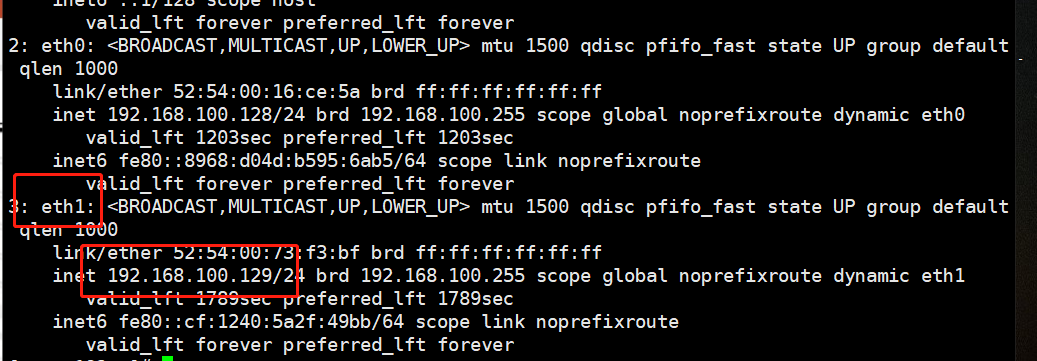
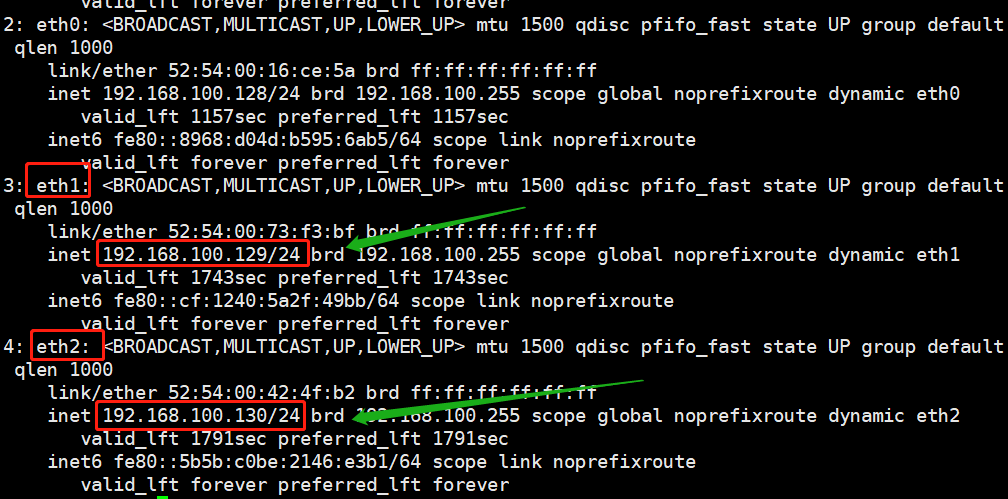
不加–model virtio
|
1 |
|

添加网络配置文件(实现永久添加)
|
1 2 3 4 5 6 |
|
现在启动虚拟机只多了一块网卡,其他的都“消失”了

3.热添加CPU
在创建虚拟机时需要添加maxcpus=4
|
1 |
|
执行这个命令会报错 ERROR Unknown options [‘maxcpus’] (有bug)
查看命令帮助
|
1 2 3 4 5 |
|
解决bug方法在max和cpus之间加v(程序员的锅)
|
1 |
|
添加cpu命令
virsh setvcpus web03 –count=2
添加前:
添加后:
热迁移备份
准备:

1、安装virt-manager所需桌面及vnc-server
[root@kvm ~]# yum group install "GNOME Desktop" -y
# vnc和vnc-manager
[root@kvm ~]# yum install tigervnc-server virt-manager.noarch -y
# virt-manager需要软件
[root@kvm ~]# yum install openssh-askpass -y
2.启动,关闭vnc
|
1 2 |
|
开启vncmanager
使用tightvnc连接,并下一步
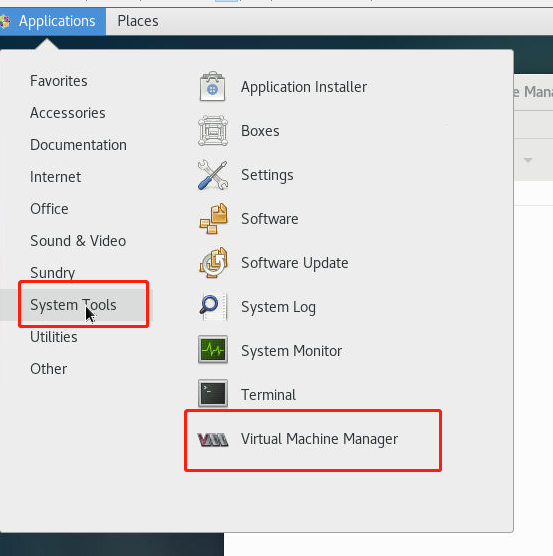
打开V M manager
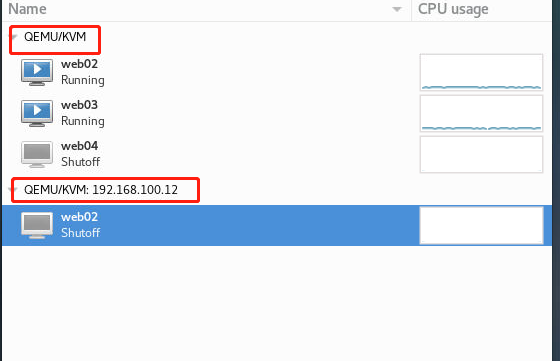
可以看到在kvm01运行的kvm虚拟机

如图所示增加一个连接


连接另一台kvm02

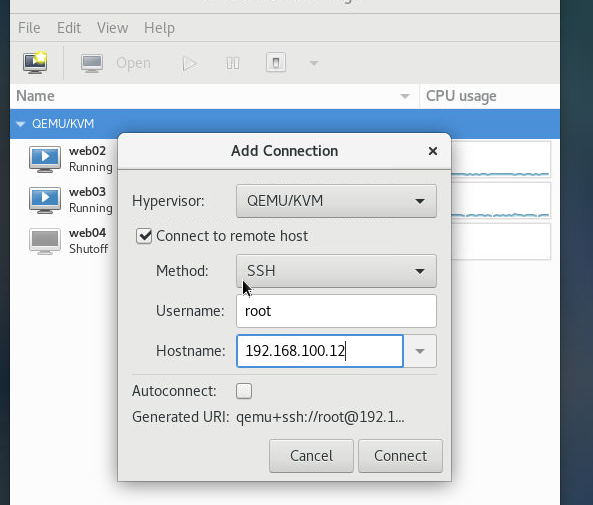
输入密码:

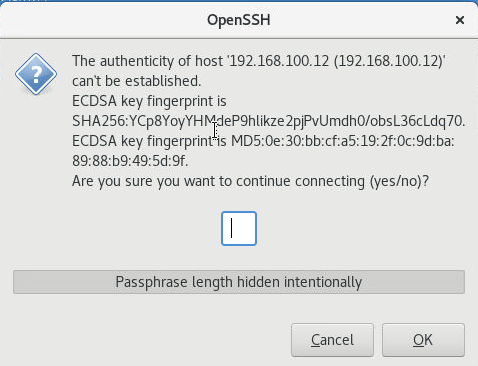
连接好之后

热迁移步骤图解
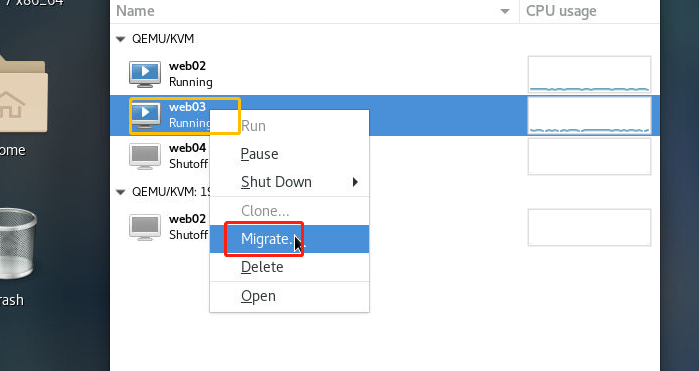

迁移

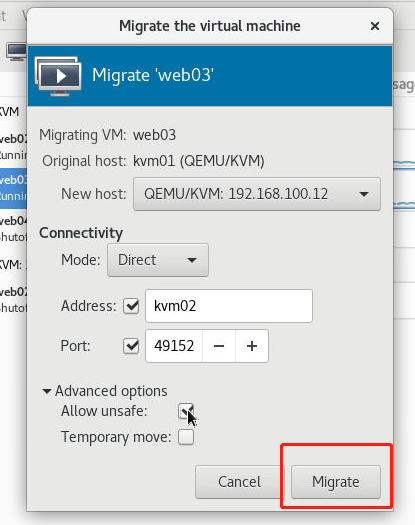
迁移过程


迁移完成
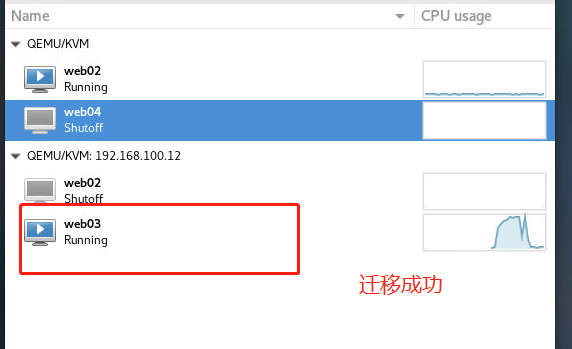
迁移过程出现短暂访问延时(没有丢包)

版权声明:本文内容由互联网用户自发贡献,该文观点仅代表作者本人。本站仅提供信息存储空间服务,不拥有所有权,不承担相关法律责任。如发现本站有涉嫌侵权/违法违规的内容, 请发送邮件至 举报,一经查实,本站将立刻删除。
文章由极客之音整理,本文链接:https://www.bmabk.com/index.php/post/77405.html

