
swagger
具体信息请阅读官网文档swagger-io
本人初略的阅读了一部分官网的文档。我这里简单介绍下我知道的(是用翻译插件大致阅读了下一部分文档,哈哈):
OpenAPI Specification (OAS 简称),一个与开发语言无关的,设计 RESTful APIs 的规范。
值得说一下的就是swaggerHub,可以在线创建接口,根据OAS规范(2.0 or 3.0),使用yaml(官方推荐)方式编写接口文档。编写API文档的界面如下:
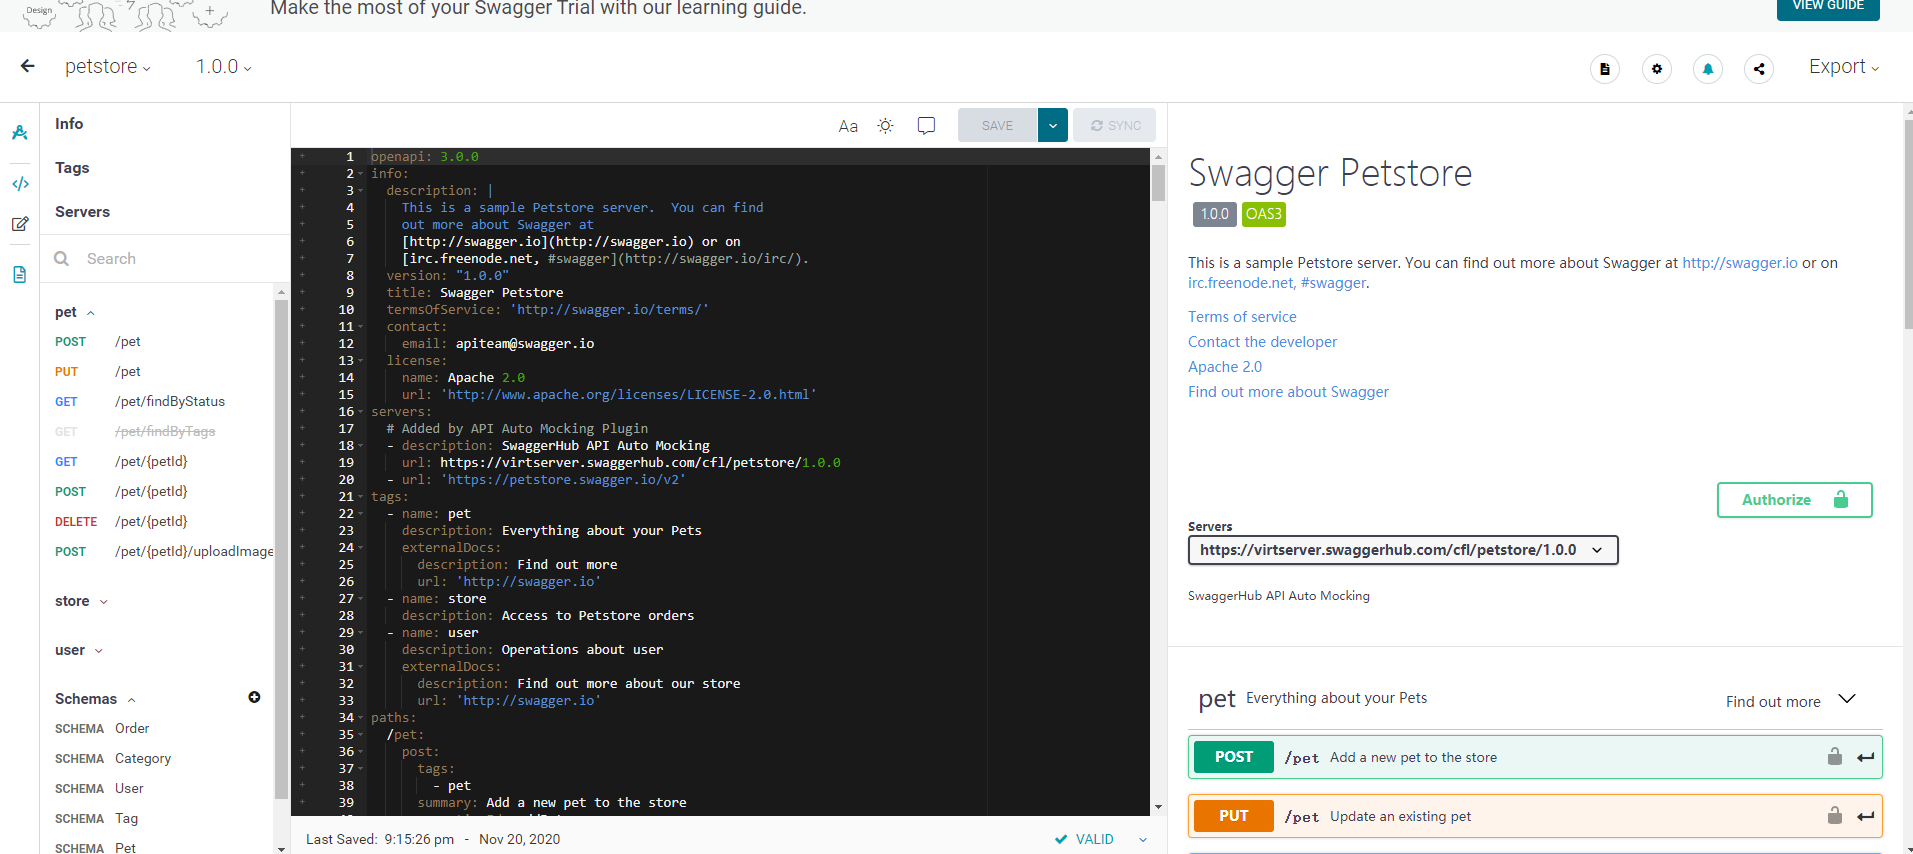
关于swaggerHub的具体使用参考官网文档:

springboot整合swagger2.x
- pom.xml
 <!--swagger-->
 <dependency>
      <groupId>io.springfox</groupId>
      <artifactId>springfox-swagger2</artifactId>
      <version>2.9.2</version>
  </dependency>
  <dependency>
      <groupId>io.springfox</groupId>
      <artifactId>springfox-swagger-ui</artifactId>
      <version>2.9.2</version>
  </dependency>
- 编写一个配置类,用于配置swagger,这里配置比较多,上面的是简单的配置,后面的很多方法适用于配置swagger的文档访问路径。
package com.cfl.jd.config;

import org.springframework.beans.factory.InitializingBean;
import org.springframework.beans.factory.annotation.Autowired;
import org.springframework.beans.factory.annotation.Value;
import org.springframework.context.annotation.Bean;
import org.springframework.context.annotation.Configuration;
import org.springframework.core.env.Environment;
import org.springframework.core.io.ClassPathResource;
import org.springframework.http.ResponseEntity;
import org.springframework.stereotype.Controller;
import org.springframework.web.bind.annotation.RequestMapping;
import org.springframework.web.bind.annotation.RequestMethod;
import org.springframework.web.bind.annotation.RequestParam;
import org.springframework.web.bind.annotation.ResponseBody;
import org.springframework.web.servlet.ModelAndView;
import org.springframework.web.servlet.handler.SimpleUrlHandlerMapping;
import org.springframework.web.servlet.resource.PathResourceResolver;
import org.springframework.web.servlet.resource.ResourceHttpRequestHandler;
import org.springframework.web.util.UrlPathHelper;
import springfox.documentation.annotations.ApiIgnore;
import springfox.documentation.builders.ApiInfoBuilder;
import springfox.documentation.builders.OAuthBuilder;
import springfox.documentation.builders.PathSelectors;
import springfox.documentation.builders.RequestHandlerSelectors;
import springfox.documentation.service.*;
import springfox.documentation.spi.DocumentationType;
import springfox.documentation.spi.service.contexts.SecurityContext;
import springfox.documentation.spring.web.DocumentationCache;
import springfox.documentation.spring.web.json.Json;
import springfox.documentation.spring.web.json.JsonSerializer;
import springfox.documentation.spring.web.plugins.Docket;
import springfox.documentation.swagger.web.ApiResourceController;
import springfox.documentation.swagger.web.SecurityConfiguration;
import springfox.documentation.swagger.web.SwaggerResource;
import springfox.documentation.swagger.web.UiConfiguration;
import springfox.documentation.swagger2.annotations.EnableSwagger2;
import springfox.documentation.swagger2.mappers.ServiceModelToSwagger2Mapper;
import springfox.documentation.swagger2.web.Swagger2Controller;

import javax.servlet.ServletContext;
import javax.servlet.http.HttpServletRequest;
import java.util.*;

/**
 * 类描述:
 * 配置 swagger
 * @ClassName Swagger2Config
 * @Author msi
 * @Date 2020/10/17 10:00
 * @Version 1.0
 */
@Configuration
@EnableSwagger2
public class Swagger2Config {

    /**
     * 文档地址
     */
    private static final String DEFAULT_PATH = "/swagger";
    /**
     * api 包(生成的api 是在指定包下)
     */
    private static final String API_BASEPACKAGE = "com.cfl.jd";

    /**
     * 是否开启swagger,正式环境一般是需要关闭的
     * 在 application.yml 配置文件设置属性值
     */
    @Value("${swagger.enable}")
    private boolean enableSwagger;
    /**
     * 应用名称
     * 在 application.yml 配置文件设置属性值
     */
    @Value("${swagger.application-name}")
    private String applicationName;
    /**
     * 版本
     * 在 application.yml 配置文件设置属性值
     */
    @Value("${swagger.application-version}")
    private String applicationVersion;
    /**
     * 描述
     * 在 application.yml 配置文件设置属性值
     */
    @Value("${swagger.application-description}")
    private String applicationDescription;

    @Bean
    public Docket createRestApi() {
        return new Docket(DocumentationType.SWAGGER_2)
//                .groupName("考试练习模块")
                .apiInfo(apiInfo())
                //是否开启 (true 开启  false隐藏。生产环境建议隐藏)
                .enable(this.enableSwagger)
                .select()
                //扫描的路径包,设置basePackage会将包下的所有被@Api标记类的所有方法作为api
                .apis(RequestHandlerSelectors.basePackage(API_BASEPACKAGE))
                //指定路径处理PathSelectors.any()代表所有的路径
                .paths(PathSelectors.any())
                .build()
                // 设置Available authorizations  BasicAuth OAuth ApiKey
//                .securitySchemes(securitySchemes())
                .securitySchemes(securitySchemes())
                .securityContexts(securityContexts());
    }

    /**
     * 这里是写允许认证的scope
     */
    private AuthorizationScope[] scopes() {
        return new AuthorizationScope[]{
                new AuthorizationScope("global", "accessAnything")
//                new AuthorizationScope("global", "Grants openid access")
//                , new AuthorizationScope("all", "All scope is trusted!")
        };
    }


    List<SecurityReference> defaultAuth() {
        AuthorizationScope authorizationScope = new AuthorizationScope("global", "accessEverything");
        AuthorizationScope[] authorizationScopes = new AuthorizationScope[1];
        authorizationScopes[0] = authorizationScope;
        List<SecurityReference> securityReferences=new ArrayList<>();
        securityReferences.add(new SecurityReference("Authorization", authorizationScopes));
        return securityReferences;
    }

    /**
     * 这个类决定了你使用哪种认证方式,我这里使用密码模式
     * 其他方式自己摸索一下,完全莫问题啊
     * SecurityScheme 子类 BasicAuth OAuth ApiKey
     */
    private List<SecurityScheme> securitySchemes() {
        List<SecurityScheme> list = new ArrayList<>();

        // OAuth
        // 验证账号密码登录的接口
        GrantType grantType = new ResourceOwnerPasswordCredentialsGrant("/api/user/swaggerlogin");

        OAuth spring_oauth = new OAuthBuilder()
                .name("OAuth2")
                .grantTypes(Collections.singletonList(grantType))
                .scopes(Arrays.asList(scopes()))
                .build();
        // Apikey
//        list.add(new ApiKey("custom-token", "token", "header"));

        // BasicAuth
//        list.add(new BasicAuth("basicAuth"));

        list.add(spring_oauth);
        return list;
    }

    /**
     * swagger 文档的基本信息
     * @return
     */
    private ApiInfo apiInfo() {
        return new ApiInfoBuilder()
                //设置文档标题(API名称)
                .title(this.applicationName)
                //文档描述
                .description(this.applicationDescription)
                //服务条款URL
//                .termsOfServiceUrl("http://127.0.0.1:8080/")
                //版本号
                .version(this.applicationVersion)
                .build();
    }

    /**
     * 这里设置 swagger2 认证的安全上下文
     */
    private List<SecurityContext> securityContexts() {
        List<SecurityContext> securityContextList = new ArrayList<>();

        List<SecurityReference> securityReferenceList = new ArrayList<>();
        securityReferenceList.add(new SecurityReference("custom-token", scopes()));

//        securityContextList.add(SecurityContext
//                .builder()
//                .securityReferences(securityReferenceList)
//                .forPaths(PathSelectors.any())
//                .build()
//        );

        securityContextList.add(
                SecurityContext.builder()
                        .securityReferences(defaultAuth())
                        .forPaths(PathSelectors.regex("^(?!auth).*$"))
                        .build());

//        securityContextList.add(SecurityContext.builder()
//                .securityReferences(Collections.singletonList(new SecurityReference("spring_oauth", scopes())))
//                .forPaths(PathSelectors.any())
//                .build());
        return securityContextList;
    }


    /**
     * SwaggerUI资源访问
     *
     * @param servletContext
     * @param order
     * @return
     * @throws Exception
     */
    @Bean
    public SimpleUrlHandlerMapping swaggerUrlHandlerMapping(ServletContext servletContext,
                                                            @Value("${swagger.mapping.order:10}") int order) throws Exception {
        SimpleUrlHandlerMapping urlHandlerMapping = new SimpleUrlHandlerMapping();
        Map<String, ResourceHttpRequestHandler> urlMap = new HashMap<>();
        {
            PathResourceResolver pathResourceResolver = new PathResourceResolver();
            pathResourceResolver.setAllowedLocations(new ClassPathResource("META-INF/resources/webjars/"));
            pathResourceResolver.setUrlPathHelper(new UrlPathHelper());

            ResourceHttpRequestHandler resourceHttpRequestHandler = new ResourceHttpRequestHandler();
            resourceHttpRequestHandler.setLocations(Arrays.asList(new ClassPathResource("META-INF/resources/webjars/")));
            resourceHttpRequestHandler.setResourceResolvers(Arrays.asList(pathResourceResolver));
            resourceHttpRequestHandler.setServletContext(servletContext);
            resourceHttpRequestHandler.afterPropertiesSet();
            //设置新的路径
            urlMap.put(DEFAULT_PATH + "/webjars/**", resourceHttpRequestHandler);
        }
        {
            PathResourceResolver pathResourceResolver = new PathResourceResolver();
            pathResourceResolver.setAllowedLocations(new ClassPathResource("META-INF/resources/"));
            pathResourceResolver.setUrlPathHelper(new UrlPathHelper());

            ResourceHttpRequestHandler resourceHttpRequestHandler = new ResourceHttpRequestHandler();
            resourceHttpRequestHandler.setLocations(Arrays.asList(new ClassPathResource("META-INF/resources/")));
            resourceHttpRequestHandler.setResourceResolvers(Arrays.asList(pathResourceResolver));
            resourceHttpRequestHandler.setServletContext(servletContext);
            resourceHttpRequestHandler.afterPropertiesSet();
            //设置新的路径
            urlMap.put(DEFAULT_PATH + "/**", resourceHttpRequestHandler);
        }
        urlHandlerMapping.setUrlMap(urlMap);
        //调整DispatcherServlet关于SimpleUrlHandlerMapping的排序
        urlHandlerMapping.setOrder(order);
        return urlHandlerMapping;
    }

    /**
     * SwaggerUI接口访问
     */
    @Controller
    @ApiIgnore
    @RequestMapping(DEFAULT_PATH)
    public static class SwaggerResourceController implements InitializingBean {

        @Autowired
        private ApiResourceController apiResourceController;

        @Autowired
        private Environment environment;

        @Autowired
        private DocumentationCache documentationCache;

        @Autowired
        private ServiceModelToSwagger2Mapper mapper;

        @Autowired
        private JsonSerializer jsonSerializer;

        private Swagger2Controller swagger2Controller;

        @Override
        public void afterPropertiesSet() {
            swagger2Controller = new Swagger2Controller(environment, documentationCache, mapper, jsonSerializer);
        }

        /**
         * 首页
         *
         * @return
         */
        @RequestMapping
        public ModelAndView index() {
            ModelAndView modelAndView = new ModelAndView("redirect:" + DEFAULT_PATH + "/swagger-ui.html");
            return modelAndView;
        }

        @RequestMapping("/swagger-resources/configuration/security")
        @ResponseBody
        public ResponseEntity<SecurityConfiguration> securityConfiguration() {
            return apiResourceController.securityConfiguration();
        }

        @RequestMapping("/swagger-resources/configuration/ui")
        @ResponseBody
        public ResponseEntity<UiConfiguration> uiConfiguration() {
            return apiResourceController.uiConfiguration();
        }

        @RequestMapping("/swagger-resources")
        @ResponseBody
        public ResponseEntity<List<SwaggerResource>> swaggerResources() {
            return apiResourceController.swaggerResources();
        }

		/**
		 * 生成的json字符串(swagger-ui 页面展示的数据)
		 */
        @RequestMapping(value = "/v2/api-docs", method = RequestMethod.GET, produces = {"application/json", "application/hal+json"})
        @ResponseBody
        public ResponseEntity<Json> getDocumentation(
                @RequestParam(value = "group", required = false) String swaggerGroup,
                HttpServletRequest servletRequest) {
            return swagger2Controller.getDocumentation(swaggerGroup, servletRequest);
        }
    }

}
- application.yml
# ===== 自定义swagger配置 ===== #
swagger:
  enable: true
  # 标题
  application-name: ${spring.application.name}
  # 版本
  application-version: 1.0
  # 文档描述
  application-description: 文档描述
  # 文档地址自定义
  application-default_path: /swagger
创建API文档
Swagger在使用过程中,本人经常使用的注解有以下几个:
| 注解 | 描述 |
|---|---|
| @EnableSwagger2 | 放在swagger配置类上,用于配置swagger |
| @Api(value = “”, tags = “”) | 我通常是放在Controller上,表明这个控制器会被Swagger生成接口文档 |
| @ApiOperation(value = “接口简短说明”, notes = “接口详细描述”) | 放在控制器中的方法上 |
| @ApiImplicitParam(name = “”, value = “”, required = true, dataType = “”) | 描述接口需要的参数说明 |
| @ApiImplicitParams({@ApiImplicitParam …}) | 描述接口需要的参数说明(多个参数时使用) |
| @ApiModel | 放在实体类上 |
| @ApiModelProperty(name = “”, value = “”, required = true) | 放在实体类的属性上 |
| @ApiIgnore | 放在方法上,用于swagger忽略该方法 |
注意
如果接口的参数是一个自定义对象的话,那么方法就不要使用 @ApiImplicitParam 和 @ApiImplicitParams ,只需要在该对象的类上添加注解 @ApiModel 在 其属性上添加@ApiModelProperty,这样就会生成 详细的接口文档。
启动项目访问文档
启动项目后,打开 ip:port/swagger/swagger-ui.html 访问。

最后
第一:因为这个是之前急忙整合的一个swagger,没有时间去慢慢看文档,所以很多都是参考网上的代码和自己一段时间的使用后,进行记录的一篇学习笔记。
第二:OAS3.0 已经出来了,这时抽时间去官网学习下,将这篇笔记保留,一倍不时之需。
如果有什么问题,请给出您宝贵意见,共同进步,不要直接喷我(年轻人不讲武德,劝你耗子喂汁)。
版权声明:本文内容由互联网用户自发贡献,该文观点仅代表作者本人。本站仅提供信息存储空间服务,不拥有所有权,不承担相关法律责任。如发现本站有涉嫌侵权/违法违规的内容, 请发送邮件至 举报,一经查实,本站将立刻删除。
文章由极客之音整理,本文链接:https://www.bmabk.com/index.php/post/78274.html

