
MongoDB和Compass安装教程
MongoDB Compass 就是一个MongoDB的可视化连接工具,提供了丰富的功能。
安装MongoDB
下载MongoDB
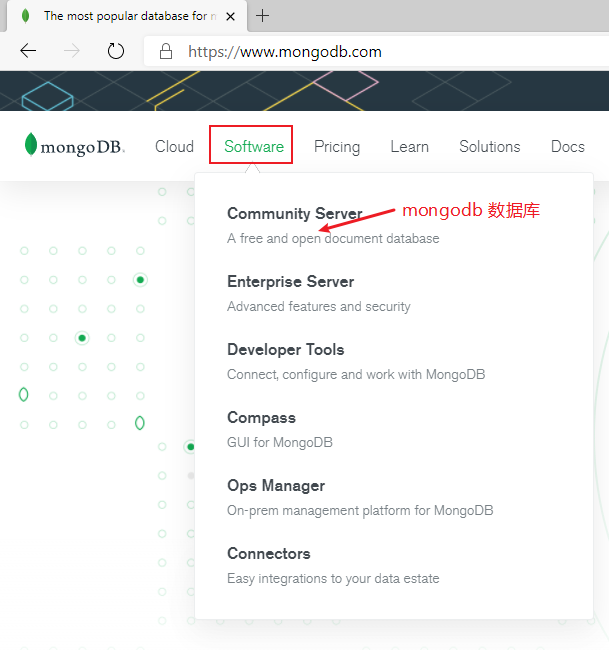
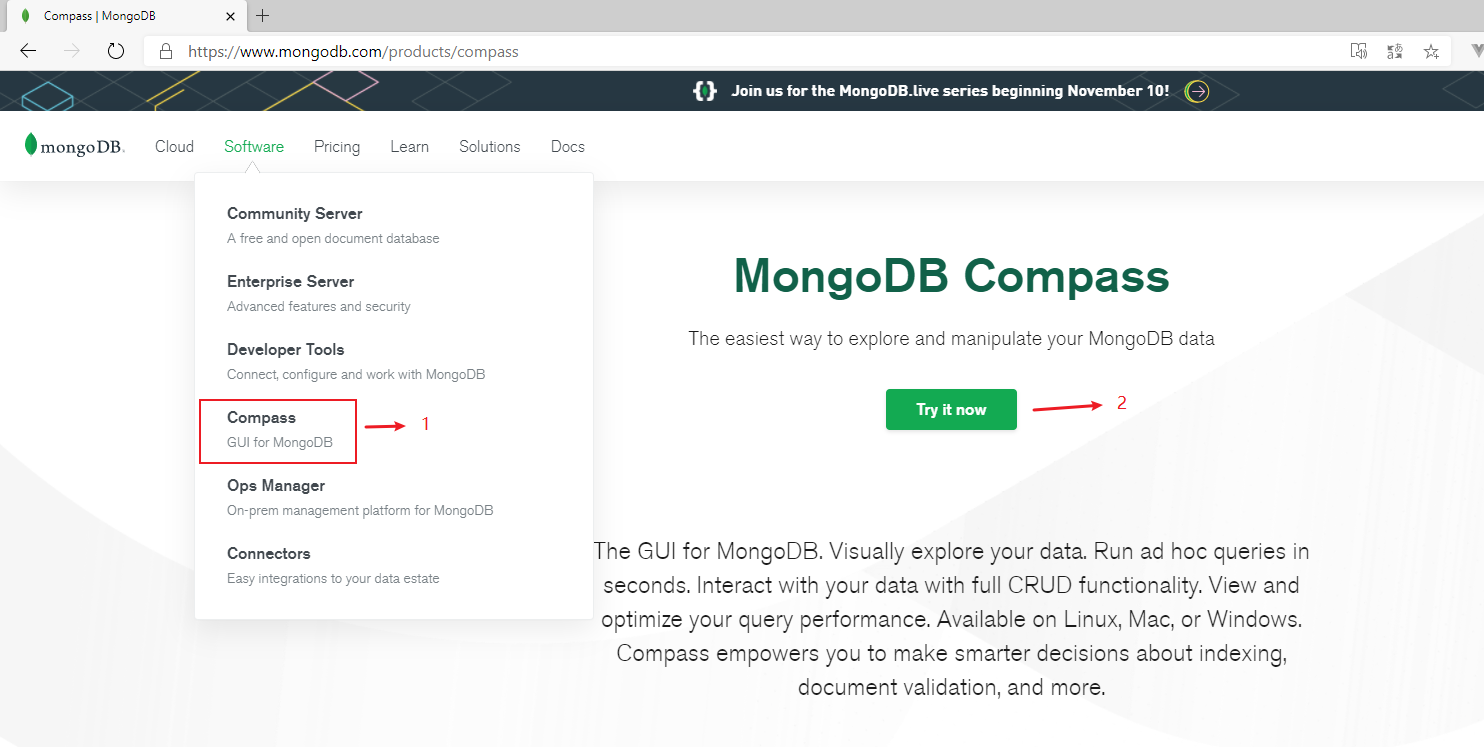
点击进去后会有好几个菜单,我们选择 MongoDB Community Server(MongoDB 社区服务器,免费),打开后,可以看到右侧有选择 version,操作系统,和下载包类型。
MongoDB的版本命名规范如:x.y.z;
y为奇数时表示当前版本为开发版,如:1.5.2、4.1.13;
y为偶数时表示当前版本为稳定版,如:1.6.3、4.0.10;
z是修正版本号,数字越大越好。
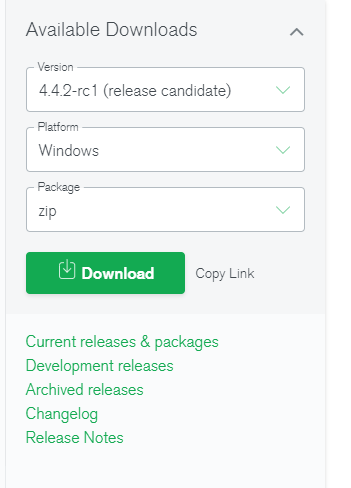
Windows
选择合适的版本、操作系统、下载包的类型,下面是我们最后完成的选择:
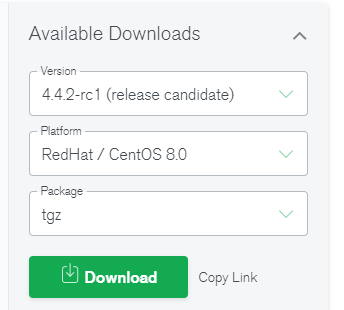
Centos
选择合适的版本、操作系统、下载包的类型,下面是我们最后完成的选择:
Windows 安装
这里我没有依照官网进行书写,本人使用的是解压版,感兴趣的朋友可以依照官网根据其他类型进行安装
安装
根据上面的示例,我们下载后会得到一个文件 mongodb-windows-x86_64-4.4.2-rc1.zip。
第一步:将压缩包解压到指定目录:
第二步:在解压目录中,手动建立一个目录用于存放数据文件,如 data/db

启动 MongoDB Serve:
方式一:命令行参数方式启动服务
在 bin 目录中打开命令行提示符,输入如下命令:
mongod --dbpath=..\data\db
我们在启动信息中可以看到,MongoDB的默认端口是27017,如果我们想改变默认的启动端口,可以通过–port来指定端口。
为了方便我们每次启动,可以将安装目录的bin目录设置到环境变量的path中, bin 目录下是一些常用命令,比如 mongod 启动服务用的,mongo 客户端连接服务用的。
方式2:配置文件方式启动服务
在解压目录中新建 config 文件夹,该文件夹中新建配置文件 mongod.conf ,内如参考如下(文件内容格式是yaml):
storage:
  #The directory where the mongod instance stores its data.Default Value is "\data\db" on Windows.
  dbPath: D:\work\databases\mongodb-windows-x86_64-4.4.2-rc1\mongodb-win32-x86_64-windows-4.4.2-rc1\data
Configuration File Options 配置文件配置
注意:
1)配置文件中如果使用双引号,比如路径地址,自动会将双引号的内容转义。如果不转义,则会报错:
error-parsing-yaml-config-file-yaml-cpp-error-at-line-3-column-15-unknown-escape-character-d
解决:
a. 路径分隔符使用反斜杠“\”
b. 如果路径中没有空格,则无需加引号。2)配置文件不使用空格
直接使用路径即可,正斜杠,反斜杠都可以实现
3)配置文件中不能以Tab分割字段
yaml格式,两个空格,value与前面的冒号有一个空格。
例如:
key: value
启动方式:
# 方式1
path/bin>mongod --config ../config/mongod.conf

# 方式2
path/bin>mongos --config ../config/mongod.conf

# 方式3
path/bin>mongod -f ../config/mongod.conf

# 方式4
path/bin>mongos -f ../config/mongod.conf
注意:
在windows上使用配置文件方式启动mongod服务报错:
Error opening config file: Is a directory
try ‘mongod –help’ for more information是因为path里面有空格(相对路径也不可以),此时需要使用双引号将绝对路径包起来:
D:>mongod -f “Program Files (x86)\mongod.conf”
更多参数配置:
systemLog:
  destination: file
  path: "D:/work/databases/mongodb-windows-x86_64-4.4.2-rc1/mongodb-win32-x86_64-windows-4.4.2-rc1/log/mongod.log"
  logAppend: true
storage:
  journal:
    enabled: true
  dbPath: "D:/work/databases/mongodb-windows-x86_64-4.4.2-rc1/mongodb-win32-x86_64-windows-4.4.2-rc1/data"
net:
  bindIp: 127.0.0.1
  port: 27018
setParameter:
  enableLocalhostAuthBypass: false
Shell连接(mongo命令)
# 方式一
path/bin>mongo
MongoDB shell version v4.4.2-rc1
connecting to: mongodb://127.0.0.1:27017/?compressors=disabled&gssapiServiceName=mongodb
Implicit session: session { "id" : UUID("66829c0e-9448-4f0b-b2ca-52b7d4a18a48") }
MongoDB server version: 4.4.2-rc1
...

# 方式二
path/bin>mongo --host=127.0.0.1 --port=27017
MongoDB shell version v4.4.2-rc1
connecting to: mongodb://127.0.0.1:27017/?compressors=disabled&gssapiServiceName=mongodb
Implicit session: session { "id" : UUID("c1295bad-6be3-4bd7-8760-1db05530c155") }
MongoDB server version: 4.4.2-rc1
...
查看已经有的数据库
> show databases
admin   0.000GB
config  0.000GB
local   0.000GB
退出mongodb
> exit
bye
更多参数可以通过帮助查看:
# mongod -h 还有 mongo -h
D:\work\databases\mongodb-windows-x86_64-4.4.2-rc1\mongodb-win32-x86_64-windows-4.4.2-rc1\bin>mongod -h
Options:
  --networkMessageCompressors arg (=snappy,zstd,zlib)
                                        Comma-separated list of compressors to
                                        use for network messages

General options:
  -h [ --help ]                         Show this usage information
  --version                             Show version information
  -f [ --config ] arg                   Configuration file specifying
                                        additional options
  --configExpand arg                    Process expansion directives in config
                                        file (none, exec, rest)
  --port arg                            Specify port number - 27017 by default
  --ipv6                                Enable IPv6 support (disabled by
                                        default)
  --listenBacklog arg (=2147483647)     Set socket listen backlog size
  --maxConns arg (=1000000)             Max number of simultaneous connections
  --pidfilepath arg                     Full path to pidfile (if not set, no
                                        pidfile is created)
  --timeZoneInfo arg                    Full path to time zone info directory,
                                        e.g. /usr/share/zoneinfo
  -v [ --verbose ] [=arg(=v)]           Be more verbose (include multiple times
                                        for more verbosity e.g. -vvvvv)
  --quiet                               Quieter output
  --logpath arg                         Log file to send write to instead of
                                        stdout - has to be a file, not
                                        directory
  --logappend                           Append to logpath instead of
                                        over-writing
  --logRotate arg                       Set the log rotation behavior
                                        (rename|reopen)
  --timeStampFormat arg                 Desired format for timestamps in log
                                        messages. One of iso8601-utc or
                                        iso8601-local
  --setParameter arg                    Set a configurable parameter
  --bind_ip arg                         Comma separated list of ip addresses to
                                        listen on - localhost by default
  --bind_ip_all                         Bind to all ip addresses
  --noauth                              Run without security
  --transitionToAuth                    For rolling access control upgrade.
                                        Attempt to authenticate over outgoing
                                        connections and proceed regardless of
                                        success. Accept incoming connections
                                        with or without authentication.
  --slowms arg (=100)                   Value of slow for profile and console
                                        log
  --slowOpSampleRate arg (=1)           Fraction of slow ops to include in the
                                        profile and console log
  --profileFilter arg                   Query predicate to control which
                                        operations are logged and profiled
  --auth                                Run with security
  --clusterIpSourceWhitelist arg        Network CIDR specification of permitted
                                        origin for `__system` access
  --profile arg                         0=off 1=slow, 2=all
  --cpu                                 Periodically show cpu and iowait
                                        utilization
  --sysinfo                             Print some diagnostic system
                                        information
  --noscripting                         Disable scripting engine
  --notablescan                         Do not allow table scans
  --keyFile arg                         Private key for cluster authentication
  --clusterAuthMode arg                 Authentication mode used for cluster
                                        authentication. Alternatives are
                                        (keyFile|sendKeyFile|sendX509|x509)

Replication options:
  --oplogSize arg                       Size to use (in MB) for replication op
                                        log. default is 5% of disk space (i.e.
                                        large is good)

Replica set options:
  --replSet arg                         arg is <setname>[/<optionalseedhostlist
                                        >]
  --enableMajorityReadConcern [=arg(=1)] (=1)
                                        Enables majority readConcern

Sharding options:
  --configsvr                           Declare this is a config db of a
                                        cluster; default port 27019; default
                                        dir /data/configdb
  --shardsvr                            Declare this is a shard db of a
                                        cluster; default port 27018

Storage options:
  --storageEngine arg                   What storage engine to use - defaults
                                        to wiredTiger if no data files present
  --dbpath arg                          Directory for datafiles - defaults to
                                        \data\db\ which is D:\data\db\ based on
                                        the current working drive
  --directoryperdb                      Each database will be stored in a
                                        separate directory
  --syncdelay arg (=60)                 Seconds between disk syncs
  --journalCommitInterval arg (=100)    how often to group/batch commit (ms)
  --upgrade                             Upgrade db if needed
  --repair                              Run repair on all dbs
  --journal                             Enable journaling
  --nojournal                           Disable journaling (journaling is on by
                                        default for 64 bit)
  --oplogMinRetentionHours arg (=0)     Minimum number of hours to preserve in
                                        the oplog. Default is 0 (turned off).
                                        Fractions are allowed (e.g. 1.5 hours)

TLS Options:
  --tlsOnNormalPorts                    Use TLS on configured ports
  --tlsMode arg                         Set the TLS operation mode
                                        (disabled|allowTLS|preferTLS|requireTLS
                                        )
  --tlsCertificateKeyFile arg           Certificate and key file for TLS
  --tlsCertificateKeyFilePassword arg   Password to unlock key in the TLS
                                        certificate key file
  --tlsClusterFile arg                  Key file for internal TLS
                                        authentication
  --tlsClusterPassword arg              Internal authentication key file
                                        password
  --tlsCAFile arg                       Certificate Authority file for TLS
  --tlsClusterCAFile arg                CA used for verifying remotes during
                                        inbound connections
  --tlsCRLFile arg                      Certificate Revocation List file for
                                        TLS
  --tlsDisabledProtocols arg            Comma separated list of TLS protocols
                                        to disable [TLS1_0,TLS1_1,TLS1_2]
  --tlsAllowConnectionsWithoutCertificates
                                        Allow client to connect without
                                        presenting a certificate
  --tlsAllowInvalidHostnames            Allow server certificates to provide
                                        non-matching hostnames
  --tlsAllowInvalidCertificates         Allow connections to servers with
                                        invalid certificates
  --tlsFIPSMode                         Activate FIPS 140-2 mode at startup
  --tlsCertificateSelector arg          TLS Certificate in system store
  --tlsClusterCertificateSelector arg   SSL/TLS Certificate in system store for
                                        internal TLS authentication
  --tlsLogVersions arg                  Comma separated list of TLS protocols
                                        to log on connect [TLS1_0,TLS1_1,TLS1_2
                                        ]

WiredTiger options:
  --wiredTigerCacheSizeGB arg           Maximum amount of memory to allocate
                                        for cache; Defaults to 1/2 of physical
                                        RAM
  --wiredTigerJournalCompressor arg (=snappy)
                                        Use a compressor for log records
                                        [none|snappy|zlib|zstd]
  --wiredTigerDirectoryForIndexes       Put indexes and data in different
                                        directories
  --wiredTigerCollectionBlockCompressor arg (=snappy)
                                        Block compression algorithm for
                                        collection data [none|snappy|zlib|zstd]
  --wiredTigerIndexPrefixCompression arg (=1)
                                        Use prefix compression on row-store
                                        leaf pages

AWS IAM Options:
  --awsIamSessionToken arg              AWS Session Token for temporary
                                        credentials

Free Monitoring Options:
  --enableFreeMonitoring arg            Enable Cloud Free Monitoring
                                        (on|runtime|off)
  --freeMonitoringTag arg               Cloud Free Monitoring Tags

Windows Service Control Manager options:
  --install                             Install Windows service
  --remove                              Remove Windows service
  --reinstall                           Reinstall Windows service (equivalent
                                        to --remove followed by --install)
  --serviceName arg                     Windows service name
  --serviceDisplayName arg              Windows service display name
  --serviceDescription arg              Windows service description
  --serviceUser arg                     Account for service execution
  --servicePassword arg                 Password used to authenticate
                                        serviceUser
提示:
MongoDB javascript shell是一个基于javascript的解释器,故是支持js程序的。
创建windows服务
- 将mongodb的bin目录设置到path系统变量中去,然后使用以下命令创建一个服务:
# 创建
mongod -f "XX\XX\mongod.conf" --install --serviceName "mongod"
#启动
net start mongod
#关闭
net stop mongod
# 更多操作可以在Windows服务中去设置,比如开机自启什么的
注意:
这里使用管理员运行的cmd命令,不然会创建不成功。
Read Hat 安装
使用tgz方式解压安装
安装所需依赖
sudo yum install libcurl openssl xz-libs
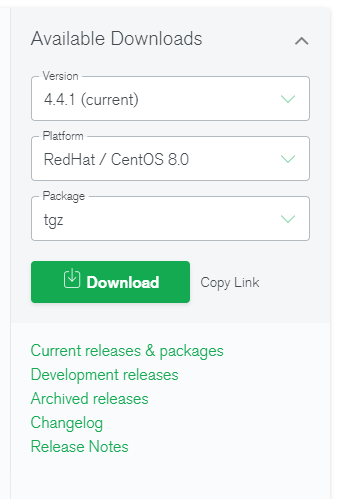
1. 在Version下拉菜单中,选择要下载的MongoDB版本。
2.在Platform下拉列表中,选择您的操作系统版本和架构。
3.在Package下拉菜单中,选择tgz。
4.点击下载。
解压
tar -zxvf mongodb-linux-*-4.4.1.tgz
将解压后的bin目录添加到PATH环境变量
vim ~/.bash_profile
PATH=/apps/mongodb4.4/mongodb-linux-x86_64-rhel80-4.4.1/bin:$PATH
source ~/.bash_profile
创建目录(解压后的根目录):
# 数据库目录
 mkdir -p data/db
# 日志目录
mkdir log
# 配置文件目录
mkdir config
# pid文件目录
mkdir pid
默认情况下,MongoDB运行使用mongod用户帐户。设置这些目录的所有者和组为mongod:
# 创建用户和组
useradd mongod -M -s /sbin/nologin
# 添加文件夹的用户和用户组 sudo chown -R mongod:mongod <directory>
chown -R  mongod:mongod mongodb-linux-x86_64-rhel80-4.4.1
设置配置文件 mongod.conf (config/mongod.conf)
Configuration File Options 配置文件配置
# where to write logging data.
systemLog:
  destination: file
  logAppend: true
  path: /apps/mongodb4.4/mongodb-linux-x86_64-rhel80-4.4.1/log/mongod.log

# Where and how to store data.
storage:
  dbPath: /apps/mongodb4.4/mongodb-linux-x86_64-rhel80-4.4.1/data/db
  journal:
    enabled: true
#  engine:
#  wiredTiger:

# how the process runs
processManagement:
  fork: true  # fork and run in background
  pidFilePath: /apps/mongodb4.4/mongodb-linux-x86_64-rhel80-4.4.1/pid/mongod.pid  # location of pidfile
  timeZoneInfo: /usr/share/zoneinfo
# network interfaces
net:
  port: 27017
  # 此时其他机器连不上本机,需要将127.0.0.1 替换成 0.0.0.0
  #bindIp: 127.0.0.1  # Enter 0.0.0.0,:: to bind to all IPv4 and IPv6 addresses or, alternatively, use the net.bindIpAll setting.
  bindIp: 0.0.0.0  # Enter 0.0.0.0,:: to bind to all IPv4 and IPv6 addresses or, alternatively, use the net.bindIpAll setting.

#security:
#operationProfiling:
#replication:
#sharding:
## Enterprise-Only Options
#auditLog:
#snmp:
启动:
# 方式一:
mongod --dbpath ../data/db --logpath ../log/mongod.log -fork
# 方式二([mongod | mongos] [-f | --config] mongod.conf):
mongod --config ../config/mongod.conf
连接:
mongo
关闭mongod
# 先连接MongoDB
mongo
# 关闭(第一种)
> use admin
switched to db admin
> db.shutdownServer()
server should be down...

# 关闭(第二种)
mongo --shutdown --dbpath ../data/db --logpath ../log/mongod.log
mongo --shutdown --config ../config/mongod.conf
如果一旦是因为数据损坏,则需要进行如下操作(了解):
1)删除lock文件:
find / -name mongod.lock
rm -rf mongod.lock
2)修复数据:
mongod –repair –dbpath=/mongodb/data/db
生成systemctl 服务
1)在/usr/lib/systemd/system 下创建一个mongod.service 文件,内容如下:
[Unit]
Description=Mongodb
Documentation=https://docs.mongodb.com/manual/
After=network.target remote-fs.target nss-lookup.target

[Service]
Type=forking
PIDFile=/apps/mongodb4.4/mongodb-linux-x86_64-rhel80-4.4.1/pid/mongod.pid
ExecStart=mongod --config /apps/mongodb4.4/mongodb-linux-x86_64-rhel80-4.4.1/config/mongod.conf
ExecReload=/bin/kill -s HUP $MAINPID
ExecStop=/apps/mongodb4.4/mongodb-linux-x86_64-rhel80-4.4.1/bin/mongod --shutdown --config /apps/mongodb4.4/mongodb-linux-x86_64-rhel80-4.4.1/config/mongod.conf
PrivateTmp=true
Restart=always
RestartSec=1 #1s后重启

[Install]
WantedBy=multi-user.target
2)服务使用命令
启动服务
systemctl start mongod.service
重启服务
systemctl restart mongod.service
关闭服务
systemctl stop mongod.service
开机启动
systemctl enable mongodb.service
yum 安装
1)配置包管理系统
Create a
/etc/yum.repos.d/mongodb-org-4.4.repofile so that you can install MongoDB directly usingyum:[mongodb-org-4.4]
name=MongoDB Repository
baseurl=https://repo.mongodb.org/yum/redhat/$releasever/mongodb-org/4.4/x86_64/
gpgcheck=1
enabled=1
gpgkey=https://www.mongodb.org/static/pgp/server-4.4.asc
# 将上面的内容复制进 mongodb-org-4.4.repo
[root@iZ2vc28obhvfh8zjqb9lc9Z apps]# vim /etc/yum.repos.d/mongodb-org-4.4.repo
2)安装MongoDB 包
需要执行下面的命令
sudo yum install -y mongodb-org
文档中提示了 以防系统自动升级MongoDB,将在配置文件 /etc/yum.conf 添加一条指令
You can specify any available version of MongoDB. However
yumupgrades the packages when a newer version becomes available. To prevent unintended upgrades, pin the package. To pin a package, add the followingexcludedirective to your/etc/yum.conffile:exclude=mongodb-org,mongodb-org-server,mongodb-org-shell,mongodb-org-mongos,mongodb-org-tools
文件路径
使用默认目录
默认情况下,MongoDB运行使用mongod用户帐户,并使用以下默认目录:
/var/lib/mongo(the data directory)/var/log/mongodb(the log directory)
配置文件 /etc/mongod.conf :
# where to write logging data.
systemLog:
  destination: file
  logAppend: true
  path: /var/log/mongodb/mongod.log

# Where and how to store data.
storage:
  dbPath: /var/lib/mongo
  journal:
    enabled: true
#  engine:
#  wiredTiger:

# how the process runs
processManagement:
  fork: true  # fork and run in background
  pidFilePath: /var/run/mongodb/mongod.pid  # location of pidfile
  timeZoneInfo: /usr/share/zoneinfo

# network interfaces
net:
  port: 27017
  # 此时其他机器连不上本机,需要将127.0.0.1 替换成 0.0.0.0
  bindIp: 127.0.0.1  # Enter 0.0.0.0,:: to bind to all IPv4 and IPv6 addresses or, alternatively, use the net.bindIpAll setting.

#security:
#operationProfiling:
#replication:
#sharding:
## Enterprise-Only Options
#auditLog:
#snmp:
由于我们使用的是yum 包管理安装的,所以会创建默认的目录,并将这些目录的所有者和组设置为mongod。
[root@iZ2vc28obhvfh8zjqb9lc9Z lib]# ll /var/lib/ | grep mongo
drwxr-xr-x   2 mongod         mongod            6 Sep  8 23:07 mongo
使用默认目录以外的数据目录和/或日志目录:
1.创建一个或多个新目录。
2.编辑配置文件/etc/mongod.conf,修改以下字段:
storage.dbPathto specify a new data directory path (e.g./some/data/directory)systemLog.pathto specify a new log file path (e.g./some/log/directory/mongod.log)确保运行MongoDB的用户能够访问一个或多个目录:
sudo chown -R mongod:mongod
如果是使用解压安装的,需要自己创建默认的MongoDB目录,创建MongoDB数据和日志目录:
sudo mkdir -p /var/lib/mongo
sudo mkdir -p /var/log/mongodb默认情况下,MongoDB运行使用mongod用户帐户。一旦创建,设置这些目录的所有者和组为mongod:
sudo chown -R mongod:mongod
初始化程序
1)启动MongoDB
sudo systemctl start mongod
2)验证MongoDB启动成功
sudo systemctl status mongod
3)设置开机自动启动
sudo systemctl enable mongod
4)停止MongoDB
sudo systemctl stop mongod
5)重启MongoDB
sudo systemctl restart mongod
您可以通过观察/var/log/mongodb/mongod.log文件中的输出来跟踪进程的错误或重要消息的状态。
6)连接MongoDB
在启动了MongoDB的主机上运行命令:
mongo
有关使用mongo shell连接的更多信息,例如连接到运行在不同主机和/或端口上的mongod实例,请参阅mongo shell。
为了帮助你开始使用MongoDB, MongoDB提供了各种驱动版本的入门指南。有关驱动程序文档,请参见Start development with MongoDB
For more information on connecting using the
mongoshell, such as to connect to amongodinstance running on a different host and/or port, see The mongo Shell.To help you start using MongoDB, MongoDB provides Getting Started Guides in various driver editions. For the driver documentation, see Start Developing with MongoDB.
Centos 卸载
1)Stop MongoDB
sudo service mongod stop
2)删除包
删除之前安装的所有MongoDB包。
sudo yum erase $(rpm -qa | grep mongodb-org)
3)删除数据目录
删除MongoDB数据库和日志文件。
sudo rm -r /var/log/mongodb
sudo rm -r /var/lib/mongo
Compass 客户端
下载安装
官网中,在 Software下拉选中选择 Compass,然后点击Try it now。
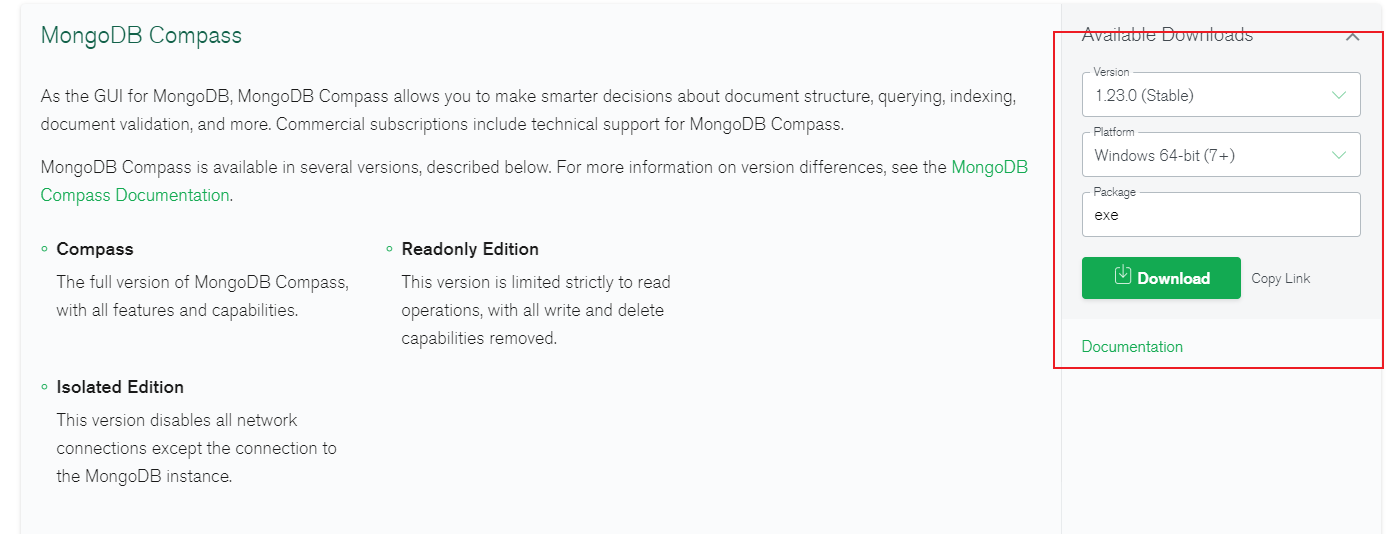
选择合适的版本的文件类型,然后点击download下载。
注意:
根据文档 https://docs.mongodb.com/compass/current/ 可以知道Compass 包含四个版本
1.Compass :MongoDB Compass的完整版本,具有所有功能。
2.Compass Readonly:严格限制读操作,删除所有写和删除功能。
3.Compass Isolated:除了Compass连接到的MongoDB服务器之外,不初始化任何网络请求。这个版本是为高度安全的环境设计的。
4.Compass Community:专为MongoDB开发而设计,包括Compass的一个子集功能。(此版本已被弃用。)
安装后的界面:
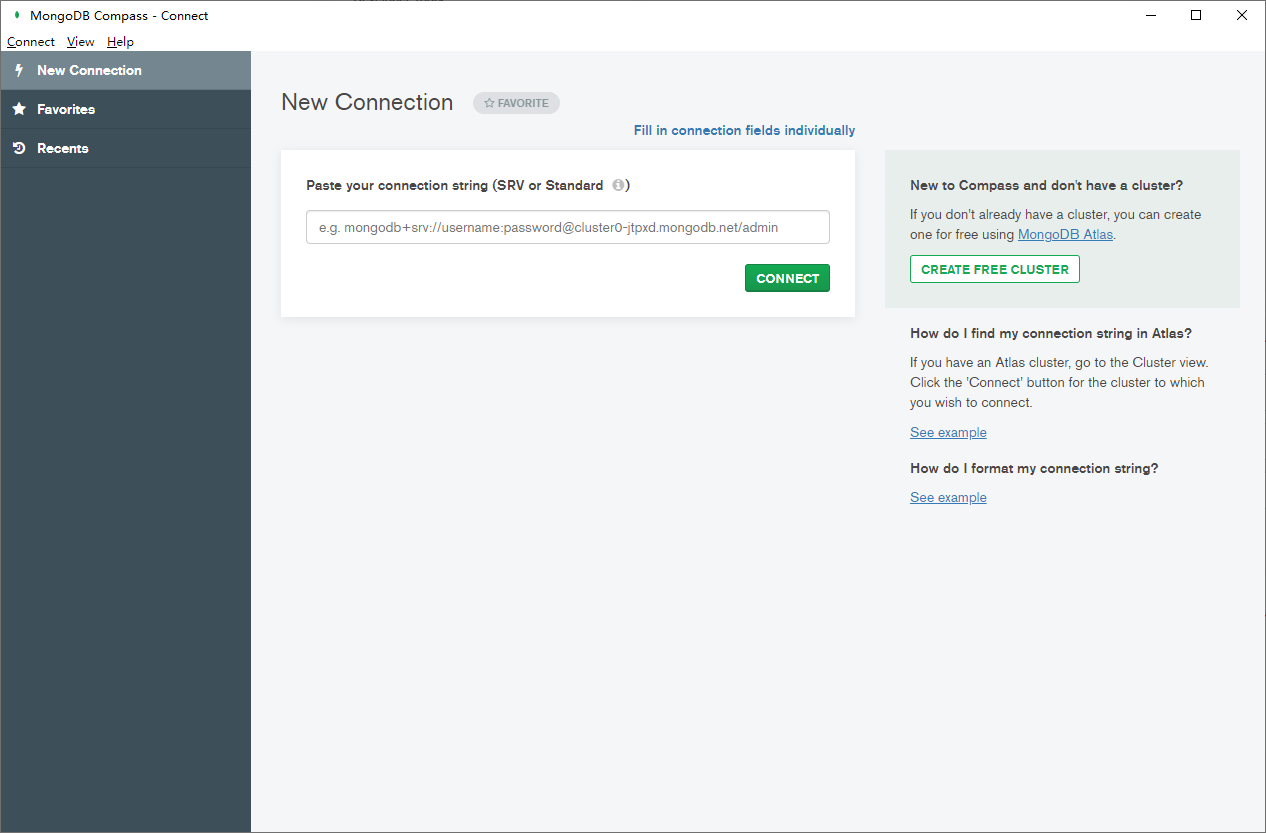
连接MongoDB
有两种方式,一种是使用字符串,另一种是填写连接的必填项(点击首页的 Fill in connection fields individually)
方式一(默认, Standard Connection String Format ):

例如:
mongodb://127.0.0.1:27017
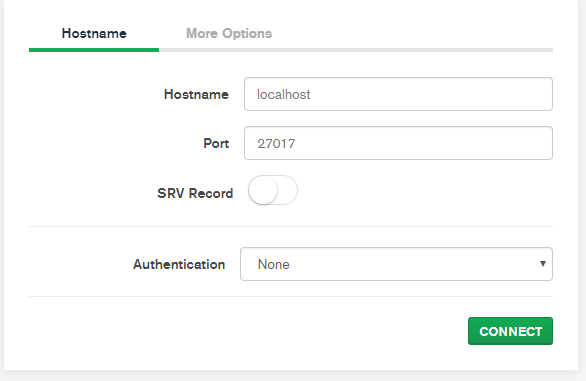
方式二:
版权声明:本文内容由互联网用户自发贡献,该文观点仅代表作者本人。本站仅提供信息存储空间服务,不拥有所有权,不承担相关法律责任。如发现本站有涉嫌侵权/违法违规的内容, 请发送邮件至 举报,一经查实,本站将立刻删除。
文章由极客之音整理,本文链接:https://www.bmabk.com/index.php/post/78277.html

