
一、Node的Web框架
1. web框架:是一个半成品,开发者只需要按要求传递数据,就可以生成一个web服务器
2. Express框架:是node开发web服务器的框架。小巧、灵活,可以帮助开发者快速的创建node web服务器。作用是:
(1)允许用户创建中间件响应http请求
(2)用户可以自己创建路由表执行http的方法
(3)允许在服务器端动态渲染参数传递给html页面
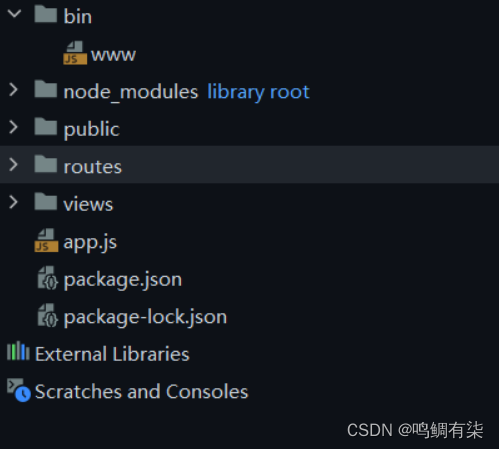
(1)bin/www文件:项目的启动文件,可以修改默认的端口号。在该文件中创建了http的服务器
(2)node_moudles文件夹:保存的支撑项目运行的模块
(3)public文件夹:存放的项目运行所用的静态文件(image、css、js)
(4)routes文件夹:存放的路由中间件文件(路由文件)
(5)views文件夹:存放的页面文件
(6)app.js文件:http服务器的配置文件。在此文件中对服务器进行配置
(7)package.json文件:项目的信息(项目的名称、版本号、启动指令、已安装的模块等)
二、webStorm中创建Express项目
(1)安装nodemon模块:监视服务器端程序是否修改,若修改了会自动重启
a、安装指令:npm install nodemon
b、在package.json修改以下配置:将node 改为nodemon
"scripts": {
    "start": "nodemon ./bin/www"
  }
(2)使用nodemon模块运行项目:npm start
npm uninstall 模块名 —— 卸载指定的模块
(1)路由中间件:是用来响应客户端的http请求的
(2)创建的步骤:
第一步:导入express模块
//1.导入Express模块
const express = require('express') 第二步:使用express模块创建路由器router
//2.使用express模块创建路由器
const router = express.Router() 第三步:创建响应模块
//3.创建响应模块:响应客户端请求的业务模块
//http://127.0.0.1:8093/employee/all
//响应客户端的get请求
router.get('/all',(req, res, next)=>{
//res是响应对象,作用是将服务器的响应信息发送给客户端
    res.send('<h2>白桦林</h2>')
}) 第四步:导出路由器router
//4.导出路由器
module.exports = router (3)响应客户端请求的业务模块:
get(path,callback)
参数path:是字符串,代表客户端请求时的地址
参数callback:回调函数
(4)响应对象res的常用方法:
res.send(参数):参数可以是字符串,也可以是json格式的对象。参数值会发送给客户端
res.send('<h2>白桦林</h2>') res.json({ }):参数是json格式的对象
(5)在app.js文件中对自定义的路由中间件进行配置
第一步:导入自定义的路由文件
var employeeRouter = require('./routes/employee'); //导入自定义的路由文件第二步:配置自定义的路由路径
app.use('/employee',employeeRouter); //配置自定义的路由路径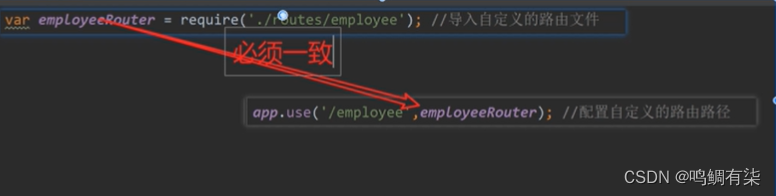
强调:路由路径的拼接:
http://127.0.0.1:8089/employee/all
(1)’/‘:表示服务器的根目录。当前服务器的根是http://127.0.0.1:8089
(2)拼接:http://127.0.0.1:8089 + app.js文件中配置的路径 + 路由文件中的路径
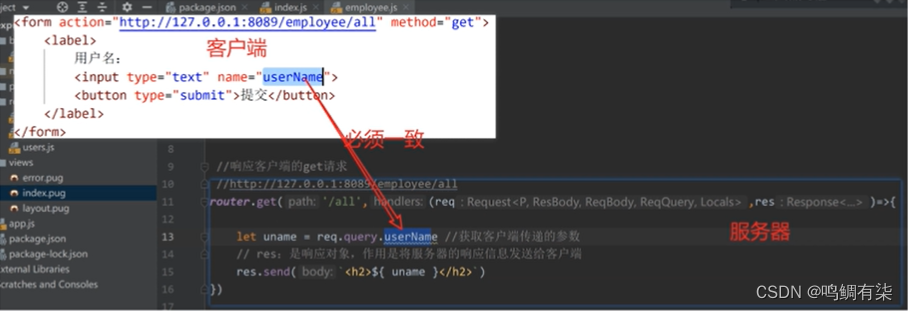
(1)客户端向服务器发送get请求同时向服务器传递参数
 <form action="http://127.0.0.1:8093/employee/all" method="get">
        <label>
            用户名:
            <input type="text" name="userName">
            密码:
            <input type="password" name="userPwd">
            <button type="submit">提交</button>
        </label>
    </form>
//1.导入express模块
const express = require('express')
//2.创建路由器
const router = express.Router()
//3.创建响应模块:响应客户端请求的业务模块
//http://127.0.0.1:8093/employee/all
//响应客户端的get请求
router.get('/all',(req, res, next)=>{
let uname = req.query.userName//获取客户端传递的参数
let pwd = req.query.userPwd
//res是响应对象,作用是将服务器的响应信息发送给客户端
res.send(`<h2>${uname} --- ${pwd}</h2>`)
})
//4.导出路由器
module.exports = router (2)在服务器端接收客户端用get方式发送的参数:
req.query.参数名 参数名与客户端的name名一致
(3)服务器端接收客户端用post方式发送的参数:
req.body.参数名
 <form action="http://127.0.0.1:8093/employee/post" method="post">
        <label>
            用户名:
            <input type="text" name="userName">
            密码:
            <input type="password" name="userPwd">
            <button type="submit">提交</button>
        </label>
    </form>
//1.导入express模块
const express = require('express')
//2.创建路由器
const router = express.Router()
//3.创建响应模块:响应客户端请求的业务模块
//http://127.0.0.1:8093/employee/post
//响应客户端的get请求
router.post('/post',(req, res, next)=>{
let uname = req.body.userName
let pwd = req.body.userPwd
res.send(`<h2>${uname} --- ${pwd}</h2>`)
})
//4.导出路由器
module.exports = router5、Express项目中的跨域设置:在服务器端进行跨域设置 —— cors方式
(1)在服务器端安装cors模块
npm install cors
(2)在app.js文件中进行跨域配置
//导入cors模块
var cors = require('cors');
//在app中应用cors模块
app.use(cors())jQuery中的ajax:
前端:
<body>
<label>
用户名:
<input type="text" name="userName" id="userName">
密码:
<input type="password" name="userPwd" id="userPwd">
<button type="submit" id="btn">提交</button>
<div id="msg"></div>
</label>
<script>
$(function () {
$('#btn').bind('click', function () {
$.ajax({
url: 'http://127.0.0.1:8093/employee/post',
type: 'post',
data: {
userName: $('#userName').val(),
userPwd: $('#userPwd').val()
},
dataType: 'text',
success: function (result) {
$('#msg').html(result)
}
})
})
})
</script>
</body>服务器端:
//1.导入express模块
const express = require('express')

//2.创建路由器
const router = express.Router()

//3.创建响应模块:响应客户端请求的业务模块
//http://127.0.0.1:8093/employee/post
//响应客户端的get请求
router.post('/post',(req, res, next)=>{
    let uname = req.body.userName
    let pwd = req.body.userPwd
    res.send(`<h2>${uname} --- ${pwd}</h2>`)
})
//4.导出路由器
module.exports = router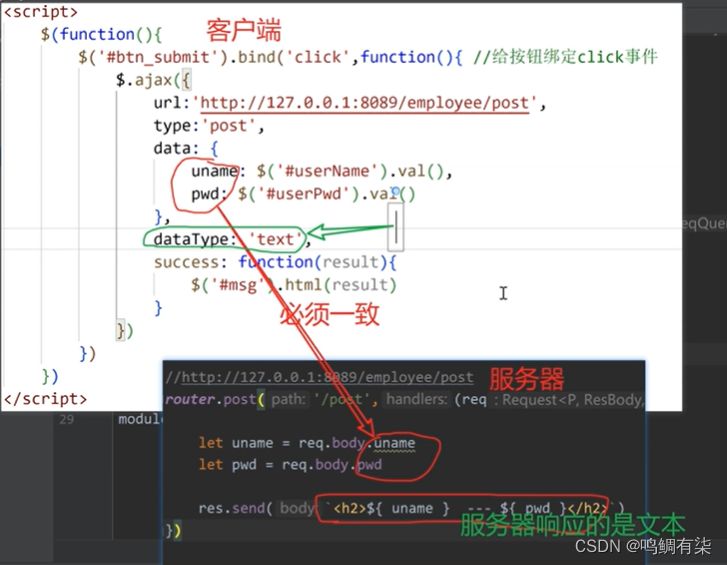
6、服务器向客户端响应json格式的数据
课堂练习:
服务器端:用数组保存了5个学生的信息,将保存学生信息的数组响应给客户端
客户端:使用jquery的ajax方法获取服务器响应的数据后显示在页面表格中
客户端不需要向服务器传递信息,所以不用post,使用get。
思路:
(1)在webStorm中新建项目文件夹,flie—>new—>project—>express—>location选择存放地址以及文件夹名称
(2)安装nodemon模块,在终端输入npm install nodemon —-> 在packjson文件的start一行,将node改为nodemon。
(3)安装cors跨域模块 npm install cors —> 在app.js文件中导入cors –>var cors = require(’cors’) 在app.js文件中使用cors —>app.use(cors( )) ,跨域使用必须写在路由配置之前。
(4)新建js文件写一个Student类,可以不用写方法(按需求来),写完之后通过module.exports = Student导出。
(5)写后端页面(新建一个js文件):
导入express模块 const express = require(‘express’)
创建路由器 const router = express.Router()
导入类的js文件 const Student = require(’文件名’) 这里导入的名与导出的名必须一致
创建服务器响应 router.get(path,(req,res,next)=>{ //path指自己定义的一个路径:/路径名
处理想要给客户端发送的信息
服务器响应给客户端的信息:res.send(JSON.stringify(arr))
})
导出路由文件 module.exports = router
(6)在app.js文件中定义路由器 var studentRouter = require(‘后端文件名’)
在app.js文件中使用路由文件 app.use(‘path’,studentRouter) path指自己定义的一个路径:/路径名
(7)在html中写利用jQuery的ajax写前端,url属性的地址是’http://127.0.0.1:端口号/app.js中使用express的path/express文件中router.get中的path’ 或者: http://localhost:8089/students/all 根地址可以是http;//localhost
需要注意的问题
(1)路由地址的拼接
(2)跨域模块的配置顺序必须在路由配置之前
(3)模块化:导入的名字和创建对象的名字必须一致,导出的名字可以和导入名字不一样。
前台
    <script src="./jquery-3.4.1.js"></script>
</head>
<body>
    <table border="1">
        <thead>
            <tr>
                <th>学号</th>
                <th>姓名</th>
                <th>HTML</th>
                <th>CSS</th>
                <th>nodejs</th>
            </tr>
        </thead>
        <tbody id="tbody"></tbody>
    </table>
    <script>
        $(function(){
            $.ajax({
                url:'http://127.0.0.1:3000/students/findAll',
                type:'get',
                dataType:'json',
                success:function(result){
                    for (let i of result) {
                        $('#tbody').append(`<tr align=center>
                            <td>${i.id}</td>
                            <td>${i.sname}</td>
                            <td>${i.html}</td>
                            <td>${i.css}</td>
                            <td>${i.nodejs}</td>
                            </tr>`)
                    }
                }
            })
        })
    </script>
</body>
后台
model/student.js
class Student{
    constructor(id,sname,html,css,nodejs) {
        this.id = id
        this.sname = sname
        this.html = html
        this.css = css
        this.nodejs = nodejs
    }
    show(){
        console.log('学号',this.id)
        console.log('姓名',this.sname)
        console.log('html',this.html)
        console.log('css',this.css)
        console.log('nodejs',this.nodejs)
    }
}
module.exports = Student
app.js中
//设置跨域
//导入cors模块
var cors = require('cors');
//使用cors模块
app.use(cors());

//导入自定义的路由文件Router
var studentRouter = require('./routes/stuRouter');

//配置自定义的路由路径
app.use('/students',studentRouter);
routes/stuRouter.js
var express = require('express');
var router = express.Router();

const Student = require('../model/student')

//http://127.0.0.1:3000/students/findAll
router.get('/findAll',(req, res) => {
    //定义数组
    let arr = [
        new Student(101,'aaa',67,78,89),
        new Student(102,'bbb',67,78,89),
        new Student(103,'ccc',67,78,89),
        new Student(104,'ddd',67,78,89),
        new Student(105,'eee',67,78,89)
    ]
    res.send(JSON.stringify(arr))
})

module.exports = router
版权声明:本文内容由互联网用户自发贡献,该文观点仅代表作者本人。本站仅提供信息存储空间服务,不拥有所有权,不承担相关法律责任。如发现本站有涉嫌侵权/违法违规的内容, 请发送邮件至 举报,一经查实,本站将立刻删除。
文章由极客之音整理,本文链接:https://www.bmabk.com/index.php/post/79762.html

