
【axios】第二部分 axios难点语法的理解和使用
文章目录
2. axios难点语法的理解和使用
2.1 axios配置对象详细说明
{
    // 请求的服务器 URL
    url: '/user',

    // 请求类型
    method: 'get', // 默认值

    // `baseURL` 将自动加在 `url` 前面,除非 `url` 是一个绝对 URL。
    // 它可以通过设置一个基本的url, 便于为 axios 实例的方法传递相对 URL
    baseURL: 'https://some-domain.com/api/',

    // `transformRequest` 允许在向服务器发送前,修改请求数据
    // 它只能用于 'PUT', 'POST' 和 'PATCH' 这几个请求方法
    // 数组中最后一个函数必须返回一个字符串, 一个Buffer实例,ArrayBuffer,FormData,或 Stream
    // 你可以修改请求头。
    transformRequest: [function (data, headers) {
      // 对发送的 data 进行任意转换处理

      return data;
    }],

    // `transformResponse` 在传递给 then/catch 前,允许修改响应数据
    transformResponse: [function (data) {
      // 对接收的 data 进行任意转换处理

      return data;
    }],

    // 自定义请求头
    headers: {'X-Requested-With': 'XMLHttpRequest'},

    // `params` 是与请求一起发送的 URL 参数
    // 必须是一个简单对象或 URLSearchParams 对象
    params: {
      id: '12345'
    },

    // `paramsSerializer`是可选方法,主要用于序列化`params`
    // (e.g. https://www.npmjs.com/package/qs, http://api.jquery.com/jquery.param/)
    paramsSerializer: function (params) {
      return Qs.stringify(params, {arrayFormat: 'brackets'})
    },

    // `data` 是作为请求体被发送的数据
    // 仅适用 'PUT', 'POST', 'DELETE 和 'PATCH' 请求方法
    // 在没有设置 `transformRequest` 时,则必须是以下类型之一:
    // - string, plain object, ArrayBuffer, ArrayBufferView, URLSearchParams
    // - 浏览器专属: FormData, File, Blob
    // - Node 专属: Stream, Buffer
    data: {
      firstName: 'Fred'
    },

    // 发送请求体数据的可选语法
    // 请求方式 post
    // 只有 value 会被发送,key 则不会
    data: 'Country=Brasil&City=Belo Horizonte',

    // `timeout` 指定请求超时的毫秒数。
    // 如果请求时间超过 `timeout` 的值,则请求会被中断
    timeout: 1000, // 默认值是 `0` (永不超时)

    // `withCredentials` 表示跨域请求时是否需要使用凭证
    withCredentials: false, // default

    // `adapter` 允许自定义处理请求,这使测试更加容易。
    // 返回一个 promise 并提供一个有效的响应 (参见 lib/adapters/README.md)。
    adapter: function (config) {
      /* ... */
    },

    // `auth` HTTP Basic Auth
    auth: {
      username: 'janedoe',
      password: 's00pers3cret'
    },

    // `responseType` 表示浏览器将要响应的数据类型
    // 选项包括: 'arraybuffer', 'document', 'json', 'text', 'stream'
    // 浏览器专属:'blob'
    responseType: 'json', // 默认值

    // `responseEncoding` 表示用于解码响应的编码 (Node.js 专属)
    // 注意:忽略 `responseType` 的值为 'stream',或者是客户端请求
    // Note: Ignored for `responseType` of 'stream' or client-side requests
    responseEncoding: 'utf8', // 默认值

    // `xsrfCookieName` 是 xsrf token 的值,被用作 cookie 的名称
    xsrfCookieName: 'XSRF-TOKEN', // 默认值

    // `xsrfHeaderName` 是带有 xsrf token 值的http 请求头名称
    xsrfHeaderName: 'X-XSRF-TOKEN', // 默认值

    // `onUploadProgress` 允许为上传处理进度事件
    // 浏览器专属
    onUploadProgress: function (progressEvent) {
      // 处理原生进度事件
    },

    // `onDownloadProgress` 允许为下载处理进度事件
    // 浏览器专属
    onDownloadProgress: function (progressEvent) {
      // 处理原生进度事件
    },

    // `maxContentLength` 定义了node.js中允许的HTTP响应内容的最大字节数
    maxContentLength: 2000,

    // `maxBodyLength`(仅Node)定义允许的http请求内容的最大字节数
    maxBodyLength: 2000,

    // `validateStatus` 定义了对于给定的 HTTP状态码是 resolve 还是 reject promise。
    // 如果 `validateStatus` 返回 `true` (或者设置为 `null` 或 `undefined`),
    // 则promise 将会 resolved,否则是 rejected。
    validateStatus: function (status) {
      return status >= 200 && status < 300; // 默认值
    },

    // `maxRedirects` 定义了在node.js中要遵循的最大重定向数。
    // 如果设置为0,则不会进行重定向
    maxRedirects: 5, // 默认值

    // `socketPath` 定义了在node.js中使用的UNIX套接字。
    // e.g. '/var/run/docker.sock' 发送请求到 docker 守护进程。
    // 只能指定 `socketPath` 或 `proxy` 。
    // 若都指定,这使用 `socketPath` 。
    socketPath: null, // default

    // `httpAgent` and `httpsAgent` define a custom agent to be used when performing http
    // and https requests, respectively, in node.js. This allows options to be added like
    // `keepAlive` that are not enabled by default.
    httpAgent: new http.Agent({ keepAlive: true }),
    httpsAgent: new https.Agent({ keepAlive: true }),

    // `proxy` 定义了代理服务器的主机名,端口和协议。
    // 您可以使用常规的`http_proxy` 和 `https_proxy` 环境变量。
    // 使用 `false` 可以禁用代理功能,同时环境变量也会被忽略。
    // `auth`表示应使用HTTP Basic auth连接到代理,并且提供凭据。
    // 这将设置一个 `Proxy-Authorization` 请求头,它会覆盖 `headers` 中已存在的自定义 `Proxy-Authorization` 请求头。
    // 如果代理服务器使用 HTTPS,则必须设置 protocol 为`https`
    proxy: {
      protocol: 'https',
      host: '127.0.0.1',
      port: 9000,
      auth: {
        username: 'mikeymike',
        password: 'rapunz3l'
      }
    },

    // see https://axios-http.com/zh/docs/cancellation
    cancelToken: new CancelToken(function (cancel) {
    }),

    decompress: true // 默认值

  }
2.2 axios的默认配置
 <h1>基本使用</h1>
    <hr>
    <button>GET请求</button>
    <button>POST请求</button>
    <button>PUT请求</button>
    <button>DELETE请求</button>
    <script>
        const btns = document.querySelectorAll('button')

        //默认配置
        axios.defaults.baseURL = 'http://localhost:3000' //设置基本url
        axios.defaults.method = 'GET' //设置请求类型
        axios.defaults.timeout = 3000 //如果3s内没有返回数据则停止请求

        btns[0].onclick = function(){
            axios({
                url:'/posts'
            }).then(response=>{
                console.log(response.data)
            })
        }
    </script>
2.3 创建实例对象发送请求
axios.create(config)
-
根据指定配置创建一个新的 axios, 也就是每个新 axios 都有自己的配置
-
新 axios 只是没有取消请求和批量发请求的方法, 其他所有语法都是一致的
-
为什么要设计这个语法?
-
需求: 项目中有部分接口需要的配置与另一部分接口需要的配置不太一样
-
解决: 创建 2 个新 axios, 每个都有自己特有的配置, 分别应用到不同要求的接口请求中
<button>GET请求</button> <script> const btn = document.querySelector('button') btn.onclick = function () { // 需求:分别向3000端口和4000端口发送请求 // 创建实例对象 const message1 = axios.create({ baseURL: 'http://localhost:3000', timeout: 3000 }) const messsage2 = axios.create({ baseURL: 'http://localhost:4000', timeout: 3000 }) // 函数的形式发送请求 message1({ url: '/xxx' }).then(response => { console.log(response) }) // 对象的形式发送请求 message1.get('/xxx').then(response => { console.log(response) }) // 函数的形式发送请求 message2({ url: '/xxx' }).then(response => { console.log(response) }) // 对象的形式发送请求 message2.get('/xxx').then(response => { console.log(response) }) } </script> -
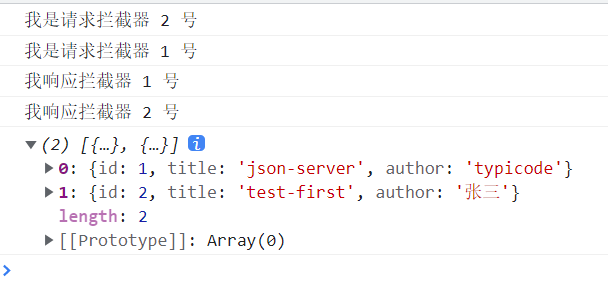
2.4 拦截器函数
 <button>GET请求</button>
    <script>
        const btn = document.querySelector('button')

        // 设置请求拦截器
        axios.interceptors.request.use(config=>{
            console.log('我是请求拦截器 1 号')
            // 在这里可以修改config中的参数
            config.timeout = 3000
            return config
        },error=>{
            return Promise.reject(error)
        })

        // 设置请求拦截器
        axios.interceptors.request.use(config=>{
            console.log('我是请求拦截器 2 号')
            // 在这里可以修改config中的参数
            config.timeout = 3000
            return config
        },error=>{
            return Promise.reject(error)
        })

        // 设置响应拦截器
        axios.interceptors.response.use(response=>{
            console.log('我响应拦截器 1 号')
            //在这里可以对response进行处理
            return response
        },error=>{
            return Promise.reject(error)
        })

        // 设置响应拦截器
        axios.interceptors.response.use(response=>{
            console.log('我响应拦截器 2 号')
            //在这里可以对response进行处理
            return response.data
        },error=>{
            return Promise.reject(error)
        })


        btn.onclick = function(){
            axios({
                method:"GET",
                url:'http://localhost:3000/posts'
            }).then(response=>{
                console.log(response)
            }).catch(reason=>{
                console.log(reason)
            })
        }
    </script>
在这里需要注意的是请求的回调函数的调用顺序,原理后面分析源码的时候会说,先知道
2.5 axios取消请求
 <button>GET请求</button>
        <button>取消请求</button>
        <script>
            /*
                取消请求:
                    1. 定义一个全局变量用于保存 取消当前请求的函数
                    2. cancelToken:new axios.CancelToken(function(c){})
                    3. 将c的值赋给cancel
            */
           /*
                当我们发现如果连续点击发送请求会导致服务器压力很大,例如抢购的时候
                苏所以我们需要解决该问题
           */
            let cancel = null
            const btns = document.querySelectorAll('button')

            btns[0].onclick = function(){
                // 判断当前是否还有未执行完的请求
                if(cancel !== null)
                {
                    cancel()
                }
                axios({
                    method:'GET',
                    url:'http://localhost:3000/posts',
                    //添加配置
                    cancelToken: new axios.CancelToken(function(c){
                        // c代表:用于取消当前请求的函数
                        // 将c的值赋给cancel
                        cancel = c
                    })
                }).then(response=>{
                    console.log(response.data)
                    // 请求完成后将cancel清空
                    cancel = null
                })
            }

            btns[1].onclick = function(){
                //调用cancle
                cancel()
            }
        </script>
总结
以上就是今天要讲的内容,希望对大家有所帮助!!!
版权声明:本文内容由互联网用户自发贡献,该文观点仅代表作者本人。本站仅提供信息存储空间服务,不拥有所有权,不承担相关法律责任。如发现本站有涉嫌侵权/违法违规的内容, 请发送邮件至 举报,一经查实,本站将立刻删除。
文章由极客之音整理,本文链接:https://www.bmabk.com/index.php/post/82907.html

