
Spring框架
目录
一、IOC
pom.xml
<?xml version="1.0" encoding="UTF-8"?>
<project xmlns="http://maven.apache.org/POM/4.0.0"
         xmlns:xsi="http://www.w3.org/2001/XMLSchema-instance"
         xsi:schemaLocation="http://maven.apache.org/POM/4.0.0 http://maven.apache.org/xsd/maven-4.0.0.xsd">
    <modelVersion>4.0.0</modelVersion>

    <groupId>com.bjpowernode</groupId>
    <artifactId>02_IOCProject</artifactId>
    <version>1.0.0</version>

    <properties>
        <project.build.sourceEncoding>UTF-8</project.build.sourceEncoding>
        <maven.compiler.source>1.8</maven.compiler.source>
        <maven.compiler.target>1.8</maven.compiler.target>
    </properties>

    <dependencies>
        <dependency>
            <groupId>org.springframework</groupId>
            <artifactId>spring-context</artifactId>
            <version>5.3.18</version>
        </dependency>
        <dependency>
            <groupId>junit</groupId>
            <artifactId>junit</artifactId>
            <version>4.12</version>
            <scope>test</scope>
        </dependency>
    </dependencies>

</project>
com.bjpowernode.domain包下
User,java
package com.bjpowernode.domain;

public class User {
    private Long id;
    private String name;
    private Integer age;

    public Long getId() {
        return id;
    }

    public void setId(Long id) {
        this.id = id;
    }

    public String getName() {
        return name;
    }

    public void setName(String name) {
        this.name = name;
    }

    public Integer getAge() {
        return age;
    }

    public void setAge(Integer age) {
        this.age = age;
    }
}
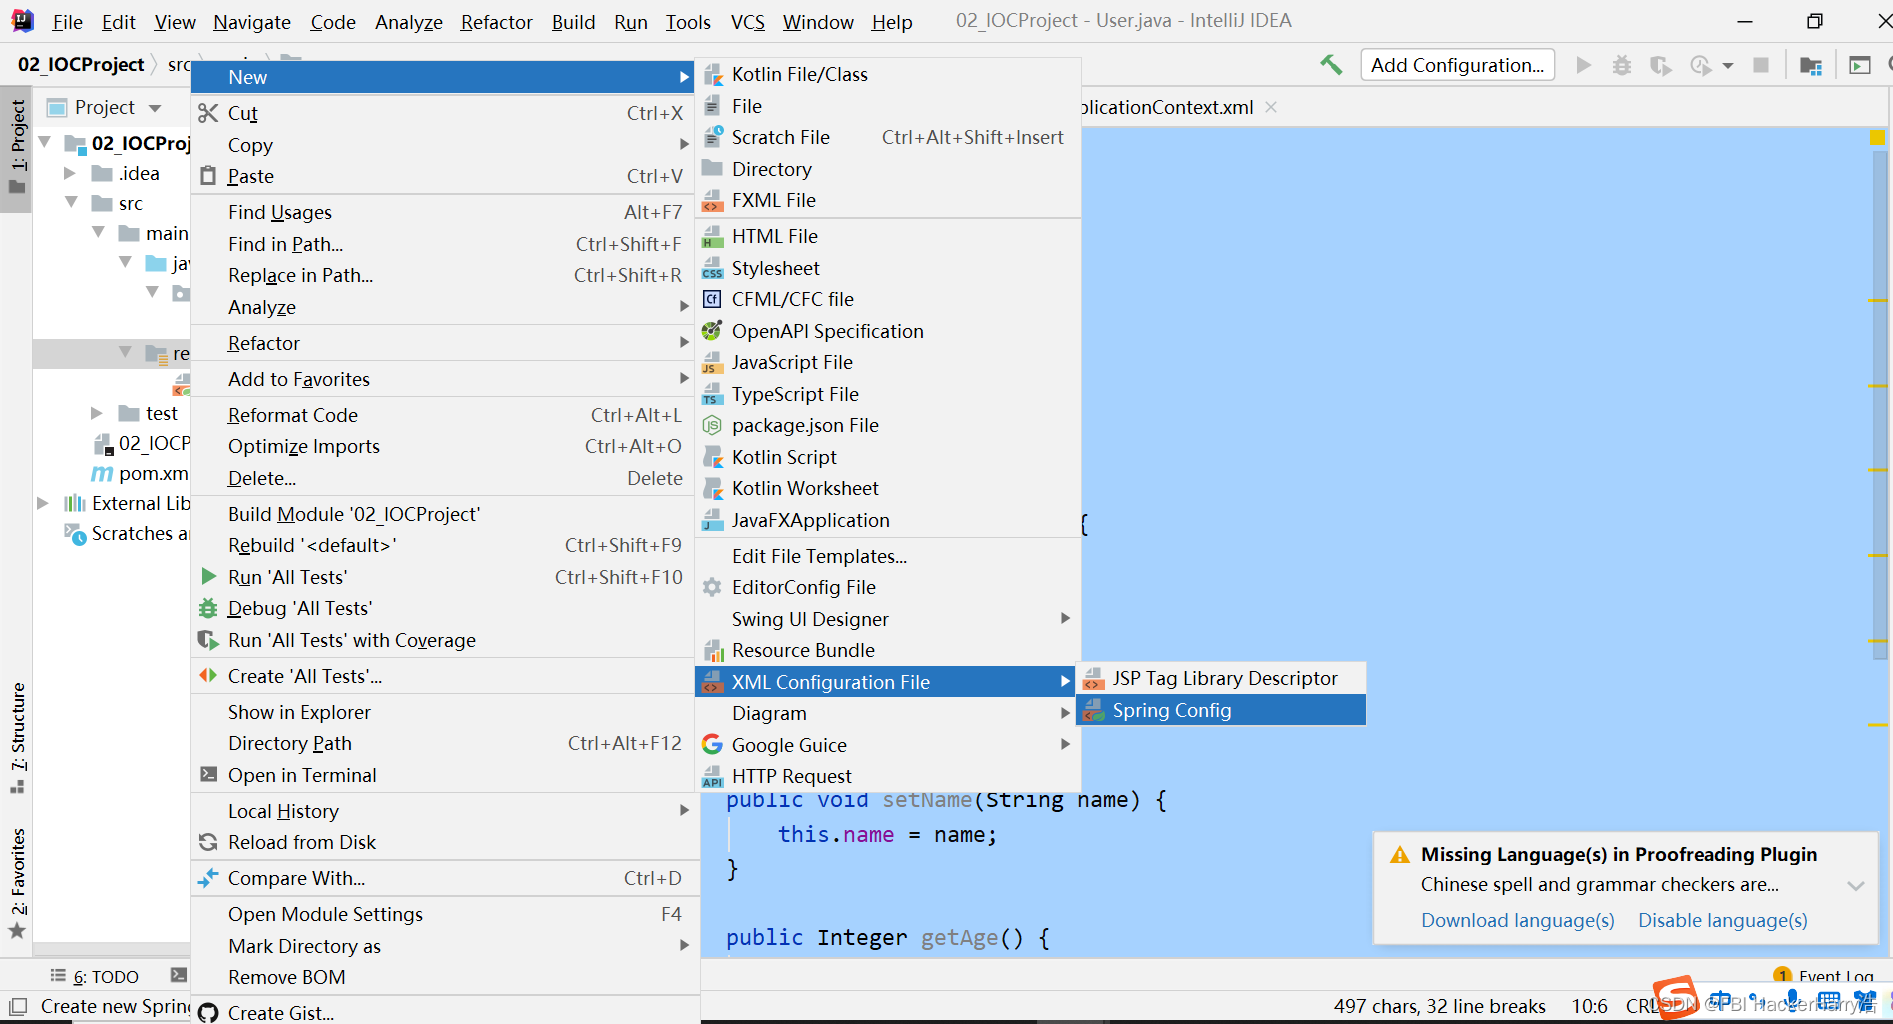
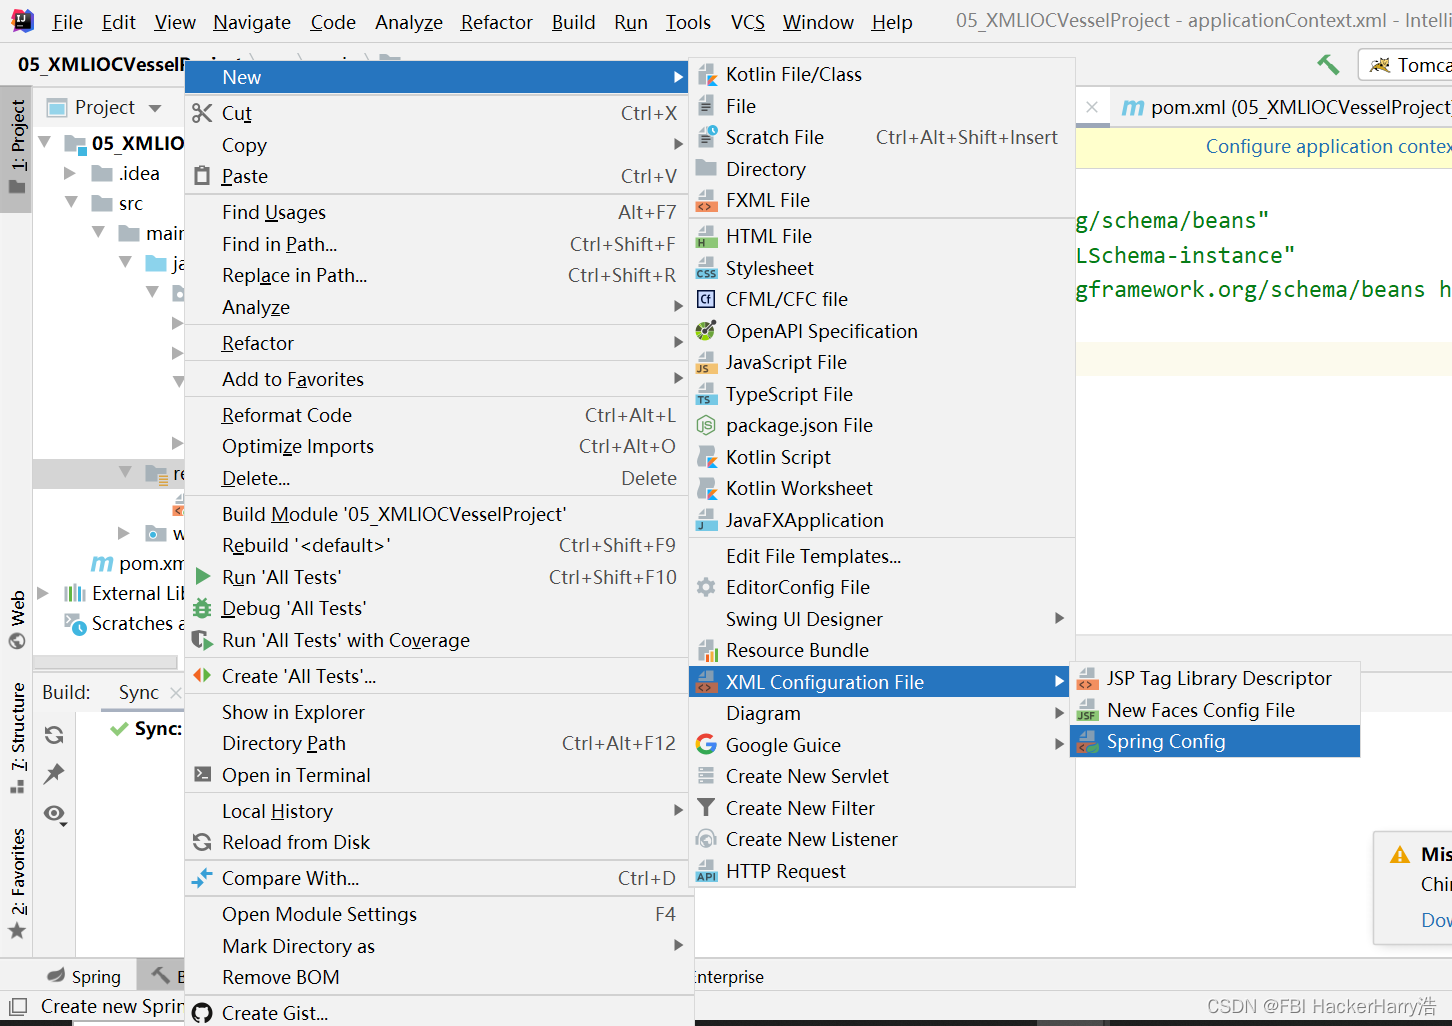
resources资源文件夹下
右击New->XML Configuration File->Spring config
命名为applicationContext
applicationContext.xml
<?xml version="1.0" encoding="UTF-8"?>
<beans xmlns="http://www.springframework.org/schema/beans"
       xmlns:xsi="http://www.w3.org/2001/XMLSchema-instance"
       xsi:schemaLocation="http://www.springframework.org/schema/beans http://www.springframework.org/schema/beans/spring-beans.xsd">

    <!--  配置要交给spring管理的类的信息
     class属性:配置类的全限定名
     -->
    <bean class="com.bjpowernode.domain.User"></bean>
</beans>
测试类
   @Test
    public void testIOC(){
        // 获取spring容器
        ClassPathXmlApplicationContext classPathXmlApplicationContext = new ClassPathXmlApplicationContext("applicationContext.xml");
        // 从spring容器中获取bean对象
        User bean = classPathXmlApplicationContext.getBean(User.class);
        System.out.println(bean);
    }
1 Bean标签属性介绍
1.1 id
是 bean的唯一标识 一个bean,其id 值只能有一个 。整个IOC 容器id 值不允许重复,使用名称作为key。
1.2 name
一个bean的名称,可以存在多个,多个之间使用逗号分隔。不论bean有没有定义name属性,默认id都会当做name。
1.3 class
bean的具体的类型,包名和类名组成。
1.4 scope
bean的作用域
prototype :非单例,每次获取都会创建一个新的bean对象。
singleton : 单例,多次获取永远同一个bean, 默认值。
request : 一次请求,基于web项目的bean的作用域。
session : 一次会话,基于web项目的bean的作用域。
1.5 lazy-init
延迟初始化,默认只要加载了配置文件。bean对象就会被初始化,lazy-init则是获取时才会初始化。只针对单例模式有效,非单例每次获取都会创建,没有延迟初始化的意义
1.6 depends-on
初始化时依赖的对象,当前对象初始化前需先初始化depends-on指定的对象
1.7 init-method
对象初始化后,调用的方法
1.8 destroy-method
对象销毁时,调用的方法
1.9 autowire
属性自动装配
byName 根据属性名称装配
byType 根据类型装配
1.10 autowire-candidate
是否允许作为自动装配的候选项
true 作为自动装配的候选项
false 不作为自动装配的候选项
1.11 primary
优先使用该bean,因为Spring需要支持使用类型查找对象,在一个大类型下,可能存在多个小类型。如果根据大类型装配属性时,不知道使用哪个具体的对象,则可以根据primary设置优先级。
2、Bean对象创建的4种方式
2.1 构造方法(反射)创建
使用构造方法(反射)创建bean对象,是spring默认的创建方式。
applicationContext.xml
  <!--创建对象的方式一:通过构造器创建-->
    <bean class="com.bjpowernode.domain.User"></bean>
测试类
    @Test
    public void createBean() {
//        ClassPathXmlApplicationContext classPathXmlApplicationContext = new ClassPathXmlApplicationContext("applicationContext.xml");
        ApplicationContext applicationContext = new ClassPathXmlApplicationContext("applicationContext.xml");
        User user = applicationContext.getBean(User.class);
        System.out.println("user = " + user);
    }
2.2 静态工厂创建
applicationContext.xml
 <!--  创建对象的方式二:通过静态工厂创建 特点:工厂对象不会产生 -->
    <bean class="com.bjpowernode.domain.MyBeanFactory" factory-method="getBean"/>
静态工厂类
package com.bjpowernode.domain;

public class MyBeanFactory {

    public MyBeanFactory(){
        System.out.println("create MyBeanFactory");
    }

    public static  Object getBean(){
        return new User();
    }
}
2.3 非静态工厂创建
applicationContext.xml
   <!-- 创建对象的方式三:通过非静态工厂创建  特点:工厂对象会产生 -->
    <bean id="nonStatic" class="com.bjpowernode.domain.MyNonStaticBeanFactory"></bean>
    <bean factory-bean="nonStatic" factory-method="getBean"/>
package com.bjpowernode.domain;

public class MyNonStaticBeanFactory {

    public MyNonStaticBeanFactory(){
        System.out.println("create MyNonStaticBeanFactory");
    }

    public Object getBean(){
        return new User();
    }
}
2.4 通过注解创建
2.4.1 @Component注解
@Component 表示该类为一个被Spring管理的组件。但是,由于在开发中为了让代码的可读性更高。
Spring基于分层思想,将需要创建的组件分为以下几类:
2.4.2 @Controller注解
@Controller注解,标识该类是controller层的类。并且,注意在使用SpringMVC时,所有的Constroller,必须使用@Controller注解。
2.4.3 @Service注解
@Service注解,标识该类是业务层的类。
2.4.4 @Respository注解
@Respository注解,标识该类是操作数据层的类。
注意:
以上注解是Spring中定义的创建对象的注解,都可以创建对象,如果该类有明确的作用,有自己所属的层,则建议使用相应的注解,如果实在无法区分该类所属层,可以使用@Component注解。
applicationContext.xml
   <!-- 创建对象的方式四:通过注解    -->
    <!-- 扫描器
    负责扫描指定包以及子包中的贴有注解 @Controller,@Service, @Component,@Repository的类
    ,并把他们交给spring容器管理-->
    <context:component-scan base-package="com.bjpowernode.domain"/>
给User贴上@Component注解
package com.bjpowernode.domain;

import org.springframework.stereotype.Component;

@Component
public class User {

}
3. IOC属性注入的3种方式
3.1 构造方法属性注入
com.bjpowernode.domain包
User.java
package com.bjpowernode.domain;

import org.springframework.stereotype.Component;

import java.math.BigDecimal;


public class User {
    private Long id;
    private String name;
    private Integer age;
    private BigDecimal salary;

    public User(){

    }

    public User(Long id, String name, Integer age, BigDecimal salary) {
        this.id = id;
        this.name = name;
        this.age = age;
        this.salary = salary;
    }

    @Override
    public String toString() {
        return "User{" +
                "id=" + id +
                ", name='" + name + '\'' +
                ", age=" + age +
                ", salary=" + salary +
                '}';
    }
}
applicationContext.xml
<?xml version="1.0" encoding="UTF-8"?>
<beans xmlns="http://www.springframework.org/schema/beans"
       xmlns:xsi="http://www.w3.org/2001/XMLSchema-instance"
       xmlns:context="http://www.springframework.org/schema/context"
       xsi:schemaLocation="http://www.springframework.org/schema/beans http://www.springframework.org/schema/beans/spring-beans.xsd http://www.springframework.org/schema/context https://www.springframework.org/schema/context/spring-context.xsd">

    <!--构造器赋值 缺点:通过索引 容易错乱赋值-->
    <bean class="com.bjpowernode.domain.User">
        <constructor-arg index="0" value="1"/>
        <constructor-arg index="1" value="tony"/>
        <constructor-arg index="3" value="9999"/>
        <constructor-arg index="2" value="12"/>
    </bean>

</beans>
测试类
    @Test
    public void createBean() {
//        ClassPathXmlApplicationContext classPathXmlApplicationContext = new ClassPathXmlApplicationContext("applicationContext.xml");
        ApplicationContext applicationContext = new ClassPathXmlApplicationContext("applicationContext.xml");
        User user = applicationContext.getBean(User.class);
        System.out.println("user = " + user);
    }
运行效果

改进版
applicationContext.xml
<!-- 优化:通过属性名称 + 类型 赋值 -->
<bean class="com.bjpowernode.domain.User">
    <constructor-arg name="id" value="1" type="java.lang.Long"/>
    <constructor-arg name="name" value="tony" type="java.lang.String"/>
    <constructor-arg name="age" value="12" type="java.lang.Integer"/>
    <constructor-arg name="salary" value="9999" type="java.math.BigDecimal"/>
</bean>
3.2 set方法属性注入
com.bjpowernode.domain
User.java
删除无参构造和全参构造,增加setter方法
package com.bjpowernode.domain;

import org.springframework.stereotype.Component;

import java.math.BigDecimal;


public class User {
    private Long id;
    private String name;
    private Integer age;
    private BigDecimal salary;

//    public User(){
//
//    }
//
//    public User(Long id, String name, Integer age, BigDecimal salary) {
//        this.id = id;
//        this.name = name;
//        this.age = age;
//        this.salary = salary;
//    }


    public void setId(Long id) {
        this.id = id;
    }

    public void setName(String name) {
        this.name = name;
    }

    public void setAge(Integer age) {
        this.age = age;
    }

    public void setSalary(BigDecimal salary) {
        this.salary = salary;
    }

    @Override
    public String toString() {
        return "User{" +
                "id=" + id +
                ", name='" + name + '\'' +
                ", age=" + age +
                ", salary=" + salary +
                '}';
    }
}
applicationContext.xml
  <!--setter方法赋值 前提必须提供标准的setter方法-->
    <bean class="com.bjpowernode.domain.User">
        <property name="id" value="1"/>
        <property name="name" value="lili"/>
    </bean>
运行结果

3.3 注解属性注入
applicationContext.xml
<context:component-scan base-package="com.bjpowernode.domain"/>
com.bjpowernode.domain
User.java
@Autowired注解
package com.bjpowernode.domain;

import org.springframework.beans.factory.annotation.Autowired;
import org.springframework.beans.factory.annotation.Value;
import org.springframework.stereotype.Component;


import java.math.BigDecimal;


@Component
public class User {
    private Long id;

//    private String name="小雪";
    @Value("小雪")
    private String name;
    private Integer age=23;
    private BigDecimal salary = BigDecimal.ONE;

   @Autowired // 自动装配(去spring容器中,寻找book对象 )
    private Book book;

    public Book getBook() {
        return book;
    }

    public void setBook(Book book) {
        this.book = book;
    }


    @Override
    public String toString() {
        return "User{" +
                "id=" + id +
                ", name='" + name + '\'' +
                ", age=" + age +
                ", salary=" + salary +
                ", book=" + book +
                '}';
    }
}
Book.java
package com.bjpowernode.domain;

import org.springframework.stereotype.Component;

import java.math.BigDecimal;

@Component
public class Book {
    private Long id = 1L;
    private String name = "java编程思想";
    private BigDecimal price=BigDecimal.TEN;

    public Long getId() {
        return id;
    }

    public void setId(Long id) {
        this.id = id;
    }

    public String getName() {
        return name;
    }

    public void setName(String name) {
        this.name = name;
    }

    public BigDecimal getPrice() {
        return price;
    }

    public void setPrice(BigDecimal price) {
        this.price = price;
    }

    @Override
    public String toString() {
        return "Book{" +
                "id=" + id +
                ", name='" + name + '\'' +
                ", price=" + price +
                '}';
    }
}
运行结果

4.常见类型的属性注入
com.bjpowernode.domain
Dream.java
package com.bjpowernode.domain;

public class Dream {

    private String title;

    public String getTitle() {
        return title;
    }

    public void setTitle(String title) {
        this.title = title;
    }

    @Override
    public String toString() {
        return "Dream{" +
                "title='" + title + '\'' +
                '}';
    }
}
Person,java
package com.bjpowernode.domain;

import java.util.*;

public class Person {

    private Integer id;

    private String name;

    private boolean sex;// true  男 false 女

    private String[] likes;//爱好

    private Set<String> girlFriends; //女朋友

    private List<Dream> dreams;//梦想

    private Map<String,String> house; //房子

    private Properties properties; //配置文件属性

    public Integer getId() {
        return id;
    }

    public void setId(Integer id) {
        this.id = id;
    }

    public String getName() {
        return name;
    }

    public void setName(String name) {
        this.name = name;
    }

    public boolean getSex() {
        return sex;
    }

    public void setSex(boolean sex) {
        this.sex = sex;
    }

    public String[] getLikes() {
        return likes;
    }

    public void setLikes(String[] likes) {
        this.likes = likes;
    }

    public Set<String> getGirlFriends() {
        return girlFriends;
    }

    public void setGirlFriends(Set<String> girlFriends) {
        this.girlFriends = girlFriends;
    }

    public List<Dream> getDreams() {
        return dreams;
    }

    public void setDreams(List<Dream> dreams) {
        this.dreams = dreams;
    }

    public Map<String, String> getHouse() {
        return house;
    }

    public void setHouse(Map<String, String> house) {
        this.house = house;
    }

    public Properties getProperties() {
        return properties;
    }

    public void setProperties(Properties properties) {
        this.properties = properties;
    }

    @Override
    public String toString() {
        return "Person{" +
                "id=" + id +
                ", name='" + name + '\'' +
                ", sex=" + sex +
                ", likes=" + Arrays.toString(likes) +
                ", girlFriends=" + girlFriends +
                ", dreams=" + dreams +
                ", house=" + house +
                ", properties=" + properties +
                '}';
    }
}
applicationContext.xml
<?xml version="1.0" encoding="UTF-8"?>
<beans xmlns="http://www.springframework.org/schema/beans"
       xmlns:xsi="http://www.w3.org/2001/XMLSchema-instance"
       xmlns:context="http://www.springframework.org/schema/context"
       xsi:schemaLocation="http://www.springframework.org/schema/beans http://www.springframework.org/schema/beans/spring-beans.xsd http://www.springframework.org/schema/context https://www.springframework.org/schema/context/spring-context.xsd">

    <bean class="com.bjpowernode.domain.Person">
        <property name="id" value="11"/>
        <property name="name" value="tony"/>
        <property name="sex" value="1"/>
        <property name="likes">
            <array>
                <value>girl</value>
                <value>money</value>
                <value>women</value>
                <value>java</value>
            </array>
        </property>
        <property name="girlFriends">
            <set>
                <value>lili</value>
                <value>lucy</value>
                <value>hani</value>
            </set>
        </property>
        <property name="dreams">
            <list>
                <bean class="com.bjpowernode.domain.Dream">
                    <property name="title" value="中国梦"/>
                </bean>
                <bean class="com.bjpowernode.domain.Dream">
                    <property name="title" value="航天梦"/>
                </bean>
            </list>
        </property>
        <property name="house">
            <map>
                <entry key="k1" value="v1"></entry>
                <entry key="k2" value="v2"></entry>
                <entry key="k3" value="v3"></entry>
            </map>
        </property>
        <property name="properties">
            <props>
                <prop key="url">jdbc:mysql:///test</prop>
            </props>
        </property>
    </bean>

</beans>
5.使用IOC容器,改造传统项目
5.1 xml配置版
pom.xml添加依赖
  <dependency>
      <groupId>org.springframework</groupId>
      <artifactId>spring-context</artifactId>
      <version>5.3.19</version>
    </dependency>
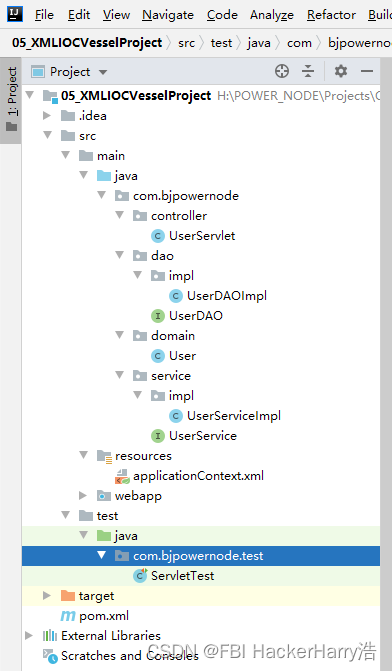
项目结构
resources文件夹
配置文件
<?xml version="1.0" encoding="UTF-8"?>
<beans xmlns="http://www.springframework.org/schema/beans"
       xmlns:xsi="http://www.w3.org/2001/XMLSchema-instance"
       xsi:schemaLocation="http://www.springframework.org/schema/beans http://www.springframework.org/schema/beans/spring-beans.xsd">

    <!--DAO-->
    <bean id="userDAO" class="com.bjpowernode.dao.impl.UserDAOImpl"/>
    <!--service-->
    <bean id="userService" class="com.bjpowernode.service.impl.UserServiceImpl">
        <property name="userDAO" ref="userDAO"/>
    </bean>
    <!--controller-->
    <bean class="com.bjpowernode.controller.UserServlet">
        <property name="userService" ref="userService"/>
    </bean>
</beans>
Controller层
package com.bjpowernode.controller;

import com.alibaba.fastjson.JSON;
import com.bjpowernode.jdk.proxy.User;

import com.bjpowernode.service.UserService;

import javax.servlet.ServletException;
import javax.servlet.annotation.WebServlet;
import javax.servlet.http.HttpServlet;
import javax.servlet.http.HttpServletRequest;
import javax.servlet.http.HttpServletResponse;
import java.io.IOException;
import java.io.PrintWriter;
import java.util.List;


public class UserServlet  {

    private UserService userService;

    public void setUserService(UserService userService) {
        this.userService = userService;
    }

    public List<User> getAllUsers(){
        return userService.selectAll();
    }
}
Service层
package com.bjpowernode.service;

import com.bjpowernode.jdk.proxy.User;

import java.util.List;

public interface UserService {

    List<User> selectAll();
}
Service层实现类
package com.bjpowernode.service.impl;

import com.bjpowernode.dao.UserDAO;
import com.bjpowernode.dao.impl.UserDAOImpl;
import com.bjpowernode.jdk.proxy.User;
import com.bjpowernode.service.UserService;

import java.util.List;

public class UserServiceImpl implements UserService {

    private UserDAO userDAO;

    public void setUserDAO(UserDAO userDAO) {
        this.userDAO = userDAO;
    }

    @Override
    public List<User> selectAll() {
        return userDAO.listAll();
    }
}
DAO层
package com.bjpowernode.dao;

import com.bjpowernode.jdk.proxy.User;

import java.util.List;

public interface UserDAO {

    List<User> listAll();

}
DAO层实现类
package com.bjpowernode.dao.impl;

import com.bjpowernode.dao.UserDAO;
import com.bjpowernode.jdk.proxy.User;

import java.util.ArrayList;
import java.util.List;

public class UserDAOImpl implements UserDAO {
    @Override
    public List<User> listAll() {
        User user = new User();
        user.setId(1L);
        user.setName("lili");
        User user1 = new User();
        user1.setId(2L);
        user1.setName("tony");
        List<User> list = new ArrayList();
        list.add(user);
        list.add(user1);
        return list;
    }
}
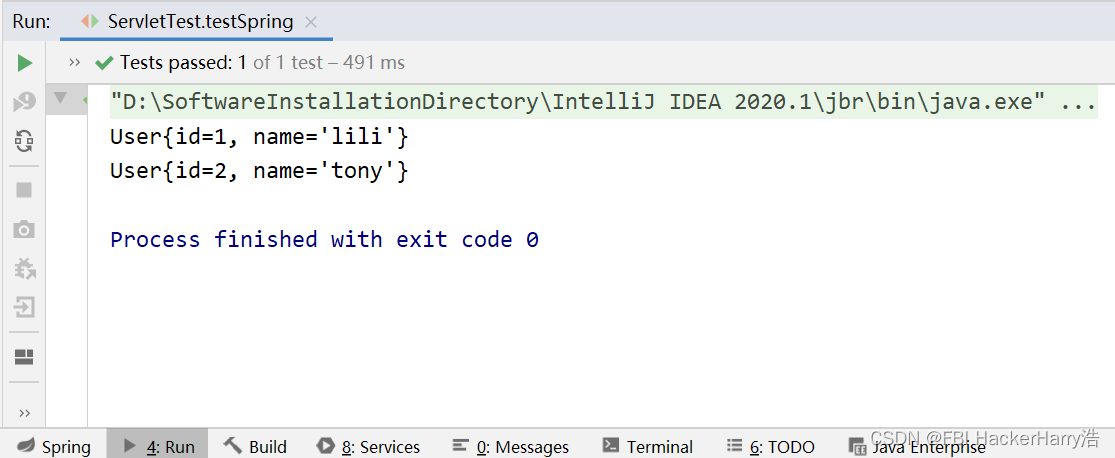
测试类
   @Test
    public void testSpring(){
        ApplicationContext applicationContext = new ClassPathXmlApplicationContext("applicationContext.xml");
        UserServlet userServlet = applicationContext.getBean(UserServlet.class);
        List<User> users = userServlet.getAllUsers();
        users.forEach(System.out::println);
    }
5.2 注解版
配置文件
<?xml version="1.0" encoding="UTF-8"?>
<beans xmlns="http://www.springframework.org/schema/beans"
       xmlns:xsi="http://www.w3.org/2001/XMLSchema-instance"
       xmlns:context="http://www.springframework.org/schema/context"
       xsi:schemaLocation="http://www.springframework.org/schema/beans http://www.springframework.org/schema/beans/spring-beans.xsd http://www.springframework.org/schema/context https://www.springframework.org/schema/context/spring-context.xsd">

    <!-- ioc 注解扫描器 -->
    <context:component-scan base-package="com.bjpowernode"></context:component-scan>
</beans>
Controller层
package com.bjpowernode.controller;

import com.alibaba.fastjson.JSON;
import com.bjpowernode.jdk.proxy.User;

import com.bjpowernode.service.UserService;
import org.springframework.beans.factory.annotation.Autowired;
import org.springframework.stereotype.Controller;

import javax.servlet.ServletException;
import javax.servlet.annotation.WebServlet;
import javax.servlet.http.HttpServlet;
import javax.servlet.http.HttpServletRequest;
import javax.servlet.http.HttpServletResponse;
import java.io.IOException;
import java.io.PrintWriter;
import java.util.List;

@Controller
public class UserServlet  {

    @Autowired
    private UserService userService;

    public void setUserService(UserService userService) {
        this.userService = userService;
    }

    public List<User> getAllUsers(){
        return userService.selectAll();
    }
}
’
Service层
接口
package com.bjpowernode.service;

import com.bjpowernode.jdk.proxy.User;

import java.util.List;

public interface UserService {

    List<User> selectAll();
}
实现类
package com.bjpowernode.service.impl;

import com.bjpowernode.dao.UserDAO;
import com.bjpowernode.dao.impl.UserDAOImpl;
import com.bjpowernode.jdk.proxy.User;
import com.bjpowernode.service.UserService;
import org.springframework.beans.factory.annotation.Autowired;
import org.springframework.stereotype.Service;

import java.util.List;

@Service
public class UserServiceImpl implements UserService {

    @Autowired
    private UserDAO userDAO;

    public void setUserDAO(UserDAO userDAO) {
        this.userDAO = userDAO;
    }

    @Override
    public List<User> selectAll() {
        return userDAO.listAll();
    }
}
DAO层
接口
package com.bjpowernode.dao;

import com.bjpowernode.jdk.proxy.User;

import java.util.List;

public interface UserDAO {

    List<User> listAll();

}
实现类
package com.bjpowernode.dao.impl;

import com.bjpowernode.dao.UserDAO;
import com.bjpowernode.jdk.proxy.User;
import org.springframework.stereotype.Repository;

import java.util.ArrayList;
import java.util.List;

@Repository
public class UserDAOImpl implements UserDAO {
    @Override
    public List<User> listAll() {
        User user = new User();
        user.setId(1L);
        user.setName("lili");
        User user1 = new User();
        user1.setId(2L);
        user1.setName("tony");
        List<User> list = new ArrayList();
        list.add(user);
        list.add(user1);
        return list;
    }
}
测试类
@Test
public void testSpring(){
    ApplicationContext applicationContext = new ClassPathXmlApplicationContext("applicationContext.xml");
    UserServlet userServlet = applicationContext.getBean(UserServlet.class);
    List<User> users = userServlet.getAllUsers();
    users.forEach(System.out::println);
}
运行结果
5.3 @Autowired+@Qualifier(“name”)
当有多个实现类时,可以使用@Autowired+@Qualifier(“name”)来指定具体是哪个实现类实现。其中name,一般为类名,且首字母小写。
新增DAO实现类 UserDAOImpl2.java
package com.bjpowernode.dao.impl;

import com.bjpowernode.dao.UserDAO;
import com.bjpowernode.jdk.proxy.User;
import org.springframework.stereotype.Repository;

import java.util.ArrayList;
import java.util.List;

@Repository
public class UserDAOImpl2 implements UserDAO {
    @Override
    public List<User> listAll() {
        User user = new User();
        user.setId(3L);
        user.setName("黄浩恒");
        User user1 = new User();
        user1.setId(4L);
        user1.setName("罗龙江");
        List<User> list = new ArrayList();
        list.add(user);
        list.add(user1);
        return list;
    }
}
修改原来的service层的实现类,并新增一个实现类
原来service层的实现类
UserServiceImpl,java
package com.bjpowernode.service.impl;

import com.bjpowernode.dao.UserDAO;
import com.bjpowernode.dao.impl.UserDAOImpl;
import com.bjpowernode.jdk.proxy.User;
import com.bjpowernode.service.UserService;
import org.springframework.beans.factory.annotation.Autowired;
import org.springframework.beans.factory.annotation.Qualifier;
import org.springframework.stereotype.Service;

import java.util.List;

@Service
public class UserServiceImpl implements UserService {

    @Autowired
    @Qualifier("userDAOImpl")
    private UserDAO userDAO;

    public void setUserDAO(UserDAO userDAO) {
        this.userDAO = userDAO;
    }

    @Override
    public List<User> selectAll() {
        return userDAO.listAll();
    }
}
新增的service层的实现类
package com.bjpowernode.service.impl;

import com.bjpowernode.dao.UserDAO;
import com.bjpowernode.jdk.proxy.User;
import com.bjpowernode.service.UserService;
import org.springframework.beans.factory.annotation.Autowired;
import org.springframework.beans.factory.annotation.Qualifier;
import org.springframework.stereotype.Service;

import java.util.List;

@Service
public class UserServiceImpl2 implements UserService {

    @Autowired
    @Qualifier("userDAOImpl2")
    private UserDAO userDAO;

    public void setUserDAO(UserDAO userDAO) {
        this.userDAO = userDAO;
    }

    @Override
    public List<User> selectAll() {
        return userDAO.listAll();
    }
}
修改Controller层
UserServlet.java
package com.bjpowernode.controller;

import com.alibaba.fastjson.JSON;
import com.bjpowernode.jdk.proxy.User;

import com.bjpowernode.service.UserService;
import org.springframework.beans.factory.annotation.Autowired;
import org.springframework.beans.factory.annotation.Qualifier;
import org.springframework.stereotype.Controller;

import javax.servlet.ServletException;
import javax.servlet.annotation.WebServlet;
import javax.servlet.http.HttpServlet;
import javax.servlet.http.HttpServletRequest;
import javax.servlet.http.HttpServletResponse;
import java.io.IOException;
import java.io.PrintWriter;
import java.util.List;

@Controller
public class UserServlet  {

    @Autowired
    @Qualifier("userServiceImpl2")
    private UserService userService;

    public void setUserService(UserService userService) {
        this.userService = userService;
    }

    public List<User> getAllUsers(){
        return userService.selectAll();
    }
}
测试类运行结果如下
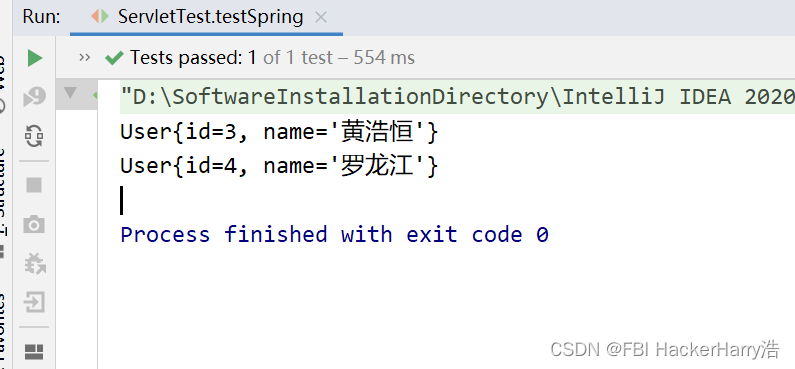
5.4 @Resource(“name”)
@Resource 是属于java的注解
使用前提需要导包
import javax.annotation.Resource;
service的两个实现类
UserServiceImpl.java
package com.bjpowernode.service.impl;

import com.bjpowernode.dao.UserDAO;
import com.bjpowernode.dao.impl.UserDAOImpl;
import com.bjpowernode.jdk.proxy.User;
import com.bjpowernode.service.UserService;
import org.springframework.beans.factory.annotation.Autowired;
import org.springframework.beans.factory.annotation.Qualifier;
import org.springframework.context.annotation.ImportResource;
import org.springframework.stereotype.Service;

import javax.annotation.Resource;
import javax.annotation.Resources;
import java.util.List;

@Service
public class UserServiceImpl implements UserService {
    @Resource(name = "userDAOImpl")
    private UserDAO userDAO;

    public void setUserDAO(UserDAO userDAO) {
        this.userDAO = userDAO;
    }

    @Override
    public List<User> selectAll() {
        return userDAO.listAll();
    }
}
UserServiceImpl2.java
package com.bjpowernode.service.impl;

import com.bjpowernode.dao.UserDAO;
import com.bjpowernode.jdk.proxy.User;
import com.bjpowernode.service.UserService;
import org.springframework.beans.factory.annotation.Autowired;
import org.springframework.beans.factory.annotation.Qualifier;
import org.springframework.stereotype.Service;


import javax.annotation.Resource;
import java.util.List;

@Service
public class UserServiceImpl2 implements UserService {

    @Resource(name = "userDAOImpl2")
    private UserDAO userDAO;

    public void setUserDAO(UserDAO userDAO) {
        this.userDAO = userDAO;
    }

    @Override
    public List<User> selectAll() {
        return userDAO.listAll();
    }
}
controller层
UserServlet.java
package com.bjpowernode.controller;

import com.alibaba.fastjson.JSON;
import com.bjpowernode.jdk.proxy.User;

import com.bjpowernode.service.UserService;
import org.springframework.beans.factory.annotation.Autowired;
import org.springframework.beans.factory.annotation.Qualifier;
import org.springframework.stereotype.Controller;

import javax.annotation.Resource;
import javax.servlet.annotation.WebServlet;
import javax.servlet.http.HttpServlet;
import javax.servlet.http.HttpServletRequest;
import javax.servlet.http.HttpServletResponse;
import java.io.IOException;
import java.io.PrintWriter;
import java.util.List;

@Controller
public class UserServlet  {

    @Resource(name = "userServiceImpl2")
    private UserService userService;

    public void setUserService(UserService userService) {
        this.userService = userService;
    }

    public List<User> getAllUsers(){
        return userService.selectAll();
    }
}
5.5 @Autowired和@Resource的区别
@Autowired和@Resource的共性和区别
共性:都是用来自动装配的
区别:@Autowired默认通过byType的方式,如果很多,那么它就会byname—spring提供的
@Resource默认通过byname的方式实现,如果找不到对应的id,则通过byType的方式—java提供的
二、AOP
1.1 JDK动态代理
被代理类
package com.bjpowernode.jdk.proxy;

// 房东 被代理类
public class Fangdong implements Lavel{

    public void sent(){
        System.out.println("出租1000");
    }
}
代理接口
package com.bjpowernode.jdk.proxy;

// 租售平台
public interface Lavel {
    void sent();
}
测试类
package com.bjpowernode.jdk.proxy;

import java.lang.reflect.InvocationHandler;
import java.lang.reflect.Method;
import java.lang.reflect.Proxy;

public class App {
    public static void main(String[] args) {
        // 创建房东对象
        Fangdong fangdong = new Fangdong();

        // 创建中介
        Lavel proxyInstance = (Lavel)Proxy.newProxyInstance(App.class.getClassLoader(),
                new Class[]{Lavel.class},
                new InvocationHandler() {// 处理器
            // (在没有修改原来的方法的前提下,对原来的方法进行增强)
                    @Override
                    public Object invoke(Object proxy, Method method, Object[] args) throws Throwable {
                        System.out.println("要额外收取佣金500");
                        return method.invoke(fangdong, args);
                    }
                });


    }
}
封装InvocationHandler
MyInvocationHandler.java
package com.bjpowernode.jdk.proxy;

import java.lang.reflect.InvocationHandler;
import java.lang.reflect.Method;

public class MyInvocationHandler implements InvocationHandler {

    private Object obj;
    public MyInvocationHandler(Object obj){
        this.obj = obj;
    }

    @Override
    public Object invoke(Object proxy, Method method, Object[] args) throws Throwable {
        System.out.println("多收500");
        return method.invoke(obj,args);// 对象.方法
    }
}
测试类简化
package com.bjpowernode.jdk.proxy;

import java.lang.reflect.InvocationHandler;
import java.lang.reflect.Method;
import java.lang.reflect.Proxy;

public class App {
    public static void main(String[] args) {
        // 创建房东对象
        Fangdong fangdong = new Fangdong();

        // 创建中介


        Lavel proxyInstance = (Lavel)Proxy.newProxyInstance(App.class.getClassLoader(),
                new Class[]{Lavel.class},
                new MyInvocationHandler(fangdong));
        proxyInstance.sent();
    }
}
JDK动态代理的不足
在JDK中使用动态代理,必须有类的接口。因为生成的代理需要实现这个接口,这样我们生成的代理类对象,才能转化为代理目标的接口对象,然后根据接口中的方法,调用处理器中invoke方法。从而引入cglib动态代理
1.2.Cglib动态代理
为了弥补JDK动态代理的不足,第三方组织封装一套工具包,cglib的工具包,这套包不基于接口,基于父子继承,通过重写的形式扩展方法,但是这个子类工具自动生成的。
早期,Cglib动态代理,性能相于JDK的动态代理高一些。JDK进行一些列优化,目前Spring默认使用的动态代理JDK,也支持Cglib。
<!-- 引入cglib 的jar 包-->
    <dependency>
        <groupId>cglib</groupId>
        <artifactId>cglib</artifactId>
        <version>3.3.0</version>
    </dependency>
被代理的类
package com.bjpowernode.jdk.proxy;

// 房东 被代理类
public class Fangdong{

    public void sent(){
        System.out.println("出租1000");
    }
}
方法执行的拦截器类
package com.bjpowernode.jdk.proxy;

import net.sf.cglib.proxy.MethodInterceptor;
import net.sf.cglib.proxy.MethodProxy;

import java.lang.reflect.Method;

public class MyMethodInterceptor implements MethodInterceptor {
    @Override
    public Object intercept(Object o, Method method, Object[] args, MethodProxy methodProxy) throws Throwable {
        System.out.println("增加租金 200");
        Object o1 = methodProxy.invokeSuper(o, args);//调用父类的方法
        return o1;
    }
}
测试类
package com.bjpowernode.jdk.proxy;

import net.sf.cglib.proxy.Enhancer;

import java.lang.reflect.InvocationHandler;
import java.lang.reflect.Method;
import java.lang.reflect.Proxy;

public class App {
    public static void main(String[] args) {
        Enhancer enhancer = new Enhancer();
        enhancer.setSuperclass(Fangdong.class);
        enhancer.setCallback(new MyMethodInterceptor());
        Fangdong o = (Fangdong) enhancer.create();
        o.sent();

    }
}
3.AOP的相关概念
AOP的相关概念
连接点(JoinPoint):所谓连接点是指那些被拦截的点,而spring中这些点就是指方法,因为spring只支持方法类型的连接点。
切入点(PointCut):所谓切入点就是指我们要对那些JoinPoint进行拦截的定义,指的是具体的拦截的位置
增强/通知(Advice) : 增强就是对具体的连接点进行扩展的功能。由于一般对方法进行增强,分为在方法前执行或者方法后,或者发生异常执行等等,所以增强被分为:前置增强(前置通知)、后置增强(后置通知)、环绕通知(环绕增强)、异常增强(异常通知)
引介(Introduction):引介是一种特殊的Advice,在不修改代码的前提下,引介可以在运行期为类动态的添加一些方法或Field.
目标(Target) :被代理的类(需要增强类)
织入(Weaving) :把Advice应用到Target的过程
代理(Proxy):使用AOP配置后产生的代理类
切面(Aspect):切点和增强整合形成了切面
4.1 Spring自身AOP具体配置
pom.xml导入依赖
<properties>
        <project.build.sourceEncoding>UTF-8</project.build.sourceEncoding>
        <maven.compiler.source>1.8</maven.compiler.source>
        <maven.compiler.target>1.8</maven.compiler.target>
        <spring.version>5.2.0.RELEASE</spring.version>
    </properties>

    <dependencies>
        <dependency>
            <groupId>org.springframework</groupId>
            <artifactId>spring-context</artifactId>
            <version>${spring.version}</version>
        </dependency>
        <dependency>
            <groupId>org.springframework</groupId>
            <artifactId>spring-context-support</artifactId>
            <version>${spring.version}</version>
        </dependency>
        <dependency>
            <groupId>org.springframework</groupId>
            <artifactId>spring-aspects</artifactId>
            <version>${spring.version}</version>
        </dependency>

        <dependency>
            <groupId>junit</groupId>
            <artifactId>junit</artifactId>
            <version>4.12</version>
            <scope>test</scope>
        </dependency>

    </dependencies>
com.bjpowernode.aop包下
目标类接口
ITargetClass.java
package com.bjpowernode.aop;

public interface ITargetClass {
    void methodBefore();

    void methodAfter();

    void methodRound();

    void methodThrow();


}
目标接口实现类
TargetClassImpl.java
package com.bjpowernode.aop;

public class TargetClassImpl implements ITargetClass {
    @Override
    public void methodBefore() {
        System.out.println("前");
    }

    @Override
    public void methodAfter() {
        System.out.println("后");
    }

    @Override
    public void methodRound() {
        System.out.println("环绕");
    }

    @Override
    public void methodThrow() {
        int i = 1/0;
        System.out.println("异常");
    }
}
后置增强通知
MyAfterAdvice.java
package com.bjpowernode.aop;

import org.springframework.aop.AfterReturningAdvice;

import java.lang.reflect.Method;

public class MyAfterAdvice implements AfterReturningAdvice {
    @Override
    public void afterReturning(Object o, Method method, Object[] objects, Object o1) throws Throwable {
        System.out.println("我是后置增强");
    }
}
前置增强通知
MyBeforeAdvice.java
package com.bjpowernode.aop;

import org.springframework.aop.MethodBeforeAdvice;

import java.lang.reflect.Method;

public class MyBeforeAdvice implements MethodBeforeAdvice {
    @Override
    public void before(Method method, Object[] objects, Object o) throws Throwable {
        System.out.println("我是前置增强");
    }
}
环绕增强通知
MyRoundAdvice.java
package com.bjpowernode.aop;

import org.aopalliance.intercept.MethodInterceptor;
import org.aopalliance.intercept.MethodInvocation;

public class MyRoundAdvice implements MethodInterceptor {
    @Override
    public Object invoke(MethodInvocation methodInvocation) throws Throwable {
        System.out.println("我是环绕增强上");
        Object proceed = methodInvocation.proceed();//相当于调用了真实对象的方法
        System.out.println("我是环绕增强下");
        return proceed;
    }
}
异常增强通知
MyThrowAdvice.java
package com.bjpowernode.aop;

import org.springframework.aop.ThrowsAdvice;

public class MyThrowAdvice implements ThrowsAdvice{
    public void afterThrowing(Exception ex){
        System.out.println("异常增强的方法!!!!!");
    }
}
applicationContext.xml配置文件
<?xml version="1.0" encoding="UTF-8"?>
<beans xmlns="http://www.springframework.org/schema/beans"
       xmlns:xsi="http://www.w3.org/2001/XMLSchema-instance" xmlns:aop="http://www.springframework.org/schema/aop"
       xsi:schemaLocation="http://www.springframework.org/schema/beans http://www.springframework.org/schema/beans/spring-beans.xsd http://www.springframework.org/schema/aop https://www.springframework.org/schema/aop/spring-aop.xsd">

        <!--目标对象-->
        <bean class="com.bjpowernode.aop.TargetClassImpl"/>

        <!--增强类-->
        <bean id="beforeAdvice" class="com.bjpowernode.aop.MyBeforeAdvice"/>
        <bean id="afterAdvice" class="com.bjpowernode.aop.MyAfterAdvice"/>
        <bean id="roundAdvice" class="com.bjpowernode.aop.MyRoundAdvice"/>
        <bean id="myThrowAdvice" class="com.bjpowernode.aop.MyThrowAdvice"/>

    <!-- aop的配置   -->
    <aop:config>
        <!--切入点-->
        <aop:pointcut id="beforePoint"
                      expression="execution(* com.bjpowernode.aop.TargetClassImpl.methodBefore(..))"/>

        <aop:pointcut id="afterPoint"
                      expression="execution(* com.bjpowernode.aop.TargetClassImpl.methodAfter(..))"/>


        <aop:pointcut id="roundPoint"
                      expression="execution(* com.bjpowernode.aop.TargetClassImpl.methodRound(..))"/>


        <aop:pointcut id="throwPoint"
                      expression="execution(* com.bjpowernode.aop.TargetClassImpl.methodThrow(..))"/>

        <!--织入-->
        <aop:advisor advice-ref="beforeAdvice" pointcut-ref="beforePoint"/>
        <aop:advisor advice-ref="afterAdvice" pointcut-ref="afterPoint"/>
        <aop:advisor advice-ref="roundAdvice" pointcut-ref="roundPoint"/>
        <aop:advisor advice-ref="myThrowAdvice" pointcut-ref="throwPoint"/>
    </aop:config>
</beans>
4.2 AspectJ框架AOP配置
在原生的spring中,每种增强都需要单独定义一个类实现相应的接口。增强类本身就更庞大,而且方法的名称是固定的。基于这种情况,AspectJ提供了相对更加灵活的方式。
在AspectJ中,只需要定义一个增强类即可,并且方法的名称可以任意定义。
pom.xml引入相关jar
<properties>
        <project.build.sourceEncoding>UTF-8</project.build.sourceEncoding>
        <maven.compiler.source>1.8</maven.compiler.source>
        <maven.compiler.target>1.8</maven.compiler.target>
        <spring.version>5.2.0.RELEASE</spring.version>
    </properties>

    <dependencies>
        <dependency>
            <groupId>org.springframework</groupId>
            <artifactId>spring-context</artifactId>
            <version>${spring.version}</version>
        </dependency>
        <dependency>
            <groupId>org.springframework</groupId>
            <artifactId>spring-context-support</artifactId>
            <version>${spring.version}</version>
        </dependency>
        <dependency>
            <groupId>org.springframework</groupId>
            <artifactId>spring-aspects</artifactId>
            <version>${spring.version}</version>
        </dependency>

        <dependency>
            <groupId>junit</groupId>
            <artifactId>junit</artifactId>
            <version>4.12</version>
            <scope>test</scope>
        </dependency>

    </dependencies>
目标接口类
ITargetClass.java
package com.bjpowernode.aop;

public interface ITargetClass {
    void methodBefore();

    void methodAfter();

    void methodRound();

    void methodThrow();


}
目标接口的实现类
TargetClassImpl.java
package com.bjpowernode.aop;

public class TargetClassImpl implements ITargetClass {
    @Override
    public void methodBefore() {
        System.out.println("前");
    }

    @Override
    public void methodAfter() {
        System.out.println("后");
    }

    @Override
    public void methodRound() {
        System.out.println("环绕");
    }

    @Override
    public void methodThrow() {
        int i = 1/0;
        System.out.println("异常");
    }
}
增强通知类
MyAdvice.java
package com.bjpowernode.aop;

import org.aspectj.lang.ProceedingJoinPoint;

public class MyAdvice {
    public void beforeAdvice(){
        System.out.println("我是前置增强");
    }

    public void afterAdvice(){
        System.out.println("我是后置增强");
    }

    public void aroundAdvice(ProceedingJoinPoint proceedingJoinPoint){
        System.out.println("我是环绕增强上");
        Object proceed = null;
        try {
            proceed = proceedingJoinPoint.proceed();//相当于调用了真实对象的方法
        } catch (Throwable throwable) {
            throwable.printStackTrace();
        }
        System.out.println("我是环绕增强下");
    }

    public void throwAdvice(Exception e){
        System.out.println("异常增强的方法!!!!!");
    }
}
配置文件
applicationContext.xml
<?xml version="1.0" encoding="UTF-8"?>
<beans xmlns="http://www.springframework.org/schema/beans"
       xmlns:xsi="http://www.w3.org/2001/XMLSchema-instance" xmlns:aop="http://www.springframework.org/schema/aop"
       xsi:schemaLocation="http://www.springframework.org/schema/beans http://www.springframework.org/schema/beans/spring-beans.xsd http://www.springframework.org/schema/aop https://www.springframework.org/schema/aop/spring-aop.xsd">

        <!--目标对象-->
        <bean class="com.bjpowernode.aop.TargetClassImpl"/>

        <!--增强类-->
        <bean id="myAdvice" class="com.bjpowernode.aop.MyAdvice"/>


    <!-- aop的配置   -->
    <aop:config>
        <!--切入点-->
        <aop:pointcut id="beforePoint"
                      expression="execution(* com.bjpowernode.aop.TargetClassImpl.methodBefore(..))"/>

        <aop:pointcut id="afterPoint"
                      expression="execution(* com.bjpowernode.aop.TargetClassImpl.methodAfter(..))"/>


        <aop:pointcut id="roundPoint"
                      expression="execution(* com.bjpowernode.aop.TargetClassImpl.methodRound(..))"/>


        <aop:pointcut id="throwPoint"
                      expression="execution(* com.bjpowernode.aop.TargetClassImpl.methodThrow(..))"/>

        <!--织入-->
        <aop:aspect ref="myAdvice">
            <!--method是属性:增强的方法
            pointcut-ref属性:切入点-->
            <aop:before method="beforeAdvice" pointcut-ref="beforePoint"/>
            <aop:after-returning method="afterAdvice" pointcut-ref="afterPoint"/>
            <aop:around method="aroundAdvice" pointcut-ref="roundPoint"/>
            <aop:after-throwing method="throwAdvice" pointcut-ref="throwPoint" throwing="e"/>
        </aop:aspect>
    </aop:config>
</beans>
测试类
 /*
     *aop的底层是采用了JDK的动态代理(JDK动态代理有优先权)
     * 产生代理对象 那么代理对象和真实对象(房东),他俩是兄弟关系
     */
    @Test
    public void testAOP(){
        // 获取容器对象
        ApplicationContext context = new ClassPathXmlApplicationContext("applicationContext.xml");
        ITargetClass bean = context.getBean(ITargetClass.class);
        System.out.println("bean = " + bean.getClass());
        bean.methodBefore();
        System.out.println("--------------");
        bean.methodAfter();
        System.out.println("--------------");
        bean.methodRound();
        System.out.println("--------------");
        bean.methodThrow();

    }
4.3 AspectJ的AOP注解方式
pom.xml导入相关依赖
  <properties>
        <project.build.sourceEncoding>UTF-8</project.build.sourceEncoding>
        <maven.compiler.source>1.8</maven.compiler.source>
        <maven.compiler.target>1.8</maven.compiler.target>
        <spring.version>5.2.0.RELEASE</spring.version>
    </properties>

    <dependencies>
        <dependency>
            <groupId>org.springframework</groupId>
            <artifactId>spring-context</artifactId>
            <version>${spring.version}</version>
        </dependency>
        <dependency>
            <groupId>org.springframework</groupId>
            <artifactId>spring-context-support</artifactId>
            <version>${spring.version}</version>
        </dependency>
        <dependency>
            <groupId>org.springframework</groupId>
            <artifactId>spring-aspects</artifactId>
            <version>${spring.version}</version>
        </dependency>

        <dependency>
            <groupId>junit</groupId>
            <artifactId>junit</artifactId>
            <version>4.12</version>
            <scope>test</scope>
        </dependency>

    </dependencies>
resources文件夹下
applicationContext.xml配置文件
<?xml version="1.0" encoding="UTF-8"?>
<beans xmlns="http://www.springframework.org/schema/beans"
       xmlns:xsi="http://www.w3.org/2001/XMLSchema-instance" xmlns:aop="http://www.springframework.org/schema/aop"
       xmlns:context="http://www.springframework.org/schema/context"
       xsi:schemaLocation="http://www.springframework.org/schema/beans http://www.springframework.org/schema/beans/spring-beans.xsd http://www.springframework.org/schema/aop https://www.springframework.org/schema/aop/spring-aop.xsd http://www.springframework.org/schema/context https://www.springframework.org/schema/context/spring-context.xsd">

    <!-- ioc 注解扫描 -->
    <context:component-scan base-package="com.bjpowernode.aop"/>

    <!-- 开启aop自动代理 -->
    <aop:aspectj-autoproxy/>
</beans>
目标接口类
ITargetClass.java
package com.bjpowernode.aop;

public interface ITargetClass {
    void methodBefore();

    void methodAfter();

    void methodRound();

    void methodThrow();
    }
目标接口的实现类
package com.bjpowernode.aop;

import org.aspectj.lang.annotation.Before;
import org.springframework.stereotype.Component;

@Component
public class TargetClassImpl implements ITargetClass {
    @Override
    public void methodBefore() {
        System.out.println("测试前");
    }

    @Override
    public void methodAfter() {
        System.out.println("测试后");
    }

    @Override
    public void methodRound() {
        System.out.println("测试环绕");
    }

    @Override
    public void methodThrow() {
        int i = 1/0;
        System.out.println("测试异常");
    }
}
增强通知类
package com.bjpowernode.aop;

import org.aspectj.lang.ProceedingJoinPoint;
import org.aspectj.lang.annotation.*;
import org.springframework.stereotype.Component;

@Component
@Aspect
public class MyAdvice {
    @Before("execution(* com.bjpowernode.aop.TargetClassImpl.methodBefore(..))")
    public void beforeAdvice(){
        System.out.println("我是前置增强");
    }

    @After("execution(* com.bjpowernode.aop.TargetClassImpl.methodAfter(..))")
    public void afterAdvice(){
        System.out.println("我是后置增强");
    }

	//切入点:指的是具体的拦截的位置(方法)
    @Around("execution(* com.bjpowernode.aop.TargetClassImpl.methodRound(..))")
    public void aroundAdvice(ProceedingJoinPoint proceedingJoinPoint){
        System.out.println("我是环绕增强上");
        Object proceed = null;
        try {
            proceed = proceedingJoinPoint.proceed();//相当于调用了真实对象的方法
        } catch (Throwable throwable) {
            throwable.printStackTrace();
        }
        System.out.println("我是环绕增强下");
    }

    @AfterThrowing(value="execution(* com.bjpowernode.aop.TargetClassImpl.methodThrow(..))",throwing = "e")
    public void throwAdvice(Exception e){
        System.out.println("异常的增强方法!!!!!");
    }
}
版权声明:本文内容由互联网用户自发贡献,该文观点仅代表作者本人。本站仅提供信息存储空间服务,不拥有所有权,不承担相关法律责任。如发现本站有涉嫌侵权/违法违规的内容, 请发送邮件至 举报,一经查实,本站将立刻删除。
文章由极客之音整理,本文链接:https://www.bmabk.com/index.php/post/85566.html

