
【狂神说Java】SpringBoot最新教程IDEA版通俗易懂_哔哩哔哩_bilibili
微信文档【狂神说Java】SpringBoot最新教程IDEA版通俗易懂
SpringBoot Web 开发
1、 简介
好的,同学们,那么接下来呢,我们开始学习SpringBoot与Web开发,从这一章往后,就属于我们实战部分的内容了;
其实SpringBoot的东西用起来非常简单,因为SpringBoot最大的特点就是自动装配。
使用SpringBoot的步骤:
1、创建一个SpringBoot应用,选择我们需要的模块,SpringBoot就会默认将我们的需要的模块自动配置好
2、手动在配置文件中配置部分配置项目就可以运行起来了
3、专注编写业务代码,不需要考虑以前那样一大堆的配置了。
要熟悉掌握开发,之前学习的自动配置的原理一定要搞明白!
比如SpringBoot到底帮我们配置了什么?我们能不能修改?我们能修改哪些配置?我们能不能扩展?
- 向容器中自动配置组件 :*** Autoconfiguration
- 自动配置类,封装配置文件的内容:***Properties
没事就找找类,看看自动装配原理!
我们之后来进行一个单体项目的小项目测试,让大家能够快速上手开发!
2、 静态资源处理
1.1 静态资源映射规则
首先,我们搭建一个普通的SpringBoot项目,回顾一下HelloWorld程序!
写请求非常简单,那我们要引入我们前端资源,我们项目中有许多的静态资源,比如css,js等文件,这个SpringBoot怎么处理呢?
如果我们是一个web应用,我们的main下会有一个webapp,我们以前都是将所有的页面导在这里面的,对吧!但是我们现在的pom呢,打包方式是为jar的方式,那么这种方式SpringBoot能不能来给我们写页面呢?当然是可以的,但是SpringBoot对于静态资源放置的位置,是有规定的!
我们先来聊聊这个静态资源映射规则:
SpringBoot中,SpringMVC的web配置都在 WebMvcAutoConfiguration 这个配置类里面;
我们可以去看看 WebMvcAutoConfigurationAdapter 中有很多配置方法;
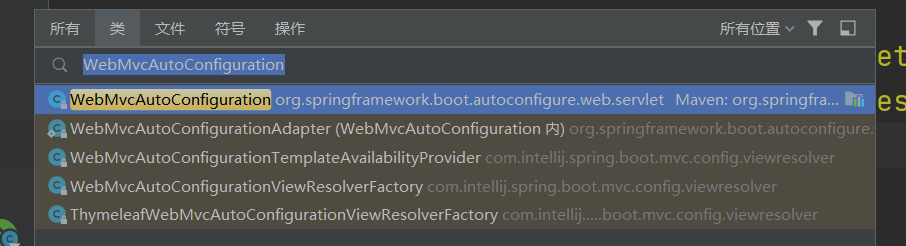
ctlr+N 搜索 WebMvcAutoConfiguration
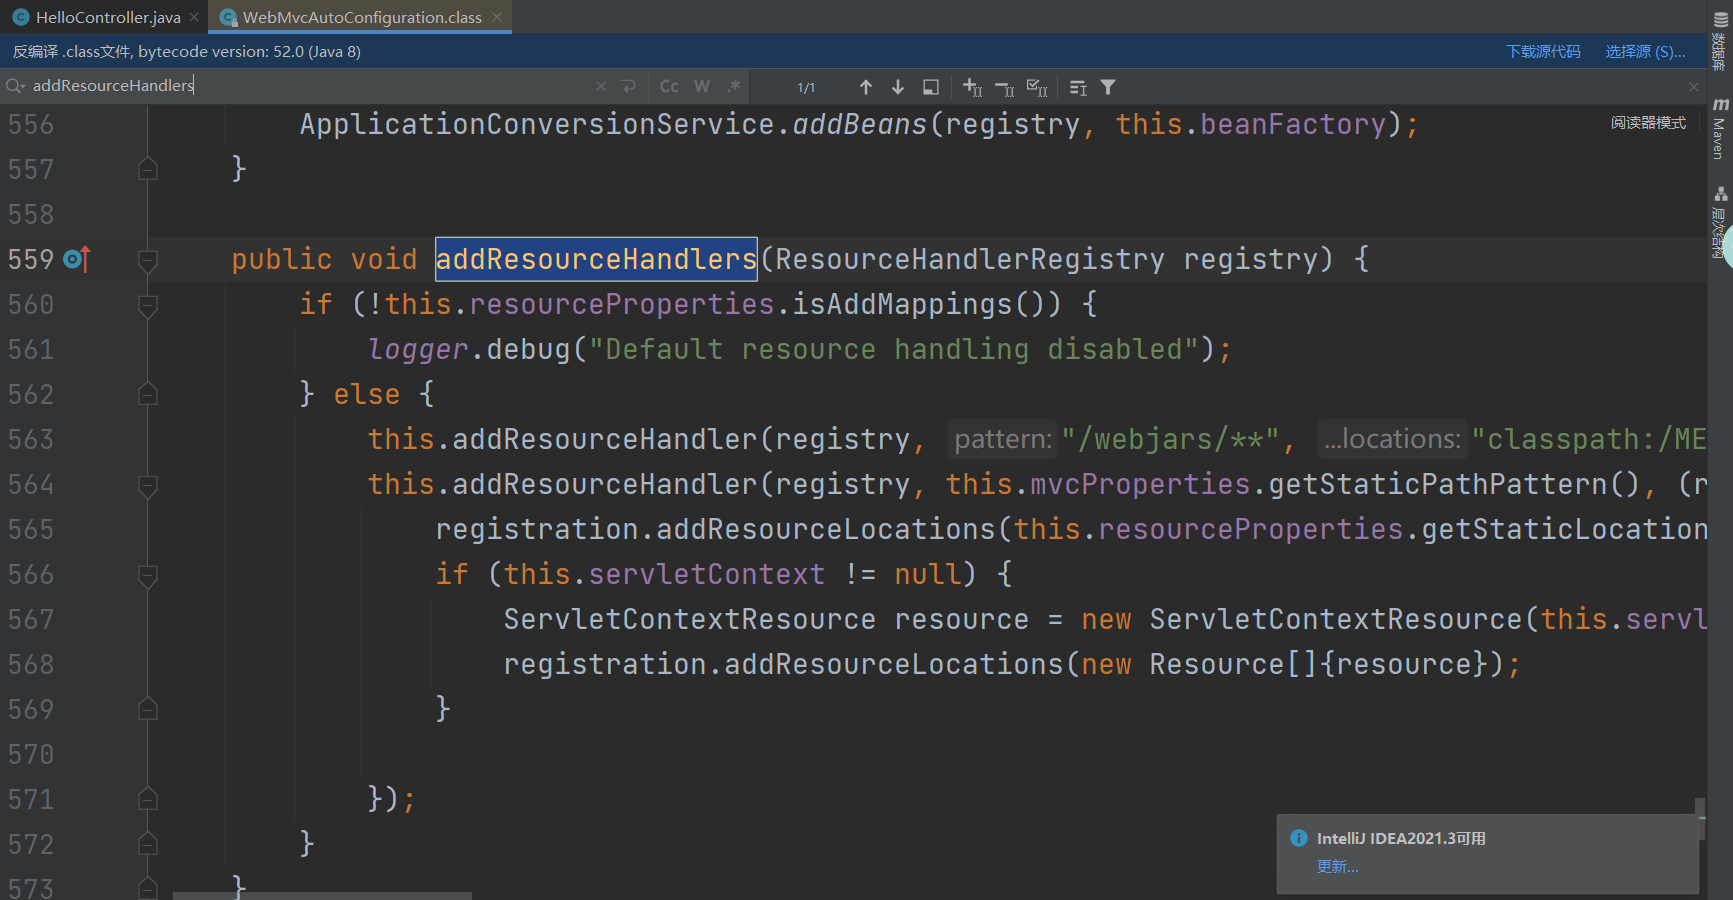
有一个方法:addResourceHandlers 添加资源处理
- 我的
public void addResourceHandlers(ResourceHandlerRegistry registry) {
    if (!this.resourceProperties.isAddMappings()) {
        // 已禁用默认资源处理
        logger.debug("Default resource handling disabled");
    } else {
        // webjars 配置
        this.addResourceHandler(registry, "/webjars/**", "classpath:/META-INF/resources/webjars/");
        this.addResourceHandler(registry, this.mvcProperties.getStaticPathPattern(), (registration) -> {
            registration.addResourceLocations(this.resourceProperties.getStaticLocations());
            if (this.servletContext != null) {
                ServletContextResource resource = new ServletContextResource(this.servletContext, "/");
                registration.addResourceLocations(new Resource[]{resource});
            }

        });
    }
}
@Override
public void addResourceHandlers(ResourceHandlerRegistry registry) {
    if (!this.resourceProperties.isAddMappings()) {
        // 已禁用默认资源处理
        logger.debug("Default resource handling disabled");
        return;
    }
    // 缓存控制
    Duration cachePeriod = this.resourceProperties.getCache().getPeriod();
    CacheControl cacheControl = this.resourceProperties.getCache().getCachecontrol().toHttpCacheControl();
    // webjars 配置
    if (!registry.hasMappingForPattern("/webjars/**")) {
        customizeResourceHandlerRegistration(registry.addResourceHandler("/webjars/**")
                                             .addResourceLocations("classpath:/META-INF/resources/webjars/")
                                             .setCachePeriod(getSeconds(cachePeriod)).setCacheControl(cacheControl));
    }
    // 静态资源配置
    String staticPathPattern = this.mvcProperties.getStaticPathPattern();
    if (!registry.hasMappingForPattern(staticPathPattern)) {
        customizeResourceHandlerRegistration(registry.addResourceHandler(staticPathPattern)
                                             .addResourceLocations(getResourceLocations(this.resourceProperties.getStaticLocations()))
                                             .setCachePeriod(getSeconds(cachePeriod)).setCacheControl(cacheControl));
    }
}
读一下源代码:比如所有的 /webjars/** , 都需要去 classpath:/META-INF/resources/webjars/ 找对应的资源;
1.2 什么是webjars 呢?(不推荐)
(一种静态资源映射规则)
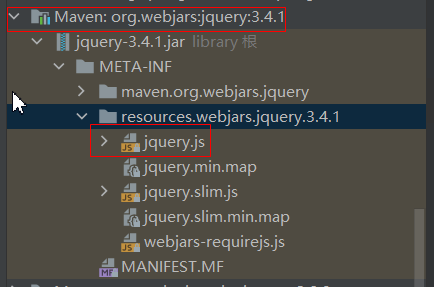
Webjars本质就是以jar包的方式引入我们的静态资源 , 我们以前要导入一个静态资源文件,直接导入即可。
使用SpringBoot需要使用Webjars,我们可以去搜索一下:
网站:https://www.webjars.org
要使用jQuery,我们只要要引入jQuery对应版本的pom依赖即可!
<dependency>
    <groupId>org.webjars</groupId>
    <artifactId>jquery</artifactId>
    <version>3.4.1</version>
</dependency>
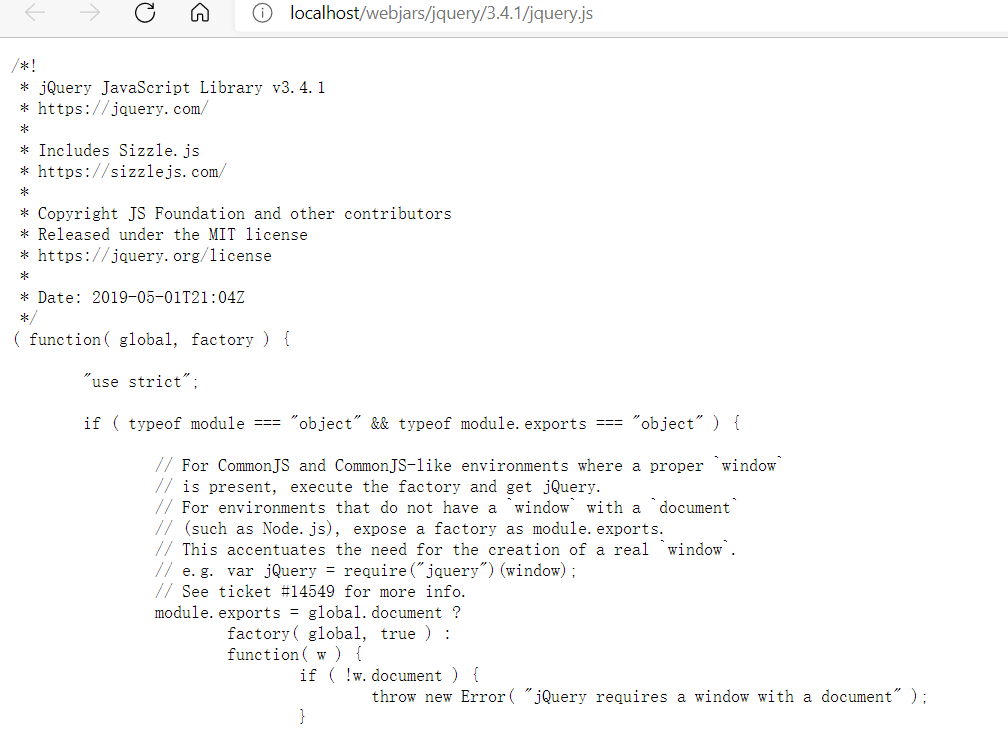
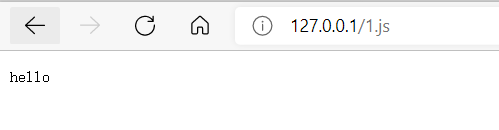
访问:只要是静态资源,SpringBoot就会去对应的路径寻找资源,我们这里访问:http://localhost:8080/webjars/jquery/3.4.1/jquery.js
访问:只要是静态资源,SpringBoot就会去对应的路径寻找资源,我们这里访问:http://localhost/webjars/jquery/3.4.1/jquery.js
1.3 第二种静态资源映射规则
那我们项目中要是使用自己的静态资源该怎么导入呢?我们看下一行代码;
我们去找staticPathPattern发现第二种映射规则 :/** , 访问当前的项目任意资源,它会去找 resourceProperties 这个类,我们可以点进去看一下分析:
// 进入方法
public String[] getStaticLocations() {
    return this.staticLocations;
}
// 找到对应的值
private String[] staticLocations = CLASSPATH_RESOURCE_LOCATIONS;
// 找到路径
private static final String[] CLASSPATH_RESOURCE_LOCATIONS = new String[]{
    "classpath:/META-INF/resources/",                                                     "classpath:/resources/",
    "classpath:/static/",
    "classpath:/public/"
};

ResourceProperties 可以设置和我们静态资源有关的参数;这里面指向了它会去寻找资源的文件夹,即上面数组的内容。
所以得出结论,以下四个目录存放的静态资源可以被我们识别:
"classpath:/META-INF/resources/"
"classpath:/resources/"
"classpath:/static/"
"classpath:/public/"
我们可以在resources根目录下新建对应的文件夹,都可以存放我们的静态文件;

比如我们访问 , 他就会去这些文件夹中寻找对应的静态资源文件;
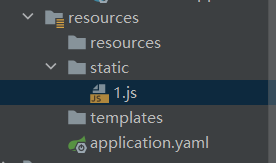
- 优先级:resources > static > public
1.4 自定义静态资源路径
我们也可以自己通过配置文件来指定一下,哪些文件夹是需要我们放静态资源文件的,在application.properties中配置;
spring.resources.static-locations=classpath:/coding/,classpath:/kuang/
spring:
  mvc:
    static-path-pattern: classpath:/coding/,classpath:/kuang/
一旦自己定义了静态文件夹的路径,原来的自动配置就都会失效了!
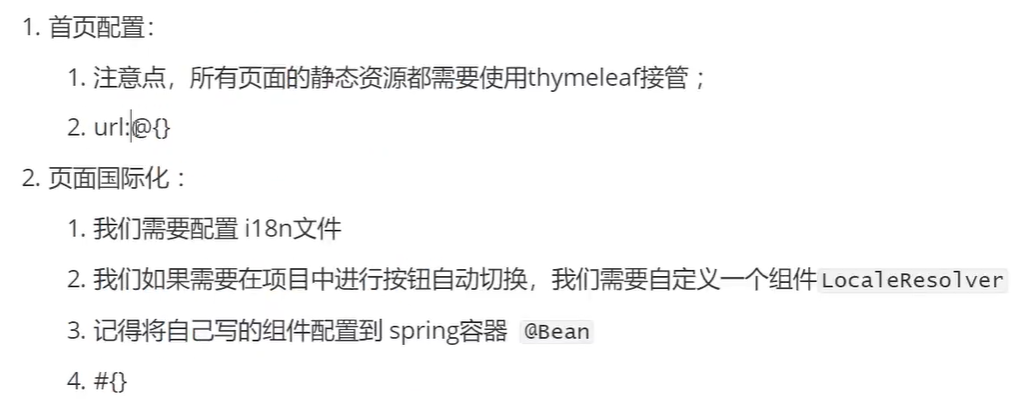
1.5 首页处理
静态资源文件夹说完后,我们继续向下看源码!可以看到一个欢迎页的映射,就是我们的首页!
- 新版
 @Bean
public WelcomePageHandlerMapping welcomePageHandlerMapping(ApplicationContext applicationContext, FormattingConversionService mvcConversionService, ResourceUrlProvider mvcResourceUrlProvider) {
    WelcomePageHandlerMapping welcomePageHandlerMapping = new WelcomePageHandlerMapping(new TemplateAvailabilityProviders(applicationContext), applicationContext, this.getWelcomePage(), this.mvcProperties.getStaticPathPattern());
    welcomePageHandlerMapping.setInterceptors(this.getInterceptors(mvcConversionService, mvcResourceUrlProvider));
    welcomePageHandlerMapping.setCorsConfigurations(this.getCorsConfigurations());
    return welcomePageHandlerMapping;
}
 private Resource getIndexHtml(Resource location) {
     try {
         Resource resource = location.createRelative("index.html");
         if (resource.exists() && resource.getURL() != null) {
             return resource;
         }
     } catch (Exception var3) {
     }

     return null;
 }
- 旧版
@Bean
public WelcomePageHandlerMapping welcomePageHandlerMapping(ApplicationContext applicationContext,
                                                           FormattingConversionService mvcConversionService,
                                                           ResourceUrlProvider mvcResourceUrlProvider) {
    WelcomePageHandlerMapping welcomePageHandlerMapping = new WelcomePageHandlerMapping(
        new TemplateAvailabilityProviders(applicationContext), applicationContext, getWelcomePage(), // getWelcomePage 获得欢迎页
        this.mvcProperties.getStaticPathPattern());
    welcomePageHandlerMapping.setInterceptors(getInterceptors(mvcConversionService, mvcResourceUrlProvider));
    return welcomePageHandlerMapping;
}
private Optional<Resource> getWelcomePage() {
    String[] locations = getResourceLocations(this.resourceProperties.getStaticLocations());
    // ::是java8 中新引入的运算符
    // Class::function的时候function是属于Class的,应该是静态方法。
    // this::function的funtion是属于这个对象的。
    // 简而言之,就是一种语法糖而已,是一种简写
    return Arrays.stream(locations).map(this::getIndexHtml).filter(this::isReadable).findFirst();
}
// 欢迎页就是一个location下的的 index.html 而已
private Resource getIndexHtml(String location) {
    return this.resourceLoader.getResource(location + "index.html");
}
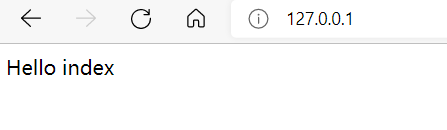
欢迎页,静态资源文件夹下的所有 index.html 页面;被 /** 映射。
比如我访问 http://127.0.0.1/,就会找静态资源文件夹下的 index.html
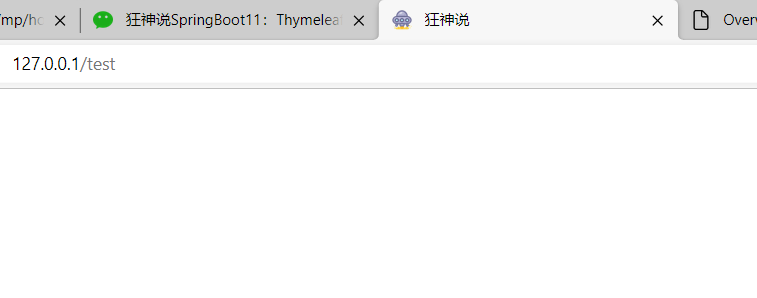
新建一个 index.html ,在我们上面的3个目录中任意一个;然后访问测试 http://127.0.0.1/ 看结果!
1.6 网站图标
与其他静态资源一样,Spring Boot在配置的静态内容位置中查找 favicon.ico。如果存在这样的文件,它将自动用作应用程序的favicon。
1、自己放一个图标在静态资源目录下,这里放在 resources目录下
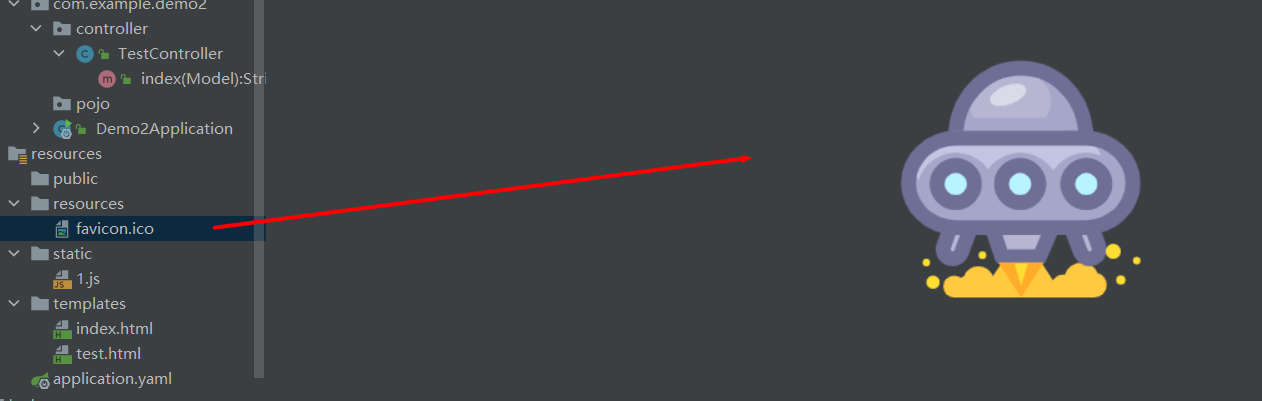
2、清除浏览器缓存!刷新网页,发现图标已经变成自己的了!
3、Thymeleaf模板引擎
3.1 模板引擎
前端交给我们的页面,是html页面。如果是我们以前开发,我们需要把他们转成jsp页面,jsp好处就是当我们查出一些数据转发到JSP页面以后,我们可以用jsp轻松实现数据的显示,及交互等。
jsp支持非常强大的功能,包括能写Java代码,但是呢,我们现在的这种情况,SpringBoot这个项目首先是以jar的方式,不是war,像第二,我们用的还是嵌入式的Tomcat,所以呢,他现在默认是不支持jsp的。
那不支持jsp,如果我们直接用纯静态页面的方式,那给我们开发会带来非常大的麻烦,那怎么办呢?
SpringBoot推荐你可以来使用模板引擎:
模板引擎,我们其实大家听到很多,其实jsp就是一个模板引擎,还有用的比较多的freemarker,包括SpringBoot给我们推荐的Thymeleaf,模板引擎有非常多,但再多的模板引擎,他们的思想都是一样的,什么样一个思想呢我们来看一下这张图:

模板引擎的作用就是我们来写一个页面模板,比如有些值呢,是动态的,我们写一些表达式。而这些值,从哪来呢,就是我们在后台封装一些数据。然后把这个模板和这个数据交给我们模板引擎,模板引擎按照我们这个数据帮你把这表达式解析、填充到我们指定的位置,然后把这个数据最终生成一个我们想要的内容给我们写出去,这就是我们这个模板引擎,不管是jsp还是其他模板引擎,都是这个思想。只不过呢,就是说不同模板引擎之间,他们可能这个语法有点不一样。其他的我就不介绍了,我主要来介绍一下SpringBoot给我们推荐的Thymeleaf模板引擎,这模板引擎呢,是一个高级语言的模板引擎,他的这个语法更简单。而且呢,功能更强大。
我们呢,就来看一下这个模板引擎,那既然要看这个模板引擎。首先,我们来看SpringBoot里边怎么用。
3.2 引入Thymeleaf
怎么引入呢,对于springboot来说,什么事情不都是一个start的事情嘛,我们去在项目中引入一下。给大家三个网址:
Thymeleaf 官网:https://www.thymeleaf.org/
Thymeleaf 在Github 的主页:https://github.com/thymeleaf/thymeleaf
Spring官方文档:找到我们对应的版本
https://docs.spring.io/spring-boot/docs/2.2.5.RELEASE/reference/htmlsingle/#using-boot-starter
找到对应的pom依赖:可以适当点进源码看下本来的包!
<!--thymeleaf-->
<dependency>
    <groupId>org.thymeleaf</groupId>
    <artifactId>thymeleaf-spring5</artifactId>
</dependency>
<dependency>
    <groupId>org.springframework.boot</groupId>
    <artifactId>spring-boot-starter-thymeleaf</artifactId>
</dependency>
3.3 Thymeleaf分析
前面呢,我们已经引入了Thymeleaf,那这个要怎么使用呢?
我们首先得按照SpringBoot的自动配置原理看一下我们这个Thymeleaf的自动配置规则,在按照那个规则,我们进行使用。
我们去找一下Thymeleaf的自动配置类:ThymeleafProperties
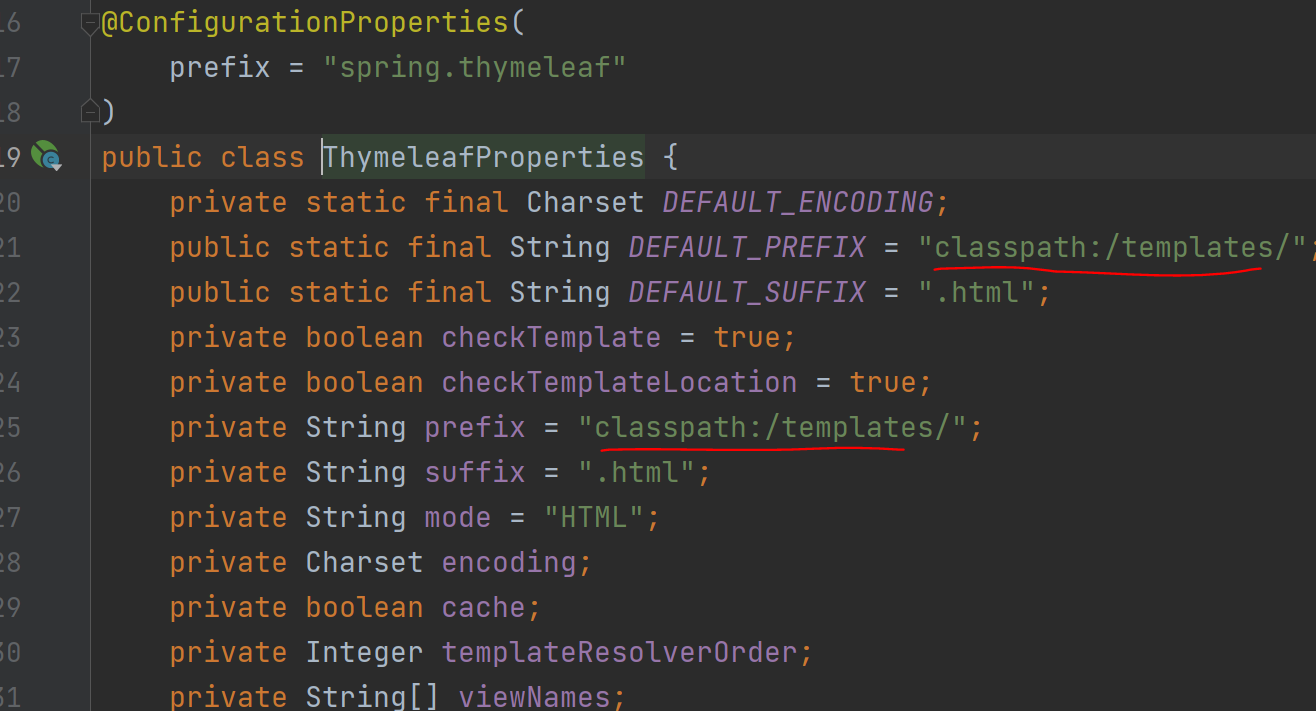
public class ThymeleafProperties {
    private static final Charset DEFAULT_ENCODING;
    public static final String DEFAULT_PREFIX = "classpath:/templates/";
    public static final String DEFAULT_SUFFIX = ".html";
    private boolean checkTemplate = true;
    private boolean checkTemplateLocation = true;
    private String prefix = "classpath:/templates/";
    private String suffix = ".html";
    private String mode = "HTML";
    //...
我们可以在其中看到默认的前缀和后缀!
我们只需要把我们的html页面放在类路径下的templates下,thymeleaf就可以帮我们自动渲染了。
使用thymeleaf什么都不需要配置,只需要将他放在指定的文件夹下即可!
3.4测试
1、编写一个TestController
package com.example.demo2.controller;

import org.springframework.stereotype.Controller;
import org.springframework.web.bind.annotation.RequestMapping;

@Controller
public class TestController {

    @RequestMapping("/test")
    public String index(){
        return "test";
    }
}
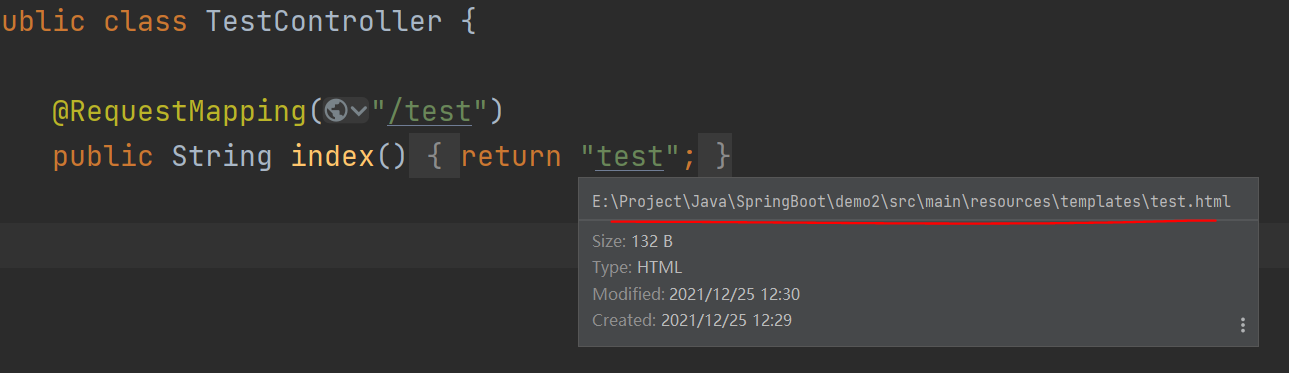
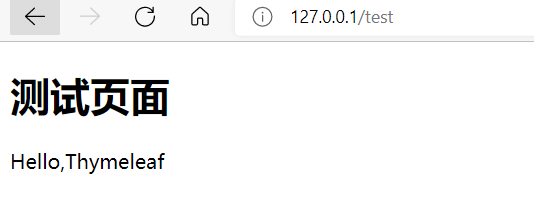
2、编写一个测试页面 test.html 放在 templates 目录下
<!DOCTYPE html>
<html lang="en">
<head>
    <meta charset="UTF-8">
    <title>Title</title>
</head>
<body>
测试页面
</body>
</html>
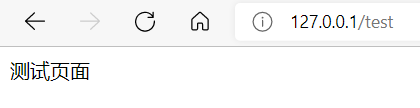
3、启动项目请求测试
3.5 Thymeleaf 语法学习
要学习语法,还是参考官网文档最为准确,我们找到对应的版本看一下;
Thymeleaf 官网:https://www.thymeleaf.org/ , 简单看一下官网!我们去下载Thymeleaf的官方文档!
thymeleaf中文文档:Thymeleaf 教程 | 範宗雲 (fanlychie.github.io)
我们做个最简单的练习 :我们需要查出一些数据,在页面中展示
1、修改测试请求,增加数据传输;
package com.example.demo2.controller;

import org.springframework.stereotype.Controller;
import org.springframework.ui.Model;
import org.springframework.web.bind.annotation.RequestMapping;

@Controller
public class TestController {

    @RequestMapping("/test")
    public String index(Model model){
        //存入数据
        model.addAttribute("msg","Hello,Thymeleaf");
        return "test";
    }
}
2、我们要使用thymeleaf,需要在html文件中导入命名空间的约束,方便提示。
我们可以去官方文档的#3中看一下命名空间拿来过来:
xmlns:th="http://www.thymeleaf.org"
3、我们去编写下前端页面
<!DOCTYPE html>
<html lang="en" xmlns:th="http://www.thymeleaf.org">
<head>
    <meta charset="UTF-8">
    <title>狂神说</title>
</head>
<body>
<h1>测试页面</h1>

<!--th:text就是将div中的内容设置为它指定的值,和之前学习的Vue一样-->
<div th:text="${msg}"></div>
</body>
</html>
4、启动测试!
3.6 Thymeleaf的使用语法
OK,入门搞定,我们来认真研习一下Thymeleaf的使用语法!
1、我们可以使用任意的 th:attr 来替换Html中原生属性的值!
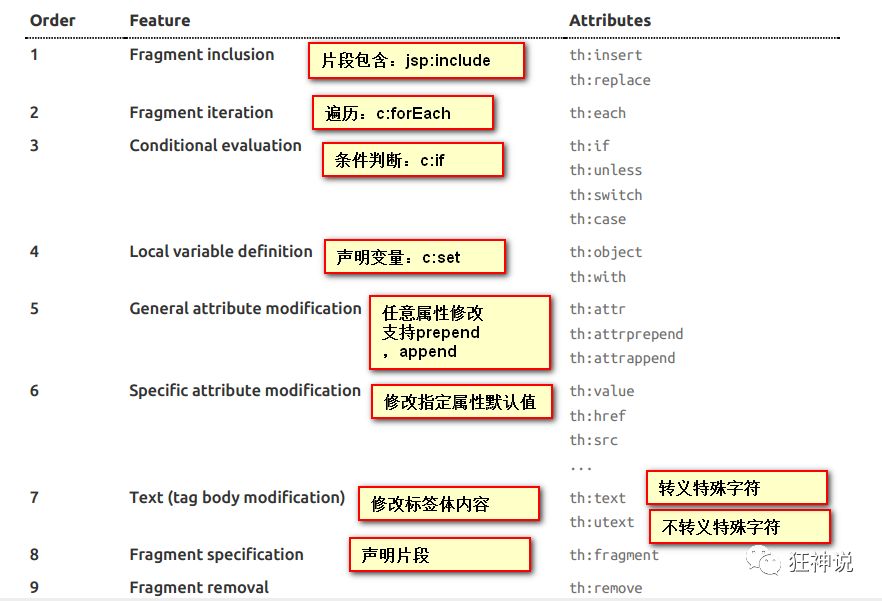
3.6.1 常用表达式
th:utext(Unescaped Text)不会对含有 HTML 标签的内容进行字符转义;
@RequestMapping("/test")
public String index(ModelMap model, HttpSession session){
    //存入数据
    model.put("message", "<h1>Welcome to BeiJing!</h1>");
    return "test";
}
<p th:text="${message}"></p>
<p th:utext="${message}"></p>

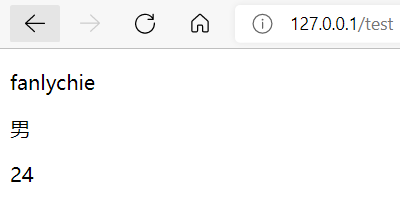
@RequestMapping("/test")
public String index(ModelMap model, HttpSession session){
    session.setAttribute("user", new User("fanlychie", "男", 24));
    return "test";
}
<div th:object="${session.user}">
    <p th:text="*{name}"></p>
    <p th:text="*{sex}"></p>
    <p th:text="*{age}"></p>
</div>
- 另一种写法
@RequestMapping("/test")
public String index(Model model){
    model.addAttribute("users", Arrays.asList("张三","李四"));
    return "test";
}
<h3 th:each="user:${users}" th:text="${user}"></h3>
<h3 th:each="user:${users}">[[${user}]]</h3>

4、MVC自动配置原理
4.1Http编码自动配置
配置文件到底能写什么?怎么写?
SpringBoot官方文档中有大量的配置,我们无法全部记住
我们以**HttpEncodingAutoConfiguration(Http编码自动配置)**为例解释自动配置原理;
Crlt+N搜索
//表示这是一个配置类,和以前编写的配置文件一样,也可以给容器中添加组件;
@Configuration(
        proxyBeanMethods = false
)
//启动指定类的ConfigurationProperties功能;
//进入这个HttpProperties查看,将配置文件中对应的值和HttpProperties绑定起来;
//并把HttpProperties加入到ioc容器中
@EnableConfigurationProperties({ServerProperties.class})

//Spring底层@Conditional注解
//根据不同的条件判断,如果满足指定的条件,整个配置类里面的配置就会生效;
//这里的意思就是判断当前应用是否是web应用,如果是,当前配置类生效
@ConditionalOnWebApplication(
        type = Type.SERVLET
)

//判断当前项目有没有这个类CharacterEncodingFilter;SpringMVC中进行乱码解决的过滤器;
@ConditionalOnClass({CharacterEncodingFilter.class})

//判断配置文件中是否存在某个配置:spring.http.encoding.enabled;
//如果不存在,判断也是成立的
//即使我们配置文件中不配置pring.http.encoding.enabled=true,也是默认生效的;
@ConditionalOnProperty(
        prefix = "server.servlet.encoding",
        value = {"enabled"},
        matchIfMissing = true
)
public class HttpEncodingAutoConfiguration {
    //他已经和SpringBoot的配置文件映射了
    private final Encoding properties;

    //只有一个有参构造器的情况下,参数的值就会从容器中拿
    public HttpEncodingAutoConfiguration(ServerProperties properties) {
        this.properties = properties.getServlet().getEncoding();
    }

    //给容器中添加一个组件,这个组件的某些值需要从properties中获取
    @Bean
    @ConditionalOnMissingBean//判断容器没有这个组件?
    public CharacterEncodingFilter characterEncodingFilter() {
        CharacterEncodingFilter filter = new OrderedCharacterEncodingFilter();
        filter.setEncoding(this.properties.getCharset().name());
        filter.setForceRequestEncoding(this.properties.shouldForce(org.springframework.boot.web.servlet.server.Encoding.Type.REQUEST));
        filter.setForceResponseEncoding(this.properties.shouldForce(org.springframework.boot.web.servlet.server.Encoding.Type.RESPONSE));
        return filter;
    }
    //。。。。。。。
一句话总结 :根据当前不同的条件判断,决定这个配置类是否生效!
- 一但这个配置类生效;这个配置类就会给容器中添加各种组件;
- 这些组件的属性是从对应的properties类中获取的,这些类里面的每一个属性又是和配置文件绑定的;
- 所有在配置文件中能配置的属性都是在xxxxProperties类中封装着;
- 配置文件能配置什么就可以参照某个功能对应的这个属性类
//从配置文件中获取指定的值和bean的属性进行绑定
@ConfigurationProperties(prefix = "spring.http")
public class HttpProperties {
    // .....
}
4.2 修改SpringBoot的默认配置
扩展springMVC
这么多的自动配置,原理都是一样的,通过这个WebMVC的自动配置原理分析,我们要学会一种学习方式,通过源码探究,得出结论;这个结论一定是属于自己的,而且一通百通。
SpringBoot的底层,大量用到了这些设计细节思想,所以,没事需要多阅读源码!得出结论;
SpringBoot在自动配置很多组件的时候,先看容器中有没有用户自己配置的(如果用户自己配置@bean),如果有就用用户配置的,如果没有就用自动配置的;
如果有些组件可以存在多个,比如我们的视图解析器,就将用户配置的和自己默认的组合起来!
我们要做的就是编写一个@Configuration注解类,并且类型要为WebMvcConfigurer,还不能标注@EnableWebMvc注解;我们去自己写一个;我们新建一个包叫config,写一个类MyMvcConfig;
@Configuration
public class MyMvcConfig implements WebMvcConfigurer {
    @Override
    public void addViewControllers(ViewControllerRegistry registry) {
        registry.addViewController("/kuang").setViewName("test");
    }
}

确实也跳转过来了!所以说,我们要扩展SpringMVC,官方就推荐我们这么去使用,既保SpringBoot留所有的自动配置,也能用我们扩展的配置!
我们可以去分析一下原理:
1、WebMvcAutoConfiguration 是 SpringMVC的自动配置类,里面有一个类WebMvcAutoConfigurationAdapter
2、这个类上有一个注解,在做其他自动配置时会导入:@Import(EnableWebMvcConfiguration.class)
3、我们点进EnableWebMvcConfiguration这个类看一下,它继承了一个父类:DelegatingWebMvcConfiguration
这个父类中有这样一段代码:
public class DelegatingWebMvcConfiguration extends WebMvcConfigurationSupport {
    private final WebMvcConfigurerComposite configurers = new WebMvcConfigurerComposite();

  // 从容器中获取所有的webmvcConfigurer
    @Autowired(required = false)
    public void setConfigurers(List<WebMvcConfigurer> configurers) {
        if (!CollectionUtils.isEmpty(configurers)) {
            this.configurers.addWebMvcConfigurers(configurers);
        }
    }
}
4、我们可以在这个类中去寻找一个我们刚才设置的viewController当做参考,发现它调用了一个
protected void addViewControllers(ViewControllerRegistry registry) {
    this.configurers.addViewControllers(registry);
}
5、我们点进去看一下
public void addViewControllers(ViewControllerRegistry registry) {
    Iterator var2 = this.delegates.iterator();

    while(var2.hasNext()) {
        // 将所有的WebMvcConfigurer相关配置来一起调用!包括我们自己配置的和Spring给我们配置的
        WebMvcConfigurer delegate = (WebMvcConfigurer)var2.next();
        delegate.addViewControllers(registry);
    }

}
所以得出结论:所有的WebMvcConfiguration都会被作用,不止Spring自己的配置类,我们自己的配置类当然也会被调用;
4.3 全面接管SpringMVC(不推荐)
官方文档:
If you want to take complete control of Spring MVC
you can add your own @Configuration annotated with @EnableWebMvc.
全面接管即:SpringBoot对SpringMVC的自动配置不需要了,所有都是我们自己去配置!
只需在我们的配置类中要加一个@EnableWebMvc。
我们看下如果我们全面接管了SpringMVC了,我们之前SpringBoot给我们配置的静态资源映射一定会无效,我们可以去测试一下;
当然,我们开发中,不推荐使用全面接管SpringMVC
思考问题?为什么加了一个注解,自动配置就失效了!我们看下源码:
1、这里发现它是导入了一个类,我们可以继续进去看
@Import({DelegatingWebMvcConfiguration.class})
public @interface EnableWebMvc {
}
2、它继承了一个父类 WebMvcConfigurationSupport
public class DelegatingWebMvcConfiguration extends WebMvcConfigurationSupport {
  // ......
}
3、我们来回顾一下Webmvc自动配置类
@Configuration(proxyBeanMethods = false)
@ConditionalOnWebApplication(type = Type.SERVLET)
@ConditionalOnClass({ Servlet.class, DispatcherServlet.class, WebMvcConfigurer.class })
// 这个注解的意思就是:容器中没有这个组件的时候,这个自动配置类才生效
@ConditionalOnMissingBean(WebMvcConfigurationSupport.class)
@AutoConfigureOrder(Ordered.HIGHEST_PRECEDENCE + 10)
@AutoConfigureAfter({ DispatcherServletAutoConfiguration.class, TaskExecutionAutoConfiguration.class,
    ValidationAutoConfiguration.class })
public class WebMvcAutoConfiguration {

}
总结一句话:@EnableWebMvc将WebMvcConfigurationSupport组件导入进来了;
而导入的WebMvcConfigurationSupport只是SpringMVC最基本的功能!
在SpringBoot中会有非常多的扩展配置,只要看见了这个,我们就应该多留心注意~
5 、员工管理系统准备
5.1 准备工作
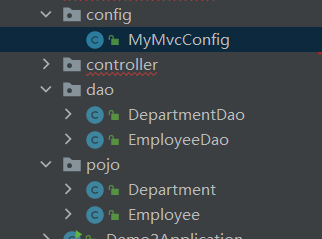
config/MyMvcConfig
package com.example.demo2.config;


import org.springframework.context.annotation.Configuration;
import org.springframework.web.servlet.config.annotation.EnableWebMvc;
import org.springframework.web.servlet.config.annotation.WebMvcConfigurer;


@Configuration
@EnableWebMvc
public class MyMvcConfig implements WebMvcConfigurer {
}
- 部门表
pojo/Department
package com.example.demo2.pojo;

import lombok.AllArgsConstructor;
import lombok.Data;
import lombok.NoArgsConstructor;

//部门表
@Data
@AllArgsConstructor
@NoArgsConstructor
public class Department {
    private int id;
    private String departmentName;
}
- 员工表
pojo/Employee
package com.example.demo2.pojo;


import lombok.AllArgsConstructor;
import lombok.Data;
import lombok.NoArgsConstructor;

import java.util.Date;

//员工表
@Data
@AllArgsConstructor
@NoArgsConstructor
public class Employee {
    private int id;
    private String lastName;
    private String email;
    private Integer gender;//性别 男:0

    private Department department;
    private Date birth;

    public Employee(int id, String lastName, String email, Integer gender, Department department) {
        this.id = id;
        this.lastName = lastName;
        this.email = email;
        this.gender = gender;
        this.department = department;
        this.birth = new Date();
    }
}
模拟实现数据库数据
dao/DepartmentDao
package com.example.demo2.dao;

import com.example.demo2.pojo.Department;

import java.util.Collection;
import java.util.HashMap;
import java.util.Map;

public class DepartmentDao {
    //模拟数据库数据
    private static Map<Integer, Department> departmentMap = null;
    static {
        departmentMap = new HashMap<Integer, Department>();
        departmentMap.put(101, new Department(101, "管理部"));
        departmentMap.put(102, new Department(102, "行政部"));
        departmentMap.put(103, new Department(103, "生产部"));
        departmentMap.put(104, new Department(104, "财务部"));
        departmentMap.put(105, new Department(105, "销售部"));
    }

    public Collection<Department> getAllDepartments(){
        return departmentMap.values();
    }

    public Department getDepartmentById(Integer id){
        return departmentMap.get(id);
    }

}
dao/EmployeeDao
package com.example.demo2.dao;

import com.example.demo2.pojo.Department;
import com.example.demo2.pojo.Employee;
import org.springframework.beans.factory.annotation.Autowired;
import org.springframework.stereotype.Repository;

import java.util.Collection;
import java.util.Date;
import java.util.HashMap;
import java.util.Map;

@Repository
public class EmployeeDao {
    //模拟数据库数据
    private static Map<Integer, Employee> employeeMap = null;

    @Autowired
    private static DepartmentDao departmentDao;
    static {
        employeeMap = new HashMap<Integer, Employee>();
        employeeMap.put(1001, new Employee(1001, "张三", "id_07221001@qq.com", 0, new Department(101, "管理部")));
        employeeMap.put(1002, new Employee(1002, "李四", "id_07221002@qq.com", 1, new Department(102, "行政部")));
        employeeMap.put(1003, new Employee(1003, "王五", "id_07221003@qq.com", 0, new Department(103, "生产部")));
        employeeMap.put(1004, new Employee(1004, "陈露", "id_07221004@qq.com", 1, new Department(104, "财务部")));
        employeeMap.put(1005, new Employee(1005, "无奇", "id_07221005@qq.com", 0, new Department(105, "销售部")));
    }

    //主键自增
    private static Integer initId;
    public void save(Employee employee){
        if(String.valueOf(employee.getId()) == null) {
            employee.setId(initId++);
        }
        employee.setDepartment(departmentDao.getDepartmentById(employee.getDepartment().getId()));
        employeeMap.put(employee.getId(),employee);
    }

    //查询员工
    public Collection<Employee> getAllEmployee(){
        return employeeMap.values();
    }

    public Employee getEmployeeById(Integer id){
        return employeeMap.get(id);
    }


    public void deleteEmployeeById(Integer id){
        employeeMap.remove(id);
    }
}
5.2 首页实现
package com.example.demo2.config;


import org.springframework.context.annotation.Configuration;
import org.springframework.web.servlet.config.annotation.EnableWebMvc;
import org.springframework.web.servlet.config.annotation.ViewControllerRegistry;
import org.springframework.web.servlet.config.annotation.WebMvcConfigurer;


@Configuration
@EnableWebMvc
public class MyMvcConfig implements WebMvcConfigurer {
    @Override
    public void addViewControllers(ViewControllerRegistry registry) {
        registry.addViewController("/").setViewName("index");
        registry.addViewController("/index.html").setViewName("index");
    }
}
- index.html
<!doctype html>
<html lang="en" xmlns:th="http://www.thymeleaf.org">
<head>
<meta charset="utf-8">
<meta name="viewport" content="width=device-width, initial-scale=1, shrink-to-fit=no">
<meta name="description" content="">
<meta name="author" content="">
<link rel="icon" th:href="@{/image/favicon.ico}">
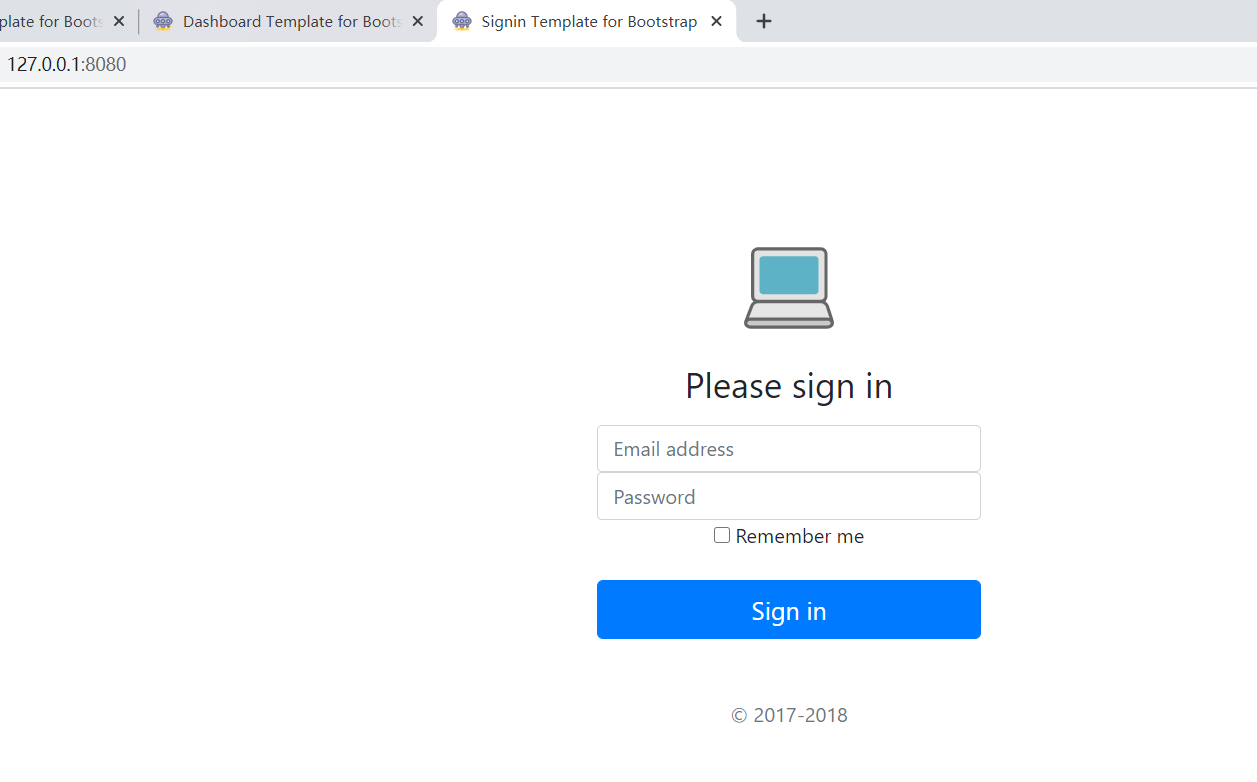
<title>Signin Template for Bootstrap</title>
<link rel="canonical" href="https://getbootstrap.com/docs/4.0/examples/sign-in/">
<!-- Bootstrap core CSS -->
<link th:href="@{/css/bootstrap.min.css}" rel="stylesheet">
<!-- Custom styles for this template -->
<link th:href="@{/css/signin.css}">
</head>
<body class="text-center">
<div class="text-center" style="margin:8% auto;width: 20%;">
<form class="form-signin">
<img class="mb-4" th:src="@{/image/笔记本电脑.svg}" alt="" width="72" height="72">
<h1 class="h3 mb-3 font-weight-normal">Please sign in</h1>
<label for="inputEmail" class="sr-only">Email address</label>
<input type="email" id="inputEmail" class="form-control" placeholder="Email address" required autofocus>
<label for="inputPassword" class="sr-only">Password</label>
<input type="password" id="inputPassword" class="form-control" placeholder="Password" required>
<div class="checkbox mb-3">
<label>
<input type="checkbox" value="remember-me"> Remember me
</label>
</div>
<button class="btn btn-lg btn-primary btn-block" type="submit">Sign in</button>
<p class="mt-5 mb-3 text-muted">© 2017-2018</p>
</form>
</div>
</body>
</html>
5.3 页面国际化
5.3.1 准备工作
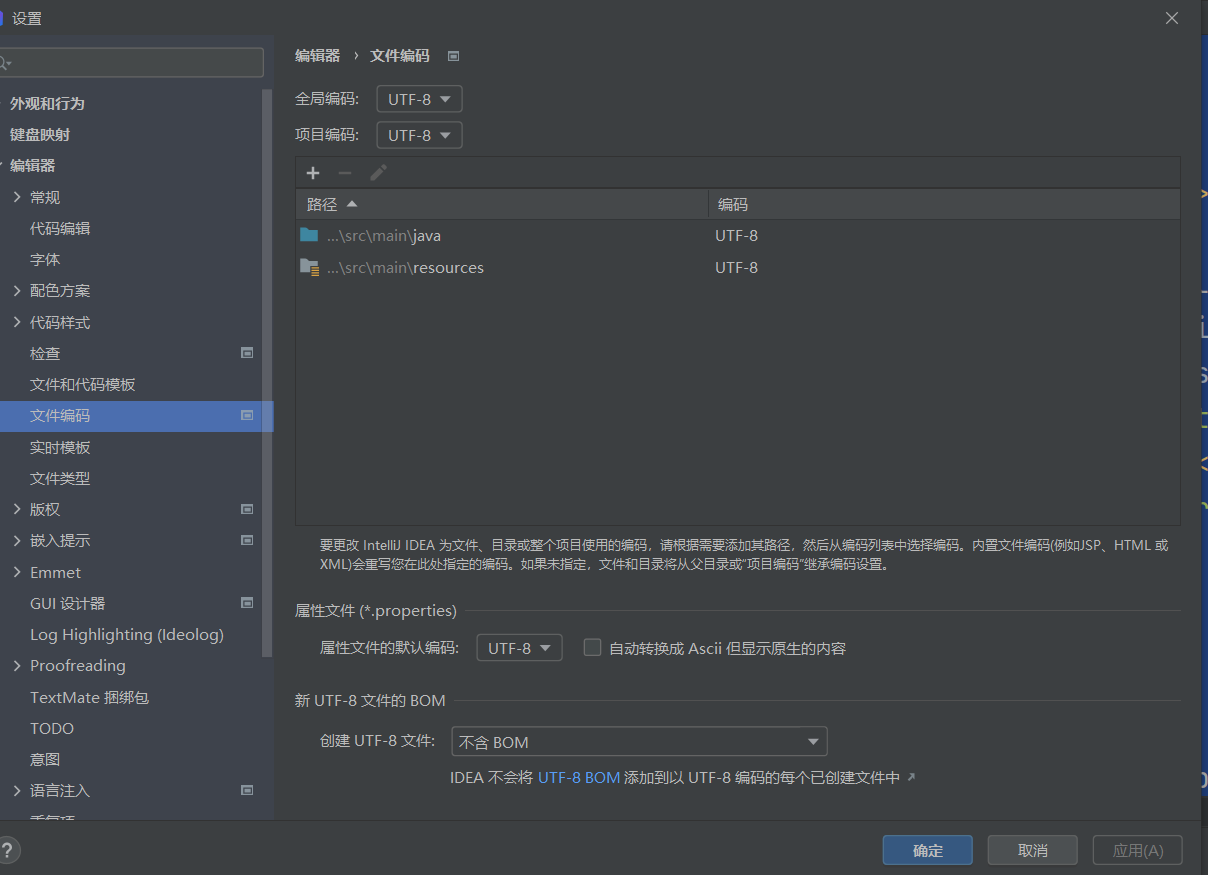
先在IDEA中统一设置properties的编码问题!
编写国际化配置文件,抽取页面需要显示的国际化页面消息。我们可以去登录页面查看一下,哪些内容我们需要编写国际化的配置!
5.3.2 配置文件编写
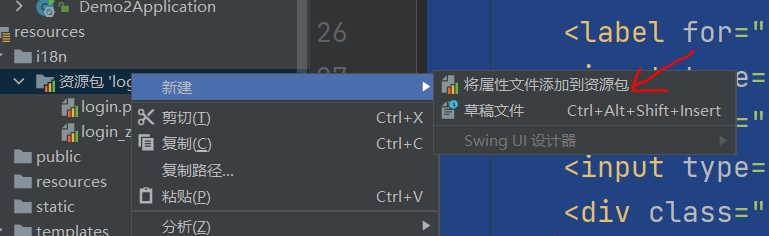
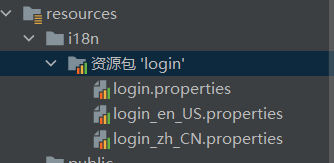
1、我们在resources资源文件下新建一个i18n目录,存放国际化配置文件
2、建立一个login.properties文件,还有一个login_zh_CN.properties;发现IDEA自动识别了我们要做国际化操作;文件夹变了!

3、我们可以在这上面去新建一个文件;
弹出如下页面:我们再添加一个英文的;
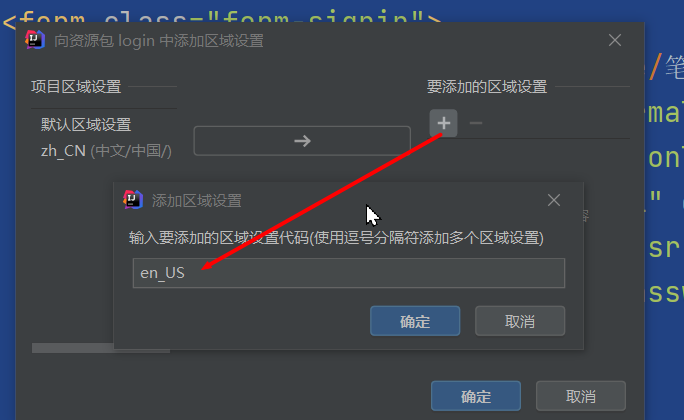
这样就快捷多了!
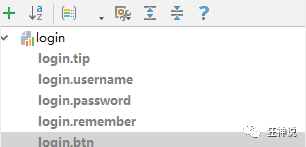
4、接下来,我们就来编写配置,我们可以看到idea下面有另外一个视图;
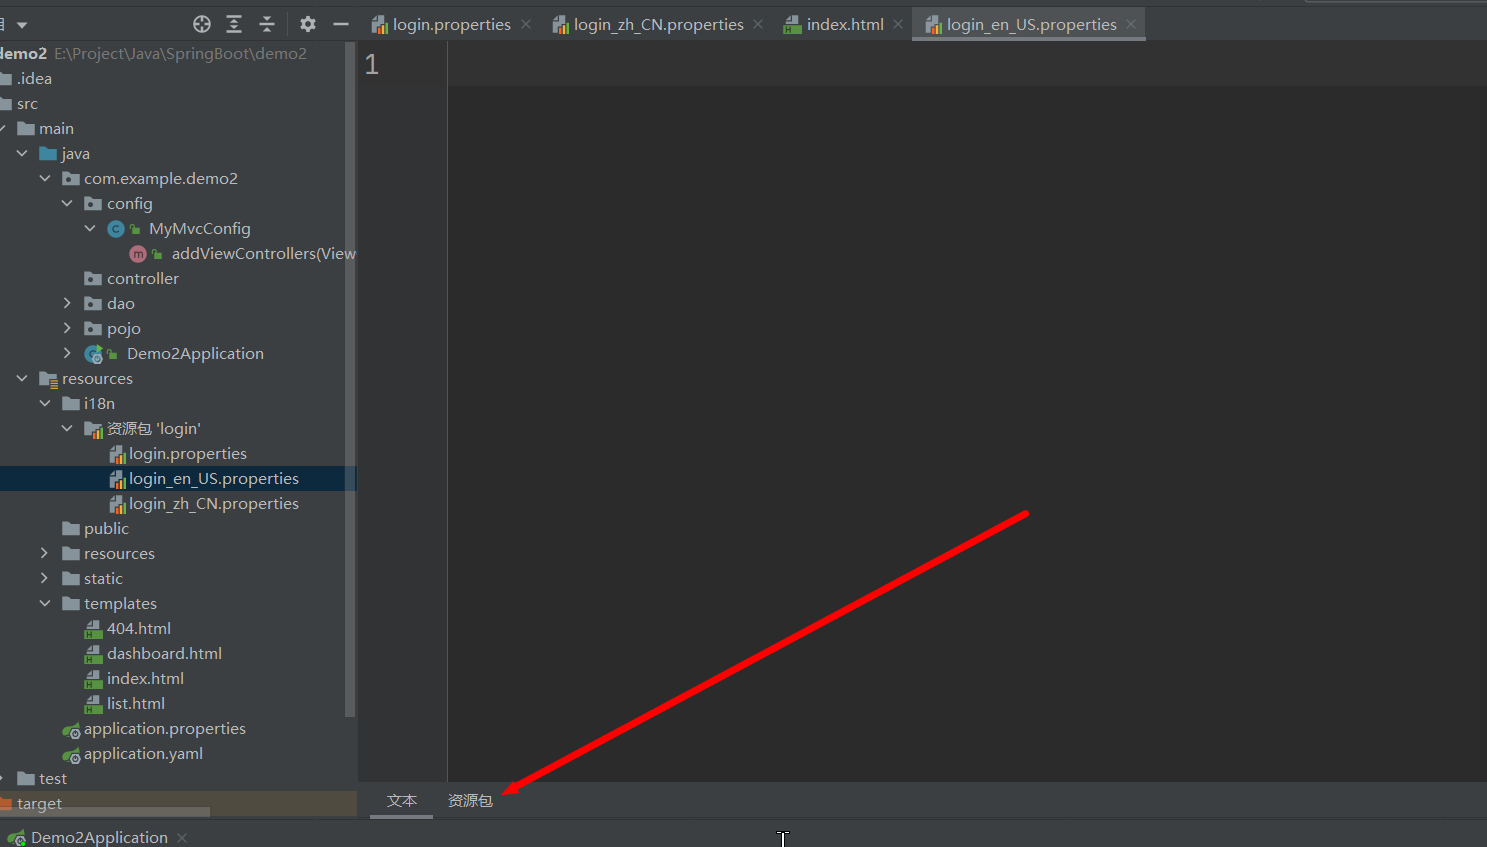
这个视图我们点击 + 号就可以直接添加属性了;我们新建一个login.tip,可以看到边上有三个文件框可以输入

我们添加一下首页的内容!

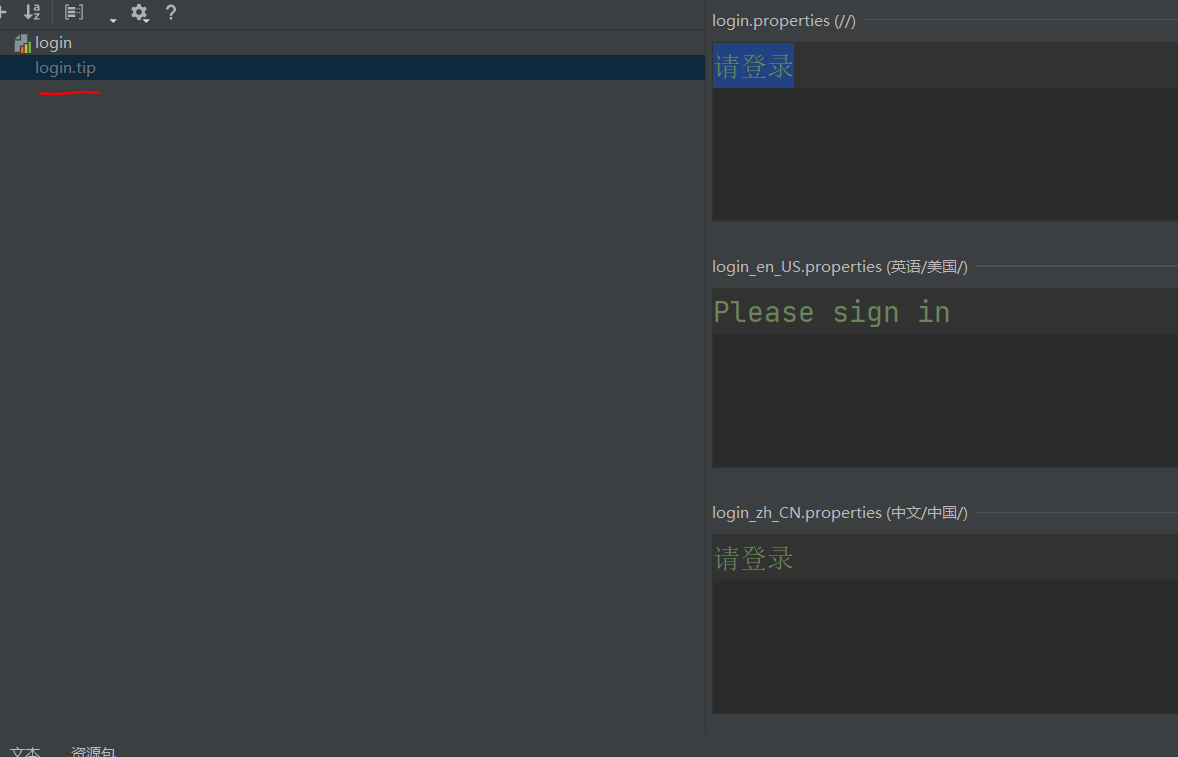
然后依次添加其他页面内容即可!
然后去查看我们的配置文件;
login.properties :默认
login.btn=登录
login.password=密码
login.remember=记住我
login.tip=请登录
login.username=用户名
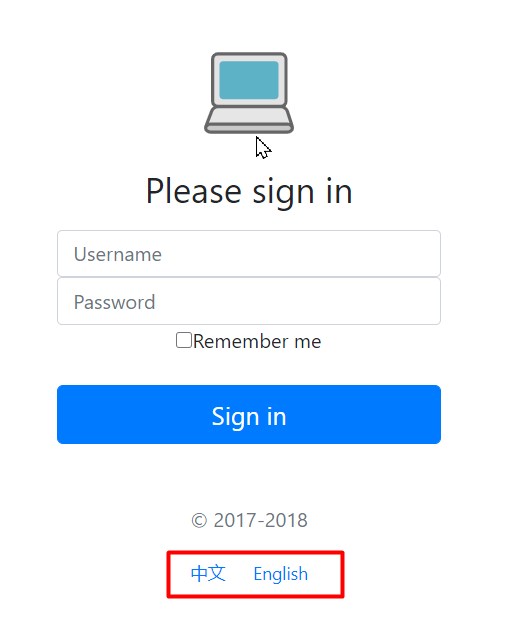
英文:
login.btn=Sign in
login.password=Password
login.remember=Remember me
login.tip=Please sign in
login.username=Username
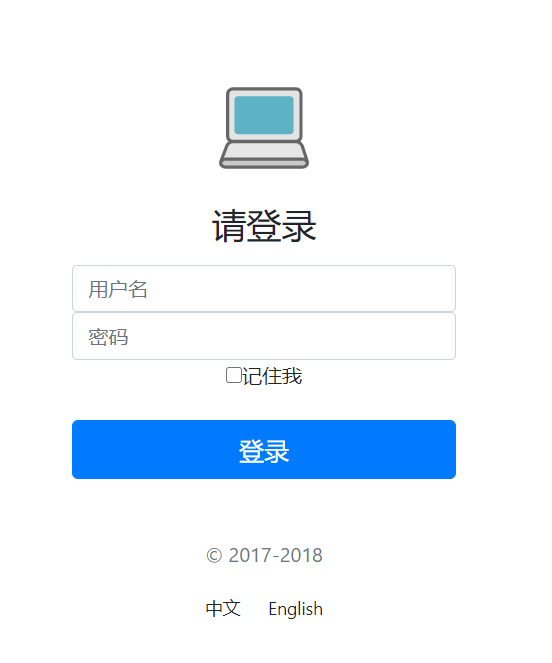
中文:
login.btn=登录
login.password=密码
login.remember=记住我
login.tip=请登录
login.username=用户名
OK,配置文件步骤搞定!
5.3.3 配置文件生效探究
我们去看一下SpringBoot对国际化的自动配置!这里又涉及到一个类:MessageSourceAutoConfiguration
里面有一个方法,这里发现SpringBoot已经自动配置好了管理我们国际化资源文件的组件 ResourceBundleMessageSource;
// 配置方法  spring.messages.** = **
@Bean
@ConfigurationProperties(
    prefix = "spring.messages"
)
public MessageSourceProperties messageSourceProperties() {
    return new MessageSourceProperties();
}


// 获取 properties 传递过来的值进行判断
@Bean
public MessageSource messageSource(MessageSourceProperties properties) {
    ResourceBundleMessageSource messageSource = new ResourceBundleMessageSource();
    if (StringUtils.hasText(properties.getBasename())) {
        messageSource.setBasenames(StringUtils.commaDelimitedListToStringArray(StringUtils.trimAllWhitespace(properties.getBasename())));
    }

    if (properties.getEncoding() != null) {
        messageSource.setDefaultEncoding(properties.getEncoding().name());
    }
    //....
查看MessageSourceProperties,可以配置的东西
public class MessageSourceProperties {
    private String basename = "messages";
    private Charset encoding;
    @DurationUnit(ChronoUnit.SECONDS)
    private Duration cacheDuration;
    private boolean fallbackToSystemLocale;
    private boolean alwaysUseMessageFormat;
    private boolean useCodeAsDefaultMessage;

    public MessageSourceProperties() {
        this.encoding = StandardCharsets.UTF_8;
        this.fallbackToSystemLocale = true;
        this.alwaysUseMessageFormat = false;
        this.useCodeAsDefaultMessage = false;
    }
    //...
我们真实 的情况是放在了i18n目录下,所以我们要去配置这个messages的路径;
spring.messages.basename=i18n/login
5.3.4 配置页面国际化值
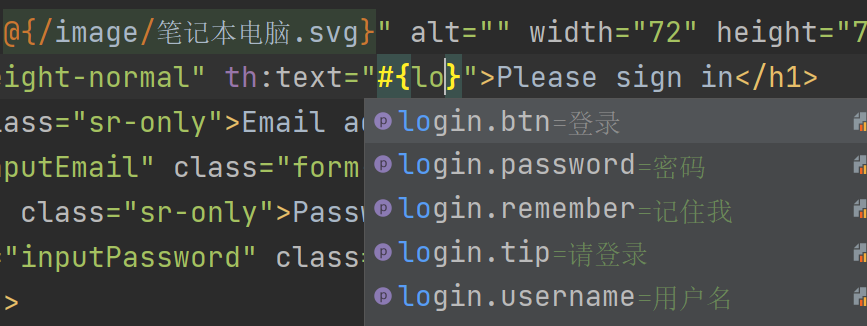
去页面获取国际化的值,查看Thymeleaf的文档,找到message取值操作为:#{…}。我们去页面测试下:
IDEA还有提示,非常智能的!
<body class="text-center">
<div class="text-center" style="margin:8% auto;width: 20%;">
<form class="form-signin">
<img class="mb-4" th:src="@{/image/笔记本电脑.svg}" alt="" width="72" height="72">
<h1 class="h3 mb-3 font-weight-normal" th:text="#{login.tip}">Please sign in</h1>
<label for="inputEmail" class="sr-only" th:text="#{login.username}">Username</label>
<input type="text" id="inputEmail" class="form-control" placeholder="Username" th:placeholder="#{login.username}" required autofocus>
<label for="inputPassword" class="sr-only" th:text="#{login.password}">Password</label>
<input type="password" id="inputPassword" class="form-control" placeholder="Password" th:placeholder="#{login.password}" required>
<div class="checkbox mb-3">
<label>
<input type="checkbox" value="remember-me" th:text="#{login.remember}">
</label>
</div>
<button class="btn btn-lg btn-primary btn-block" type="submit" th:text="#{login.btn}">Sign in</button>
<p class="mt-5 mb-3 text-muted">© 2017-2018</p>
<a class="btn btn-sm">中文</a>
<a class="btn btn-sm">English</a>
</form>
</div>
</body>
我们可以去启动项目,访问一下,发现已经自动识别为中文的了!
但是我们想要更好!可以根据按钮自动切换中文英文!
在Spring中有一个国际化的Locale (区域信息对象);里面有一个叫做LocaleResolver (获取区域信息对象)的解析器!
我们去我们webmvc自动配置文件,寻找一下!看到SpringBoot默认配置:
WebMvcAutoConfiguration
 @Bean
    @ConditionalOnMissingBean({HiddenHttpMethodFilter.class})
    @ConditionalOnProperty(
        prefix = "spring.mvc.hiddenmethod.filter",
        name = {"enabled"}
    )
    public OrderedHiddenHttpMethodFilter hiddenHttpMethodFilter() {
        return new OrderedHiddenHttpMethodFilter();
    }

    @Bean
    @ConditionalOnMissingBean({FormContentFilter.class})
    @ConditionalOnProperty(
        prefix = "spring.mvc.formcontent.filter",
        name = {"enabled"},
        matchIfMissing = true
    )
//...
 @Bean
        @ConditionalOnMissingBean(
            name = {"localeResolver"}
        )
        public LocaleResolver localeResolver() {
            if (this.webProperties.getLocaleResolver() == org.springframework.boot.autoconfigure.web.WebProperties.LocaleResolver.FIXED) {
                return new FixedLocaleResolver(this.webProperties.getLocale());
            } else {
                AcceptHeaderLocaleResolver localeResolver = new AcceptHeaderLocaleResolver();
                localeResolver.setDefaultLocale(this.webProperties.getLocale());
                return localeResolver;
            }
        }
AcceptHeaderLocaleContextResolver
 @Nullable
    public Locale getDefaultLocale() {
        return this.defaultLocale;
    }

    public Locale resolveLocale(HttpServletRequest request) {
        Locale defaultLocale = this.getDefaultLocale();
        if (defaultLocale != null && request.getHeader("Accept-Language") == null) {
            return defaultLocale;
        } else {
            Locale requestLocale = request.getLocale();
            List<Locale> supportedLocales = this.getSupportedLocales();
            if (!supportedLocales.isEmpty() && !supportedLocales.contains(requestLocale)) {
                Locale supportedLocale = this.findSupportedLocale(request, supportedLocales);
                if (supportedLocale != null) {
                    return supportedLocale;
                } else {
                    return defaultLocale != null ? defaultLocale : requestLocale;
                }
            } else {
                return requestLocale;
            }
        }
    }
那假如我们现在想点击链接让我们的国际化资源生效,就需要让我们自己的Locale生效!
我们去自己写一个自己的LocaleResolver(照着AcceptHeaderLocaleContextResolver),可以在链接上携带区域信息!
修改一下前端页面的跳转连接:
<!-- 这里传入参数不需要使用 ?使用 (key=value)-->
<a class="btn btn-sm" th:href="@{/index.html(l='zh_CN')}">中文</a>
<a class="btn btn-sm" th:href="@{/index.html(l='en_US')}">English</a>
我们去写一个处理的组件类!
package com.kuang.component;

import org.springframework.util.StringUtils;
import org.springframework.web.servlet.LocaleResolver;

import javax.servlet.http.HttpServletRequest;
import javax.servlet.http.HttpServletResponse;
import java.util.Locale;

//可以在链接上携带区域信息
public class MyLocaleResolver implements LocaleResolver {

    //解析请求
    @Override
    public Locale resolveLocale(HttpServletRequest request) {

        String language = request.getParameter("l");
        Locale locale = Locale.getDefault(); // 如果没有获取到就使用系统默认的
        //如果请求链接不为空
        if (!StringUtils.isEmpty(language)){
            //分割请求参数
            String[] split = language.split("_");
            //国家,地区
            locale = new Locale(split[0],split[1]);
        }
        return locale;
    }

    @Override
    public void setLocale(HttpServletRequest httpServletRequest, HttpServletResponse httpServletResponse, Locale locale) {

    }
}
为了让我们的区域化信息能够生效,我们需要再配置一下这个组件!在我们自己的MyMvcConfig下添加bean;
@Bean
public LocaleResolver localeResolver(){
    return new MyLocaleResolver();
}
我们重启项目,来访问一下,发现点击按钮可以实现成功切换!搞定收工!
6、登录功能实现
6.1 实现登录控制器:
- 登录控制器:LoginController
package com.example.demo2.controller;

import org.springframework.stereotype.Controller;
import org.springframework.ui.Model;
import org.springframework.web.bind.annotation.RequestMapping;
import org.springframework.web.bind.annotation.RequestParam;

@Controller
public class LoginController {

    @RequestMapping("/user/login")
    public String userLogin(Model model,
            @RequestParam("username") String username,
            @RequestParam("password") String password){

        if(!username.isEmpty() & !password.isEmpty() & password.equals("123456")){
            return "redirect:/main.html";
        }else{
            model.addAttribute("msg","用户名或密码错误!");
            return "index";
        }
    }
}
- MyMvcConfig
public void addViewControllers(ViewControllerRegistry registry) {
    registry.addViewController("/").setViewName("index");
    registry.addViewController("/index.html").setViewName("index");
    registry.addViewController("/main.html").setViewName("dashboard");
    registry.addViewController("/404.html").setViewName("404");
    registry.addViewController("/list.html").setViewName("list");
}
- index.html
<div class="text-center" style="margin:8% auto;width: 20%;">
<form class="form-signin" th:action="@{/user/login}">
<img class="mb-4" th:src="@{/image/笔记本电脑.svg}" alt="" width="72" height="72">
<h1 class="h3 mb-3 font-weight-normal" th:text="#{login.tip}">Please sign in</h1>
<p style="color: red" th:text="${msg}" th:if="${not #strings.isEmpty(msg)}"></p>
<input type="text" id="inputEmail" class="form-control" placeholder="Username" name="username"
th:placeholder="#{login.username}" required autofocus>
<input type="password" id="inputPassword" class="form-control" placeholder="Password" name="password"
th:placeholder="#{login.password}" required>
<div class="checkbox mb-3">
<label>
<input type="checkbox" value="remember-me" th:text="#{login.remember}">
</label>
</div>
<button class="btn btn-lg btn-primary btn-block" type="submit" th:text="#{login.btn}">Sign in</button>
<p class="mt-5 mb-3 text-muted">© 2017-2018</p>
<!-- 这里传入参数不需要使用 ?使用 (key=value)-->
<a class="btn btn-sm" th:href="@{/index.html(l='zh_CN')}">中文</a>
<a class="btn btn-sm" th:href="@{/index.html(l='en_US')}">English</a>
</form>
</div>
6.2 登录拦截器
- 新建登录拦截器 LoginHandlerInterInterceptor
package com.example.demo2.config;

import org.springframework.web.servlet.HandlerInterceptor;
import org.springframework.web.servlet.ModelAndView;

import javax.servlet.http.HttpServletRequest;
import javax.servlet.http.HttpServletResponse;

public class LoginHandlerInterInterceptor implements HandlerInterceptor {
    @Override
    public boolean preHandle(HttpServletRequest request, HttpServletResponse response, Object handler) throws Exception {
        //判断Session
        Object loginUser = request.getSession().getAttribute("loginUser");
        if(loginUser == null){
            request.setAttribute("msg", "没有权限,请先登录");
            request.getRequestDispatcher("/index.html").forward(request, response);
            return false;
        }else {
            return true;
        }
    }
}
- 配置登录拦截器 MyMvcConfig
@Override
public void addInterceptors(InterceptorRegistry registry) {
    WebMvcConfigurer.super.addInterceptors(registry);
    registry.addInterceptor(new LoginHandlerInterInterceptor())
            .addPathPatterns("/**").excludePathPatterns("/","/index.html",
            "/user/login","/css/*","/image/*","/js/*");
}
7、模板引擎(页面代码重用)
7.1 介绍
-
th:insert:保留自己的主标签,保留th:fragment的主标签
-
th:replace:不保留自己的主标签,保留th:fragment的主标签
-
th:include:保留自己的主标签,不保留th:fragment的主标签(官方3.0不推荐)
步骤1:注册要引用的html代码
th:fragment=“sidebar”
<nav class="col-md-2 d-none d-md-block bg-light sidebar" th:fragment="sidebar">
    <div class="sidebar-sticky">
        //......
    </div>
</nav>
步骤2:引用的html代码
th:replace=”~{dashboard::navbar}”
<nav th:replace="~{dashboard::navbar}"></nav>
模板引擎传参
- 传参
<nav th:replace="~{commons/commons::sidebar(active='list.html')}"></nav>
- 接受
<a th:class="${active=='main.html'?'nav-link active':'nav-link'}" th:href="@{/main.html}">
7.2 完整代码:
1.模板页面: commons.html
<!doctype html>
<html lang="en" xmlns:th="http://www.thymeleaf.org">
<!--模板-->
<head th:fragment="head">
  <meta charset="utf-8">
  <meta name="viewport" content="width=device-width, initial-scale=1, shrink-to-fit=no">
  <meta name="description" content="">
  <meta name="author" content="">
  <link rel="icon" th:href="@{/image/favicon.ico}">

  <title>员工管理系统</title>

  <link rel="canonical" href="https://getbootstrap.com/docs/4.0/examples/dashboard/">

  <!-- Bootstrap core CSS -->
  <link th:href="@{/css/bootstrap.min.css}" rel="stylesheet">

  <!-- Custom styles for this template -->
  <link th:href="@{/css/dashboard.css}" rel="stylesheet">
</head>

<body>
<!-- 头部-->
<nav class="navbar navbar-dark sticky-top bg-dark flex-md-nowrap p-0" th:fragment="navbar">
  <a class="navbar-brand col-sm-3 col-md-2 mr-0" href="#">[[${session.loginUser}]]</a>
  <input class="form-control form-control-dark w-100" type="text" placeholder="Search" aria-label="Search">
  <ul class="navbar-nav px-3">
    <li class="nav-item text-nowrap">
      <a class="nav-link" th:href="@{/index.html}">Sign out</a>
    </li>
  </ul>
</nav>

<div class="container-fluid">
  <div class="row">
    <!--侧边框-->
    <nav class="col-md-2 d-none d-md-block bg-light sidebar" th:fragment="sidebar">
      <div class="sidebar-sticky">
        <ul class="nav flex-column">
          <li class="nav-item">
            <a th:class="${active=='main.html'?'nav-link active':'nav-link'}" th:href="@{/main.html}">
              <span data-feather="home"></span>
              首页 <span class="sr-only">(current)</span>
            </a>
          </li>
          <li class="nav-item">
            <a class="nav-link" href="#">
              <span data-feather="file"></span>
              Orders
            </a>
          </li>
          <li class="nav-item">
            <a class="nav-link" href="#">
              <span data-feather="shopping-cart"></span>
              Products
            </a>
          </li>
          <li class="nav-item">
            <a th:class="${active=='list.html'?'nav-link active':'nav-link'}" th:href="@{/emps}">
              <span data-feather="users"></span>
              员工管理
            </a>
          </li>
          <li class="nav-item">
            <a class="nav-link" href="#">
              <span data-feather="bar-chart-2"></span>
              Reports
            </a>
          </li>
          <li class="nav-item">
            <a class="nav-link" href="#">
              <span data-feather="layers"></span>
              Integrations
            </a>
          </li>
        </ul>

        <h6 class="sidebar-heading d-flex justify-content-between align-items-center px-3 mt-4 mb-1 text-muted">
          <span>Saved reports</span>
          <a class="d-flex align-items-center text-muted" href="#">
            <span data-feather="plus-circle"></span>
          </a>
        </h6>
        <ul class="nav flex-column mb-2">
          <li class="nav-item">
            <a class="nav-link" href="#">
              <span data-feather="file-text"></span>
              Current month
            </a>
          </li>
          <li class="nav-item">
            <a class="nav-link" href="#">
              <span data-feather="file-text"></span>
              Last quarter
            </a>
          </li>
          <li class="nav-item">
            <a class="nav-link" href="#">
              <span data-feather="file-text"></span>
              Social engagement
            </a>
          </li>
          <li class="nav-item">
            <a class="nav-link" href="#">
              <span data-feather="file-text"></span>
              Year-end sale
            </a>
          </li>
        </ul>
      </div>
    </nav>


  </div>
</div>

<div th:fragment="js">
  <script th:href="@{/js/jquery-3.2.1.slim.min.js}"
          integrity="sha384-KJ3o2DKtIkvYIK3UENzmM7KCkRr/rE9/Qpg6aAZGJwFDMVNA/GpGFF93hXpG5KkN"
          crossorigin="anonymous"></script>
  <script>window.jQuery || document.write('<script src="../../assets/js/vendor/jquery-slim.min.js"><\/script>')</script>
  <script th:href="@{/js/popper.min.js}"></script>
  <script th:href="@{/js/bootstrap.min.js}"></script>

  <!-- Icons -->
  <script src="https://unpkg.com/feather-icons/dist/feather.min.js"></script>
  <script>
    feather.replace()
  </script>
</div>


</body>
</html>
2.引用模板的页面 dashboard.html:
<!doctype html>
<html lang="en" xmlns:th="http://www.thymeleaf.org">
<head th:replace="~{commons/commons::head}"></head>

<body>
<!--头部-->
<nav th:replace="~{commons/commons::navbar}"></nav>

<div class="container-fluid">
    <div class="row">
        <!-- 侧边框-->
        <nav th:replace="~{commons/commons::sidebar(active='main.html')}"></nav>

        <main role="main" class="col-md-9 ml-sm-auto col-lg-10 pt-3 px-4">
            <div class="d-flex justify-content-between flex-wrap flex-md-nowrap align-items-center pb-2 mb-3 border-bottom">
                <h1 class="h2">Dashboard</h1>
                <div class="btn-toolbar mb-2 mb-md-0">
                    <div class="btn-group mr-2">
                        <button class="btn btn-sm btn-outline-secondary">Share</button>
                        <button class="btn btn-sm btn-outline-secondary">Export</button>
                    </div>
                    <button class="btn btn-sm btn-outline-secondary dropdown-toggle">
                        <span data-feather="calendar"></span>
                        This week
                    </button>
                </div>
            </div>

            <canvas class="my-4" id="myChart" width="900" height="380"></canvas>

        </main>
    </div>
</div>

<div th:replace="~{commons/commons::js}"></div>

<!-- Graphs -->
<script src="https://cdnjs.cloudflare.com/ajax/libs/Chart.js/2.7.1/Chart.min.js"></script>
<script>
    var ctx = document.getElementById("myChart");
    var myChart = new Chart(ctx, {
        type: 'line',
        data: {
            labels: ["Sunday", "Monday", "Tuesday", "Wednesday", "Thursday", "Friday", "Saturday"],
            datasets: [{
                data: [15339, 21345, 18483, 24003, 23489, 24092, 12034],
                lineTension: 0,
                backgroundColor: 'transparent',
                borderColor: '#007bff',
                borderWidth: 4,
                pointBackgroundColor: '#007bff'
            }]
        },
        options: {
            scales: {
                yAxes: [{
                    ticks: {
                        beginAtZero: false
                    }
                }]
            },
            legend: {
                display: false,
            }
        }
    });
</script>

</body>
</html>
3.引用模板的页面 list.html
<!doctype html>
<html lang="en">
<head th:replace="~{commons/commons::head}"></head>

<body>
<!--头部-->
<nav th:replace="~{commons/commons::navbar}"></nav>

<div class="container-fluid">
  <div class="row">
    <!-- 侧边框-->
    <nav th:replace="~{commons/commons::sidebar(active='list.html')}"></nav>

    <main role="main" class="col-md-9 ml-sm-auto col-lg-10 pt-3 px-4">

      <div class="table-responsive">
        <table class="table table-striped table-sm">
          <thead>
          <tr>
            <th>#</th>
            <th>Header</th>
            <th>Header</th>
            <th>Header</th>
            <th>Header</th>
          </tr>
          </thead>
          <tbody>
          <tr>
            <td>1,001</td>
            <td>Lorem</td>
            <td>ipsum</td>
            <td>dolor</td>
            <td>sit</td>
          </tr>
          </tbody>
        </table>
      </div>

    </main>
  </div>
</div>


<div th:replace="~{commons/commons::js}"></div>

</body>
</html>
7.3 列表循环
<table class="table table-striped table-sm">
  <thead>
  <tr>
    <th>id</th>
    <th>lastName</th>
    <th>email</th>
    <th>gender</th>
    <th>department</th>
    <th>birth</th>
    <th>操作</th>
  </tr>
  </thead>
  <tbody>
  <tr th:each="emp:${emps}">
    <td th:text="${emp.getId()}"></td>
    <td th:text="${emp.getLastName()}"></td>
    <td th:text="${emp.getEmail()}"></td>
    <td th:text="${emp.getGender()==0?'男':'女'}"></td>
    <td th:text="${emp.department.getDepartmentName()}"></td>
    <td th:text="${#dates.format(emp.getBirth(),'yyyy-MM-dd HH:mm:ss')}"></td>
    <td>
      <button class="btn btn-sm btn-primary">编辑</button>-
      <button class="btn btn-sm btn-danger">删除</button>
    </td>
  </tr>
  </tbody>
</table>
版权声明:本文内容由互联网用户自发贡献,该文观点仅代表作者本人。本站仅提供信息存储空间服务,不拥有所有权,不承担相关法律责任。如发现本站有涉嫌侵权/违法违规的内容, 请发送邮件至 举报,一经查实,本站将立刻删除。
文章由极客之音整理,本文链接:https://www.bmabk.com/index.php/post/92663.html

