
外网映射(netApp)
在做
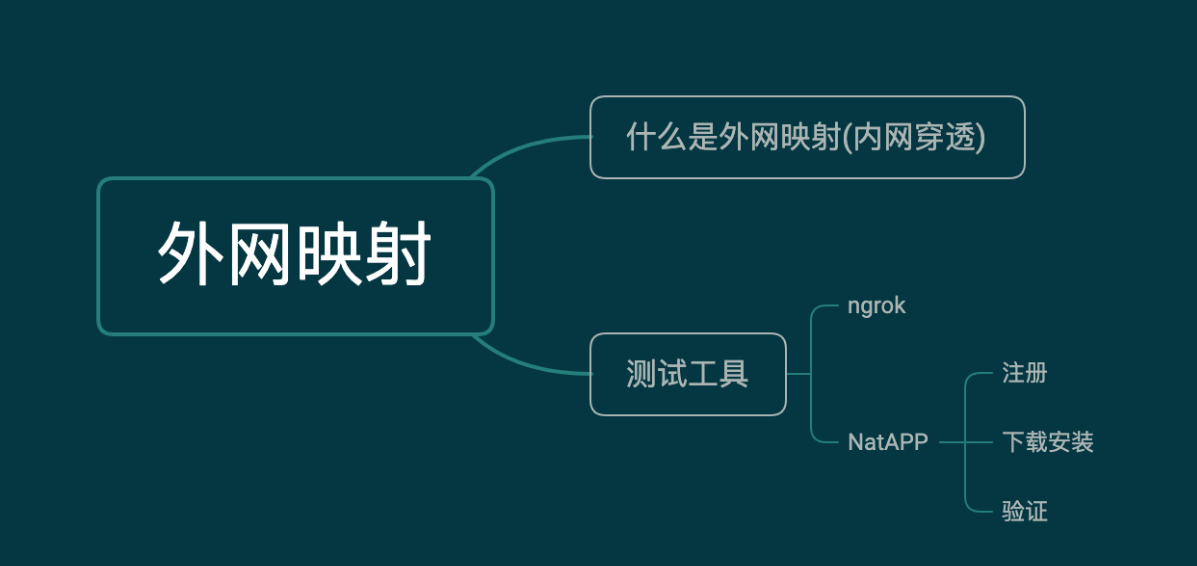
微信开发或者是对接第三方支付接口时,回调接口可能需要外网访问(内网穿透)。这时候开发者在本地测试的时候,需要用到外网测试工具。
平时常用的外网测试工具有natapp、ngrok(https://juejin.cn/post/6844903617279819784),下面我们主要来讲讲NatApp。
NatApp官网地址:https://natapp.cn/
1.注册账号
注册账号需要实名制,注册地址:https://natapp.cn/register
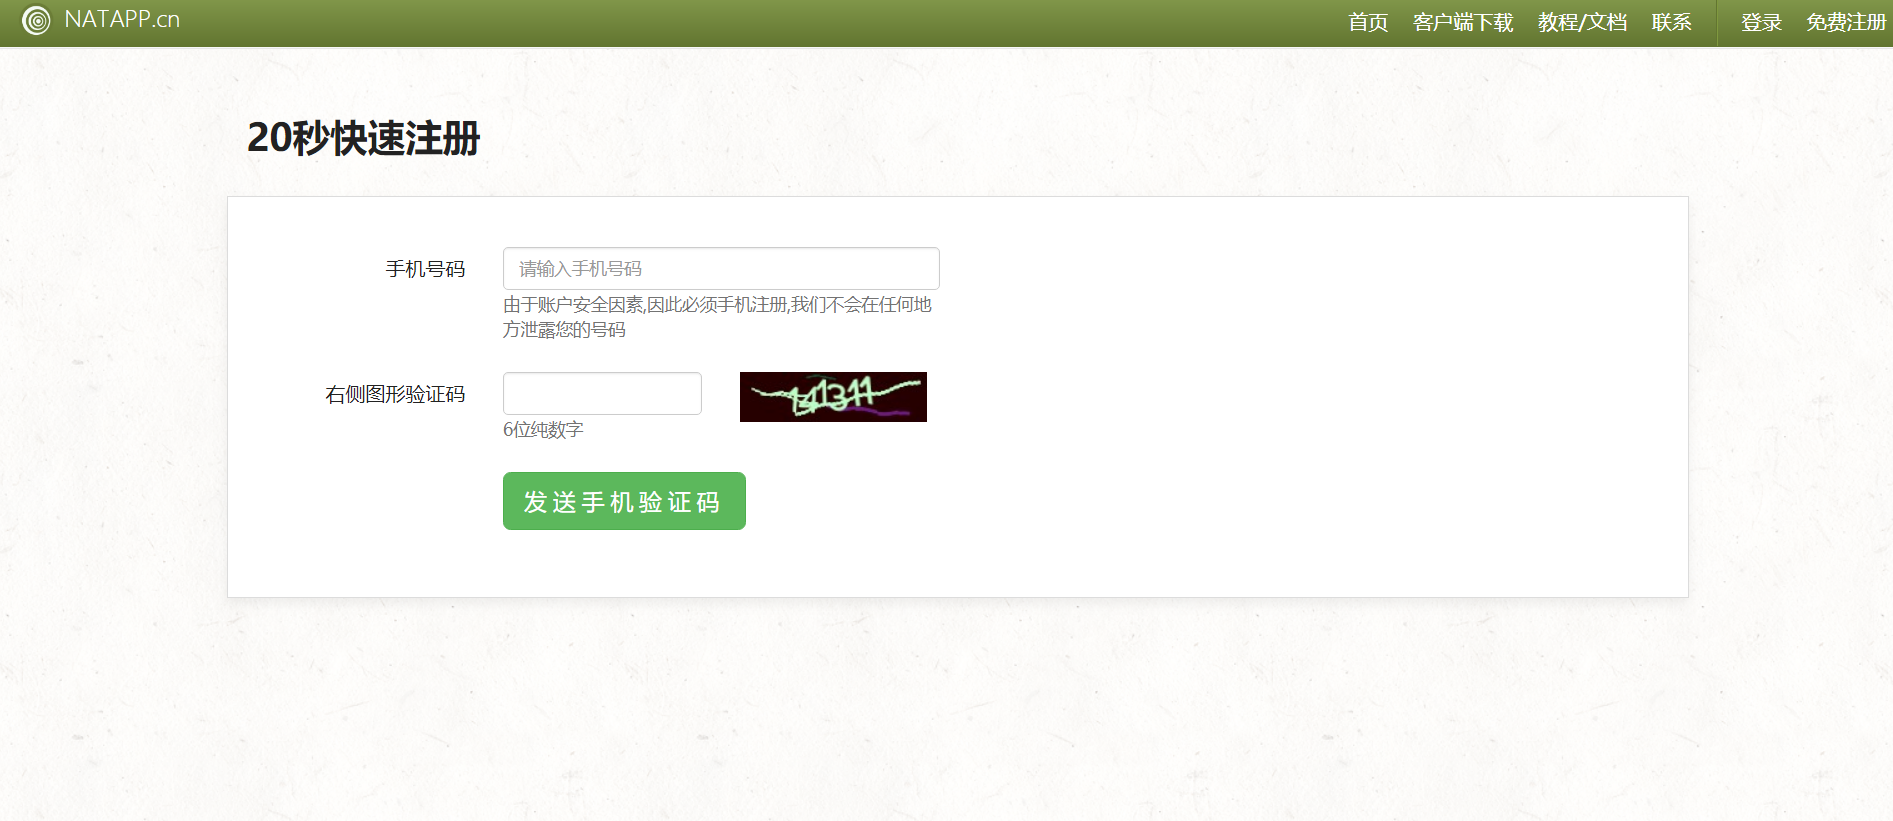
按照常规的一步一步来操作就可以了
2.实名验证

需要支付宝验证,验证成功后界面如下:

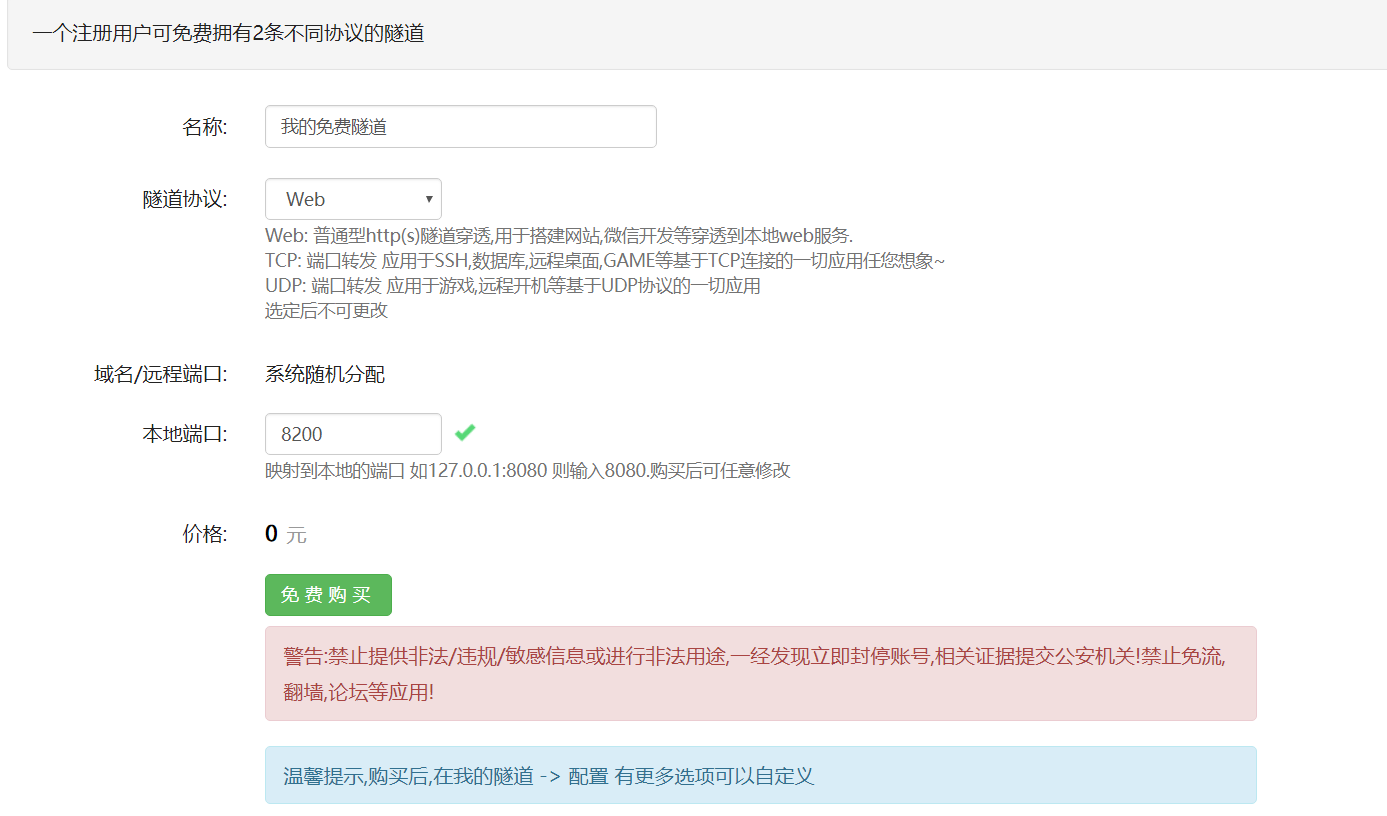
3.购买免费隧道

购买:
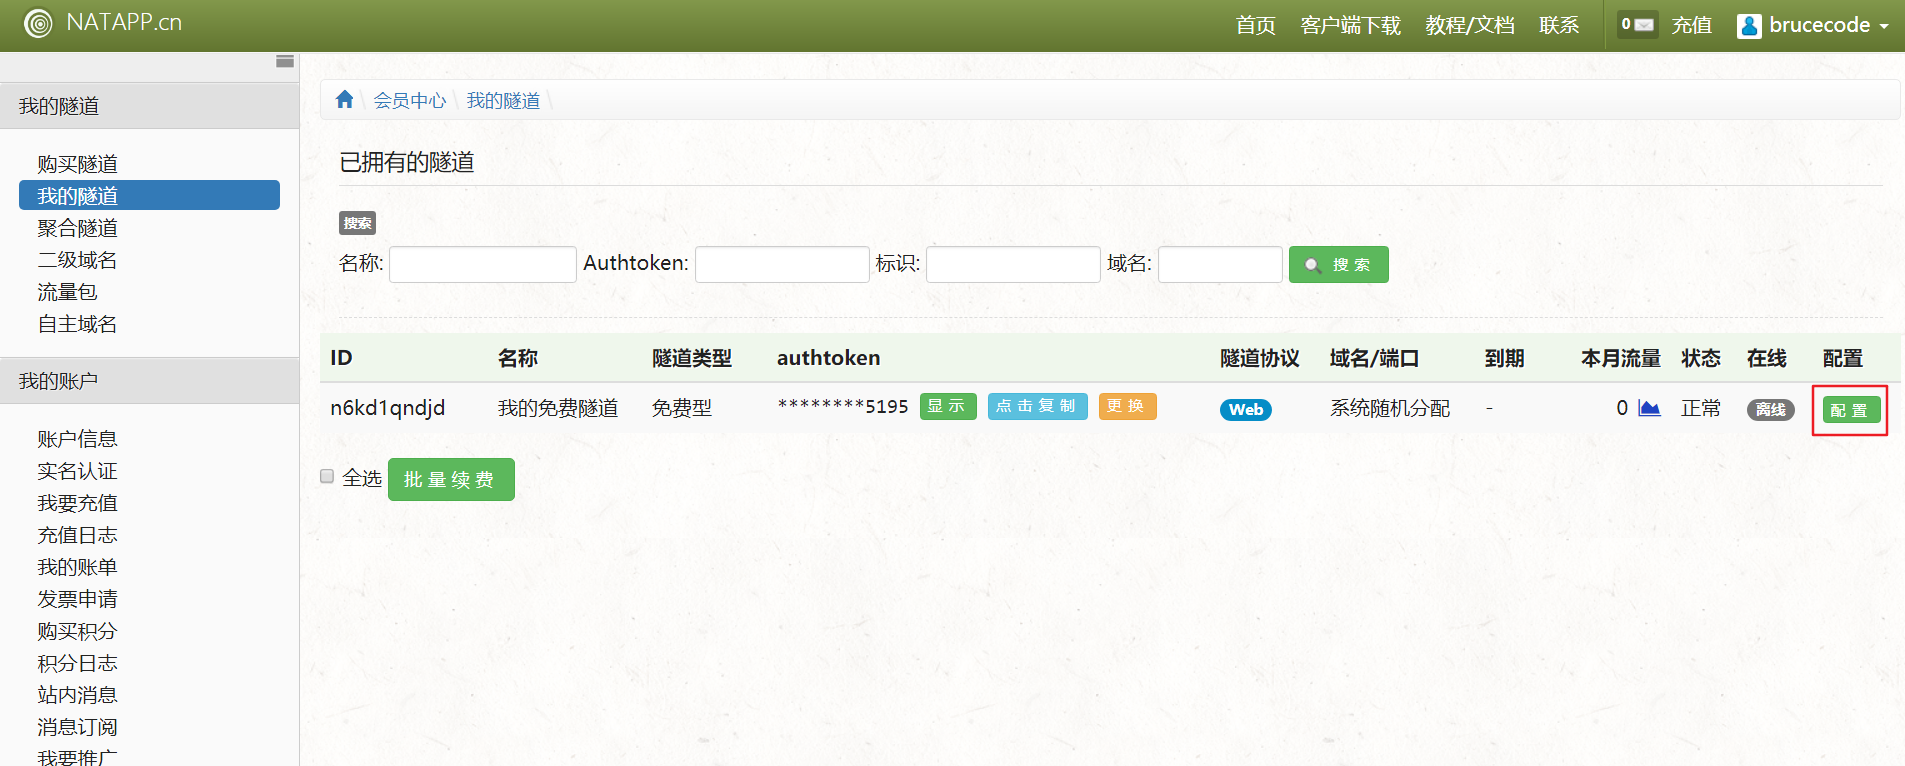
4.配置隧道
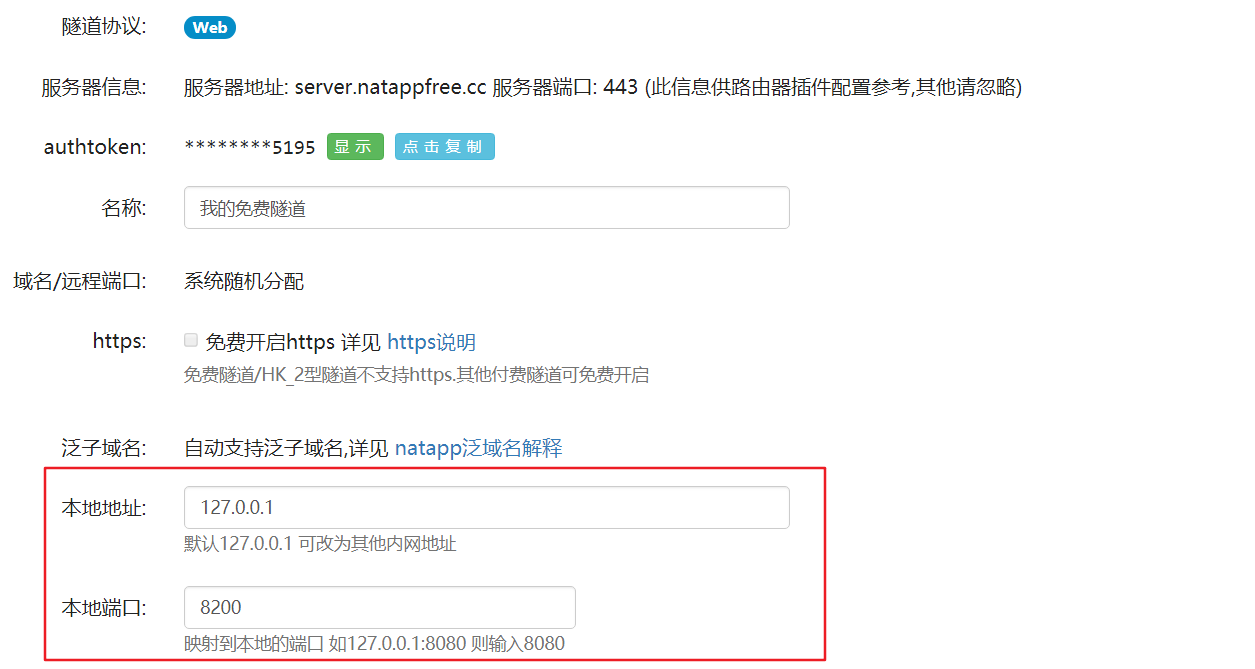
authtoken:开启natapp服务时用到的参数
主要是修改本地地址和本地端口
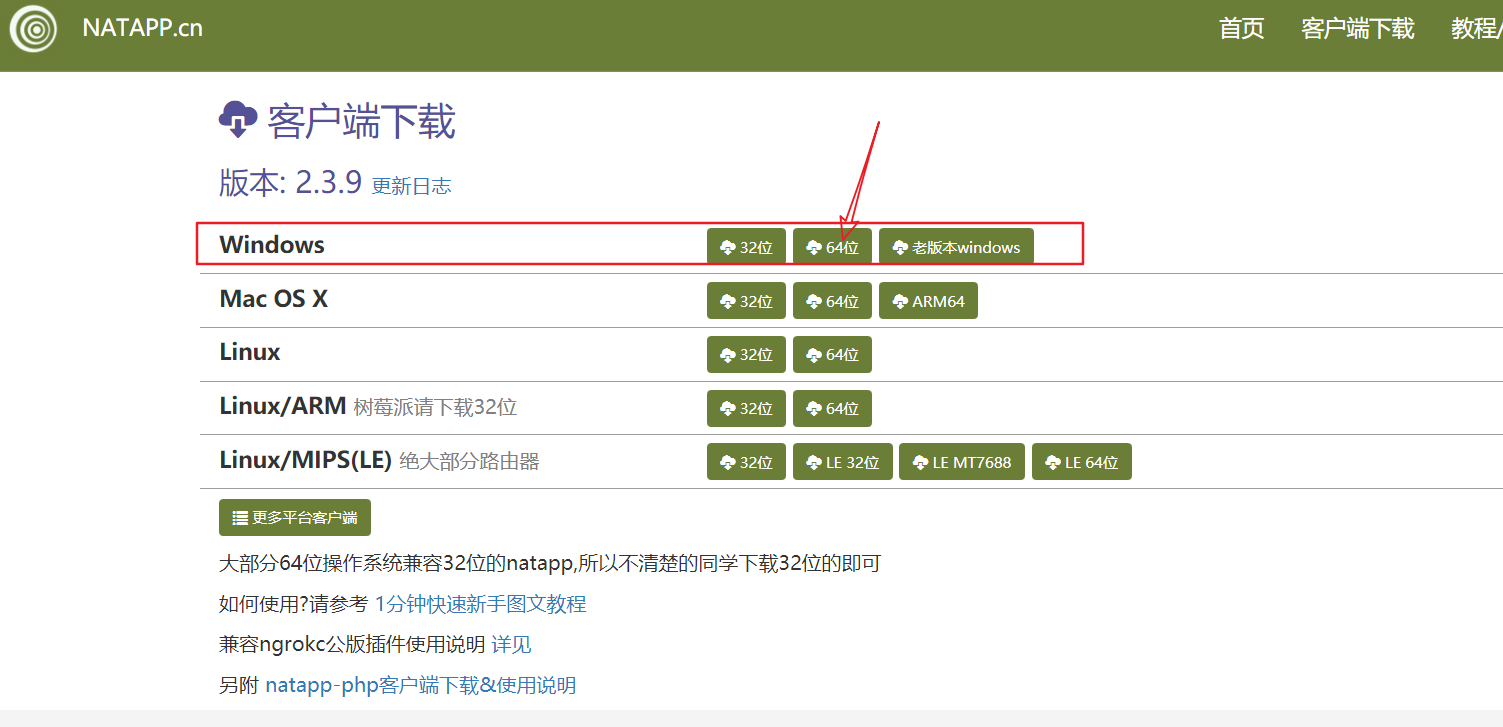
5.NatApp下载安装
1.根据自己的系统下载NatApp(我的是Mac系统):https://natapp.cn/
2.解压安装包,并进入安装包目录
3.在同一目录下,新建config.ini文件,并填写config.ini:

编辑config.ini,里面填上对应的authtoken
#将本文件放置于natapp同级目录 程序将读取 [default] 段
#在命令行参数模式如 natapp -authtoken=xxx 等相同参数将会覆盖掉此配置
#命令行参数 -config= 可以指定任意config.ini文件
[default]
authtoken=                      #对应一条隧道的authtoken
clienttoken=                    #对应客户端的clienttoken,将会忽略authtoken,若无请留空,
log=none                        #log 日志文件,可指定本地文件, none=不做记录,stdout=直接屏幕输出 ,默认为none
loglevel=ERROR                  #日志等级 DEBUG, INFO, WARNING, ERROR 默认为 DEBUG
http_proxy=                     #代理设置 如 http://10.123.10.10:3128 非代理上网用户请务必留空
4.与运行程序:
natapp.exe
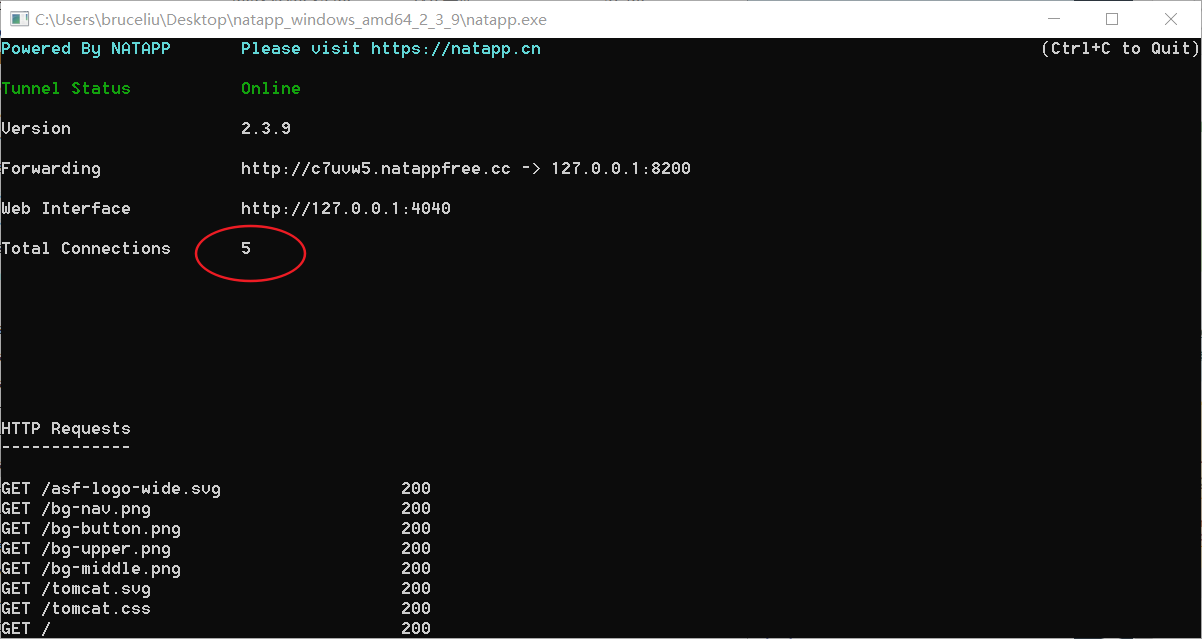
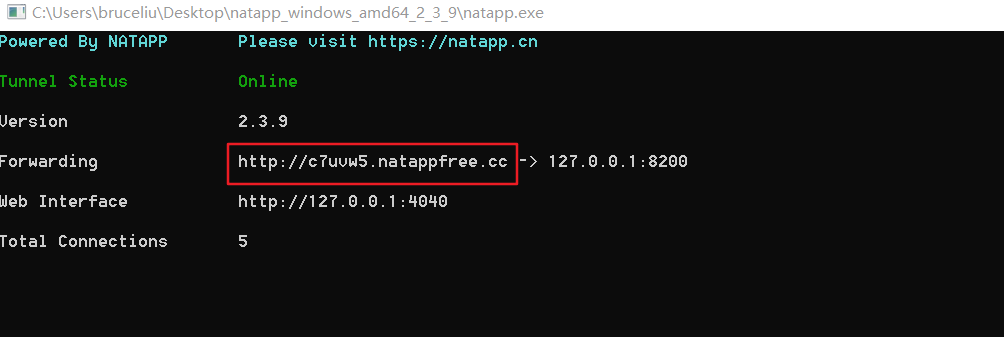
运行成功!

注意:http://c7uvw5.natappfree.cc这个地址就是外网访问内部网络127.0.0.1:8200的地址。
6.测试
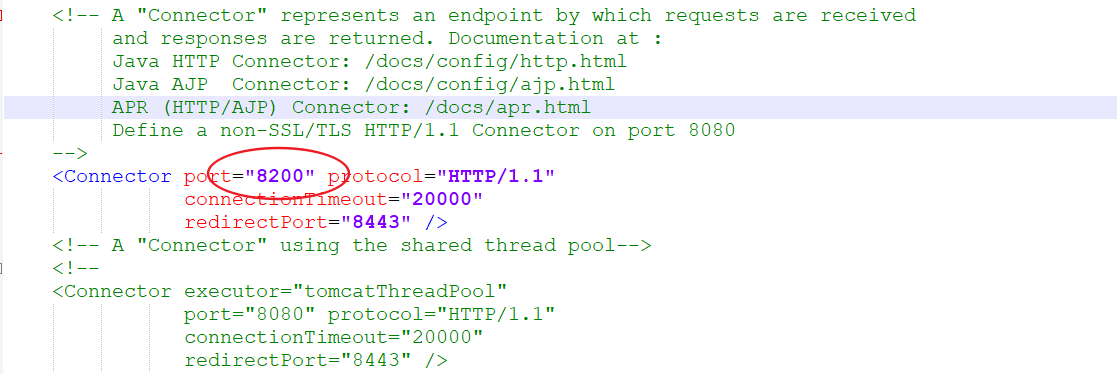
1.进入tomcat解压目录/config/server.xml,端口设置为8200:
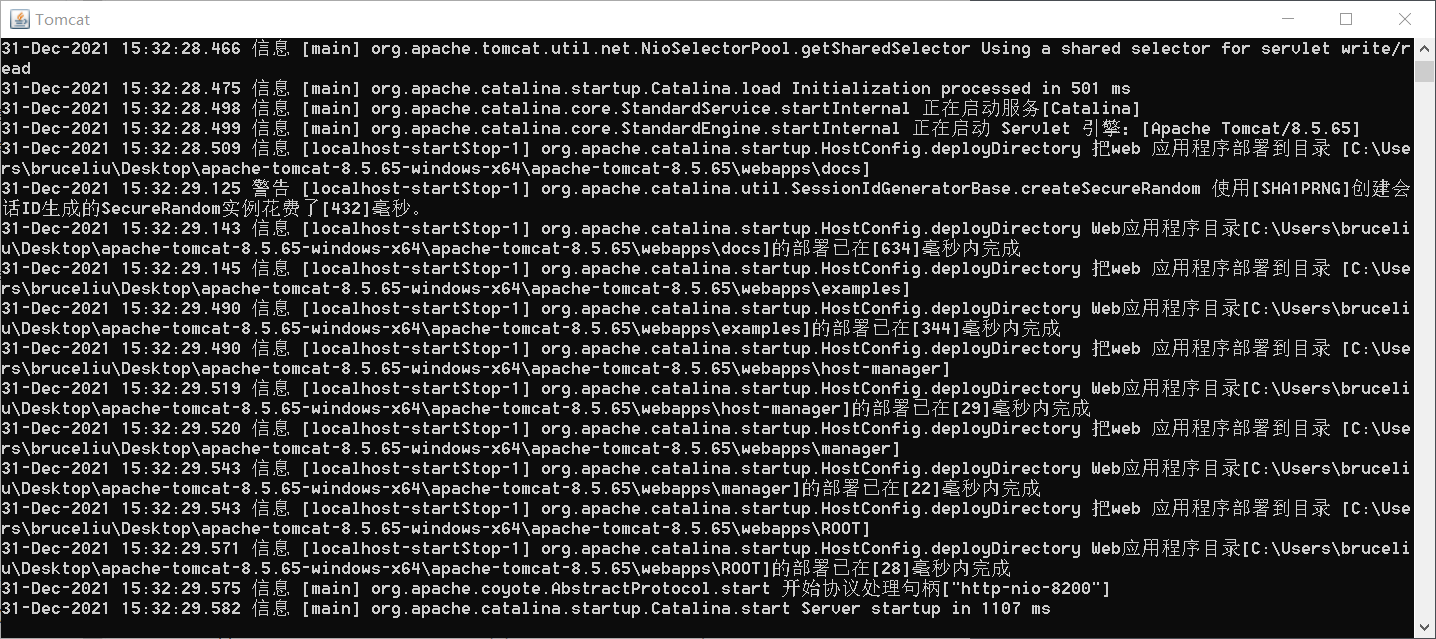
2.启动tomcat:新开一个命令窗口,进入tomcat解压目录/bin,启动tomcat:
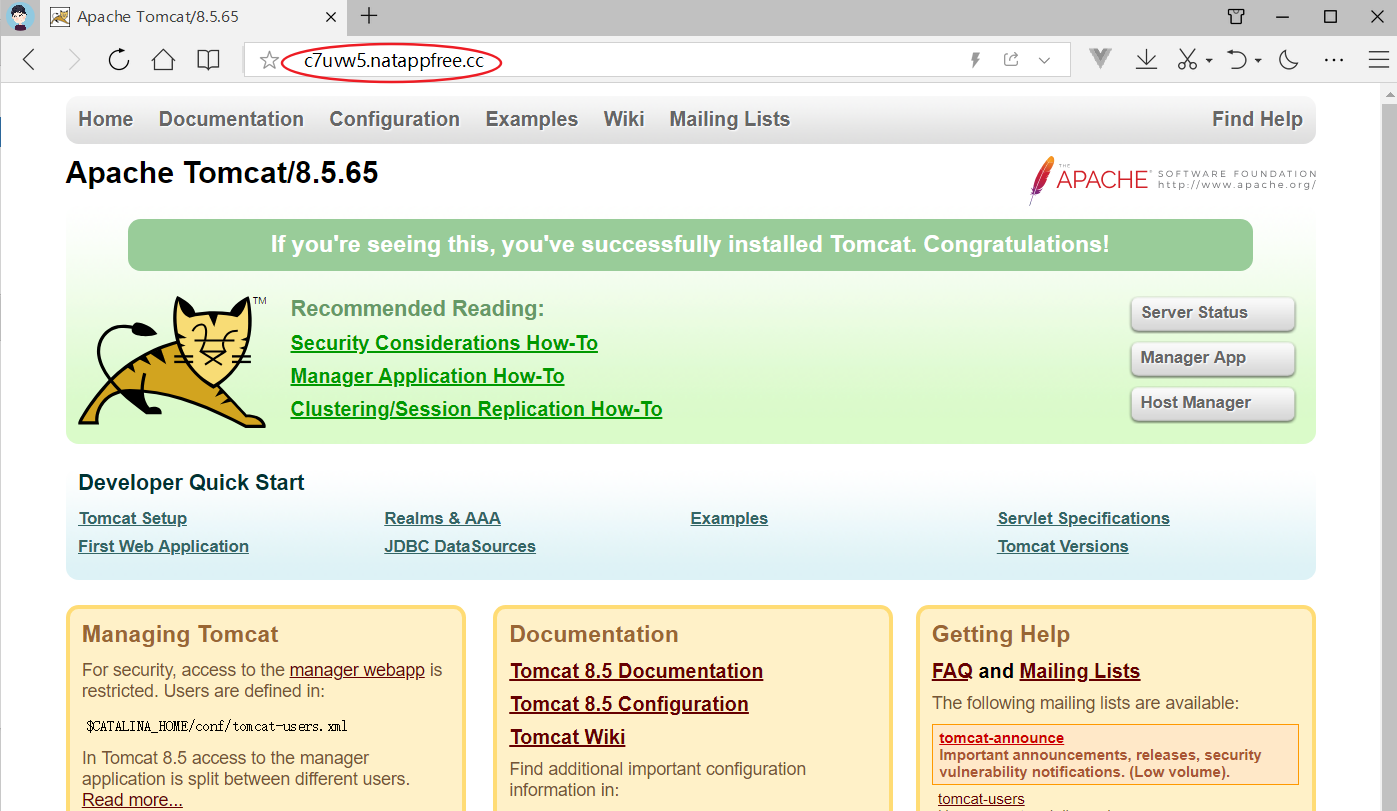
3.浏览器访问:输入http://localhost:8200/,可以看到本地访问成功:

使用NatApp生成的地址访问:http://c7uvw5.natappfree.cc,会发现跟本地的访问也是一样的。
同时命令框的内容也改变了:
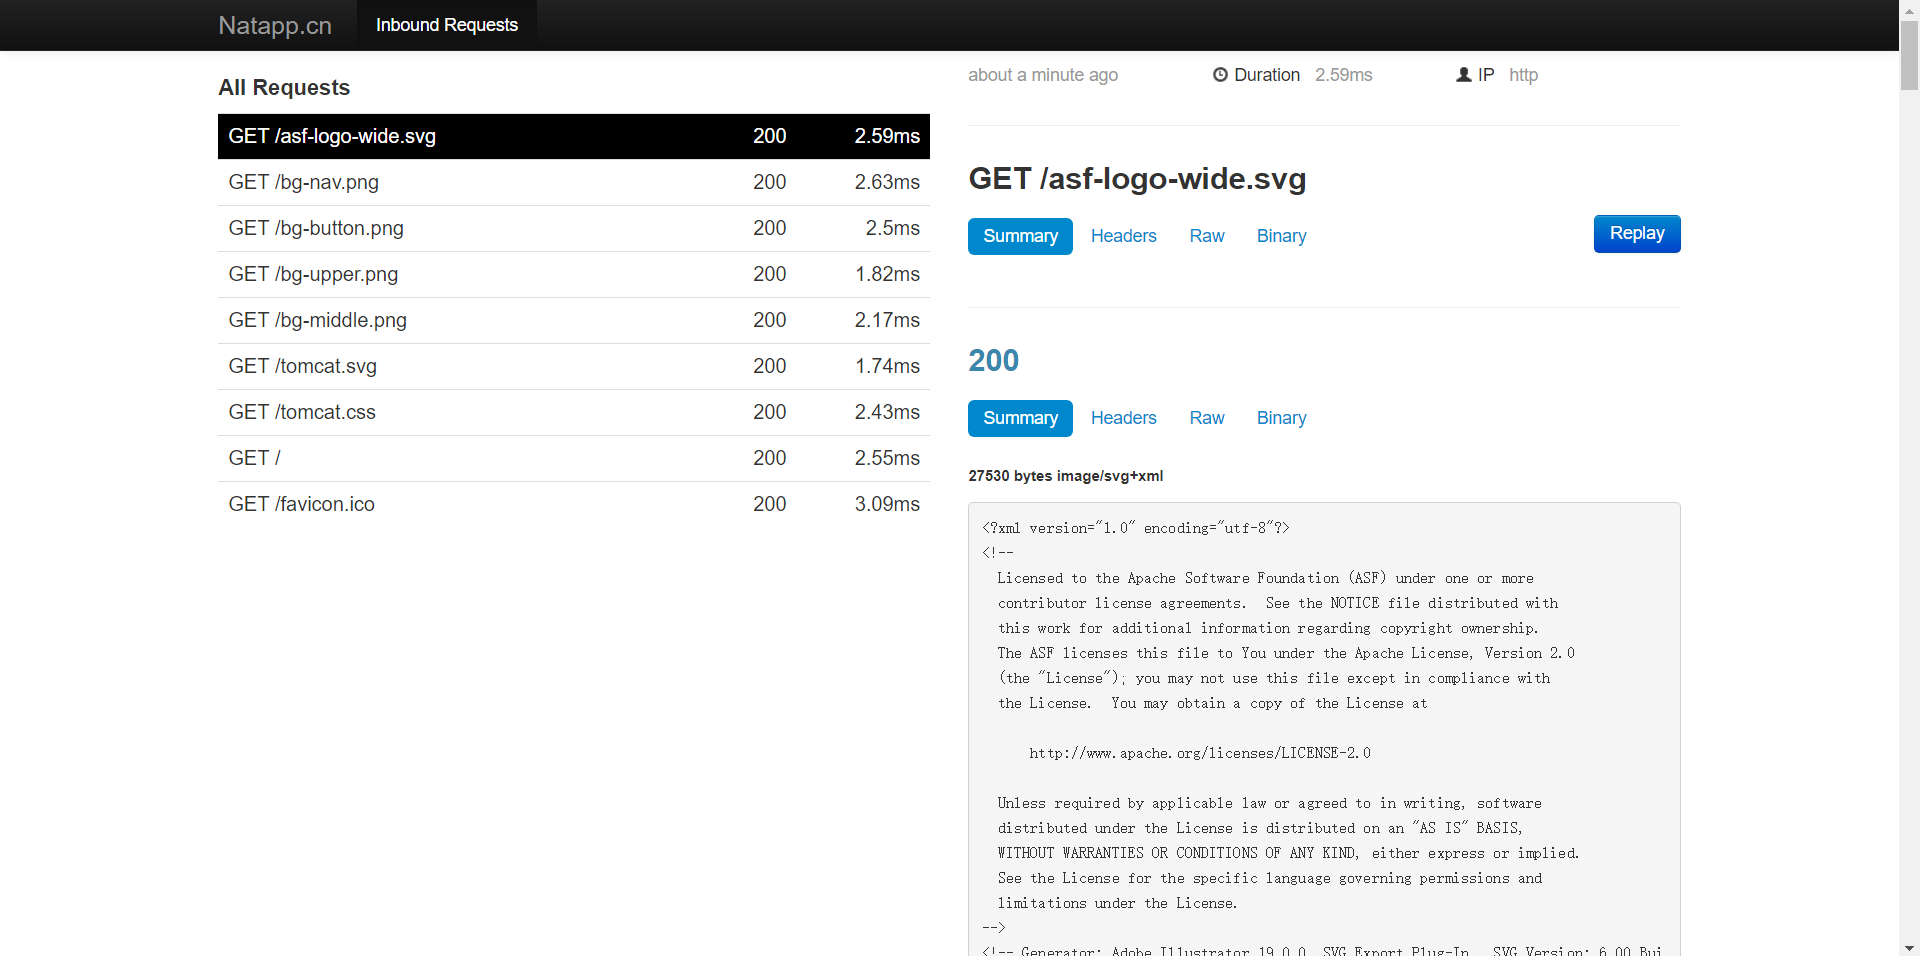
7.如何登录管理台查看信息?
浏览器输入网址:http://127.0.0.1:4040,可以看到每个请求的详细情况。
8.总结
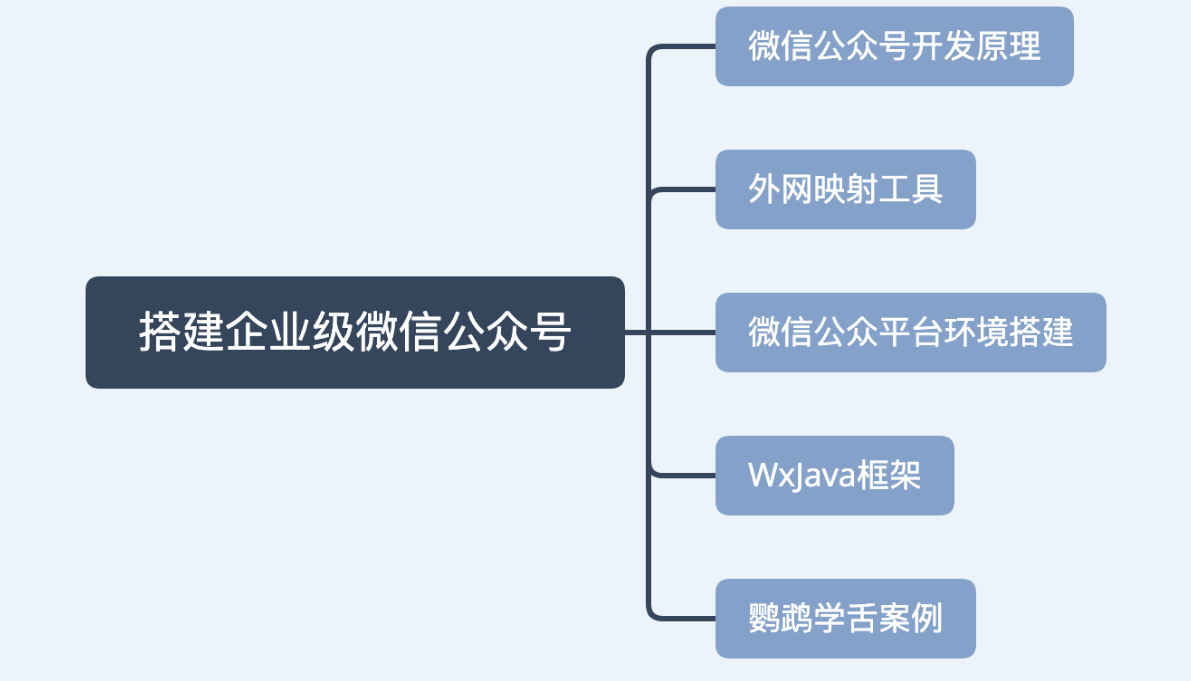
搭建企业级微信公众号
引言
本文开始讲解如何搭建企业级微信公众号以及如何使用WxJava框架来进行开发。
1.微信公众号开发原理
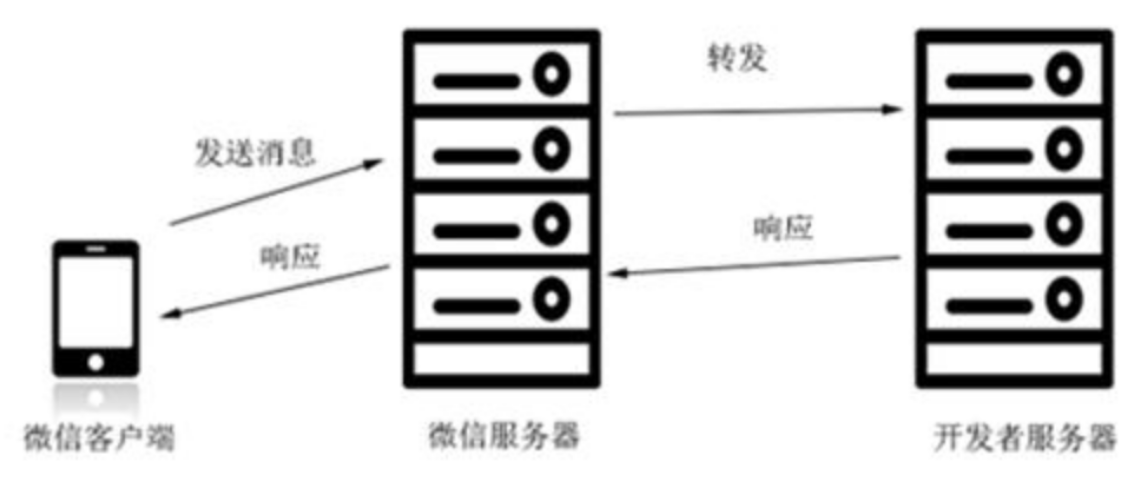
下面贴的是微信公众号开发原理图。其实站在我们开发者的角度来讲,微信服务器相当于是客户端,请求我们开发者服务器获取信息,并把信息反馈给微信用户,需要注意的几点如下:
- 微信服务器需要访问开发者服务器,必须把开发者服务器暴露在外网(下面讲的
NatApp来实现) - 开发者服务器的代码需要满足微信服务器请求的规则(下面讲的
WxJava框架来实现)

2.外网映射工具
外网访问工具,我这里使用的外网工具是NatApp,如果启动成功后,控制台会有如下信息:
其中上面涂上红色的URL就是外网的访问地址了,映射内网本地8200端口。
3. 微信公众平台环境配置
搭建好外网了,那么我们需要先在微信公众平台配置好我们的外网信息。
3.1. 微信公众平台配置介绍
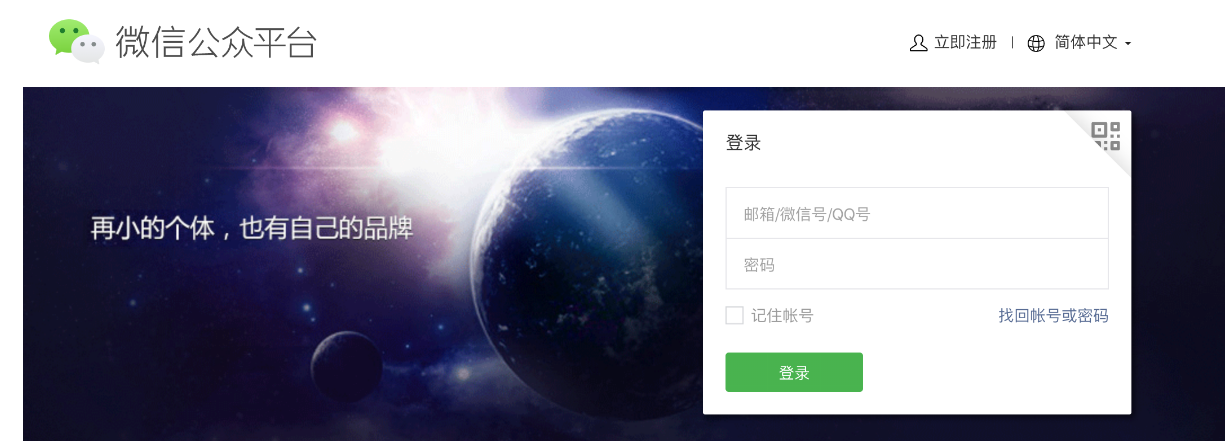
step1:登录微信公众平台https://mp.weixin.qq.com/,输入账号密码登录
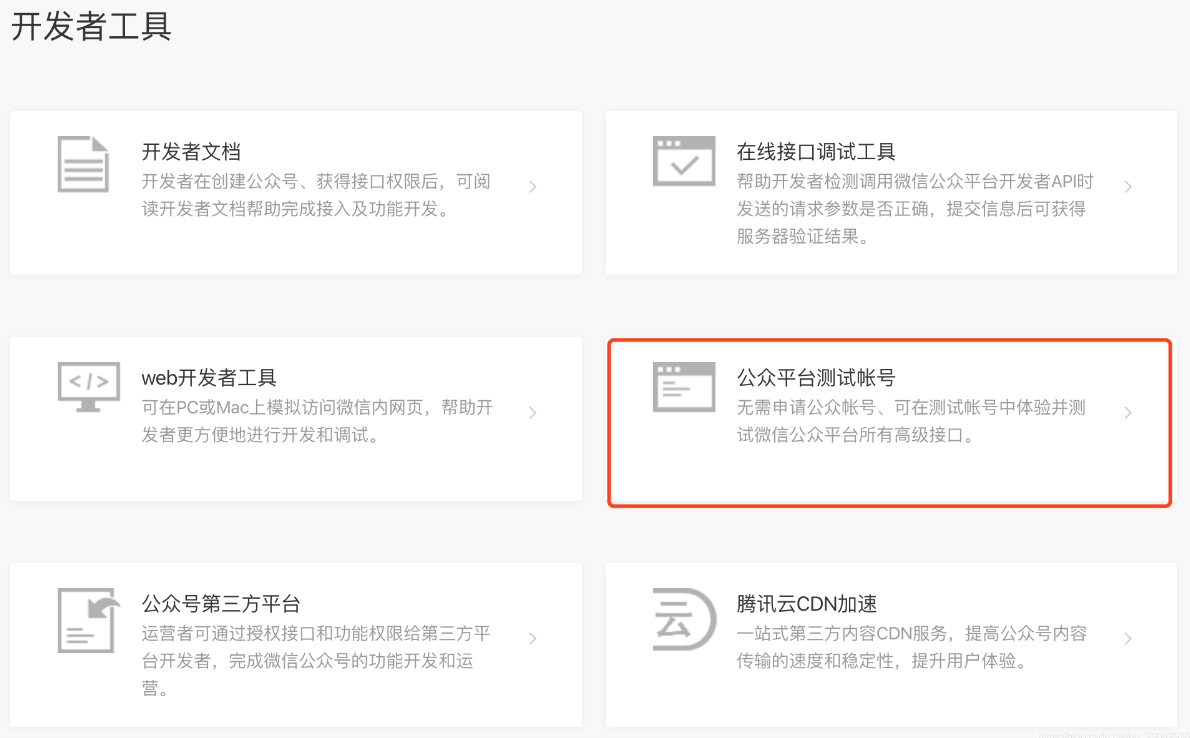
step2:登录成功后,扫码进入主页面,点击左侧菜单的 「开发者工具」,并选择“公众平台测试账号”。
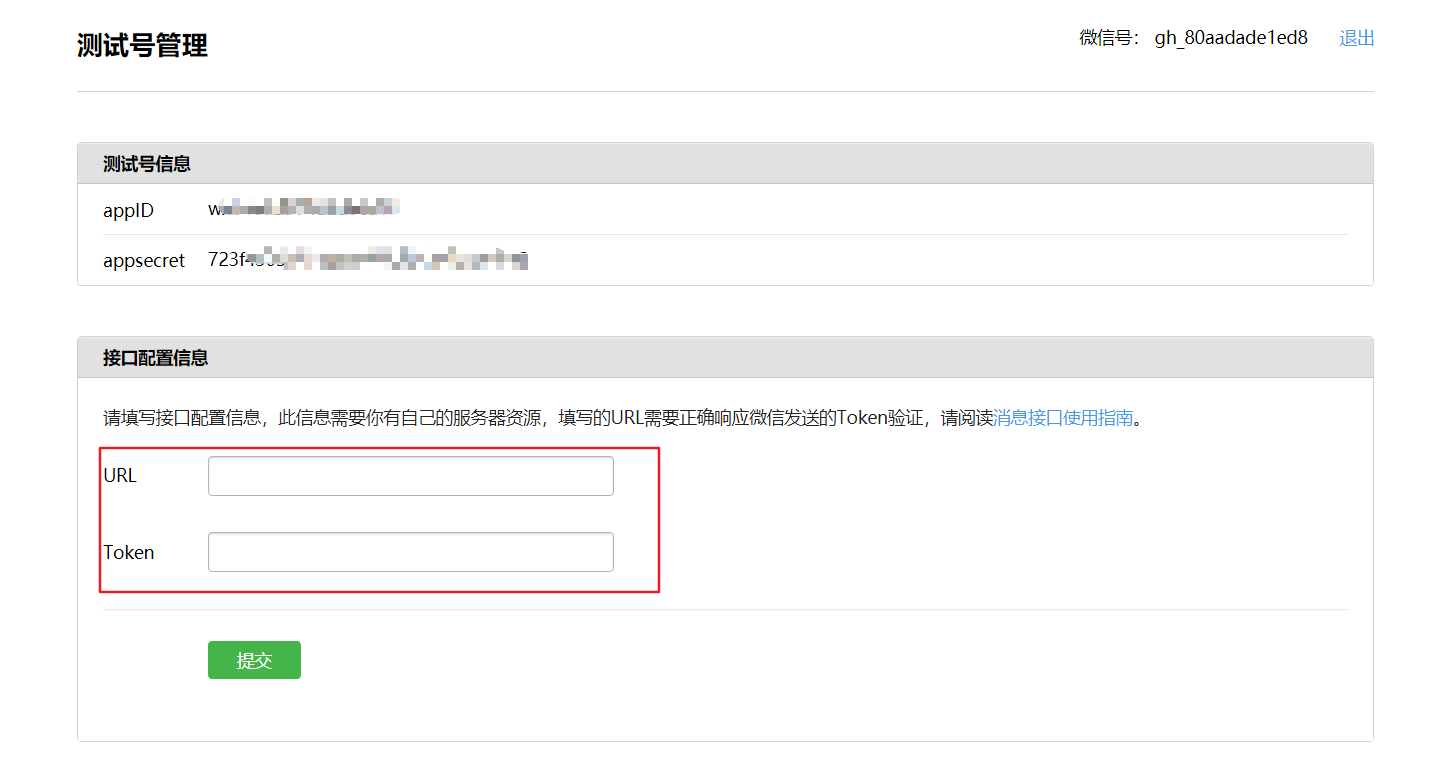
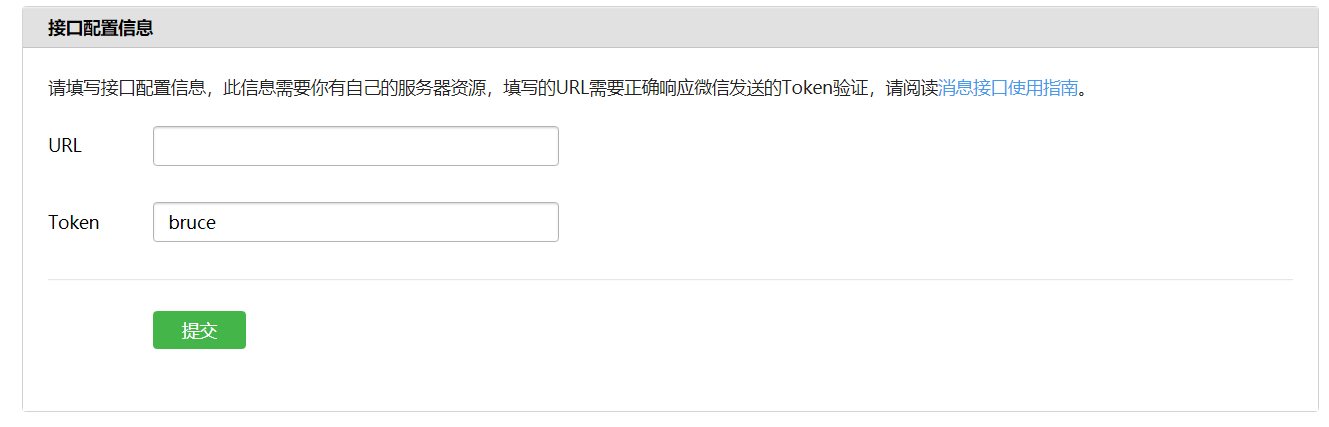
step3:进入后,会让我们填写测试的URL以及Token,这里先不填,讲到WxJava框架案例的时候将会填写。
4.WxJava框架
4.1.WxJava源码
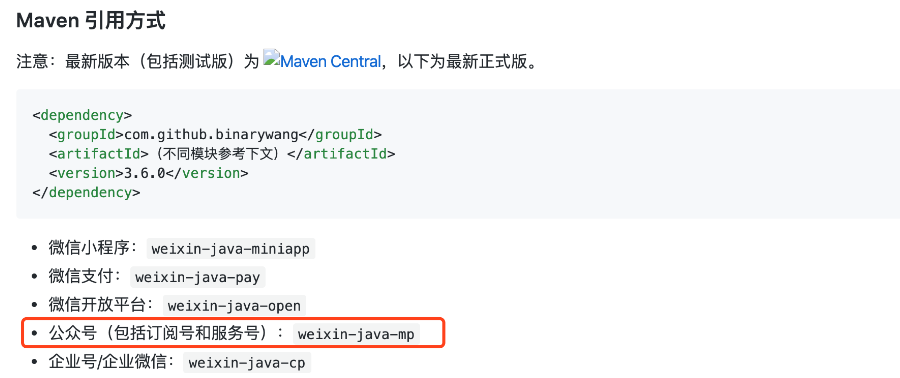
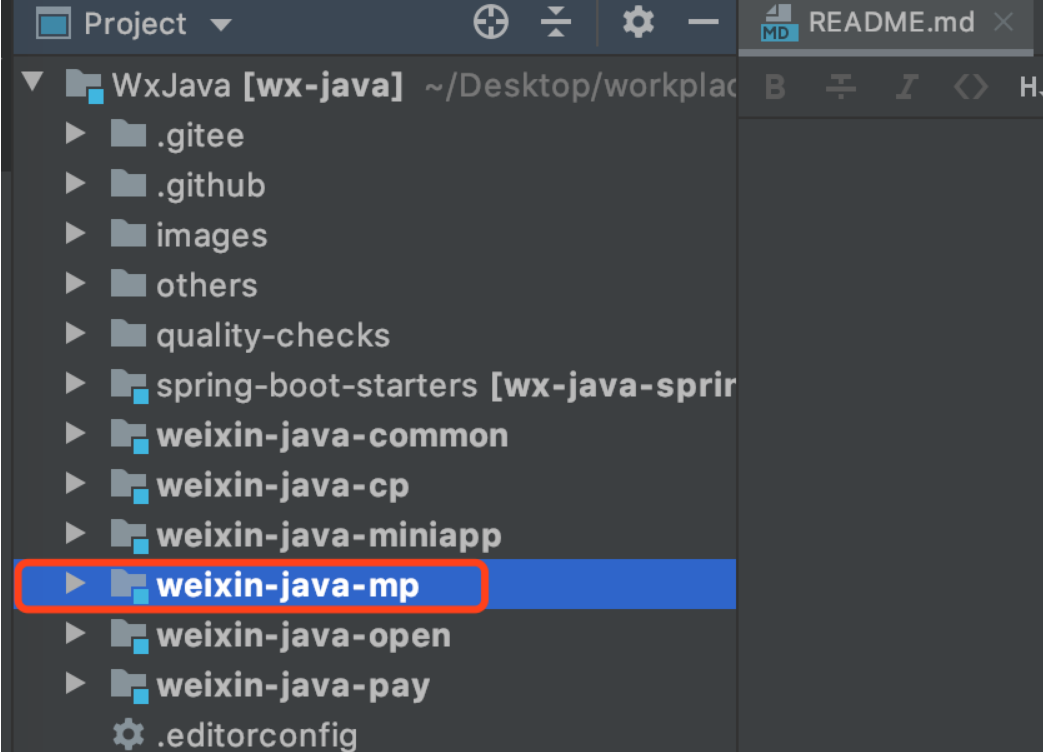
WxJava微信公众号框架已经开源了,地址: https://github.com/Wechat-Group/WxJava
如果想看源码的同学,可以从Github clone到本地:
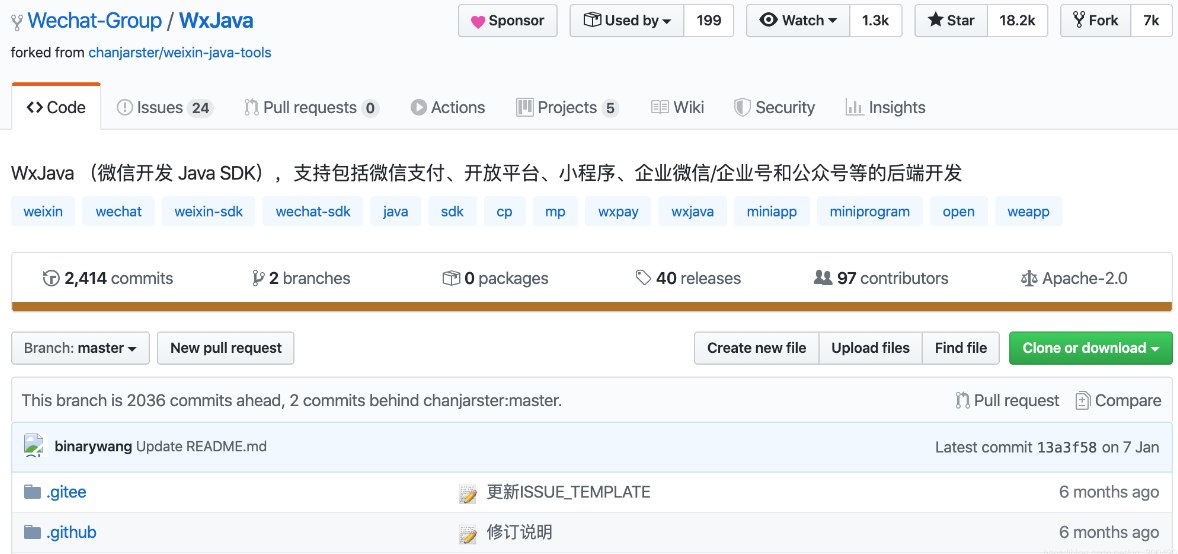
导入工程,可以看到有很多模块,从Github的文档里面,可以看到微信公众号的模块是weixin-java-mp:
4.2.微信服务器访问本地服务器
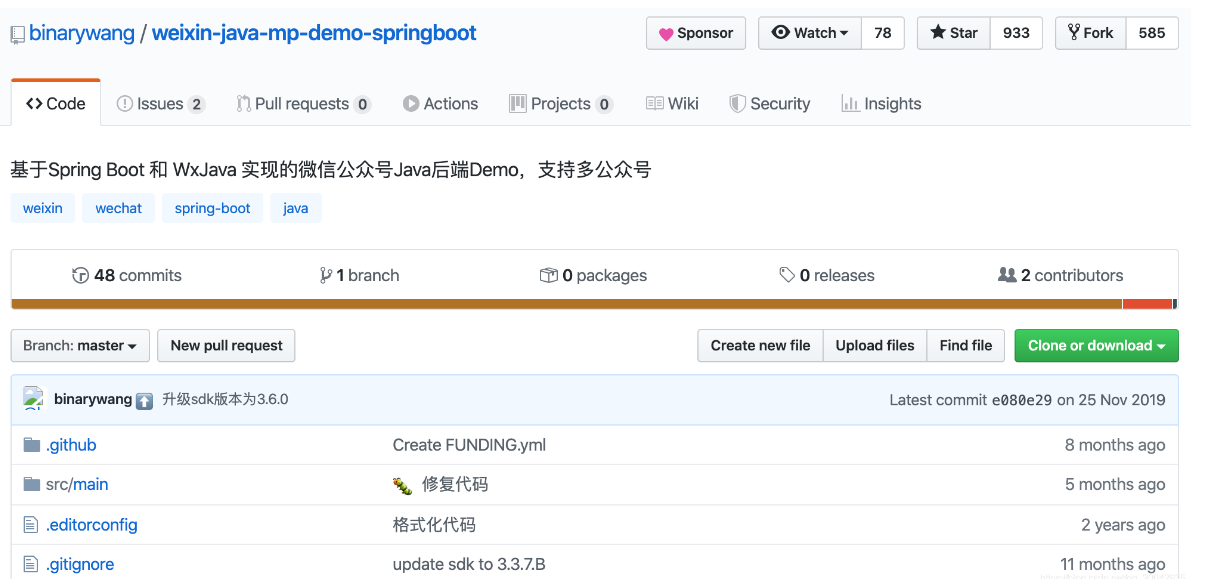
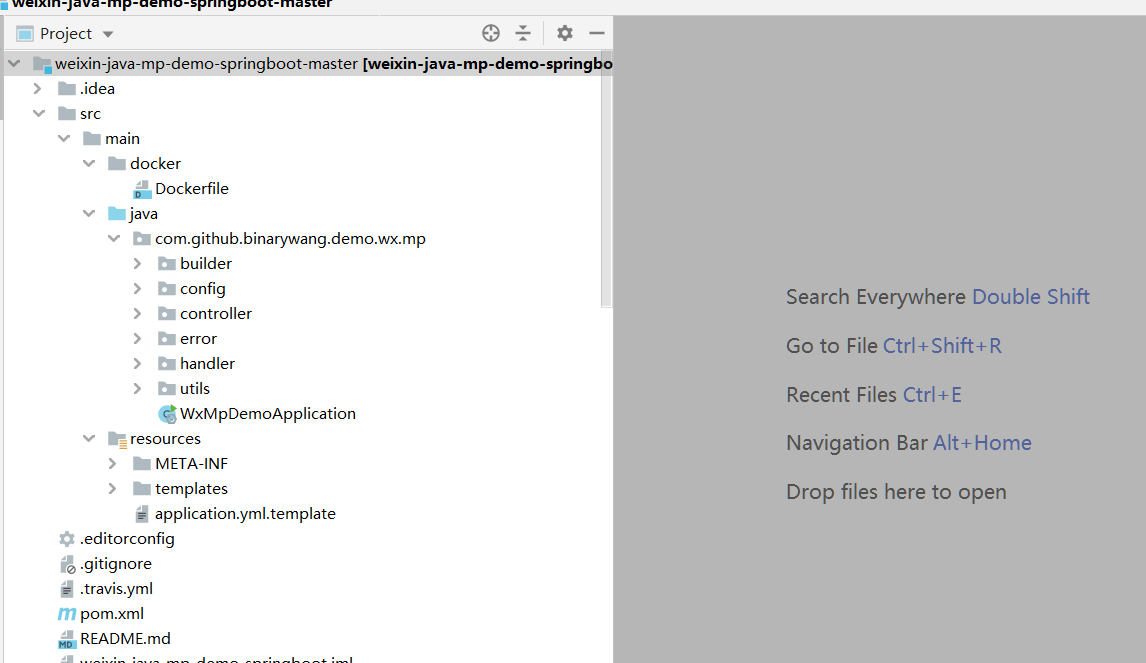
微信服务器访问本地服务器具体是如何实现的呢?其实微信公众号开发的Demo已经上传到了Github,地址:https://github.com/binarywang/weixin-java-mp-demo-springboot
现在按照官方的教程,一步一步来操作:
step1: 克隆项目到本地,并打开
step2: 复制/src/main/resources/application.yml.template 或修改其扩展名生成 application.yml文件,根据自己需要填写相关配置(需要注意的是:yml文件内的属性冒号后面的文字之前需要加空格,可参考已有配置,否则属性会设置不成功)
step3: 配置application.yml
wx:
mp:
configs:
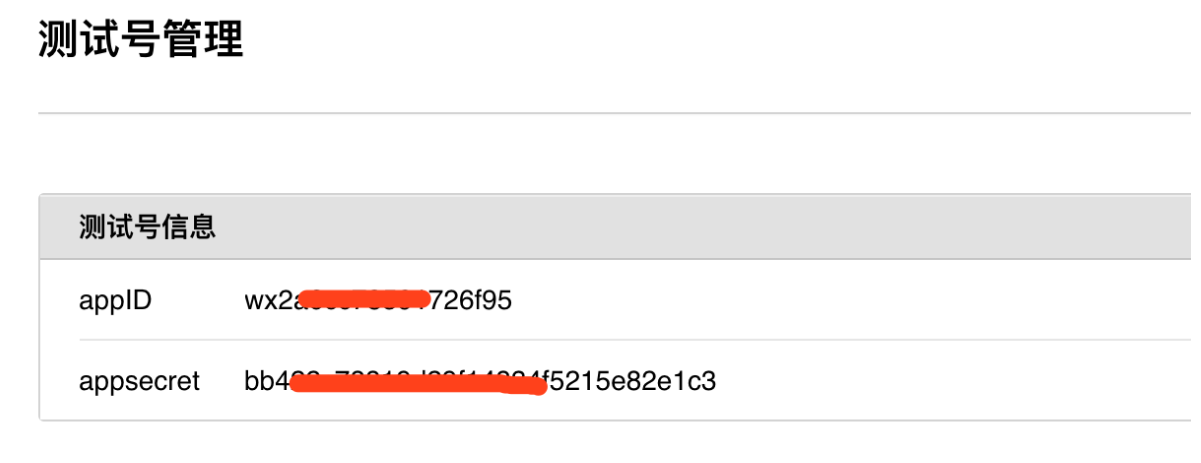
- appId: wx2????95 #(一个公众号的appid)
secret: bb4??????2e1c3 #(公众号的appsecret)
token: bruce #(接口配置里的Token值)
#aesKey: 111(接口配置里的EncodingAESKey值)
appId、secret可以从公众平台测试账号里获取:
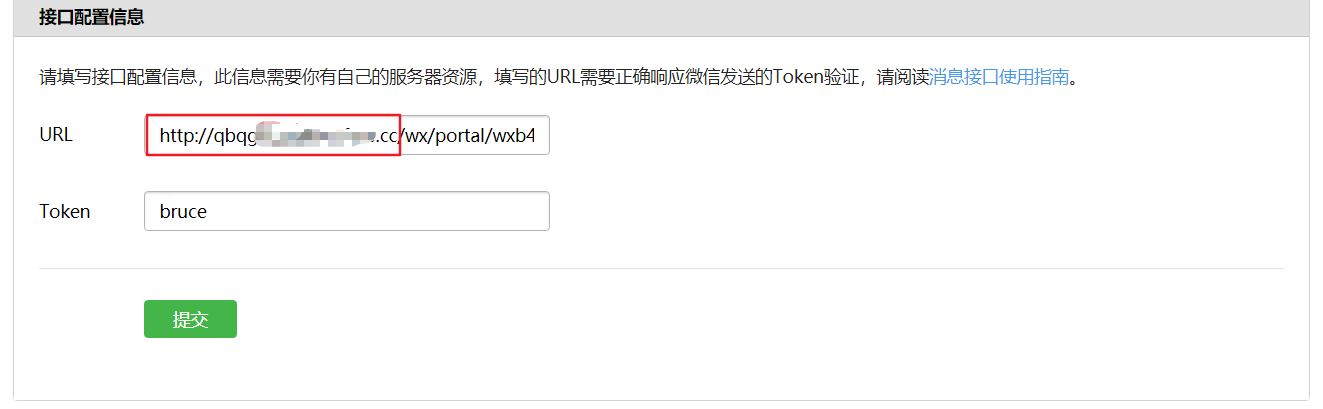
step4: 打开项目的WxPortalController类,可以看到验证的URL格式为 {暴露的外网地址+/wx/portal/{appid}},需要填写到微信公众号平台:
step5: 运行WxMpDemoApplication
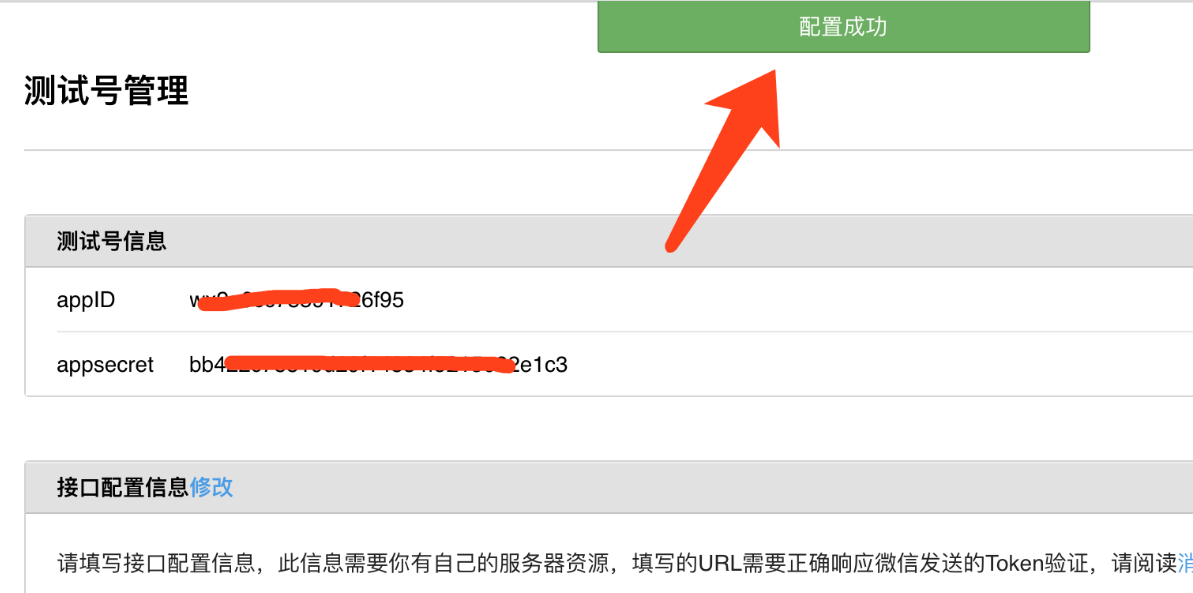
step6: 微信公众平台点击提交,可以看到进入了本机的断点(注意超时),以及在界面可以看到配置成功:

5. 鹦鹉学舌案例
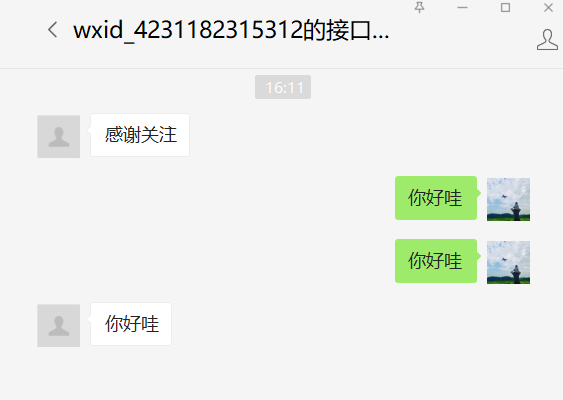
现在想实现一个功能,用户发送消息,服务器回复相同的消息。下面来看看过程:
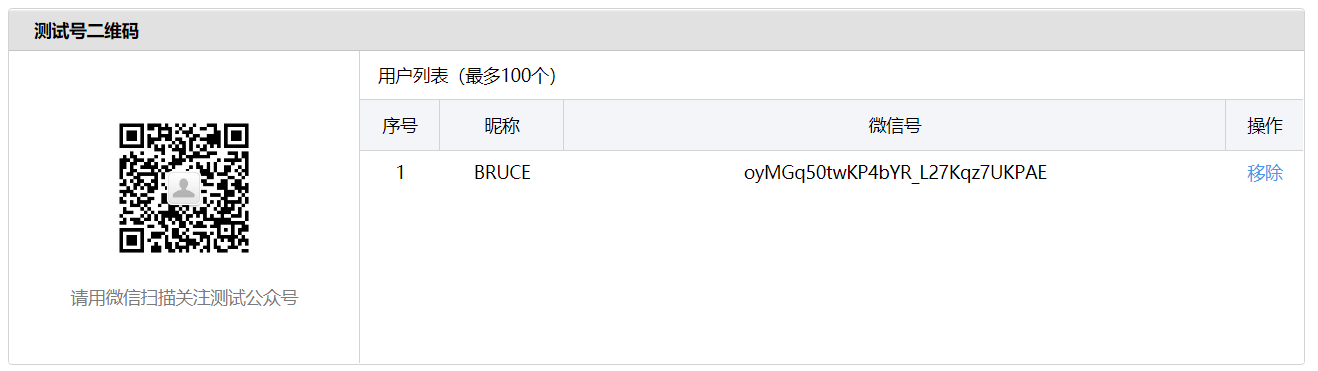
step1: 在「测试号管理模块」首先用手机关注测试号的二维码,可以在用户列表看到已经关注成功:
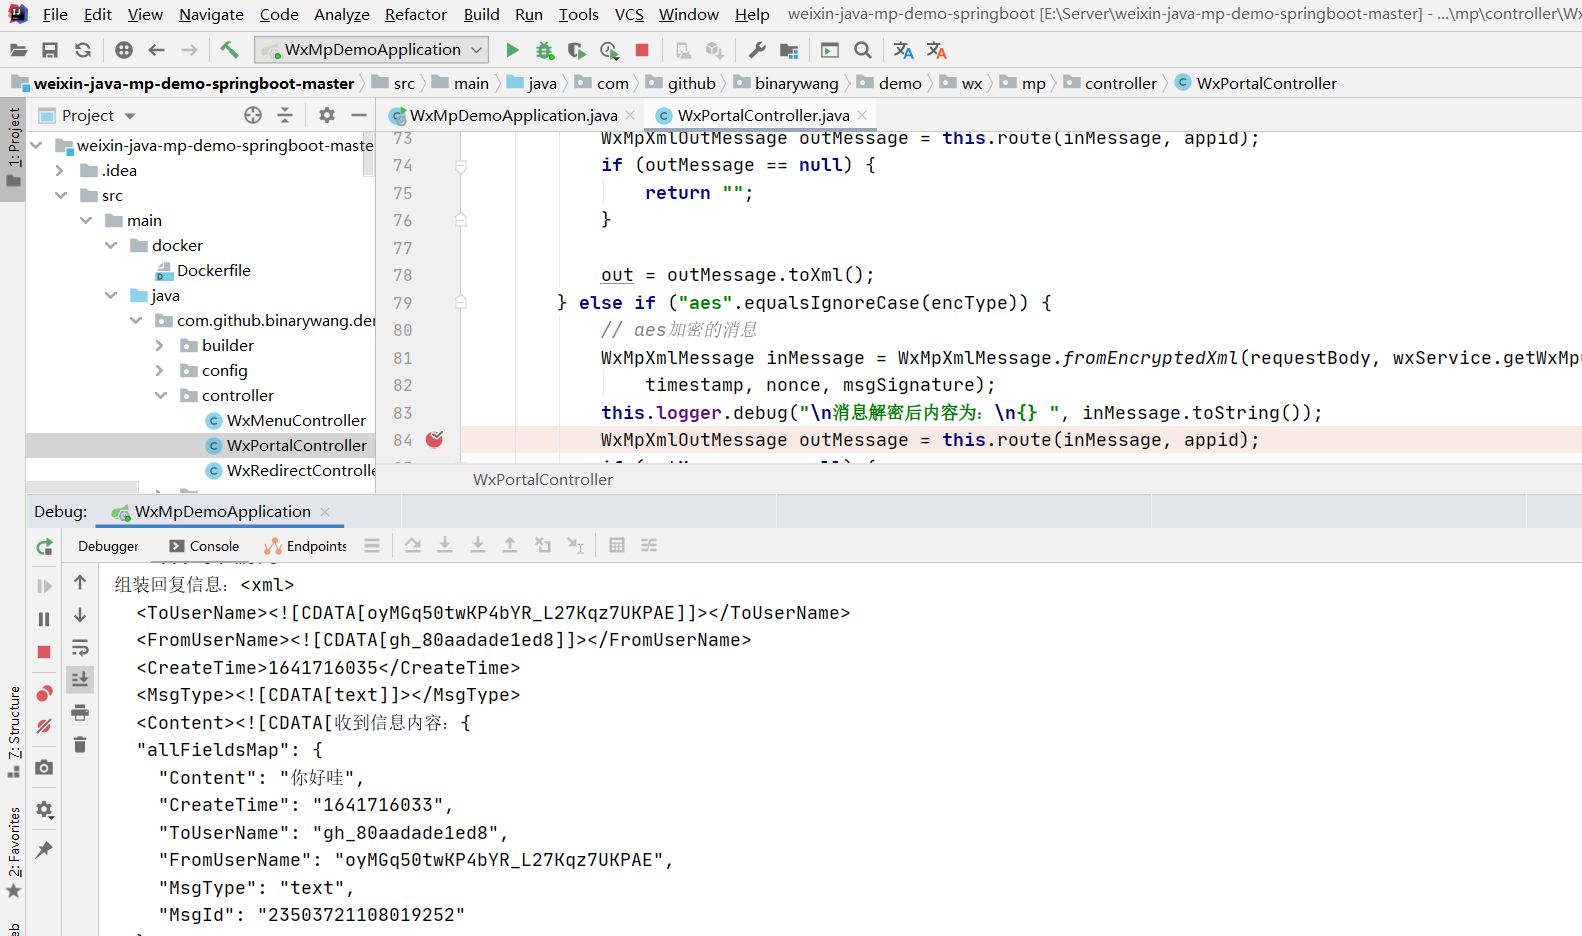
step2: 使用手机发送消息,在项目中的WxPortalController类里面的post方法代码里断点,可以看见接收到了消息:
step3: 修改服务器回复的内容,需要修改MsgHandler里面的内容,把回复的内容修改,修改后的代码如下:
@Component
public class MsgHandler extends AbstractHandler {

    @Override
    public WxMpXmlOutMessage handle(WxMpXmlMessage wxMessage,
                                    Map<String, Object> context, WxMpService weixinService,
                                    WxSessionManager sessionManager) {

        if (!wxMessage.getMsgType().equals(XmlMsgType.EVENT)) {
            //TODO 可以选择将消息保存到本地
        }

        //当用户输入关键词如“你好”,“客服”等,并且有客服在线时,把消息转发给在线客服
        try {
            if (StringUtils.startsWithAny(wxMessage.getContent(), "你好", "客服")
                && weixinService.getKefuService().kfOnlineList()
                .getKfOnlineList().size() > 0) {
                return WxMpXmlOutMessage.TRANSFER_CUSTOMER_SERVICE()
                    .fromUser(wxMessage.getToUser())
                    .toUser(wxMessage.getFromUser()).build();
            }
        } catch (WxErrorException e) {
            e.printStackTrace();
        }

        //TODO 组装回复消息
        //String content = "收到信息内容:" + JsonUtils.toJson(wxMessage);
        String content = wxMessage.getContent();
        return new TextBuilder().build(content, wxMessage, weixinService);

    }

}
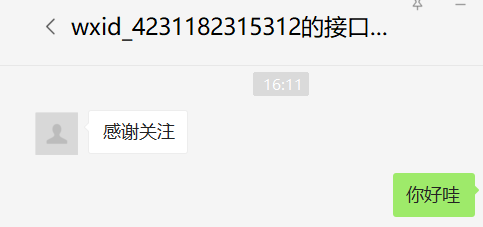
step4: 发送消息,可以看到如下结果:
6. 总结
公众号获取注册码功能
1.引言
上一节主要讲解如何把WxJava框架整合到我们的电商项目,并完成了“鹦鹉学舌”的功能。
本文主要实现「注册码功能」。在公众号里输入手机号码获取注册码的功能,验证注册码的功能。
2.开发前准备
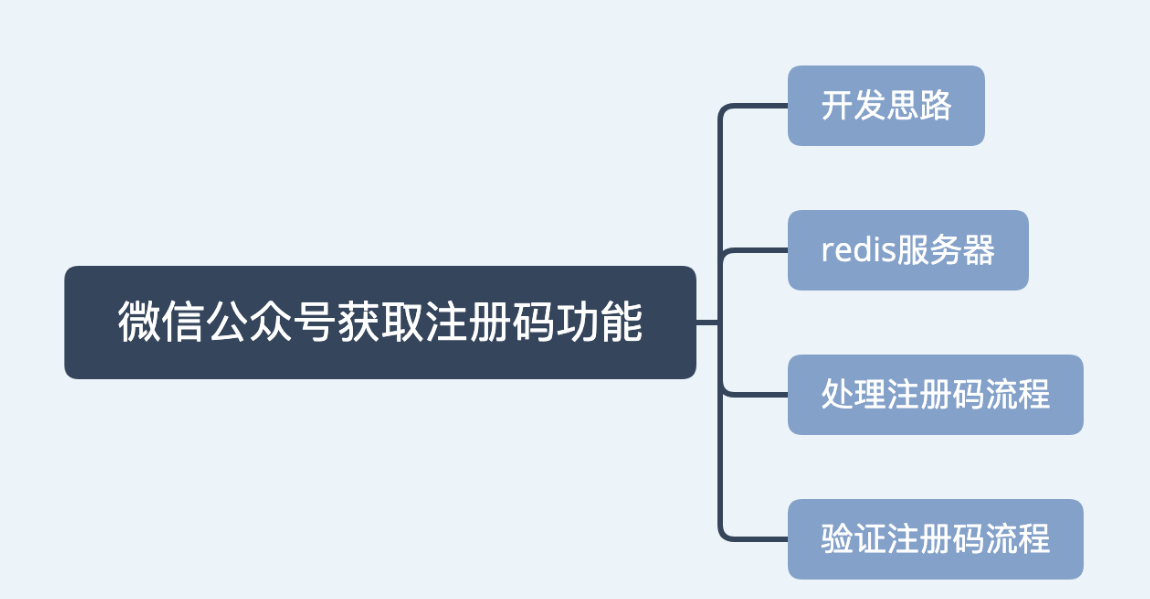
2.1 注册码功能开发思路
本文的开发流程主要如下:

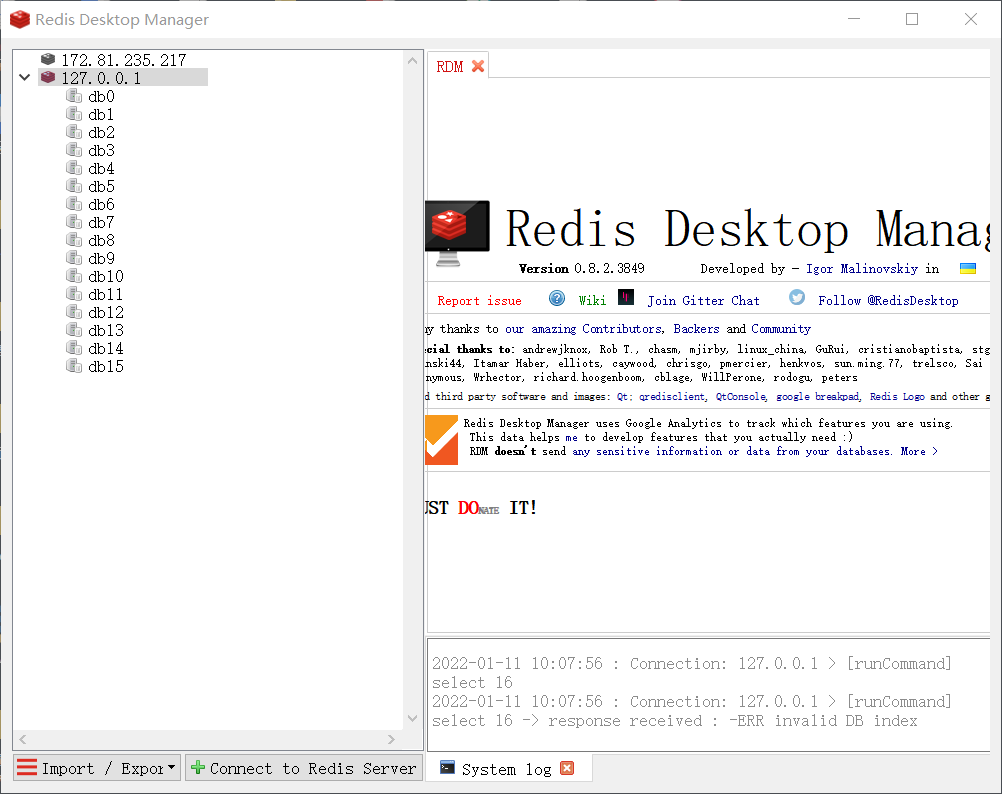
2.2 Redis服务器搭建
Redis的安装教程,本文不再具体详述.
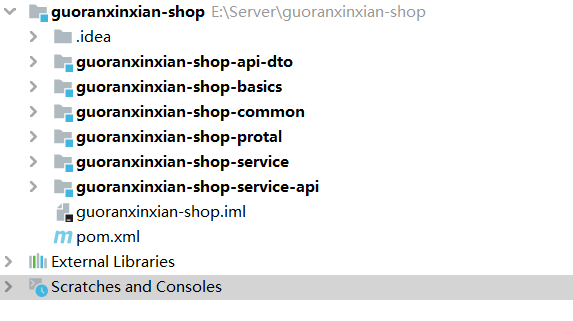
2.3.开发前项目结构整理
目前项目结构是这样的:
3.注册功能开发
在上一节已经WxJava框架整合到我们的电商项目,并在MsgHandler类里面处理收到的信息,完成了“鹦鹉学舌”的功能,下面开始讲解如何实现注册码功能。
3.3.注册功能开发
3.3.1.Redis封装
- 添加
maven依赖(guoranxinxian-shop-common-core模块里添加):
<!-- 集成redis -->
<dependency>
	<groupId>org.springframework.boot</groupId>
	<artifactId>spring-boot-starter-data-redis</artifactId>
</dependency>
- 在业务模块(
guoranxinxian-shop-service-weixin)配置redis(也可以配置到Apollo配置中心):
###服务名称(服务注册到eureka名称)
spring:

  application:
    name: guoranxinxian-shop-service-weixin
  redis:
    host: 127.0.0.1
    port: 6379
    jedis:
      pool:
        max-idle: 100
        min-idle: 1
        max-active: 1000
        max-wait: -1
### 公众号默认回复消息
guoranxinian:
  weixin:
    registration:
      code:
        ###微信注册码消息
        message:  您的注册码为:%s,欢迎您注册我们的系统!
    ###默认提示消息
    default:
      registration:
        code:
          message: 我们已经收到您的消息,将有客服会及时回复您的!
- 定义
RedisUtil工具类(guoranxinxian-shop-common-core模块里添加):
package com.guoranxinxian.util;

import org.springframework.beans.factory.annotation.Autowired;
import org.springframework.data.redis.core.StringRedisTemplate;
import org.springframework.stereotype.Component;

import java.util.List;
import java.util.concurrent.TimeUnit;

/**
 * description: Redis工具类
 */
@Component
public class RedisUtil {

    @Autowired
    private StringRedisTemplate stringRedisTemplate;

    /**
     * description: 如果key存在的话返回fasle 不存在的话返回true
     */
    public Boolean setNx(String key, String value, Long timeout) {
        Boolean setIfAbsent = stringRedisTemplate.opsForValue().setIfAbsent(key, value);
        if (timeout != null) {
            stringRedisTemplate.expire(key, timeout, TimeUnit.SECONDS);
        }
        return setIfAbsent;
    }

    /**
     * 存放string类型
     *
     * @param key
     *            key
     * @param data
     *            数据
     * @param timeout
     *            超时间
     */
    public void setString(String key, String data, Long timeout) {
        try {

            stringRedisTemplate.opsForValue().set(key, data);
            if (timeout != null) {
                stringRedisTemplate.expire(key, timeout, TimeUnit.SECONDS);
            }

        } catch (Exception e) {

        }

    }

    /**
     * 开启Redis 事务
     *
     */
    public void begin() {
        // 开启Redis 事务权限
        stringRedisTemplate.setEnableTransactionSupport(true);
        // 开启事务
        stringRedisTemplate.multi();

    }

    /**
     * 提交事务
     *
     */
    public void exec() {
        // 成功提交事务
        stringRedisTemplate.exec();
    }

    /**
     * 回滚Redis 事务
     */
    public void discard() {
        stringRedisTemplate.discard();
    }

    /**
     * 存放string类型
     *
     * @param key
     *            key
     * @param data
     *            数据
     */
    public void setString(String key, String data) {
        setString(key, data, null);
    }

    /**
     * 根据key查询string类型
     *
     * @param key
     * @return
     */
    public String getString(String key) {
        String value = stringRedisTemplate.opsForValue().get(key);
        return value;
    }

    /**
     * 根据对应的key删除key
     *
     * @param key
     */
    public Boolean delKey(String key) {
        return stringRedisTemplate.delete(key);

    }

    public void setList(String key, List<String> listToken) {
        stringRedisTemplate.opsForList().leftPushAll(key, listToken);
    }
    public StringRedisTemplate getStringRedisTemplate() {
        return stringRedisTemplate;
    }
}
3.3.2 正则表达式工具类
package com.guoranxinxian.util;

import java.util.regex.Matcher;
import java.util.regex.Pattern;

/**
 * description: 正则表达式工具类
 */
public class RegexUtils {

    /**
     * 验证Email
     *
     * @param email email地址,格式:zhangsan@zuidaima.com,zhangsan@xxx.com.cn,
     *              xxx代表邮件服务商
     * @return 验证成功返回true,验证失败返回false
     */
    public static boolean checkEmail(String email) {
        String regex = "\\w+@\\w+\\.[a-z]+(\\.[a-z]+)?";
        return Pattern.matches(regex, email);
    }

    /**
     * 验证身份证号码
     *
     * @param idCard 居民身份证号码15位或18位,最后一位可能是数字或字母
     * @return 验证成功返回true,验证失败返回false
     */
    public static boolean checkIdCard(String idCard) {
        String regex = "[1-9]\\d{13,16}[a-zA-Z0-9]{1}";
        return Pattern.matches(regex, idCard);
    }

    /**
     * 验证手机号码(支持国际格式,+86135xxxx...(中国内地),+00852137xxxx...(中国香港))
     *
     * @param mobile 移动、联通、电信运营商的号码段
     *               <p>
     *               移动的号段:134(0-8)、135、136、137、138、139、147(预计用于TD上网卡)
     *               、150、151、152、157(TD专用)、158、159、187(未启用)、188(TD专用) 177 170 166
     *               开头
     *               </p>
     *               <p>
     *               联通的号段:130、131、132、155、156(世界风专用)、185(未启用)、186(3g)
     *               </p>
     *               <p>
     *               电信的号段:133、153、180(未启用)、189
     *               </p>
     * @return 验证成功返回true,验证失败返回false
     */
    public static boolean checkMobile(String mobile) {
        String regex = "^(13[0-9]|14[579]|15[0-3,5-9]|16[6]|17[0135678]|18[0-9]|19[89])\\d{8}$";
        return Pattern.matches(regex, mobile);
    }

    /**
     * 验证固定电话号码
     *
     * @param phone 电话号码,格式:国家(地区)电话代码 + 区号(城市代码) + 电话号码,如:+8602085588447
     *              <p>
     *              <b>国家(地区) 代码 :</b>标识电话号码的国家(地区)的标准国家(地区)代码。它包含从 0 到 9
     *              的一位或多位数字, 数字之后是空格分隔的国家(地区)代码。
     *              </p>
     *              <p>
     *              <b>区号(城市代码):</b>这可能包含一个或多个从 0 到 9 的数字,地区或城市代码放在圆括号——
     *              对不使用地区或城市代码的国家(地区),则省略该组件。
     *              </p>
     *              <p>
     *              <b>电话号码:</b>这包含从 0 到 9 的一个或多个数字
     *              </p>
     * @return 验证成功返回true,验证失败返回false
     */
    public static boolean checkPhone(String phone) {
        String regex = "(\\+\\d+)?(\\d{3,4}\\-?)?\\d{7,8}$";
        return Pattern.matches(regex, phone);
    }

    /**
     * 验证整数(正整数和负整数)
     *
     * @param digit 一位或多位0-9之间的整数
     * @return 验证成功返回true,验证失败返回false
     */
    public static boolean checkDigit(String digit) {
        String regex = "\\-?[1-9]\\d+";
        return Pattern.matches(regex, digit);
    }

    /**
     * 验证整数和浮点数(正负整数和正负浮点数)
     *
     * @param decimals 一位或多位0-9之间的浮点数,如:1.23,233.30
     * @return 验证成功返回true,验证失败返回false
     */
    public static boolean checkDecimals(String decimals) {
        String regex = "\\-?[1-9]\\d+(\\.\\d+)?";
        return Pattern.matches(regex, decimals);
    }

    /**
     * 验证空白字符
     *
     * @param blankSpace 空白字符,包括:空格、\t、\n、\r、\f、\x0B
     * @return 验证成功返回true,验证失败返回false
     */
    public static boolean checkBlankSpace(String blankSpace) {
        String regex = "\\s+";
        return Pattern.matches(regex, blankSpace);
    }

    /**
     * 验证中文
     *
     * @param chinese 中文字符
     * @return 验证成功返回true,验证失败返回false
     */
    public static boolean checkChinese(String chinese) {
        String regex = "^[\u4E00-\u9FA5]+$";
        return Pattern.matches(regex, chinese);
    }

    /**
     * 验证日期(年月日)
     *
     * @param birthday 日期,格式:1992-09-03,或1992.09.03
     * @return 验证成功返回true,验证失败返回false
     */
    public static boolean checkBirthday(String birthday) {
        String regex = "[1-9]{4}([-./])\\d{1,2}\\1\\d{1,2}";
        return Pattern.matches(regex, birthday);
    }

    /**
     * 验证URL地址
     *
     * @param url 格式:http://blog.csdn.net:80/xyang81/article/details/7705960? 或
     *            http://www.csdn.net:80
     * @return 验证成功返回true,验证失败返回false
     */
    public static boolean checkURL(String url) {
        String regex = "(https?://(w{3}\\.)?)?\\w+\\.\\w+(\\.[a-zA-Z]+)*(:\\d{1,5})?(/\\w*)*(\\??(.+=.*)?(&.+=.*)?)?";
        return Pattern.matches(regex, url);
    }

    /**
     * <pre>
     * 获取网址 URL 的一级域
     * </pre>
     *
     * @param url
     * @return
     */
    public static String getDomain(String url) {
        Pattern p = Pattern.compile("(?<=http://|\\.)[^.]*?\\.(com|cn|net|org|biz|info|cc|tv)",
                Pattern.CASE_INSENSITIVE);
        // 获取完整的域名
        // Pattern
        // p=Pattern.compile("[^//]*?\\.(com|cn|net|org|biz|info|cc|tv)",
        // Pattern.CASE_INSENSITIVE);
        Matcher matcher = p.matcher(url);
        matcher.find();
        return matcher.group();
    }

    /**
     * 匹配中国邮政编码
     *
     * @param postcode 邮政编码
     * @return 验证成功返回true,验证失败返回false
     */
    public static boolean checkPostcode(String postcode) {
        String regex = "[1-9]\\d{5}";
        return Pattern.matches(regex, postcode);
    }

    /**
     * 匹配IP地址(简单匹配,格式,如:192.168.1.1,127.0.0.1,没有匹配IP段的大小)
     *
     * @param ipAddress IPv4标准地址
     * @return 验证成功返回true,验证失败返回false
     */
    public static boolean checkIpAddress(String ipAddress) {
        String regex = "[1-9](\\d{1,2})?\\.(0|([1-9](\\d{1,2})?))\\.(0|([1-9](\\d{1,2})?))\\.(0|([1-9](\\d{1,2})?))";
        return Pattern.matches(regex, ipAddress);
    }

}
3.3.3 MsgHandler验证码处理
1.在服务模块(guoranxinxian-shop-service)添加Maven依赖:
 <dependency>
   <groupId>com.guoranxinxian</groupId>
   <artifactId>guoranxinxian-shop-common-core</artifactId>
   <version>1.0-SNAPSHOT</version>
</dependency>
2.MsgHandler生成验证码,并把验证码保存到Redis服务器,完整代码如下:
package com.guoranxinxian.mp.handler;

import com.guoranxinxian.constants.Constants;
import com.guoranxinxian.mp.builder.TextBuilder;
import com.guoranxinxian.util.RedisUtil;
import com.guoranxinxian.util.RegexUtils;
import me.chanjar.weixin.common.error.WxErrorException;
import me.chanjar.weixin.common.session.WxSessionManager;
import me.chanjar.weixin.mp.api.WxMpService;
import me.chanjar.weixin.mp.bean.message.WxMpXmlMessage;
import me.chanjar.weixin.mp.bean.message.WxMpXmlOutMessage;
import org.apache.commons.lang3.StringUtils;
import org.springframework.beans.factory.annotation.Autowired;
import org.springframework.beans.factory.annotation.Value;

import java.util.Map;

import static me.chanjar.weixin.common.api.WxConsts.XmlMsgType;

@Component
public class MsgHandler extends AbstractHandler {

    /**
     * 发送验证码消息
     */
    @Value("${guoranxinian.weixin.registration.code.message}")
    private String registrationCodeMessage;

    /**
     * 默认回复消息
     */
    @Value("${guoranxinian.weixin.default.registration.code.message}")
    private String defaultRegistrationCodeMessage;

    @Autowired
    private RedisUtil redisUtil;

    @Override
    public WxMpXmlOutMessage handle(WxMpXmlMessage wxMessage,
                                    Map<String, Object> context, WxMpService weixinService,
                                    WxSessionManager sessionManager) {

        if (!wxMessage.getMsgType().equals(XmlMsgType.EVENT)) {
            // TODO 可以选择将消息保存到本地
        }
        // 当用户输入关键词如“你好”,“客服”等,并且有客服在线时,把消息转发给在线客服
        try {
            if (StringUtils.startsWithAny(wxMessage.getContent(), "你好", "客服")
                    && weixinService.getKefuService().kfOnlineList().getKfOnlineList().size() > 0) {
                return WxMpXmlOutMessage.TRANSFER_CUSTOMER_SERVICE().fromUser(wxMessage.getToUser())
                        .toUser(wxMessage.getFromUser()).build();
            }
        } catch (WxErrorException e) {
            e.printStackTrace();
        }
        // 1.获取客户端发送的消息
        String fromContent = wxMessage.getContent();
        // 2.如果客户端发送消息为手机号码,则发送验证码
        if (RegexUtils.checkMobile(fromContent)) {
            // 3.生成随机四位注册码
            int registCode = registCode();
            String content = String.format(registrationCodeMessage, registCode);
            // 4.将验证码存放在Redis中
            redisUtil.setString(Constants.WEIXINCODE_KEY + fromContent, registCode + "", Constants.WEIXINCODE_TIMEOUT);
            return new TextBuilder().build(content, wxMessage, weixinService);
        }
        return new TextBuilder().build(defaultRegistrationCodeMessage, wxMessage, weixinService);
    }

    // 获取注册码
    private int registCode() {
        int registCode = (int) (Math.random() * 9000 + 1000);
        return registCode;
    }

}
3.2 验证注册码
1.定义验证接口(微信服务接口层guoranxinxian-shop-service-api-weixin):
package com.guoranxinxian.service;
import com.alibaba.fastjson.JSONObject;
import com.guoranxinxian.api.BaseResponse;
import io.swagger.annotations.Api;
import io.swagger.annotations.ApiImplicitParam;
import io.swagger.annotations.ApiImplicitParams;
import io.swagger.annotations.ApiOperation;
import org.springframework.web.bind.annotation.GetMapping;
/**
* description: 微信验证服务接口
*/
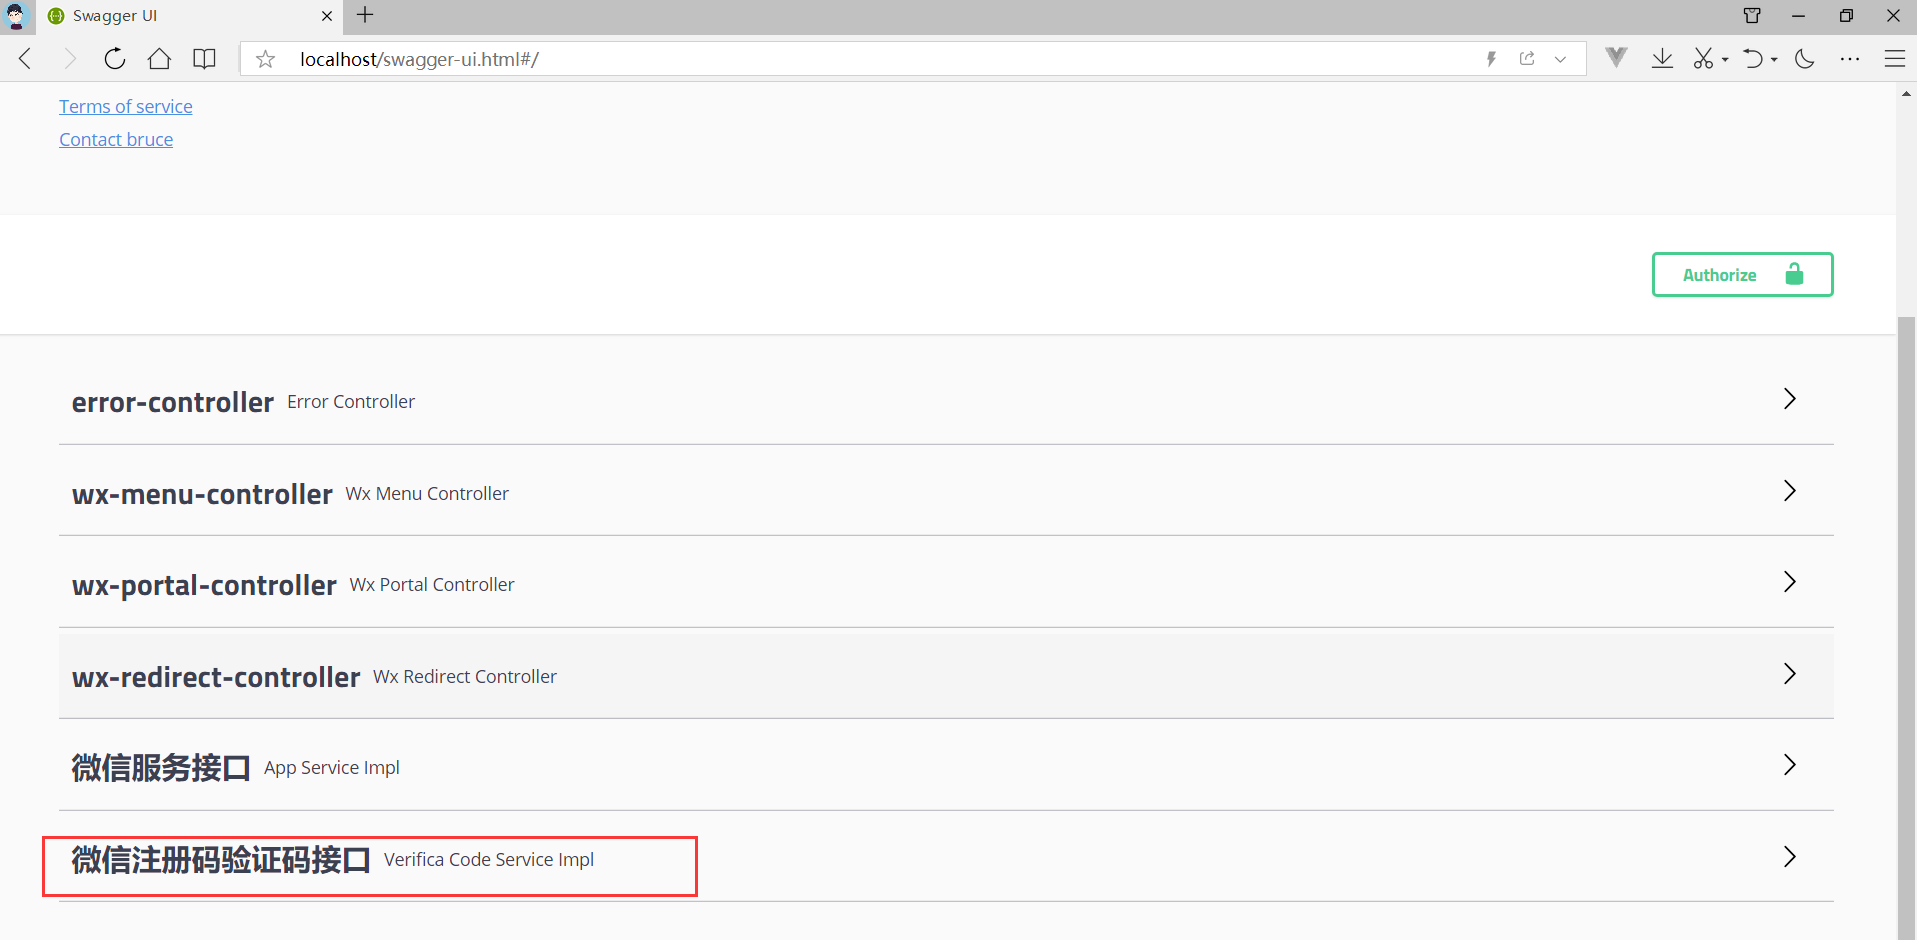
@Api(tags = "微信注册码验证码接口")
public interface VerificaCodeService {
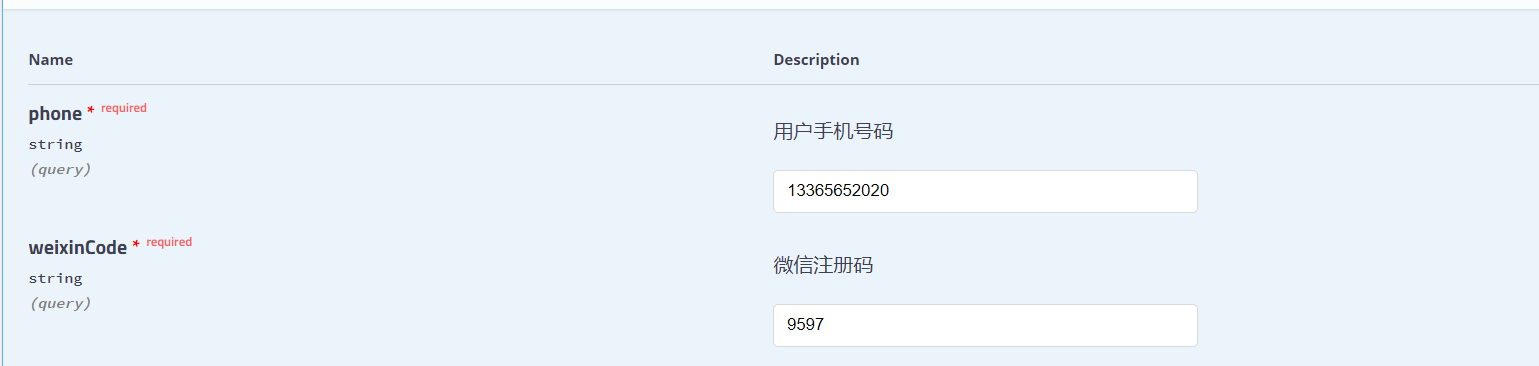
@ApiOperation(value = "根据手机号码验证码token是否正确")
@GetMapping("/verificaWeixinCode")
@ApiImplicitParams({
// @ApiImplicitParam(paramType="header",name="name",dataType="String",required=true,value="用户的姓名",defaultValue="zhaojigang"),
@ApiImplicitParam(paramType = "query", name = "phone", dataType = "String", required = true, value = "用户手机号码"),
@ApiImplicitParam(paramType = "query", name = "weixinCode", dataType = "String", required = true, value = "微信注册码") })
BaseResponse<JSONObject> verificaWeixinCode(String phone, String weixinCode);
}
2.实现接口(微信业务层guoranxinxian-shop-service-weixin):
package com.guoranxinxian.impl;

import com.alibaba.fastjson.JSONObject;
import com.guoranxinxian.api.BaseResponse;
import com.guoranxinxian.constants.Constants;
import com.guoranxinxian.entity.BaseApiService;
import com.guoranxinxian.service.VerificaCodeService;
import com.guoranxinxian.util.RedisUtil;
import org.apache.commons.lang3.StringUtils;
import org.springframework.beans.factory.annotation.Autowired;
import org.springframework.web.bind.annotation.RestController;

@RestController
public class VerificaCodeServiceImpl extends BaseApiService<JSONObject> implements VerificaCodeService {

    @Autowired
    private RedisUtil redisUtil;

    @Override
    public BaseResponse<JSONObject> verificaWeixinCode(String phone, String weixinCode) {
        if (StringUtils.isEmpty(phone)) {
            return setResultError("手机号码不能为空!");
        }
        if (StringUtils.isEmpty(weixinCode)) {
            return setResultError("注册码不能为空!");
        }
        String code = redisUtil.getString(Constants.WEIXINCODE_KEY + phone);
        if (StringUtils.isEmpty(code)) {
            return setResultError("注册码已经过期,请重新发送验证码");
        }
        if (!code.equals(weixinCode)) {
            return setResultError("注册码不正确");
        }
        return setResultSuccess("注册码验证码正确");
    }

}
4.测试
启动微信服务:AppWeiXin
4.1 获取注册码
注意:代码里设置微信注册码超时时间为3分钟!
首先发送手机号,可以看到:


4.2 校验注册码
我们在Redis可视化窗口里也可以看到:


5.总结
版权声明:本文内容由互联网用户自发贡献,该文观点仅代表作者本人。本站仅提供信息存储空间服务,不拥有所有权,不承担相关法律责任。如发现本站有涉嫌侵权/违法违规的内容, 请发送邮件至 举报,一经查实,本站将立刻删除。
文章由极客之音整理,本文链接:https://www.bmabk.com/index.php/post/94148.html

