
拓扑

IP规划:
nginx反向代理服务器:192.168.14.16
nginx-web1:192.168.14.12
nginx-web2:192.168.14.13
client:192.168.14.40
Nginx反向代理proxy与负载均衡upstream
配置反向代理proxy:proxy_pass url地址
配置负载均衡upstream:upstream
官方配置:http://nginx.org/en/docs
注意:反向代理之后获取客户端IP地址为nginx服务器地址,这里需要nginx进行forward,设置真实的IP地址:
proxy_set_header X-real-ip $remote_addr;
一、nginx反向代理
1、关闭防火墙和selinux
[root@nginx ~]# systemctl stop  firewalld
[root@nginx ~]# systemctl disable   firewalld
[root@nginx ~]# sed  -i 's/SELINUX=enforcing/SELINUX=disabled/g' /etc/selinux/config
2、配置nginx源;同等[root@nginx ~]#vim /etc/yum.repos.d/nginx.repo
[root@nginx ~]# cat << EOF >>/etc/yum.repos.d/nginx.repo
> [nginx]
> name=aliyun epel
> baseurl=http://mirrors.aliyun.com/epel/7Server/x86_64/
> gpgcheck=0
> EOF
3、安装nginx
[root@nginx ~]# yum install -y nginx4、修改nginx配置文件:[root@nginx ~]# vim /etc/nginx/nginx.conf
nginx负载均衡的配置upstream是在http内,server外(是与sever平级关系)
web_up用户自定义
    upstream  web_up {
    server 192.168.14.12:80 max_fails=3 fail_timeout=20s weight=2;
    server 192.168.14.13:80 max_fails=3 fail_timeout=20s weight=2;
   }
weight:权重,越大,访问的机会越多(其实还有其他的负载均衡方法,比如hash)
max_fails:最大失败次数
fail_timeout:最大连接时间(如果超过了就是一次fails,连续两次超时就达到了max_fails=2,则判断它挂掉了)
        location / {
        proxy_pass http://web_up;    #对应上面upstream定义的web_up
        proxy_store off;        #启用本地缓存功能
        proxy_redirect off;     #指定修改被代理服务器返回的响应头中的location头域跟refresh头域数值
        proxy_set_header X-Forwarded-For $proxy_add_x_forwarded_for;    #定义或添加字段传递给代理服务器的请求头
        proxy_set_header X-Real-IP $remote_addr;
        proxy_set_header Host $host;
        }

5、检测配置文件
[root@nginx ~]# /usr/sbin/nginx  -t
nginx: the configuration file /etc/nginx/nginx.conf syntax is ok
nginx: configuration file /etc/nginx/nginx.conf test is successful
6、启动nginx
[root@nginx ~]# systemctl start nginx二、nginx-web1(nginx-web2一样配置)
1、关闭防火墙和selinux
[root@web1 ~]# systemctl stop  firewalld
[root@web1 ~]# systemctl disable   firewalld
[root@web1 ~]# sed  -i 's/SELINUX=enforcing/SELINUX=disabled/g' /etc/selinux/config
2、配置nginx源,[root@web1 ~]#vim /etc/yum.repos.d/nginx.repo
[nginx]
name=aliyun epel
baseurl=http://mirrors.aliyun.com/epel/7Server/x86_64/
gpgcheck=0
3、安装nginx
[root@web1 ~]# yum install -y nginx4、修改页面,方便识别
[root@web1 ~]# cp /usr/share/nginx/html/index.html  /usr/share/nginx/html/index.html.bak
[root@web1 ~]# vim /usr/share/nginx/html/index.html
查看
[root@web1 ~]# cat /usr/share/nginx/html/index.html
this is 12 server
[root@web2 ~]# cat /usr/share/nginx/html/index.html
this is 13 server
5、启动nginx
[root@web1 ~]# systemctl start nginx三、Client客户端
1、验证
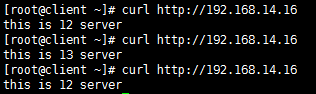
版权声明:本文内容由互联网用户自发贡献,该文观点仅代表作者本人。本站仅提供信息存储空间服务,不拥有所有权,不承担相关法律责任。如发现本站有涉嫌侵权/违法违规的内容, 请发送邮件至 举报,一经查实,本站将立刻删除。
文章由极客之音整理,本文链接:https://www.bmabk.com/index.php/post/95284.html

