
📖摘要
今天分享下 ——
SpringBoot使用Nacos做配置中心,绝对可用不与复制粘贴的文章做比较! 的一些基本知识,欢迎关注!
欢迎阅读,总结系列:SpringCloudAlibaba 实战搭建
本文使用的是Nacos 1.4.1 版本,下载安装配置教程看这里:Nacos配置安装
🌂引入依赖
这里需要注意 nacos-config-spring-boot-starter 于 0.2.2版本 开始支持 yaml-yml 文件的配置(0.2.x对应springboot 2.0.x 版本)
<!-- 引入 nacos 做配置中心 -->
        <dependency>
            <groupId>com.alibaba.boot</groupId>
            <artifactId>nacos-config-spring-boot-starter</artifactId>
            <version>0.2.2</version>
        </dependency>
配置项目 application.yml

配置信息–绝对可行,根本不需要在启动类添加任何注解,保证全网最靠谱
# Tomcat
server:
  port: 8090

# Spring
spring:
  application:
    # 应用名称
    name: fckj-restaurant
  profiles:
    # 环境配置
    active: dev
  # 允许覆盖bean定义
  main:
    allow-bean-definition-overriding: true

# nacos注册中心配置
nacos:
  config:
    # 如果不想使用 Nacos 进行配置管理,设置为 false 即可
    bootstrap:
      # 开启预加载
      enable: true
    # 命名空间 id 配置,对应你创建的命名空间的 id值,用于读取不同环境的配置信息
    namespace: 3d5be776-0d3c-410f-bd0e-bbab757a3d2d
    # 命名空间所属的 data-ids
    data-ids: ${spring.application.name}-${spring.profiles.active}.yml
    # 配置中心地址
    server-addr: ip:8848
    remote-first: true
    # 自动刷新开启
    auto-refresh: true
    # 配置文件类型 ps:0.2.2版本开始支持yaml
    type: yaml
    # nacos 账号
    username: nacos
    # nacos 密码
    password: nacos
    # 配置所属的分组
    group: CONSTRUCTIONS_CHIYUN
    max-retry: 10
    config-retry-time: 46000
    enable-remote-sync-config: true
💕启动服务
启动类直接启动即可读取配置
package com.fckj.fckjrestaurant;

import cn.hutool.core.date.DateUtil;
import com.alibaba.nacos.api.config.annotation.NacosValue;
import com.alibaba.nacos.spring.context.annotation.config.NacosPropertySource;
import io.swagger.annotations.ApiOperation;
import lombok.extern.slf4j.Slf4j;
import org.springframework.beans.factory.annotation.Value;
import org.springframework.boot.SpringApplication;
import org.springframework.boot.autoconfigure.EnableAutoConfiguration;
import org.springframework.boot.autoconfigure.SpringBootApplication;
import org.springframework.boot.autoconfigure.jdbc.DataSourceAutoConfiguration;
import org.springframework.boot.autoconfigure.jdbc.DataSourceTransactionManagerAutoConfiguration;
import org.springframework.boot.autoconfigure.security.servlet.SecurityAutoConfiguration;
import org.springframework.cache.annotation.EnableCaching;
import org.springframework.scheduling.annotation.EnableScheduling;
import org.springframework.web.bind.annotation.GetMapping;
import org.springframework.web.bind.annotation.RequestMapping;
import org.springframework.web.bind.annotation.RestController;

/**
 * The type FutureApp application.
 * Redis 常用命令 https://www.cnblogs.com/wh1997/p/10560953.html
 * 整合 Redis:https://blog.csdn.net/yangyun901222/article/details/88973223 https://blog.csdn.net/qq_21508727/article/details/81908258
 *
 * @author ChenYongJia
 * @Description: FutureAppApplication 启动类
 * @ClassName: FutureAppApplication.java
 * @Date 2021-3-31 14:31:07
 * @Email chen87647213@163.com
 */
@Slf4j
@EnableScheduling
/** 开启缓存 */
@EnableCaching
/**  启用swagger-bootstrap-ui */
@RestController
@SpringBootApplication(exclude = {SecurityAutoConfiguration.class, DataSourceAutoConfiguration.class})
public class FckjRestaurantApplication {

    /**
     * 读取 username 配置信息
     */
    @NacosValue(value = "${username:陈永佳}", autoRefreshed = true)
    private String userName;

    /**
     * 读取 redis 配置信息
     */
    @NacosValue(value = "${spring.redis.lettuce.pool.max-active:300}", autoRefreshed = true)
    private String redis;

    /**
     * 项目启动方法
     *
     * @param args the input arguments
     * @date 2021-3-31 14:34:19
     * @author Sunny Chen
     */
    public static void main(String[] args) {
        SpringApplication.run(FckjRestaurantApplication.class, args);
    }

    /**
     * 获取配置内容
     *
     * @return
     */
    @ApiOperation(value = "测试调用从 nacos 获取的配置信息", httpMethod = "GET")
    @RequestMapping(value = "/getS")
    public String getConfig() {
        System.out.println(userName);
        System.out.println(redis);
        return userName + "" + redis;
    }

}
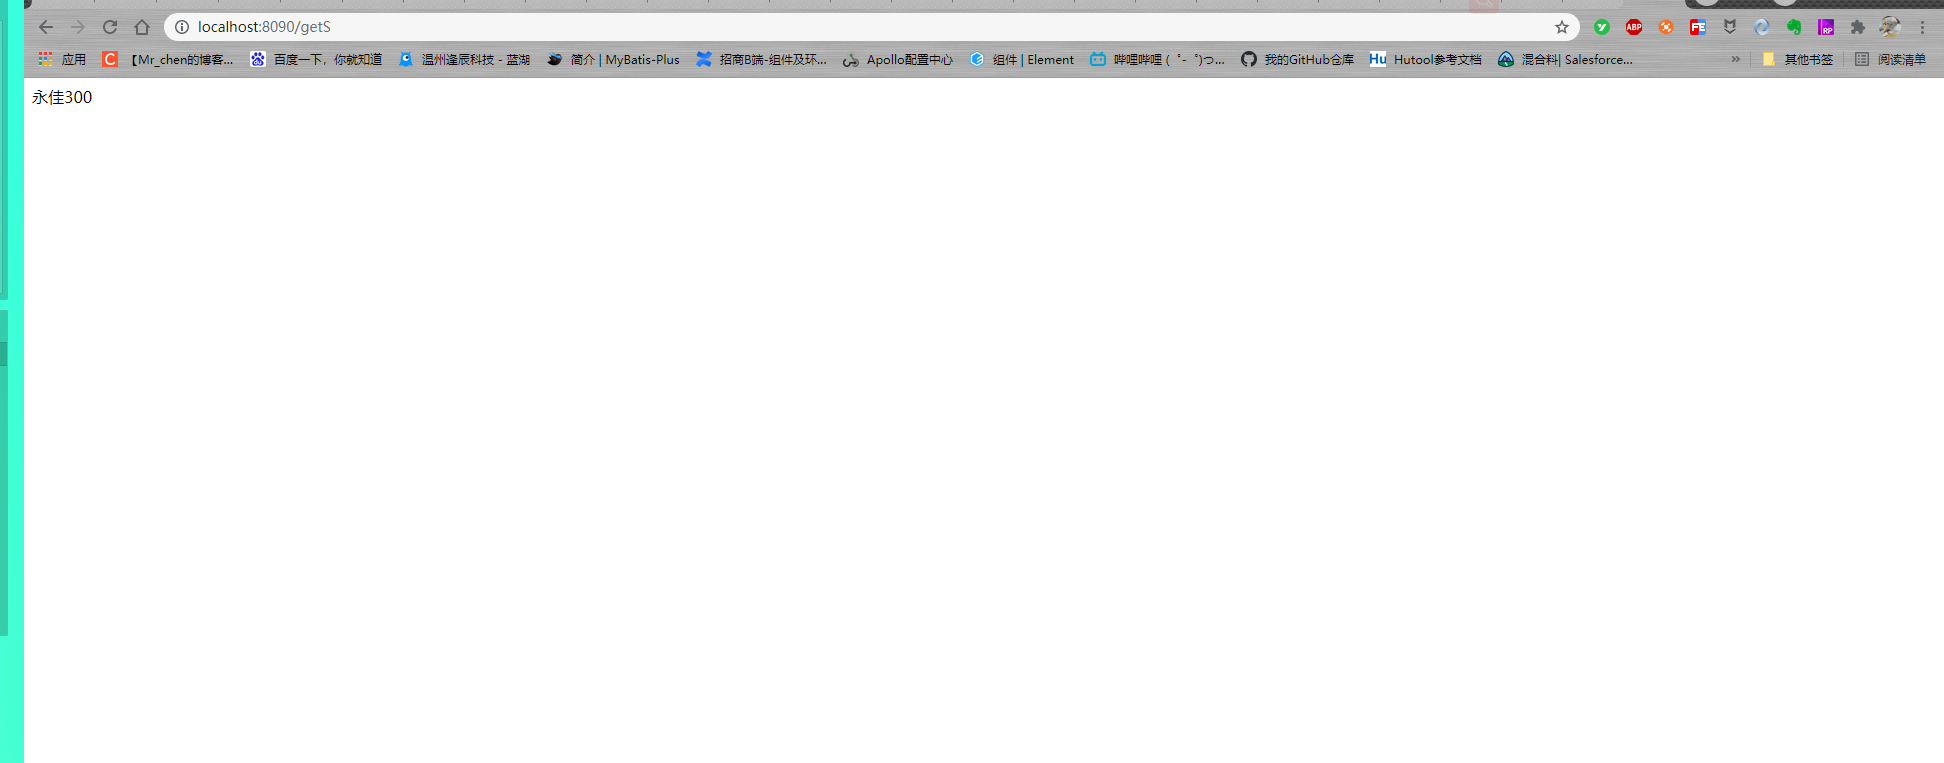
👍请求结果,简直不要太完美!
最后感谢大家耐心观看完毕,有问题欢迎留言,留个点赞收藏是您对我最大的鼓励!
🎉最后
-
更多参考精彩博文请看这里:《陈永佳的博客》
-
喜欢博主的小伙伴可以加个关注、点个赞哦,持续更新嘿嘿!
版权声明:本文内容由互联网用户自发贡献,该文观点仅代表作者本人。本站仅提供信息存储空间服务,不拥有所有权,不承担相关法律责任。如发现本站有涉嫌侵权/违法违规的内容, 请发送邮件至 举报,一经查实,本站将立刻删除。
文章由极客之音整理,本文链接:https://www.bmabk.com/index.php/post/97359.html

