GUI简介
Gui的核心技术: Swing AWT
      1.因为界面不美观。
      2.需要jre环境!
    所以并不流行
为什么我们要学习?
  1.可以写出自己心中想要的一些小工具
  2.工作时候,也可能需要维护到swing界面,概率极小!
  3.了解MVC架构,了解监听!
AWT
1.包含了很多类和窗口,GUI
2.元素:窗口,按钮,文本框
3.java.awt
创建自己的第一个Frame窗口
public class TestFrame {
    public static void main(String[] args) {
        //建立自己的一个Frame窗口
        Frame frame = new Frame("这是我的第一个frame窗口");
        //让frame窗口从内存中显示出来
        frame.setVisible(true);
        //设置长宽
        frame.setSize(400,400);
        //设置窗口的初始位置
        frame.setLocation(250,250);
        //设置背景颜色
        frame.setBackground(new Color(187,222,145));
        //设置窗口不可拉伸
        frame.setResizable(false);
    }
}

坑一、我们发现窗口点X关不掉,只能以停止程序运行的方式关掉
创建多个弹窗:
public class TestFrame02 {
    //设置多个弹窗
    public static void main(String[] args) {
        MyFrame myFrame1 = new MyFrame(100,100,200,200,Color.blue);
        MyFrame myFrame2 = new MyFrame(300,100,200,200,Color.yellow);
        MyFrame myFrame3 = new MyFrame(100,300,200,200,Color.red);
        MyFrame myFrame4 = new MyFrame(300,300,200,200,Color.green);
    }
}
class MyFrame extends Frame{
    static int id = 0;//用于计数多个窗口的数量
    public MyFrame(int x,int y,int w,int h,Color color){
         super("MyFrame+"+(++id));//这是每个窗口的题目
         setBackground(color);
         setBounds(x,y,w,h);
         setVisible(true);
    }
}
Panel面板
面板不能单独存在,它是基于Frame而存在的,它存在于某个容器内部,创建一个面板:
public class panel {
    public static void main(String[] args) {
        Frame frame = new Frame();
        Panel panel = new Panel();
        //设置布局
        frame.setLayout(null);
        //设置frame坐标
        frame.setBounds(300,300,500,500);
        frame.setBackground(new Color(40,160,77));
        //设置panel位置,它的位置是相对于frame的
        panel.setBounds(50,50,400,400);
        panel.setBackground(new Color(193,15,60));
        //往frame里面添加panel
        frame.add(panel);
        frame.setVisible(true);
    }
}
效果图:
现在解决上面的坑——点X关闭不了窗口,实现起来简单,只需要添加监听事件,监听窗口关闭事件需要注意,addWindowListener()里面的参数就不要是new WindowListener了,原因是new WindowListener需要重写十几种方法,而在这里我们只需要实现关闭窗口的功能,所以只需要拿WindowListener的一个子类WindowAdapter就可以了,而这就是适配器模式。
//添加监听事件,监听窗口关闭事件
frame.addWindowListener(new WindowAdapter() {
    @Override
    public void windowClosing(WindowEvent e) {//适配器
        //结束进程
        System.exit(0);
    }
});
布局管理器
- 流式布局:
 public class TestFlowLayOut {
    public static void main(String[] args) {
        //流式布局
        Frame frame = new Frame();
        Button button1 = new Button("button1");
        Button button2 = new Button("button2");
        Button button3 = new Button("button3");
        //设置流式布局
        //frame.setLayout(new FlowLayout());//默认居中
        frame.setLayout(new FlowLayout(FlowLayout.LEFT));
        //frame.setLayout(new FlowLayout(FlowLayout.RIGHT));
        //frame.setLayout(new FlowLayout());
        frame.add(button1);
        frame.add(button2);
        frame.add(button3);
        frame.setSize(200,200);
        frame.setVisible(true);
    }
}
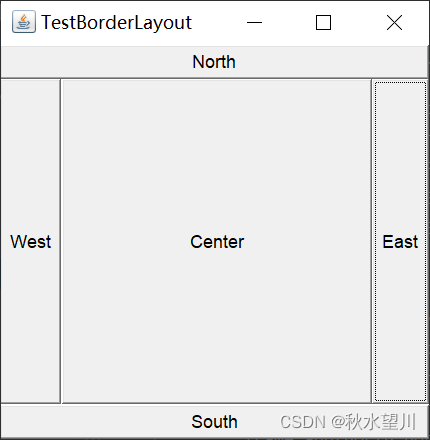
- 东西南北中
public class TestBorderLayout {
public static void main(String[] args) {
Frame frame = new 
Frame("TestBorderLayout");
Button east = new Button("East");
Button west = new Button("West");
Button south = new Button("South");
Button north = new Button("North");
Button center = new Button("Center");
frame.add(east,BorderLayout.EAST);
frame.add(west,BorderLayout.WEST);
frame.add(south,BorderLayout.SOUTH);
frame.add(north,BorderLayout.NORTH);
frame.add(center,BorderLayout.CENTER);
frame.setSize(300,300);
frame.setVisible(true);
}
}
- 表格布局Grid
 public class TestGridLayout {
    public static void main(String[] args) {
        Frame frame = new Frame("TestGridLayout");
        Button btn1 = new Button("btn1");
        Button btn2 = new Button("btn2");
        Button btn3 = new Button("btn3");
        Button btn4 = new Button("btn4");
        Button btn5 = new Button("btn5");
        Button btn6 = new Button("btn6");
        frame.setLayout(new GridLayout(3,2));
        frame.add(btn1);
        frame.add(btn2);
        frame.add(btn3);
        frame.add(btn4);
        frame.add(btn5);
        frame.add(btn6);
        frame.pack();//这个函数的作用是让这六个表格自适应填充
        frame.setVisible(true);
    }
}
事件监听
public class TestActionEvent {
    public static void main(String[] args) {
        //事件监听,监听按下按钮,触发一些事件
        Frame frame = new Frame();
        Button button = new Button();
        //因为addActionlistener()需要一个Actionlistener,所以我们创建一个Actionlistener
        MyActionListener myActionListener = new MyActionListener();
        button.addActionListener(myActionListener);
        frame.add(button,BorderLayout.CENTER);
        frame.pack();
        frame.setVisible(true);
        windowClose(frame);
    }
    //自定义一个关闭窗口事件
   private static void windowClose(Frame frame){
        frame.addWindowListener(new WindowAdapter() {
            @Override
            public void windowClosing(WindowEvent e) {
                System.exit(0);
            }
        });
   }
}
class  MyActionListener  implements ActionListener{

    @Override
    public void actionPerformed(ActionEvent e) {
        System.out.println("aaa");
    }
}
- 输入框TextField事件监听
 public class TestText01 {
    public static void main(String[] args) {
        new MyFrame01();//启动
    }
}
class MyFrame01 extends Frame{
    public MyFrame01(){
        TextField textField = new TextField();
        add(textField);
        //监听这个文本框输入的文字
        MyActionListener2 myActionListener2 = new MyActionListener2();
        textField.addActionListener(myActionListener2);
        //设置替换编码,使得输入的文本编程*号
        textField.setEchoChar('*');
        setVisible(true);
        pack();
    }
}
class MyActionListener2 implements ActionListener{

    @Override
    public void actionPerformed(ActionEvent e) {
        TextField field = (TextField)e.getSource();
        System.out.println(field.getText());
        //设置回车之后文本框的内容变为空
        field.setText("");
    }
}
oop原则:组合大于继承!
class A extends B{
}
class A{
public B b;//这就是组合
}
一个简易计算器
public class TestCalc {
    public static void main(String[] args) {
        new MyCalculator();
    }
}
class MyCalculator extends Frame{
    public MyCalculator(){
        TextField num1 = new TextField(10);
        TextField num2 = new TextField(10);
        TextField num3 = new TextField(20);
        Button button = new Button("=");
        Label label = new Label("+");
        //给button添加监听事件
        button.addActionListener(new MyCalculatorListener(num1,num2,num3));
        setLayout(new FlowLayout());
        add(num1);
        add(label);
        add(num2);
        add(button);
        add(num3);
        pack();
        setVisible(true);
    }
}
class MyCalculatorListener implements ActionListener{
    private TextField num1,num2,num3;
    //添加一个构造器获取三个参数
    public MyCalculatorListener(TextField num1,TextField num2,TextField num3){
        this.num1=num1;this.num2=num2;this.num3=num3;
    }
    @Override
    public void actionPerformed(ActionEvent e) {
        int n1=Integer.parseInt(num1.getText());
        int n2=Integer.parseInt(num2.getText());
        num3.setText(""+(n1+n2));
        //清除前两个框
        num1.setText("");
        num2.setText("");
    }
}
这里的代码能用组合类的知识进行优化,但推荐更好的内部类知识进行包装,面向对象编程嘛,但我懒得写了。
结尾语:兄弟们,后面的东西跟前面的就很像了,基本看一遍视频就能掌握,以后有时间了我就回来补一下剩下的笔记。个人觉得后面以及前面的这些窗口啥的用前端来做会更加的合适,而且内容与前端有点类似。我就继续下一环节了_。
版权声明:本文内容由互联网用户自发贡献,该文观点仅代表作者本人。本站仅提供信息存储空间服务,不拥有所有权,不承担相关法律责任。如发现本站有涉嫌侵权/违法违规的内容, 请发送邮件至 举报,一经查实,本站将立刻删除。
文章由极客之音整理,本文链接:https://www.bmabk.com/index.php/post/99080.html


