
前言
TX-LCN 是一款国产分布式事务协调框架,框架其本身并不操作事务,而是基于对事务的协调从而达到事务一致性的效果。
本文讲解如何使用 Springboot 作为基础,来配置使用 TX-LCN。
名词解释
-
• TM (Tx-Manager / Transaction Manager) 事务协调者
-
• TC (Tx-Client / Transaction Client) 事务参与者 / 业务服务
-
• 2PC (two phase commit) 两阶段提交
TM 配置
-
• 初始化 TM Mysql 数据库,创建数据库名称为 tx-manager。执行以下 SQL 创建表 “`sql DROP TABLE IF EXISTS
t_tx_exception; CREATE TABLEt_tx_exception(idbigint(20) NOT NULL AUTO_INCREMENT,group_idvarchar(32) CHARACTER SET utf8mb4 COLLATE utf8mb4_general_ci NULL DEFAULT NULL,unit_idvarchar(32) CHARACTER SET utf8mb4 COLLATE utf8mb4_general_ci NULL DEFAULT NULL,mod_idvarchar(32) CHARACTER SET utf8mb4 COLLATE utf8mb4_general_ci NULL DEFAULT NULL,transaction_statetinyint(4) NULL DEFAULT NULL,registrartinyint(4) NULL DEFAULT NULL COMMENT ‘-1 未知 0 Manager 通知事务失败, 1 client询问事务状态失败2 事务发起方关闭事务组失败’,ex_statetinyint(4) NULL DEFAULT NULL COMMENT ‘0 待处理 1已处理’,create_timedatetime(0) NULL DEFAULT NULL, PRIMARY KEY (id) USING BTREE ) ENGINE = InnoDB AUTO_INCREMENT = 967 CHARACTER SET = utf8mb4 COLLATE = utf8mb4_general_ci ROW_FORMAT = Dynamic;
SET FOREIGN_KEY_CHECKS = 1;
 - 创建一个 Springboot 项目,pom.xml 添加依赖,指定相同版本号

```xml
<dependency>
    <groupId>com.codingapi.txlcn</groupId>
    <artifactId>txlcn-tm</artifactId>
    <version>${txlcn.version}</version>
</dependency>

<dependency>
    <groupId>com.codingapi.txlcn</groupId>
    <artifactId>txlcn-tc</artifactId>
    <version>${txlcn.version}</version>
</dependency>

<dependency>
    <groupId>com.codingapi.txlcn</groupId>
    <artifactId>txlcn-txmsg-netty</artifactId>
    <version>${txlcn.version}</version>
</dependency>-
• 创建 Springboot 启动类,添加注解 @EnableTransactionManagerServer
import com.codingapi.txlcn.tm.config.EnableTransactionManagerServer;
import org.springframework.boot.SpringApplication;
import org.springframework.boot.autoconfigure.SpringBootApplication;

@SpringBootApplication
@EnableTransactionManagerServer
public class ManagerApplication {

    public static void main(String[] args) {
        SpringApplication.run(ManagerApplication.class, args);
    }
}-
• 添加配置文件 application.properties。配置 MySQL Redis 地址 “`java spring.application.name=tx-manager server.port=7970
spring.datasource.driver-class-name=com.mysql.jdbc.Driver spring.datasource.url=jdbc:mysql://127.0.0.1:3306/tx-manager?characterEncoding=UTF-8 spring.datasource.username=root spring.datasource.password=pwd888888
mybatis.configuration.map-underscore-to-camel-case=true mybatis.configuration.use-generated-keys=true
TM 与 TC 通信接口
#tx-lcn.manager.port=8070 #redis Ip spring.redis.host=192.168.252.131 #redis 端口 spring.redis.port=6379 #redis 密码 spring.redis.password=
- TM 配置到此完成,启动服务即可
- TM 要实现高可用,多启动几台,连接相同的 MySQL Redis 即可。要注意它占用了两个(服务本身、与 TC 通信)端口。TC 配置文件中配置多个 TM 服务地址用逗号分隔
# TC 配置
## LCN (Lock Confirm Notify) 模式
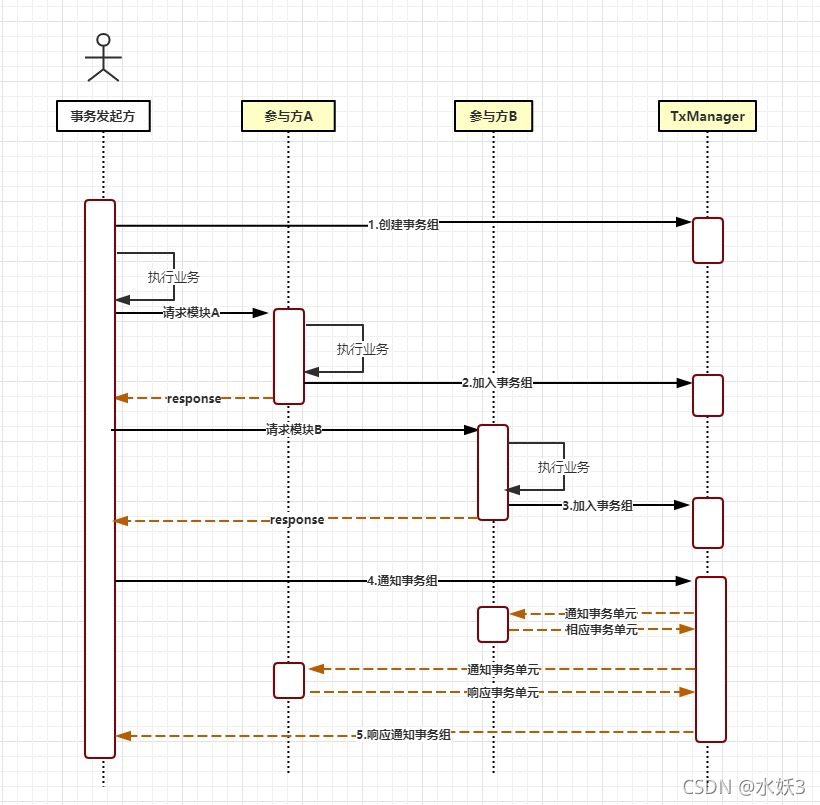
- LCN 是 2PC 的一种实现。通过代理 Connection 的方式实现对本地事务的操作,然后在由 TxManager 统一协调控制事务。当本地事务提交回滚或者关闭连接时将会执行假操作,该代理的连接将由 LCN 连接池管理。
- 该模式对代码的嵌入性为低。仅限于本地存在连接对象且可通过连接对象控制事务的模块。该模式下的事务提交与回滚是由本地事务方控制,对于数据一致性上有较高的保障。该模式缺陷在于代理的连接需要随事务发起方一共释放连接,增加了连接占用的时间。
- 其执行流程如下图示,图中事务发起方本身也是个参与者,是用户请求到达的第一个业务服务
- pom.xml 添加依赖
```xml
<dependency>
<groupId>com.codingapi.txlcn</groupId>
<artifactId>txlcn-tc</artifactId>
<version>${txlcn.version}</version>
</dependency>
<dependency>
<groupId>com.codingapi.txlcn</groupId>
<artifactId>txlcn-txmsg-netty</artifactId>
<version>${txlcn.version}</version>
</dependency>-
• 创建 Springboot 启动类,添加注解 @EnableTransactionManagerServer
import com.codingapi.txlcn.tc.config.EnableDistributedTransaction;
import org.mybatis.spring.annotation.MapperScan;
import org.springframework.boot.SpringApplication;

@EnableDistributedTransaction
@SpringBootApplication
public class TxLcnApplicationA {

    public static void main(String[] args) {
        SpringApplication.run(TxLcnApplicationA.class, args);
    }
}-
• 配置文件 中需要指定 TM 服务地址,多个用逗号分隔
tx-lcn:
  client:
manager-address: localhost:8070-
• 在事务方法上加注解 @LcnTransaction
@LcnTransaction
@Transactional(rollbackFor = Exception.class)
public void addBusinessData(BusinessData businessData, boolean throwException) {
    save(businessData);
    String url = "http://txlcn-b/lcn/" + throwException;
    // 调用其他参与者事务
    restTemplate.postForEntity(url, businessData, String.class);
}
TCC (Try Confirm Cancel) 模式
-
• TCC 通过对(由业务系统提供的)业务逻辑的调度来实现分布式事务。主要有三步操作:尝试执行业务(Try)、确认执行业务(Confirm)、取消执行业务(Cancel)。
-
• 对有无本地事务控制都可以支持。
-
• 对代码的嵌入性、业务开发难度较高,要求每个业务需要写三种步骤的操作,数据一致性控制几乎完全由开发者控制。
-
• 其配置和 LCN 是一样的,只是处理业务方法时不一样。
-
• 在业务方法上添加注解 @TccTransaction。
-
• 写业务方法对应的 confirm 和 cancel 方法,默认情况这两个方法名字就是在业务方法名前加对应前缀。如果想自定义则需要在 @TccTransaction 注解中为这两个属性指定 confirmMethod cancelMethod。
@TccTransaction
@Transactional(rollbackFor = Exception.class)
public void addBusinessData(BusinessData businessData, boolean throwException) {
    save(businessData);
    // 调用其他参与者业务事务
    restTemplate.postForEntity("http://txlcn-b/tcc", businessData, String.class);
}

/**
 * 确认事务
 *
 * @param businessData -
 */
public void confirmAddBusinessData(BusinessData businessData, boolean throwException) {
    log.info("confirmAddBusinessData 写入 MySQL 成功 : " + businessData);
}

/**
 * 回滚事务
 *
 * @param businessData -
 */
public void cancelAddBusinessData(BusinessData businessData, boolean throwException) {
    removeById(businessData.getId());
    log.error("回滚 MySQL 成功 idempotenceKey = " + businessData.getIdempotenceKey());
}
参考链接
TX-LCN 中文文档[1]
GitHub TX-LCN[2]
GitHub 本文代码地址[3]
引用链接
[1] TX-LCN 中文文档: https://www.codingapi.com/docs/txlcn-preface/[2] GitHub TX-LCN: https://github.com/codingapi/tx-lcn[3] GitHub 本文代码地址: https://github.com/1115675202/fruitbasket-litchi-distributed-transaction/tree/master/txlcn
原文始发于微信公众号(我有八千部下):Springboot整合TX-LCN实现分布式事务
版权声明:本文内容由互联网用户自发贡献,该文观点仅代表作者本人。本站仅提供信息存储空间服务,不拥有所有权,不承担相关法律责任。如发现本站有涉嫌侵权/违法违规的内容, 请发送邮件至 举报,一经查实,本站将立刻删除。
文章由极客之音整理,本文链接:https://www.bmabk.com/index.php/post/102432.html

