
获取前端数据
目录
一、简单数据版
1. 配置
先按照搭建SpringMVC框架_我是老伯的博客-CSDN博客搭建SpringMVC框架,然后按照一文学会在idea中Tomcat的配置_我是老伯的博客-CSDN博客配置本地Tomcat。
2. 书写Controlloer层
MyController.java
package com.qcby.Controller;

import com.qcby.entity.User;
import org.springframework.stereotype.Controller;
import org.springframework.web.bind.annotation.RequestMapping;
import org.springframework.web.bind.annotation.RequestMethod;

@Controller
@RequestMapping("my")
public class MyController {
    @RequestMapping(path = "/save1.do",method = {RequestMethod.GET})
    public static void save1(String username,String password){
        System.out.println(username);
        System.out.println(password);
    }
}
2.1 RequestMapping注解
RequestMapping注解的作用是建立请求URL和处理方法之间的对应关系
RequestMapping注解可以作用在方法和类上(相当于servlet当中的@WebServlet)
1. 作用在类上:第一级的访问目录
2. 作用在方法上:第二级的访问目录
3. 细节:路径可以不编写 / 表示应用的根目录开始
RequestMapping的属性
1. path 指定请求路径的url
2. value value属性和path属性是一样的
3. mthod 指定该方法的请求方式
3. index.html界面书写
<!DOCTYPE html>
<html lang="en">
<head>
    <meta charset="UTF-8">
    <title>入门程序</title>
</head>
<body>
<form action="/SpringMVCDemo/my/save1.do" method="get">
    <input type="text" name="username"/>
    <input type="text" name="password"/>
    <input type="submit" value="提交"/>
</form>

</body>
</html>
4. 点击tomcat运行
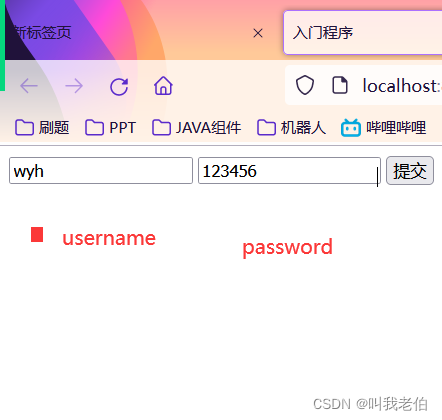
以上是在前端输入的username + password
看我们的idea中输出,这样我们就获取到了前端输入的。
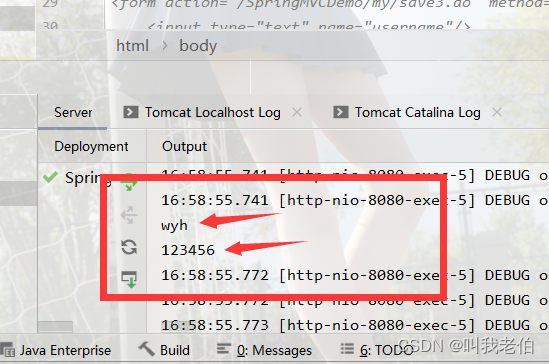
一个简单的获取前端输入数据的功能完成。
二、数据升级版
当我们需要在前端获取到的数据不在是简简单单String 和 Integer 这种简单类型时,我们该如何处理?也就是如何获取集合类型的数据。

1. 建立实体类entity下的User.java
它下面三个数据,分别生成Get() Set() toString()方法
username;passwordaccount
package com.qcby.entity;

import java.util.List;

public class User {
    private String username;
    private String password;
    private Account account;

    public String getUsername() {
        return username;
    }

    public void setUsername(String username) {
        this.username = username;
    }

    public String getPassword() {
        return password;
    }

    public void setPassword(String password) {
        this.password = password;
    }

    public Account getAccount() {
        return account;
    }

    public void setAccount(Account account) {
        this.account = account;
    }

    @Override
    public String toString() {
        return "User{" +
                "username='" + username + '\'' +
                ", password='" + password + '\'' +
                ", account=" + account +
                '}';
    }
}
2. 建立entity下面的Account.java
package com.qcby.entity;

public class Account {
    public Double getMoney() {
        return money;
    }

    public void setMoney(Double money) {
        this.money = money;
    }

    private Double money;

    @Override
    public String toString() {
        return "Account{" +
                "money=" + money +
                '}';
    }
}
3. 编写MyController.java
package com.qcby.Controller;

import com.qcby.entity.User;
import org.springframework.stereotype.Controller;
import org.springframework.web.bind.annotation.RequestMapping;
import org.springframework.web.bind.annotation.RequestMethod;

@Controller
@RequestMapping("my")
public class MyController {
    @RequestMapping(value = "/save4",method = {RequestMethod.POST})
    public void save4(User user){
        System.out.println(user.toString());
    }

}
4. index.html界面
<!DOCTYPE html>
<html lang="en">
<head>
    <meta charset="UTF-8">
    <title>入门程序</title>
</head>
<body>
<form action="/SpringMVCDemo/my/save4.do" method="post">
    <input type="text" name="username"/>
    <input type="text" name="password"/>
    <input type="text" name="account.money">
 <!--   <input type="text" name="car.money">-->
    <input type="submit" value="提交"/>
</form>
</body>
</html>
5. 运行
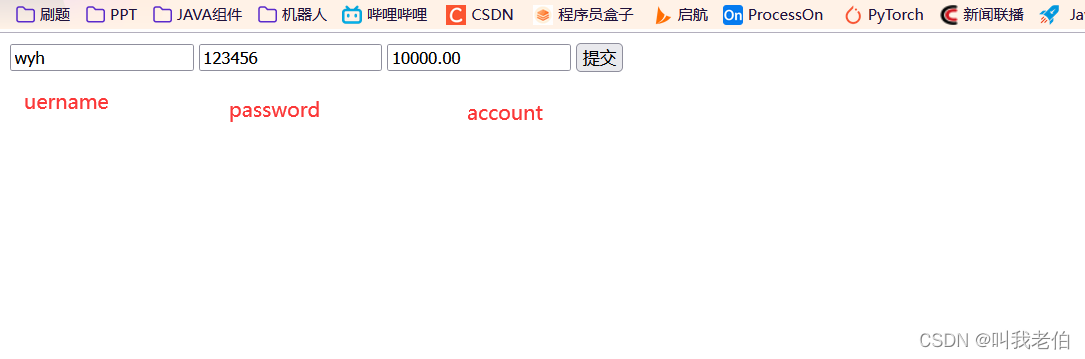
运行成功!!
三、集合数据操作(List<>类型)
1. 实体类中User.java
package com.qcby.entity;

import java.util.List;

public class User {
    private String username;
    private String password;
    private Account account;
    private Car car;
    List<Account> accounts;

    public String getUsername() {
        return username;
    }

    public void setUsername(String username) {
        this.username = username;
    }

    public String getPassword() {
        return password;
    }

    public void setPassword(String password) {
        this.password = password;
    }

    public Account getAccount() {
        return account;
    }

    public void setAccount(Account account) {
        this.account = account;
    }

    public Car getCar() {
        return car;
    }

    public void setCar(Car car) {
        this.car = car;
    }

    public List<Account> getAccounts() {
        return accounts;
    }

    public void setAccounts(List<Account> accounts) {
        this.accounts = accounts;
    }

    @Override
    public String toString() {
        return "User{" +
                "username='" + username + '\'' +
                ", password='" + password + '\'' +
                ", account=" + account +
                ", car=" + car +
                ", accounts=" + accounts +
                '}';
    }
}
2. 实体类中Car.java
package com.qcby.entity;

public class Car {
    private Double money;

    public Double getMoney() {
        return money;
    }

    public void setMoney(Double money) {
        this.money = money;
    }

    @Override
    public String toString() {
        return "Car{" +
                "money=" + money +
                '}';
    }
}
3. MyController.java不变
(只是改变一下路径@RequestMapping后面的path)
@RequestMapping(value = "/save5",method = {RequestMethod.POST})
public void save5(User user){
System.out.println(user.toString());
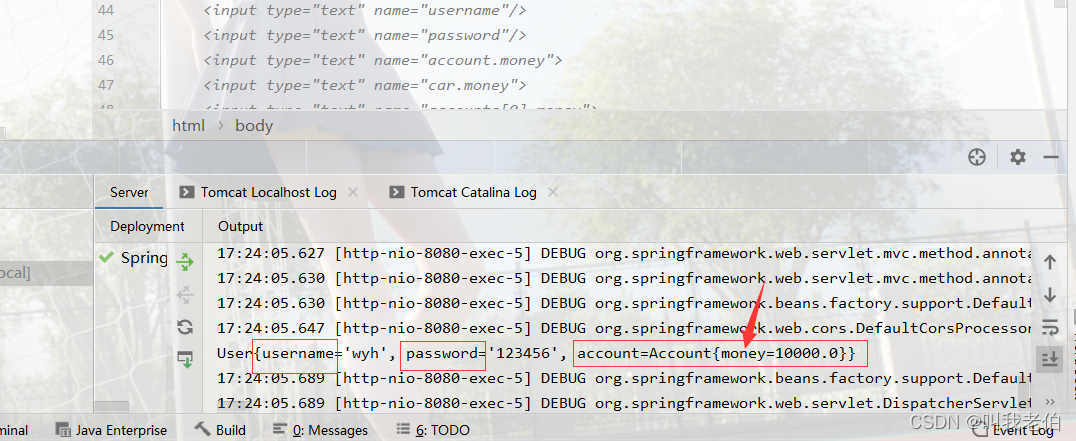
}4. index.html界面
<!DOCTYPE html>
<html lang="en">
<head>
<meta charset="UTF-8">
<title>入门程序</title>
</head>
<body>
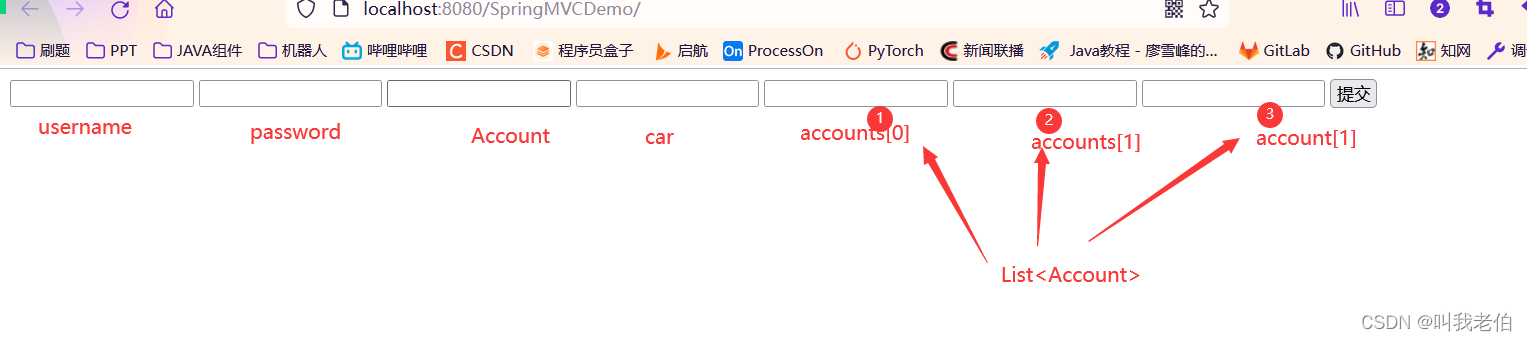
<form action="/SpringMVCDemo/my/save5.do" method="post">
<input type="text" name="username"/>
<input type="text" name="password"/>
<input type="text" name="account.money">
<input type="text" name="car.money">
<input type="text" name="accounts[0].money">
<input type="text" name="accounts[1].money">
<input type="text" name="accounts[2].money">
<input type="submit" value="提交"/>
</form>
</body>
</html>5. 运行

idea后台成功接收

版权声明:本文内容由互联网用户自发贡献,该文观点仅代表作者本人。本站仅提供信息存储空间服务,不拥有所有权,不承担相关法律责任。如发现本站有涉嫌侵权/违法违规的内容, 请发送邮件至 举报,一经查实,本站将立刻删除。
文章由极客之音整理,本文链接:https://www.bmabk.com/index.php/post/115376.html

