
目录
JAVA8的新特性
1. Lambda表达式
Lambda表达式初体验
介绍: Lambda表达式旨在解决Java7在处理匿名内部类时的繁琐写法,其写法较Java7有很大差别,Lambda是Java8的精髓,通过Lambda表达式,我们可以更加快捷方便的编程,快速实现功能需求。
废话不多说,下面我们来看案例,例如要使用Java7快速新建线程,我们可以这么写:
public class LambdaD01 {

    public static void main(String[] args) {
        /**
         * java7常规写法 使用匿名内部类 新建线程,打印线程名称
         **/
        new Thread(new Runnable() {
            @Override
            public void run() {
                System.out.println("java7常规写法"+Thread.currentThread().getName());
            }
        }).start();
    }

}以上代码完全可以通过Java8的Lambda表达式去实现,写法如下:
public class LambdaD01 {

    public static void main(String[] args) {
        /**
         * Java8新写法
         **/
        new Thread(() ->{
            System.out.println("Java8写法"+Thread.currentThread().getName());
        }).start();

    }

}
我们可以看到,在处理匿名内部类时,Java8以一种全新的写法去处理了,代码更加的简介。
下面对Lambda表达式进行介绍:
主体:() ->{}
1. 小括号()代表调用了接口中的方法,小括号里面可以填写传入的参数(参数类型可以省略).
2. 花括号{}代表执行方法的方法体,可以编写自定义的程序逻辑。
Lambda表达式的使用条件
Lambda表达式在使用时,需要遵循以下条件
1. 方法的参数或局部变量类型必须为接口才能使用lambda
2. 接口中有且只有一个抽象方法(使用@FunctionalInterface修饰时代表接口只有一个抽象方法)。
Lambda表达式的实现原理
1. 第一步,我们来反编译一下含有Lambda表达式的calss文件:
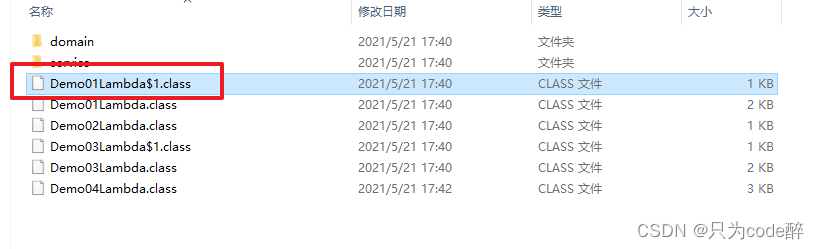
2. 我们发现反编译的calss文件中,多了一个lambda开头的方法。
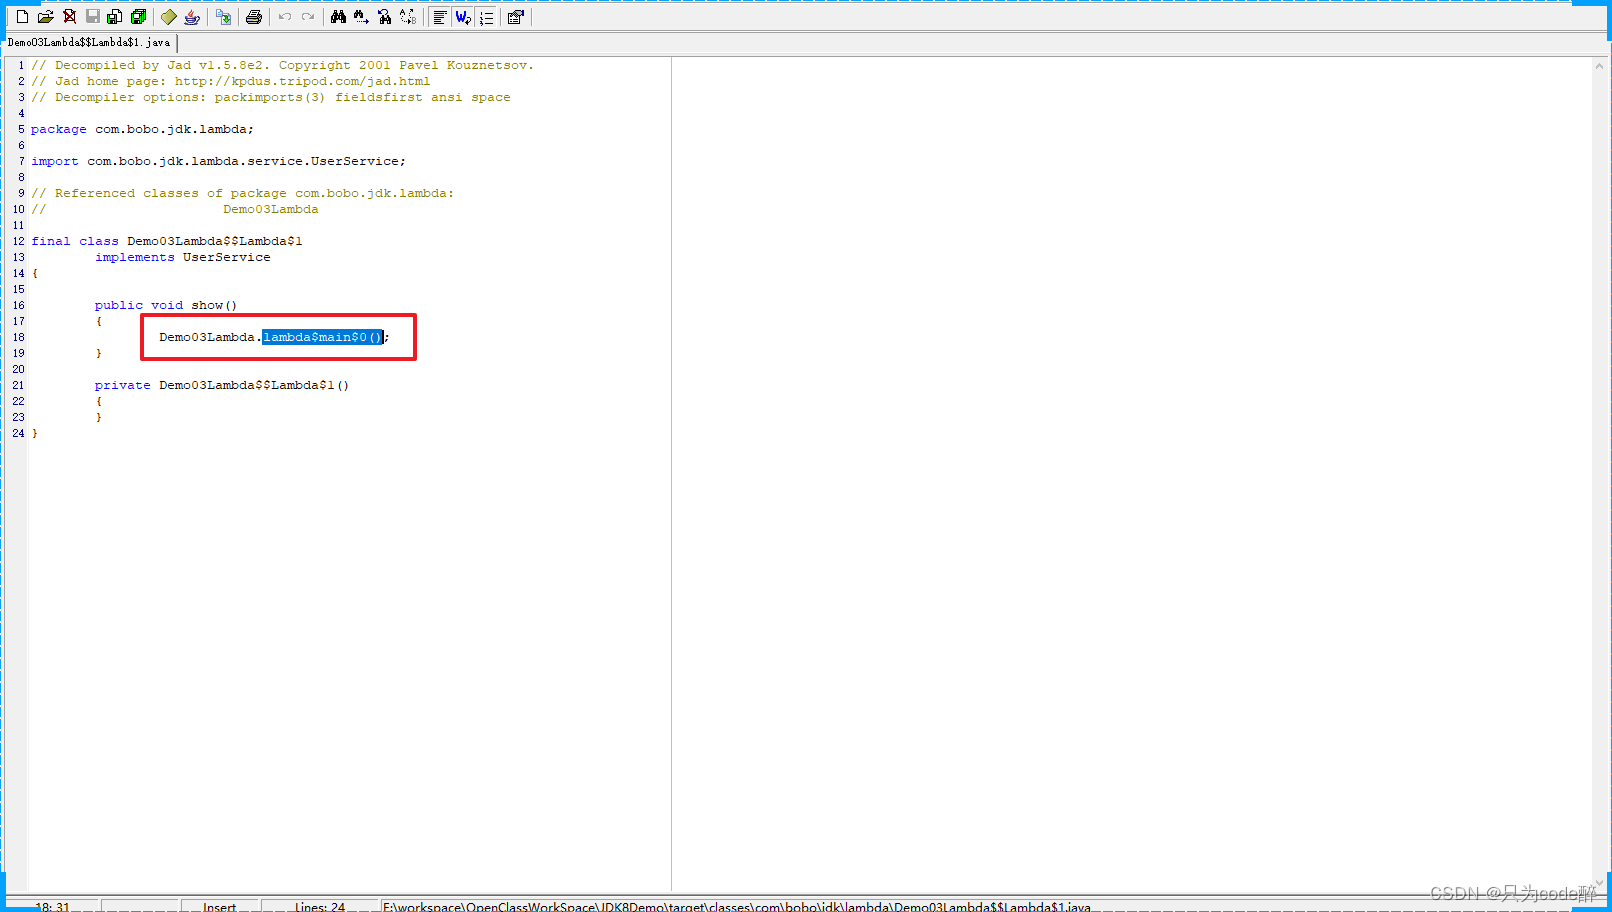
通过以上操作,我们可以看到,文件中生成了一个lambda$main$0方法,而这个方法里面正是我们编写在lambda表达式中的方法内容,主方法调用的正是lambda$main$0方法,所以Lambda的调用过程实际如下:
- 主类实现了接口
- 主类重新了接口的方法
- 主方法调用了lambda的方法
- Lambda方法里面写了执行内
Lambda表达式的省略写法
Lambda表达式在以下情况下可以使用省略写法:
1. 小括号内的参数类型可以省略
2. 如果小括号内有且仅有一个参数,则小括号可以省略
3. 如果大括号内有且仅有一个语句,可以同时省略大括号,return 关键字及语句分号。
话不多说,我们来看代码:
public class LambdaD04 {

    public static void main(String[] args) {
        //小括号内的参数类型可以省略
        noshow1((a,b)->{
            System.out.println(a+b+"6666");
            return a+b+"6666";
        });

        //如果小括号有且只有一个参数,小括号可以省略。
        noshow2(a->{
            return a+"**666";
        });

        //如果大括号内只有一个语句,那大括号可以省略,可以直接return关键字及语句
        noshow2(a-> a+"**666");
    }

    public static void noshow1(User1Service user1Service){
        user1Service.show("111","222");
    }

    public static void noshow2(User2Service user2Service){
        user2Service.show("333");
    }

}
Lambda和匿名内部类的对比
| Lambda | 匿名内部类 |
|
Lambda表达式需要的参数类型必须是接口 |
匿名内部类可以为其他类型 |
|
Lambda表达式需要接口中的抽象方法必须是一个 |
匿名内部类可以是多个 |
|
匿名内部类在编译后生成一个class |
Lambda在程序运行时动态生成class |
2. 新特性之接口增强与函数式接口
接口增强
Java8在接口中可以新增默认方法与静态方法来对接口进行增强,而默认方法和静态方法均可以带有方法体,打破了Java7接口中不可用定义方法体的规则,下面对默认方法和静态方法进行介绍。
默认方法
默认方法解决的场景举例如下:
1. 项目中含有接口1,接口1中有方法a。
2. 接口1被A、B、C类所实现。
3. 此时要在接口中新增另一个方法b
4. 那么此时A、B、C类都需要重写方法b
默认方法的存在可以解决上述的问题,在接口中可以定义多个默认方法,而接口的众多实现类无需对默认方法进行实现,这就解决了每次在更新接口时,实现类也需要更新的问题,下面我们来看默认方法的代码:
public class InterfaceD01 {

    public static void main(String[] args) {
        Jiekou1 j1=new S1();
        //默认方法 通过实现类调用
        j1.show();
        j1.show1();
    }

    interface Jiekou1{
        public void show();

        //接口中可定义含有方法体的默认方法 使用default关键字修饰
        public default String show1(){
            System.out.println("default");
            return "default";
        }

        public default String shows(){
            System.out.println("default");
            return "default";
        }
        public default String shows1(){
            System.out.println("default");
            return "default";
        }
        public void show2();
    }


    public static class S1 implements Jiekou1{
        @Override
        public void show() {
            System.out.println("S1");
        }
        @Override
        public String show1() {
            System.out.println("Override");
            return "Override";
        }

        @Override
        public void show2() {

        }
    }

}
静态方法
接口中也可以定义静态方法,就像我们项目中工具类的写法一样,直接通过接口.方法名进行调用,下面来看代码:
public class InterfaceD01 {

    public static void main(String[] args) {

        Jiekou2 j2=new S2();
        //静态方法 通过接口名称调用
        j2.show();
        Jiekou2.show2();
    }


    interface Jiekou2{
        public void show();
        public static String show2(){
            System.out.println("S2******");
            return "S2******";
        }
    }


    public static class S2 implements Jiekou2{
        @Override
        public void show() {
            System.out.println("S2");
        }


    }

}
函数式接口
方法的参数或局部变量类型必须为接口时,才可使用Lambda表达式,而Java8为我们定义了一系列的常用的函数式接口,可用于我们快捷的使用Lambda表达式,下面为大家介绍以下接口:
Supplier
无参有返回值的接口,对于的Lambda表达式需要提供一个返回数据的类型,常用直接使用此接口返回一个对象,使用代码如下:
/**
 * Supplier 函数式接口的使用
 */
public class SupplierTest {

    public static void main(String[] args) {
        fun1(()->{
            int arr[] = {22,33,55,66,44,99,10};
            // 计算出数组中的最大值
            Arrays.sort(arr);
            return arr[arr.length-1];
        });
    }

    private static void fun1(Supplier<Integer> supplier){
        // get() 是一个无参的有返回值的 抽象方法
        Integer max = supplier.get();
        System.out.println("max = " + max);

    }
}
Consumer
有参无返回值得接口,前面介绍的Supplier接口是用来生产数据的,而Consumer接口是用来消费数据的,使用的时候需要指定一个泛型来定义参数类型,代码如下:
public class ConsumerTest {

    public static void main(String[] args) {
        test(msg -> {
            System.out.println(msg + "-> 转换为小写:" + msg.toLowerCase());
        });
    }

    public static void test(Consumer<String> consumer){
        consumer.accept("Hello World");
    }
}
默认方法:andThen
如果一个方法的参数和返回值全部是Consumer类型,那么就可以实现效果,消费一个数据的时候,首先做一个操作,然后再做一个操作,实现组合,而这个方法就是Consumer接口中的default方法 andThen方法,代码如下:
public class ConsumerAndThenTest {

    public static void main(String[] args) {
        test2(msg1->{
            System.out.println(msg1 + "-> 转换为小写:" + msg1.toLowerCase());
        },msg2->{
            System.out.println(msg2 + "-> 转换为大写:" + msg2.toUpperCase());
        });
    }


    public static void test2(Consumer<String> c1,Consumer<String> c2){
        String str = "Hello World";
        //c1.accept(str); // 转小写
        //c2.accept(str); // 转大写
        //c1.andThen(c2).accept(str);
        c2.andThen(c1).accept(str);
    }
}
Function
有参有返回值的接口,Function接口是根据一个类型的数据得到另一个类型的数据,前者称为前置条件,后者称为后置条件,有参数有返回值,代码如下:
public class FunctionTest {

    public static void main(String[] args) {
        test(msg ->{
            return Integer.parseInt(msg);
        });
    }

    public static void test(Function<String,Integer> function){
        Integer apply = function.apply("666");
        System.out.println("apply = " + apply);
    }
}
默认方法:andThen,也是用来进行组合操作,代码如下:
public class FunctionAndThenTest {

    public static void main(String[] args) {
        test(msg ->{
            return Integer.parseInt(msg);
        },msg2->{
            return msg2 * 10;
        });
    }

    public static void test(Function<String,Integer> f1,Function<Integer,Integer> f2){
        /*Integer i1 = f1.apply("666");
        Integer i2 = f2.apply(i1);*/
        Integer i2 = f1.andThen(f2).apply("666");
        System.out.println("i2:" + i2);

    }
}
Predicate
有参且返回值为Boolean的接口,常用于一些判断场景,例如含有某个字符等,代码如下:
package com.bobo.jdk.fun;

import java.util.function.Predicate;

public class PredicateDefaultTest {

    public static void main(String[] args) {
        test(msg1 -> {
            return msg1.contains("H");
        },msg2 -> {
            return msg2.contains("W");
        });
    }

    private static void test(Predicate<String> p1,Predicate<String> p2){
        /*boolean b1 = predicate.test(msg);
        boolean b2 = predicate.test("Hello");*/
        // b1 包含H b2 包含W
        // p1 包含H 同时 p2 包含W
        boolean bb1 = p1.and(p2).test("Hello");
        // p1 包含H 或者 p2 包含W
        boolean bb2 = p1.or(p2).test("Hello");
        // p1 不包含H
        boolean bb3 = p1.negate().test("Hello");
        System.out.println(bb1); // FALSE
        System.out.println(bb2); // TRUE
        System.out.println(bb3); // FALSE
    }
}
3. 新特性之方法引用
方法引用是对Lambda表达式符合特定情况下的一种缩写方式,它使得我们的Lambda表达式更加的精简,也可以理解为lambda表达式的缩写形式,不过要注意的是方法引用只能引用已经存在的方法。
针对Lambda表达式的各种场景,我们又可以对Lambda表达式进行简写操作,以减少冗余代码的存在,主要使用双冒号”::”来实现具体使用,适用场景如下:
对象名::方法名
这是最常见的一种用法。如果一个类中的已经存在了一个成员方法,则可以通过对象名引用成员方法,代码如下:
 public static void main(String[] args) {
        Date now = new Date();
        Supplier<Long> supplier = ()->{return now.getTime();};
        System.out.println(supplier.get());
        // 然后我们通过 方法引用 的方式来处理
        Supplier<Long> supplier1 = now::getTime;
        System.out.println(supplier1.get());
    }
注意:
- 被引用的方法,参数要和接口中的抽象方法的参数一样
- 当接口抽象方法有返回值时,被引用的方法也必须有返回值
类名::静态方法名
也是比较常用的方式,代码如下:
public class FunctionRefTest04 {

    public static void main(String[] args) {
        Supplier<Long> supplier1 = ()->{
            return System.currentTimeMillis();
        };
        System.out.println(supplier1.get());

        // 通过 方法引用 来实现
        Supplier<Long> supplier2 = System::currentTimeMillis;
        System.out.println(supplier2.get());
    }
}
类名::引用实例方法
Java面向对象中,类名只能调用静态方法,类名引用实例方法是用前提的,实际上是拿第一个参数作为方法的调用者,代码如下:
package com.bobo.jdk.funref;

import java.util.Date;
import java.util.function.BiFunction;
import java.util.function.Function;
import java.util.function.Supplier;

public class FunctionRefTest05 {

    public static void main(String[] args) {
        Function<String,Integer> function = (s)->{
            return s.length();
        };
        System.out.println(function.apply("hello"));

        // 通过方法引用来实现
        Function<String,Integer> function1 = String::length;
        System.out.println(function1.apply("hahahaha"));

        BiFunction<String,Integer,String> function2 = String::substring;
        String msg = function2.apply("HelloWorld", 3);
        System.out.println(msg);
    }
}
类名::构造器
由于构造器的名称和类名完全一致,所以构造器引用使用::new的格式使用,代码如下:
public class FunctionRefTest06 {

    public static void main(String[] args) {
        Supplier<Person> sup = ()->{return new Person();};
        System.out.println(sup.get());
        // 然后通过 方法引用来实现
        Supplier<Person> sup1 = Person::new;
        System.out.println(sup1.get());
        BiFunction<String,Integer,Person> function = Person::new;
        System.out.println(function.apply("张三",22));
    }
}
数组::构造器
数组是怎么构造出来的呢?其实类似于对象的方式,代码如下:
public static void main(String[] args) {
        Function<Integer,String[]> fun1 = (len)->{
            return new String[len];
        };
        String[] a1 = fun1.apply(3);
        System.out.println("数组的长度是:" + a1.length);
        // 方法引用 的方式来调用数组的构造器
        Function<Integer,String[]> fun2 = String[]::new;
        String[] a2 = fun2.apply(5);
        System.out.println("数组的长度是:" + a2.length);
    }
4. 新特性之StreamAPI
当我们在需要对集合中的元素进行操作的时候,除了必需的添加,删除,获取外,最典型的操作就是集合遍历,来看一下java7是怎么操作集合的:
package com.bobo.jdk.stream;

import java.util.ArrayList;
import java.util.Arrays;
import java.util.List;

public class StreamTest01 {

    public static void main(String[] args) {
        // 定义一个List集合
        List<String> list = Arrays.asList("张三","张三丰","成龙","周星驰");
        // 1.获取所有 姓张的信息
        List<String> list1 = new ArrayList<>();
        for (String s : list) {
            if(s.startsWith("张")){
                list1.add(s);
            }
        }

        // 2.获取名称长度为3的用户
        List<String> list2 = new ArrayList<>();
        for (String s : list1) {
            if(s.length() == 3){
                list2.add(s);
            }
        }

        // 3. 输出所有的用户信息
        for (String s : list2) {
            System.out.println(s);
        }
    }
}
每次在新增需求的时候都需要写大量的代码去实现对集合的操作,显然是耗费精力的,下面看一下使用StreamAPI的解决方案:
package com.bobo.jdk.stream;

import java.util.ArrayList;
import java.util.Arrays;
import java.util.List;

public class StreamTest02 {

    public static void main(String[] args) {
        // 定义一个List集合
        List<String> list = Arrays.asList("张三","张三丰","成龙","周星驰");
        // 1.获取所有 姓张的信息
        // 2.获取名称长度为3的用户
        // 3. 输出所有的用户信息
        list.stream()
                .filter(s->s.startsWith("张"))
                .filter(s->s.length() == 3)
                .forEach(s->{
                    System.out.println(s);
                });
        System.out.println("----------");
        list.stream()
                .filter(s->s.startsWith("张"))
                .filter(s->s.length() == 3)
                .forEach(System.out::println);
    }
}
怎么样?是不是很简洁,写起来很爽呢?让我们来了解一下Stream的相关知识吧。
Stream流的创建方式
根据Collection获取
首先,java.util.Collection 接口中加入了default方法 stream,也就是说Collection接口下的所有的实现都可以通过steam方法来获取Stream流,代码如下:
 public static void main(String[] args) {
        List<String> list = new ArrayList<>();
        list.stream();
        Set<String> set = new HashSet<>();
        set.stream();
        Vector vector = new Vector();
        vector.stream();
    }
通过Stream的of方法获取
但是Map接口别没有实现Collection接口,那这时怎么办呢?这时我们可以根据Map获取对应的key value的集合,代码如下:
 public static void main(String[] args) {
        Map<String,Object> map = new HashMap<>();
        Stream<String> stream = map.keySet().stream(); // key
        Stream<Object> stream1 = map.values().stream(); // value
        Stream<Map.Entry<String, Object>> stream2 = map.entrySet().stream(); // entry
    }
Stream的常用方法介绍
Stream常用方法 Stream流模型的操作很丰富,这里介绍一些常用的API。这些方法可以被分成两种:
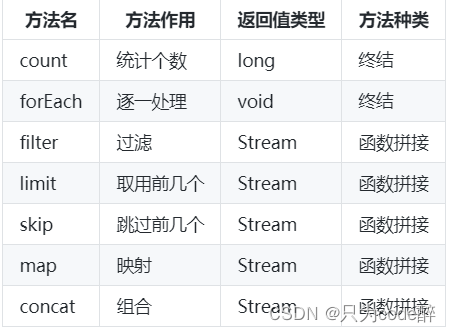
终结方法:返回值类型不再是 Stream 类型的方法,不再支持链式调用。本小节中,终结方法包括 count 和
forEach 方法。
非终结方法:返回值类型仍然是 Stream 类型的方法,支持链式调用。(除了终结方法外,其余方法均为非终结
方法。)
Stream注意事项(重要)
-
Stream只能操作一次
-
Stream方法返回的是新的流
-
Stream不调用终结方法,中间的操作不会执行
Stream常用方法举例
forEach
forEach用来遍历流中的数据,该方法接受一个Consumer接口,会将每一个流元素交给函数处理,具体代码如下:
//foreach方法的具体实现
void forEach(Consumer<? super T> action);

//使用forEach遍历集合
public static void main(String[] args) {
        Stream.of("a1", "a2", "a3").forEach(System.out::println);;
}
count
Stream流中的count方法用来统计其中的元素个数,该方法返回一个long值,代表元素的个数,具体代码如下:
public static void main(String[] args) {
        long count = Stream.of("a1", "a2", "a3").count();
        System.out.println(count);
    }
filter
filter方法的作用是用来过滤数据的。返回符合条件的数据,该接口接收一个Predicate函数式接口参数作为筛选条件,具体代码如下:
public static void main(String[] args) {
         Stream.of("a1", "a2", "a3","bb","cc","aa","dd")
                 .filter((s)->s.contains("a"))
                 .forEach(System.out::println);

    }
limit
limit方法可以对流进行截取处理,支取前n个数据,参数是一个long类型的数值,如果集合当前长度大于参数就进行截取,否则不操作,具体代码如下:
public static void main(String[] args) {
         Stream.of("a1", "a2", "a3","bb","cc","aa","dd")
                 .limit(3)
                 .forEach(System.out::println);

    }
skip
如果希望跳过前面几个元素,可以使用skip方法获取一个截取之后的新流,具体代码如下:
public static void main(String[] args) {
         Stream.of("a1", "a2", "a3","bb","cc","aa","dd")
                 .skip(3)
                 .forEach(System.out::println);

    }
map
如果我们需要将流中的元素映射到另一个流中,可以使用map方法,该接口需要一个Function函数式接口参数,可以将当前流中的T类型数据转换为另一种R类型的数据,具体代码如下:
public static void main(String[] args) {
         Stream.of("1", "2", "3","4","5","6","7")
                 //.map(msg->Integer.parseInt(msg))
                 .map(Integer::parseInt)
                 .forEach(System.out::println);

    }
sorted
如果需要将数据排序,可以使用sorted方法,在使用的时候可以根据自然规则排序,也可以通过比较强来指定对应的排序规则,具体代码如下:
public static void main(String[] args) {
         Stream.of("1", "3", "2","4","0","9","7")
                 //.map(msg->Integer.parseInt(msg))
                 .map(Integer::parseInt)
                 //.sorted() // 根据数据的自然顺序排序
                 .sorted((o1,o2)->o2-o1) // 根据比较强指定排序规则
                 .forEach(System.out::println);

    }
distinct
如果要去掉重复数据,可以使用distinct方法, Stream流中的distinct方法对于基本数据类型是可以直接出重的,但是对于自定义类型,我们是需要重写hashCode和equals方法来移除重复元素,具体代码如下:
public static void main(String[] args) {
         Stream.of("1", "3", "3","4","0","1","7")
                 //.map(msg->Integer.parseInt(msg))
                 .map(Integer::parseInt)
                 //.sorted() // 根据数据的自然顺序排序
                 .sorted((o1,o2)->o2-o1) // 根据比较强指定排序规则
                 .distinct() // 去掉重复的记录
                 .forEach(System.out::println);
        System.out.println("--------");
        Stream.of(
                new Person("张三",18)
                ,new Person("李四",22)
                ,new Person("张三",18)
        ).distinct()
                .forEach(System.out::println);

    }
match
如果需要判断数据是否匹配指定的条件,可以使用match相关的方法,具体代码如下:
public static void main(String[] args) {
        boolean b = Stream.of("1", "3", "3", "4", "5", "1", "7")
                .map(Integer::parseInt)
                //.allMatch(s -> s > 0)
                //.anyMatch(s -> s >4)
                .noneMatch(s -> s > 4)
                ;
        System.out.println(b);
    }
find
如果我们需要找到某些数据,可以使用find方法来实现,具体代码如下:
public static void main(String[] args) {

        Optional<String> first = Stream.of("1", "3", "3", "4", "5", "1", "7").findFirst();
        System.out.println(first.get());

        Optional<String> any = Stream.of("1", "3", "3", "4", "5", "1", "7").findAny();
        System.out.println(any.get());
    }
max、min
如果我们想要获取最大值和最小值,那么可以使用max和min方法,具体代码如下:
public static void main(String[] args) {

        Optional<Integer> max = Stream.of("1", "3", "3", "4", "5", "1", "7")
                .map(Integer::parseInt)
                .max((o1,o2)->o1-o2);
        System.out.println(max.get());

        Optional<Integer> min = Stream.of("1", "3", "3", "4", "5", "1", "7")
                .map(Integer::parseInt)
                .min((o1,o2)->o1-o2);
        System.out.println(min.get());
    }
reduce
如果需要将所有数据归纳得到一个数据,可以使用reduce方法,具体代码如下:
public static void main(String[] args) {
        Integer sum = Stream.of(4, 5, 3, 9)
                // identity默认值
                // 第一次的时候会将默认值赋值给x
                // 之后每次会将 上一次的操作结果赋值给x y就是每次从数据中获取的元素
                .reduce(0, (x, y) -> {
                    System.out.println("x="+x+",y="+y);
                    return x + y;
                });
        System.out.println(sum);
        // 获取 最大值
        Integer max = Stream.of(4, 5, 3, 9)
                .reduce(0, (x, y) -> {
                    return x > y ? x : y;
                });
        System.out.println(max);
    }
map和reduce的结合
在实际开发中我们经常会将map和reduce一块来使用,具体代码如下:
public static void main(String[] args) {
        // 1.求出所有年龄的总和
        Integer sumAge = Stream.of(
                new Person("张三", 18)
                , new Person("李四", 22)
                , new Person("张三", 13)
                , new Person("王五", 15)
                , new Person("张三", 19)
        ).map(Person::getAge) // 实现数据类型的转换
                .reduce(0, Integer::sum);
        System.out.println(sumAge);

        // 2.求出所有年龄中的最大值
        Integer maxAge = Stream.of(
                new Person("张三", 18)
                , new Person("李四", 22)
                , new Person("张三", 13)
                , new Person("王五", 15)
                , new Person("张三", 19)
        ).map(Person::getAge) // 实现数据类型的转换,符合reduce对数据的要求
                .reduce(0, Math::max); // reduce实现数据的处理
        System.out.println(maxAge);
        // 3.统计 字符 a 出现的次数
        Integer count = Stream.of("a", "b", "c", "d", "a", "c", "a")
                .map(ch -> "a".equals(ch) ? 1 : 0)
                .reduce(0, Integer::sum);
        System.out.println(count);
    }
mapToInt
如果需要将Stream中的Integer类型转换成int类型,可以使用mapToInt方法来实现,具体代码如下:
 public static void main(String[] args) {
        // Integer占用的内存比int多很多,在Stream流操作中会自动装修和拆箱操作
        Integer arr[] = {1,2,3,5,6,8};
        Stream.of(arr)
                .filter(i->i>0)
                .forEach(System.out::println);
        System.out.println("---------");
        // 为了提高程序代码的效率,我们可以先将流中Integer数据转换为int数据,然后再操作
        IntStream intStream = Stream.of(arr)
                .mapToInt(Integer::intValue);
        intStream.filter(i->i>3)
                .forEach(System.out::println);

    }
concat
如果有两个流,希望合并成为一个流,那么可以使用Stream接口的静态方法concat,具体代码如下:
 public static void main(String[] args) {
        Stream<String> stream1 = Stream.of("a","b","c");
        Stream<String> stream2 = Stream.of("x", "y", "z");
        // 通过concat方法将两个流合并为一个新的流
        Stream.concat(stream1,stream2).forEach(System.out::println);
    }
StreamAPI的综合案例
下面我们来练习一下StreamAPI的相关操作,定义两个集合,然后在集合中存储多个用户名称。然后完成如下的操作:
- 第一个队伍只保留姓名长度为3的成员
- 第一个队伍筛选之后只要前3个人
- 第二个队伍只要姓张的成员
- 第二个队伍筛选之后不要前两个人
- 将两个队伍合并为一个队伍
- 根据姓名创建Person对象
- 打印整个队伍的Person信息
package com.bobo.jdk.stream;

import com.bobo.jdk.lambda.domain.Person;

import java.util.Arrays;
import java.util.List;
import java.util.stream.Stream;

public class StreamTest21Demo {

    /**
     * 1. 第一个队伍只保留姓名长度为3的成员
     * 2. 第一个队伍筛选之后只要前3个人
     * 3. 第二个队伍只要姓张的成员
     * 4. 第二个队伍筛选之后不要前两个人
     * 5. 将两个队伍合并为一个队伍
     * 6. 根据姓名创建Person对象
     * 7. 打印整个队伍的Person信息
     * @param args
     */
    public static void main(String[] args) {
        List<String> list1 = Arrays.asList("迪丽热巴", "宋远桥", "苏星河", "老子", "庄子", "孙子", "洪七 公");
        List<String> list2 = Arrays.asList("古力娜扎", "张无忌", "张三丰", "赵丽颖", "张二狗", "张天爱", "张三");
        // 1. 第一个队伍只保留姓名长度为3的成员
        // 2. 第一个队伍筛选之后只要前3个人
        Stream<String> stream1 = list1.stream().filter(s ->  s.length() == 3).limit(3);
        // 3. 第二个队伍只要姓张的成员
        // 4. 第二个队伍筛选之后不要前两个人
        Stream<String> stream2 = list2.stream().filter(s -> s.startsWith("张")).skip(2);
        // 5. 将两个队伍合并为一个队伍
        // 6. 根据姓名创建Person对象
        // 7. 打印整个队伍的Person信息
        Stream.concat(stream1,stream2)
                //.map(n-> new Person(n))
                .map(Person::new)
                .forEach(System.out::println);

    }
}
Stream的结果收集
结果收集到集合中
具体代码如下:
/**
     * Stream结果收集
     *    收集到集合中
     */
    @Test
    public void test01(){
        // Stream<String> stream = Stream.of("aa", "bb", "cc");
        List<String> list = Stream.of("aa", "bb", "cc","aa")
                .collect(Collectors.toList());
        System.out.println(list);
        // 收集到 Set集合中
        Set<String> set = Stream.of("aa", "bb", "cc", "aa")
                .collect(Collectors.toSet());
        System.out.println(set);
        // 如果需要获取的类型为具体的实现,比如:ArrayList HashSet

        ArrayList<String> arrayList = Stream.of("aa", "bb", "cc", "aa")
                //.collect(Collectors.toCollection(() -> new ArrayList<>()));
                .collect(Collectors.toCollection(ArrayList::new));
        System.out.println(arrayList);
        HashSet<String> hashSet = Stream.of("aa", "bb", "cc", "aa")
                .collect(Collectors.toCollection(HashSet::new));
        System.out.println(hashSet);
    }
结果收集到数组中
Stream中提供了toArray方法来将结果放到一个数组中,返回值类型是Object[],如果我们要指定返回的类型,那么可以使用另一个重载的toArray(IntFunction f)方法,具体代码如下:
  /**
     * Stream结果收集到数组中
     */
    @Test
    public void test02(){
        Object[] objects = Stream.of("aa", "bb", "cc", "aa")
                .toArray(); // 返回的数组中的元素是 Object类型
        System.out.println(Arrays.toString(objects));
        // 如果我们需要指定返回的数组中的元素类型
        String[] strings = Stream.of("aa", "bb", "cc", "aa")
                .toArray(String[]::new);
        System.out.println(Arrays.toString(strings));

    }
Stream的聚合运算
当我们使用Stream流处理数据后,可以像数据库的聚合函数一样对某个字段进行操作,比如获得最大值,最小值,求和,平均值,统计数量,具体代码如下:
/**
     * Stream流中数据的聚合计算
     */
    @Test
    public void test03(){
        // 获取年龄的最大值
        Optional<Person> maxAge = Stream.of(
                new Person("张三", 18)
                , new Person("李四", 22)
                , new Person("张三", 13)
                , new Person("王五", 15)
                , new Person("张三", 19)
        ).collect(Collectors.maxBy((p1, p2) -> p1.getAge() - p2.getAge()));
        System.out.println("最大年龄:" + maxAge.get());
        // 获取年龄的最小值
        Optional<Person> minAge = Stream.of(
                new Person("张三", 18)
                , new Person("李四", 22)
                , new Person("张三", 13)
                , new Person("王五", 15)
                , new Person("张三", 19)
        ).collect(Collectors.minBy((p1, p2) -> p1.getAge() - p2.getAge()));
        System.out.println("最新年龄:" + minAge.get());
        // 求所有人的年龄之和
        Integer sumAge = Stream.of(
                new Person("张三", 18)
                , new Person("李四", 22)
                , new Person("张三", 13)
                , new Person("王五", 15)
                , new Person("张三", 19)
        )
                //.collect(Collectors.summingInt(s -> s.getAge()))
                .collect(Collectors.summingInt(Person::getAge))
                ;
        System.out.println("年龄总和:" + sumAge);
        // 年龄的平均值
        Double avgAge = Stream.of(
                new Person("张三", 18)
                , new Person("李四", 22)
                , new Person("张三", 13)
                , new Person("王五", 15)
                , new Person("张三", 19)
        ).collect(Collectors.averagingInt(Person::getAge));
        System.out.println("年龄的平均值:" + avgAge);
        // 统计数量
        Long count = Stream.of(
                new Person("张三", 18)
                , new Person("李四", 22)
                , new Person("张三", 13)
                , new Person("王五", 15)
                , new Person("张三", 19)
        ).filter(p->p.getAge() > 18)
                .collect(Collectors.counting());
        System.out.println("满足条件的记录数:" + count);

    }
Stream的分组操作
当我们使用Stream流处理数据后,可以根据某个属性将数据分组,具体代码如下:
 /**
     * 分组计算
     */
    @Test
    public void test04(){
        // 根据账号对数据进行分组
        Map<String, List<Person>> map1 = Stream.of(
                new Person("张三", 18, 175)
                , new Person("李四", 22, 177)
                , new Person("张三", 14, 165)
                , new Person("李四", 15, 166)
                , new Person("张三", 19, 182)
        ).collect(Collectors.groupingBy(Person::getName));
        map1.forEach((k,v)-> System.out.println("k=" + k +"\t"+ "v=" + v));
        System.out.println("-----------");
        // 根据年龄分组 如果大于等于18 成年否则未成年
        Map<String, List<Person>> map2 = Stream.of(
                new Person("张三", 18, 175)
                , new Person("李四", 22, 177)
                , new Person("张三", 14, 165)
                , new Person("李四", 15, 166)
                , new Person("张三", 19, 182)
        ).collect(Collectors.groupingBy(p -> p.getAge() >= 18 ? "成年" : "未成年"));
        map2.forEach((k,v)-> System.out.println("k=" + k +"\t"+ "v=" + v));

    }
这里还可以进行多级分组,比如先根据name分组然后根据年龄分组,具体代码如下:
/**
     * 分组计算--多级分组
     */
    @Test
    public void test05(){
        // 先根据name分组,然后根据age(成年和未成年)分组
        Map<String,Map<Object,List<Person>>> map =  Stream.of(
                new Person("张三", 18, 175)
                , new Person("李四", 22, 177)
                , new Person("张三", 14, 165)
                , new Person("李四", 15, 166)
                , new Person("张三", 19, 182)
        ).collect(Collectors.groupingBy(
                Person::getName
                ,Collectors.groupingBy(p->p.getAge()>=18?"成年":"未成年"
                )
        ));
        map.forEach((k,v)->{
            System.out.println(k);
            v.forEach((k1,v1)->{
                System.out.println("\t"+k1 + "=" + v1);
            });
        });
    }
对Stream中的数据进行分区操作
Collectors.partitioningBy会根据值是否为true,把集合中的数据分割为两个列表,一个true列表,一个false列表,具体代码如下:
/**
     * 分区操作
     */
    @Test
    public void test06(){
        Map<Boolean, List<Person>> map = Stream.of(
                new Person("张三", 18, 175)
                , new Person("李四", 22, 177)
                , new Person("张三", 14, 165)
                , new Person("李四", 15, 166)
                , new Person("张三", 19, 182)
        ).collect(Collectors.partitioningBy(p -> p.getAge() > 18));
        map.forEach((k,v)-> System.out.println(k+"\t" + v));
    }
Stream的拼接操作
Collectors.joining会根据指定的连接符,将所有的元素连接成一个字符串,具体代码如下:
/**
     * 对流中的数据做拼接操作
     */
    @Test
    public void test07(){
        String s1 = Stream.of(
                new Person("张三", 18, 175)
                , new Person("李四", 22, 177)
                , new Person("张三", 14, 165)
                , new Person("李四", 15, 166)
                , new Person("张三", 19, 182)
        ).map(Person::getName)
                .collect(Collectors.joining());
        // 张三李四张三李四张三
        System.out.println(s1);
        String s2 = Stream.of(
                new Person("张三", 18, 175)
                , new Person("李四", 22, 177)
                , new Person("张三", 14, 165)
                , new Person("李四", 15, 166)
                , new Person("张三", 19, 182)
        ).map(Person::getName)
                .collect(Collectors.joining("_"));
        // 张三_李四_张三_李四_张三
        System.out.println(s2);

        String s3 = Stream.of(
                new Person("张三", 18, 175)
                , new Person("李四", 22, 177)
                , new Person("张三", 14, 165)
                , new Person("李四", 15, 166)
                , new Person("张三", 19, 182)
        ).map(Person::getName)
                .collect(Collectors.joining("_", "###", "$$$"));
        // ###张三_李四_张三_李四_张三$$$
        System.out.println(s3);
    }
Stream之并行流
我们前面使用的Stream流都是串行,也就是在一个线程上面执行,parallelStream是一个并行执行的流,它通过默认的ForkJoinPool,可以提高多线程任务的速度,可以通过以下几种方式获取并行流,具体代码如下:
/**
     * 获取并行流的两种方式
     */
    @Test
    public void test02(){
        List<Integer> list = new ArrayList<>();
        // 通过List 接口 直接获取并行流
        Stream<Integer> integerStream = list.parallelStream();
        // 将已有的串行流转换为并行流
        Stream<Integer> parallel = Stream.of(1, 2, 3).parallel();
    }
下面我们通过案例,来看一下并行流在处理程序时的时效,具体代码如下:
package com.bobo.jdk.res;

import org.junit.After;
import org.junit.Before;
import org.junit.Test;

import java.util.stream.LongStream;

public class Test03 {

    private static long times = 500000000;

    private  long start;

    @Before
    public void befor(){
        start = System.currentTimeMillis();
    }

    @After
    public void end(){
        long end = System.currentTimeMillis();
        System.out.println("消耗时间:" + (end - start));
    }

    /**
     * 普通for循环 消耗时间:138
     */
    @Test
    public void test01(){
        System.out.println("普通for循环:");
        long res = 0;
        for (int i = 0; i < times; i++) {
            res += i;
        }
    }

    /**
     * 串行流处理
     *   消耗时间:203
     */
    @Test
    public void test02(){
        System.out.println("串行流:serialStream");
        LongStream.rangeClosed(0,times)
                .reduce(0,Long::sum);
    }

    /**
     * 并行流处理 消耗时间:84
     */
    @Test
    public void test03(){
        LongStream.rangeClosed(0,times)
                .parallel()
                .reduce(0,Long::sum);
    }
}
通过案例我们可以看到parallelStream的效率是最高的。
Stream并行处理的过程会分而治之,也就是将一个大的任务切分成了多个小任务,这表示每个任务都是一个线程操作,但是引入多线程的话,也就涉及了线程安全的问题,我们来通过案例了解一下问题现象,具体代码如下:
@Test
    public void test01(){
        List<Integer> list = new ArrayList<>();
        for (int i = 0; i < 1000; i++) {
            list.add(i);
        }
        System.out.println(list.size());
        List<Integer> listNew = new ArrayList<>();
        // 使用并行流来向集合中添加数据
        list.parallelStream()
                //.forEach(s->listNew.add(s));
                .forEach(listNew::add);
        System.out.println(listNew.size());
//运行效果:890
    }
如何解决这种情况呢:
- 加同步锁
- 使用线程安全的容器
- 通过Stream中的toArray/collect操作
/**
     * 加同步锁
     */
    @Test
    public void test02(){
        List<Integer> listNew = new ArrayList<>();
        Object obj = new Object();
        IntStream.rangeClosed(1,1000)
                .parallel()
                .forEach(i->{
                    synchronized (obj){
                        listNew.add(i);
                    }

                });
        System.out.println(listNew.size());
    }

    /**
     * 使用线程安全的容器
     */
    @Test
    public void test03(){
        Vector v = new Vector();
        Object obj = new Object();
        IntStream.rangeClosed(1,1000)
                .parallel()
                .forEach(i->{
                    synchronized (obj){
                        v.add(i);
                    }

                });
        System.out.println(v.size());
    }

    /**
     * 将线程不安全的容器转换为线程安全的容器
     */
    @Test
    public void test04(){
        List<Integer> listNew = new ArrayList<>();
        // 将线程不安全的容器包装为线程安全的容器
        List<Integer> synchronizedList = Collections.synchronizedList(listNew);
        Object obj = new Object();
        IntStream.rangeClosed(1,1000)
                .parallel()
                .forEach(i->{
                        synchronizedList.add(i);
                });
        System.out.println(synchronizedList.size());
    }


    /**
     * 我们还可以通过Stream中的 toArray方法或者 collect方法来操作
     * 就是满足线程安全的要求
     */
    @Test
    public void test05(){
        List<Integer> listNew = new ArrayList<>();
        Object obj = new Object();
        List<Integer> list = IntStream.rangeClosed(1, 1000)
                .parallel()
                .boxed()
                .collect(Collectors.toList());
        System.out.println(list.size());
    }
5. 新特性之Optional类
Optional是一个没有子类的工具类,Optional是一个可以为null的容器对象,它的主要作用就是为了避免Null检查,防止NullpointerException,下面看一下optional的使用方式:
/**
     * Optional中的常用方法介绍
     *   get(): 如果Optional有值则返回,否则抛出NoSuchElementException异常
     *          get()通常和isPresent方法一块使用
     *   isPresent():判断是否包含值,包含值返回true,不包含值返回false
     *   orElse(T t):如果调用对象包含值,就返回该值,否则返回t
     *   orElseGet(Supplier s):如果调用对象包含值,就返回该值,否则返回 Lambda表达式的返回值
     */
    @Test
    public void test03(){
        Optional<String> op1 = Optional.of("zhangsan");
        Optional<String> op2 = Optional.empty();

        // 获取Optional中的值
        if(op1.isPresent()){
            String s1 = op1.get();
            System.out.println("用户名称:" +s1);
        }

        if(op2.isPresent()){
            System.out.println(op2.get());
        }else{
            System.out.println("op2是一个空Optional对象");
        }

        String s3 = op1.orElse("李四");
        System.out.println(s3);
        String s4 = op2.orElse("王五");
        System.out.println(s4);

        String s5 = op2.orElseGet(()->{
            return "Hello";
        });
        System.out.println(s5);
    }
@Test
public void test04(){
Optional<String> op1 = Optional.of("zhangsan");
Optional<String> op2 = Optional.empty();
// 如果存在值 就做什么
op1.ifPresent(s-> System.out.println("有值:" +s));
op1.ifPresent(System.out::println);
}
/**
* 自定义一个方法,将Person对象中的 name 转换为大写 并返回
*/
@Test
public void test05(){
Person p = new Person("zhangsan",18);
Optional<Person> op = Optional.of(p);
String name = getNameForOptional(op);
System.out.println("name="+name);
}
/**
* 根据Person对象 将name转换为大写并返回
* 通过Optional方式实现
* @param op
* @return
*/
public String getNameForOptional(Optional<Person> op){
if(op.isPresent()){
String msg = //op.map(p -> p.getName())
op.map(Person::getName)
//.map(p -> p.toUpperCase())
.map(String::toUpperCase)
.orElse("空值");
return msg;
}
return null;
}
/**
* 根据Person对象 将name转换为大写并返回
* @param person
* @return
*/
public String getName(Person person){
if(person != null){
String name = person.getName();
if(name != null){
return name.toUpperCase();
}else{
return null;
}
}else{
return null;
}
}6. 新特性之日期API
我们首先来看一下旧版本的API在处理日期的案例,代码如下:
 /**
     * 旧版日期时间设计的问题
     */
    @Test
    public void test01() throws Exception{
        // 1.设计不合理
        Date date = new Date(2021,05,05);
        System.out.println(date);

        // 2.时间格式化和解析操作是线程不安全的
        SimpleDateFormat sdf = new SimpleDateFormat("yyyy-MM-dd");
        for (int i = 0; i < 50; i++) {
            new Thread(()->{
               // System.out.println(sdf.format(date));
                try {
                    System.out.println(sdf.parse("2021-05-06"));
                } catch (ParseException e) {
                    e.printStackTrace();
                }
            }).start();
        }
    }
我们来总结下,旧版本的API在日期处理上的缺点:
- 设计不合理,在java.util和java.sql的包中都有日期类,java.util.Date同时包含日期和时间的,而java.sql.Date仅仅包含日期,此外用于格式化和解析的类在java.text包下。
- 非线程安全,java.util.Date是非线程安全的,所有的日期类都是可变的,这是java日期类最大的问题之一。
- 时区处理麻烦,日期类并不提供国际化,没有时区支持。
新版日期API的介绍
JDK 8中增加了一套全新的日期时间API,这套API设计合理,是线程安全的。新的日期及时间API位于 java.time 包 中,下面是一些关键类。
- LocalDate :表示日期,包含年月日,格式为 2019-10-16
- LocalTime :表示时间,包含时分秒,格式为 16:38:54.158549300
- LocalDateTime :表示日期时间,包含年月日,时分秒,格式为 2018-09-06T15:33:56.750
- DateTimeFormatter :日期时间格式化类。
- Instant:时间戳,表示一个特定的时间瞬间。
- Duration:用于计算2个时间(LocalTime,时分秒)的距离
- Period:用于计算2个日期(LocalDate,年月日)的距离
- ZonedDateTime :包含时区的时间
Java中使用的历法是ISO 8601日历系统,它是世界民用历法,也就是我们所说的公历。平年有365天,闰年是366 天。此外Java 8还提供了4套其他历法,分别是:
- ThaiBuddhistDate:泰国佛教历
- MinguoDate:中华民国历
- JapaneseDate:日本历
- HijrahDate:伊斯兰历
新版API常用操作
LocalDate,LocalTime以及LocalDateTime的操作,具体代码如下:
/**
     * JDK8 日期时间操作
     */
    @Test
    public void test01(){
        // 1.创建指定的日期
        LocalDate date1 = LocalDate.of(2021, 05, 06);
        System.out.println("date1 = "+date1);

        // 2.得到当前的日期
        LocalDate now = LocalDate.now();
        System.out.println("now = "+now);

        // 3.根据LocalDate对象获取对应的日期信息
        System.out.println("年:" + now.getYear());
        System.out.println("月:" + now.getMonth().getValue());
        System.out.println("日:" + now.getDayOfMonth());
        System.out.println("星期:" + now.getDayOfWeek().getValue());
    }

    /**
     * 时间操作
     */
    @Test
    public void test02(){
        // 1.得到指定的时间
        LocalTime time = LocalTime.of(5,26,33,23145);
        System.out.println(time);
        // 2.获取当前的时间
        LocalTime now = LocalTime.now();
        System.out.println(now);
        // 3.获取时间信息
        System.out.println(now.getHour());
        System.out.println(now.getMinute());
        System.out.println(now.getSecond());
        System.out.println(now.getNano());
    }

    /**
     * 日期时间类型  LocalDateTime
     */
    @Test
    public void test03(){
        // 获取指定的日期时间
        LocalDateTime dateTime =
                LocalDateTime.of(2020
                        , 06
                        , 01
                        , 12
                        , 12
                        , 33
                        , 213);
        System.out.println(dateTime);
        // 获取当前的日期时间
        LocalDateTime now = LocalDateTime.now();
        System.out.println(now);
        // 获取日期时间信息
        System.out.println(now.getYear());
        System.out.println(now.getMonth().getValue());
        System.out.println(now.getDayOfMonth());
        System.out.println(now.getDayOfWeek().getValue());
        System.out.println(now.getHour());
        System.out.println(now.getMinute());
        System.out.println(now.getSecond());
        System.out.println(now.getNano());
    }
日期的比较和修改
/**
     * 日期时间的修改
     */
    @Test
    public void test01(){
        LocalDateTime now = LocalDateTime.now();
        System.out.println("now = "+now);
        // 修改日期时间  对日期时间的修改,对已存在的LocalDate对象,创建了它模板
        // 并不会修改原来的信息
        LocalDateTime localDateTime = now.withYear(1998);
        System.out.println("now :"+now);
        System.out.println("修改后的:" + localDateTime);

        System.out.println("月份:" + now.withMonth(10));
        System.out.println("天:" + now.withDayOfMonth(6));
        System.out.println("小时:" + now.withHour(8));
        System.out.println("分钟:" + now.withMinute(15));

        // 在当前日期时间的基础上 加上或者减去指定的时间
        System.out.println("两天后:" + now.plusDays(2));
        System.out.println("10年后:"+now.plusYears(10));
        System.out.println("6个月后 = " + now.plusMonths(6));

        System.out.println("10年前 = " + now.minusYears(10));
        System.out.println("半年前 = " + now.minusMonths(6));
        System.out.println("一周前 = " + now.minusDays(7));
    }

    /**
     * 日期时间的比较
     */
    @Test
    public void test02(){
        LocalDate now = LocalDate.now();
        LocalDate date = LocalDate.of(2020, 1, 3);
        // 在JDK8中要实现 日期的比较 isAfter  isBefore isEqual 通过这几个方法来直接比较
        System.out.println(now.isAfter(date)); // true
        System.out.println(now.isBefore(date)); // false
        System.out.println(now.isEqual(date)); // false
    }
注意:在进行日期时间修改的时候,原来的LocalDate对象是不会被修改,每次操作都是返回了一个新的LocalDate对象,所以在多线程场景下是数据安全的。
格式化和解析
在JDK8中我们可以通过java.time.format.DateTimeFormatter类可以进行日期的解析和格式化操作
/**
     * 日期格式化
     */
    @Test
    public void test01(){
        LocalDateTime now = LocalDateTime.now();
        // 指定格式  使用系统默认的格式 2021-05-27T16:16:38.139
        DateTimeFormatter isoLocalDateTime = DateTimeFormatter.ISO_LOCAL_DATE_TIME;
        // 将日期时间转换为字符串
        String format = now.format(isoLocalDateTime);
        System.out.println("format = " + format);

        // 通过 ofPattern 方法来指定特定的格式
        DateTimeFormatter dateTimeFormatter = DateTimeFormatter.ofPattern("yyyy-MM-dd HH:mm:ss");
        String format1 = now.format(dateTimeFormatter);
        // 2021-05-27 16:16:38
        System.out.println("format1 = " + format1);

        // 将字符串解析为一个 日期时间类型
        LocalDateTime parse = LocalDateTime.parse("1997-05-06 22:45:16", dateTimeFormatter);
        // parse = 1997-05-06T22:45:16
        System.out.println("parse = " + parse);
    }
计算日期差
JDK8中提供了两个工具类Duration/Period:计算日期时间差
- Duration:用来计算两个时间差(LocalTime)
- Period:用来计算两个日期差(LocalDate)
 /**
     * 计算日期时间差
     */
    @Test
    public void test01(){
        // 计算时间差
        LocalTime now = LocalTime.now();
        LocalTime time = LocalTime.of(22, 48, 59);
        System.out.println("now = " + now);
        // 通过Duration来计算时间差
        Duration duration = Duration.between(now, time);
        System.out.println(duration.toDays()); // 0
        System.out.println(duration.toHours()); // 6
        System.out.println(duration.toMinutes()); // 368
        System.out.println(duration.toMillis()); // 22124240

        // 计算日期差
        LocalDate nowDate = LocalDate.now();
        LocalDate date = LocalDate.of(1997, 12, 5);
        Period period = Period.between(date, nowDate);
        System.out.println(period.getYears()); // 23
        System.out.println(period.getMonths()); // 5
        System.out.println(period.getDays()); // 22
    }
时间矫正器
有时候我们可以需要如下调整:将日期调整到”下个月的第一天”等操作。这时我们通过时间校正器效果可能会更好。
- TemporalAdjuster:时间校正器
- TemporalAdjusters:通过该类静态方法提供了大量的常用TemporalAdjuster的实现。
 /**
     * 时间校正器
     */
    @Test
    public void test02(){
        LocalDateTime now = LocalDateTime.now();
        // 将当前的日期调整到下个月的一号
        TemporalAdjuster adJuster = (temporal)->{
            LocalDateTime dateTime = (LocalDateTime) temporal;
            LocalDateTime nextMonth = dateTime.plusMonths(1).withDayOfMonth(1);
            System.out.println("nextMonth = " + nextMonth);
            return nextMonth;
        };
        // 我们可以通过TemporalAdjusters 来实现
        // LocalDateTime nextMonth = now.with(adJuster);
        LocalDateTime nextMonth = now.with(TemporalAdjusters.firstDayOfNextMonth());
        System.out.println("nextMonth = " + nextMonth);
    }
时区
Java8 中加入了对时区的支持,LocalDate、LocalTime、LocalDateTime是不带时区的,带时区的日期时间类分别为:ZonedDate、ZonedTime、ZonedDateTime。 其中每个时区都对应着 ID,ID的格式为 “区域/城市” 。例如 :Asia/Shanghai 等。 ZoneId:该类中包含了所有的时区信息。
 /**
     * 时区操作
     */
    @Test
    public void test01(){
        // 1.获取所有的时区id
        // ZoneId.getAvailableZoneIds().forEach(System.out::println);

        // 获取当前时间 中国使用的 东八区的时区,比标准时间早8个小时
        LocalDateTime now = LocalDateTime.now();
        System.out.println("now = " + now); // 2021-05-27T17:17:06.951
        // 获取标准时间
        ZonedDateTime bz = ZonedDateTime.now(Clock.systemUTC());
        System.out.println("bz = " + bz); // 2021-05-27T09:17:06.952Z

        // 使用计算机默认的时区,创建日期时间
        ZonedDateTime now1 = ZonedDateTime.now();
        System.out.println("now1 = " + now1); //2021-05-27T17:17:06.952+08:00[Asia/Shanghai]

        // 使用指定的时区创建日期时间
        ZonedDateTime now2 = ZonedDateTime.now(ZoneId.of("America/Marigot"));
        System.out.println("now2 = " + now2);

    }
JDK新的日期和时间API的优势:
- 新版日期时间API中,日期和时间对象是不可变,操作日期不会影响原来的值,而是生成一个新的实例
- 提供不同的两种方式,有效的区分了人和机器的操作
- TemporalAdjuster可以更精确的操作日期,还可以自定义日期调整期
- 线程安全
版权声明:本文内容由互联网用户自发贡献,该文观点仅代表作者本人。本站仅提供信息存储空间服务,不拥有所有权,不承担相关法律责任。如发现本站有涉嫌侵权/违法违规的内容, 请发送邮件至 举报,一经查实,本站将立刻删除。
文章由极客之音整理,本文链接:https://www.bmabk.com/index.php/post/116513.html

