
0、序
OpenCV是什么?引用度娘的介绍就是“其是一个基于BSD许可(开源)发行的跨平台计算机视觉和机器学习软件库,可以运行在Linux、Windows、Android和Mac OS操作系统上。它轻量级而且高效——由一系列 C 函数和少量 C++ 类构成,同时提供了Python、Ruby、MATLAB等语言的接口,实现了图像处理和计算机视觉方面的很多通用算法。”可以说是一个功能强大的用于图像视频等相关处理的一个库。
查看是否已安装好opencv,check原系统已经安装好opencv,只要是import cv2没问题,那就是安装OK的。


| 相关版本details | version |
|---|---|
| CUDA | 10.2.89 |
| cuDNN | 8.0.0.180 |
| OpenCV | 4.4.0 |
| Python | 3.6.9 |
| TensorFlow | 2.3.1 |
| Jetpack | Jetpack 4.4.1 |
| Platform | Jetson nano |
1、Gsteamer获取camera数据流
在Jetson 中调用CSI摄像头,需要使用Gsteamer获取数据流,需要先进行gstreamer_pipeline的配置。
def gstreamer_pipeline(
         capture_width=640,
         capture_height=480,
         display_width=640,
         display_height=480,
         framerate=60,
         flip_method=0,
):
return (
         "nvarguscamerasrc ! "
         "video/x-raw(memory:NVMM), "
         "width=(int)%d, height=(int)%d, "
         "format=(string)NV12, framerate=(fraction)%d/1 ! "
         "nvvidconv flip-method=%d ! "
         "video/x-raw, width=(int)%d, height=(int)%d, format=(string)BGRx ! "
         "videoconvert ! "
         "video/x-raw, format=(string)BGR ! appsink"
        % (
                capture_width,
                capture_height,
                framerate,
                flip_method,
                display_width,
                display_height,
        )
)
2、人脸检测的实现
2.1、基于haar cascades分类器实现
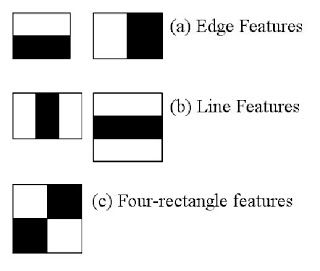
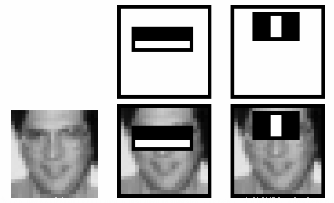
参考opencv官方中face detect的介绍,关于使用基于Haar特征的级联分类器进行对象检测是Paul Viola和Michael Jones在其论文“使用简单特征的增强级联进行快速对象检测”中于2001年提出的一种有效的对象检测方法。
在opencv中常用的人脸检测的分类器有:haarcascade_frontalface_default.xml、haarcascade_frontalface_alt2.xml、lbpcascade_frontalface.xml、haarcascade_frontalface_alt_tree.xml等。
How to use Haar-cascade Detection in OpenCV?
在opencv中配备了相关的检测器和训练器,可以为你需要检测的对象进行训练,获得自己的适用于特定对象的检测器。使用opencv进行人脸检测,在opencv中已经提供了许多特定对象的分类器,例如说针对人脸的、眼睛等经过预训练的分类器。这些XML分类器文件存储在“你的安装路径/opencv / data / haarcascades /文件夹中。”
该demo使用的分类器是haarcascade_frontalface_alt2。

def CatchUsbVideo(window_name, camera_idx):
    cv2.namedWindow(window_name)

    #视频来源,可以来自一段已存好的视频,也可以直接来自USB摄像头
    cap = cv2.VideoCapture(gstreamer_pipeline(flip_method=camera_idx), cv2.CAP_GSTREAMER)

    #告诉OpenCV使用人脸识别分类器
    classfier = cv2.CascadeClassifier("/usr/share/opencv4/haarcascades/haarcascade_frontalface_alt2.xml")

    #识别出人脸后要画的边框的颜色,RGB格式
    color = (0, 255, 0)

    while cap.isOpened():
        ok, frame = cap.read() #读取一帧数据
        if not ok:
            break

        #将当前帧转换成灰度图像
        grey = cv2.cvtColor(frame, cv2.COLOR_BGR2GRAY)
        cv2.imshow("grey pic", grey)

        #人脸检测,1.2和2分别为图片缩放比例和需要检测的有效点数
        faceRects = classfier.detectMultiScale(grey, scaleFactor = 1.2, minNeighbors = 3, minSize = (32, 32))
        if len(faceRects) > 0:               #大于0则检测到人脸
            pic_time = time.strftime('%Y.%m.%d_%H:%M:%S ',time.localtime(time.time()))
            pic_name = "./works/pic_data/" + pic_time + ".png"
            print(pic_name)
            cv2.imwrite(pic_name, frame)		#保存图片

            for faceRect in faceRects:       #单独框出每一张人脸
                x, y, w, h = faceRect
                cv2.rectangle(frame, (x, y), (x+w, y+h), color, 2)

        #显示图像
        cv2.imshow(window_name, frame)
        c = cv2.waitKey(10)
        if c & 0xFF == ord('q'):
            break

    #释放摄像头并销毁所有窗口
    cap.release()
    cv2.destroyAllWindows()

if __name__ == '__main__':
    CatchUsbVideo("Find face", 0)
效果就引用OpenCV官网的介绍:
Now we find the faces in the image. If faces are found, it returns the positions of detected faces as Rect(x,y,w,h). Once we get these locations, we can create a ROI for the face and apply eye detection on this ROI (since eyes are always on the face !!! ).
2.2、基于预训练的caffe模型
该模型是基于SSD和ResNet网络来训练的,实现参考@cv小白_jackko
该博主的《opencv_deeplearning实战1:基于深度学习的opencv人脸检测》,模型和相关权重参数的传送门如下:
模型结构文件:https://github.com/opencv/opencv/tree/master/samples/dnn/face_detector
参数文件:https://github.com/JackKoLing/opencv_deeplearning_practice/blob/master/practice1_face_detection/res10_300x300_ssd_iter_140000.caffemodel
import numpy as np
import cv2
import os
import time
import pickle

# 定义相关的路径参数
modelPath = "deploy.prototxt.txt"
weightPath = "res10_300x300_ssd_iter_140000.caffemodel"
confidence = 0.5 # 置信度参数,高于此数才认为是人脸,可调

font=cv2.FONT_HERSHEY_SIMPLEX

def resize_auto(height, width):

	image_exchange = cv2.imread("/home/colin/works/face_detect/mark.png")

	height_e, width_e = image_exchange.shape[:2]
	h = height/height_e
	if h <= 0:
		h = 1

	w = width/width_e
	if w <= 0:
		w = 1

	img_rs = cv2.resize(image_exchange, (int(width_e * h/2), int(width_e * h/2)), interpolation = cv2.INTER_CUBIC)

	return img_rs


def image_save(img):
	pic_time = time.strftime('%Y.%m.%d_%H:%M:%S ',time.localtime(time.time()))
	pic_name = "/home/colin/works/pic_data/" + pic_time + ".jpg"
	print(pic_name)
	cv2.imwrite(pic_name, img)

catch_count = 0
def catch_face(startX, endX, startY, endY, image):
	global catch_count
	face_pic = image[startY -50: endY + 50, startX-50 : endX + 50]

	if face_pic.size > 0 and catch_count < 50:
		catch_count +=1
		pic_name = "/home/colin/works/pic_data/" + "colin_" + str(catch_count) + ".jpg"
		cv2.imwrite(pic_name, face_pic)
		print("face catch %d\n"%(catch_count))

def face_detector(image, save_switch, catch_switch):

	net = cv2.dnn.readNetFromCaffe(modelPath, weightPath)
	net.setPreferableBackend(cv2.dnn.DNN_BACKEND_CUDA)  #使用cuDNN加速
	net.setPreferableTarget(cv2.dnn.DNN_TARGET_CUDA)	#使用cuDNN加速

	# 输入图片并重置大小符合模型的输入要求
	(h, w) = image.shape[:2]  #获取图像的高和宽,用于画图
	blob = cv2.dnn.blobFromImage(cv2.resize(image, (300, 300)), 1.0,
		(300, 300), (104.0, 177.0, 123.0))
	#blobFromImage
	net.setInput(blob)
	detections = net.forward() # 预测结果

	# 可视化:在原图加上标签和框
	for i in range(0, detections.shape[2]):
		# 获得置信度
		res_confidence = detections[0, 0, i, 2]
		# 过滤掉低置信度的像素
		if res_confidence > confidence :
			#save img
			if save_switch == 1:
				image_save(image)

			# 获得框的位置
			box = detections[0, 0, i, 3:7] * np.array([w, h, w, h])
			(startX, startY, endX, endY) = box.astype("int")

			#add by colin.tan
			if catch_switch == 1:
				catch_face(startX, endX, startY, endY, image)

			# 在图片上写上标签
			text = "{:.2f}%".format(res_confidence * 100)
			# 如果检测脸部在左上角,则把标签放在图片内,否则放在图片上面
			y = startY - 10 if startY - 10 > 10 else startY + 10
			cv2.rectangle(image, (startX, startY), (endX, endY),(0, 255, 0), 2)
			cv2.putText(image, text, (startX, y),cv2.FONT_HERSHEY_SIMPLEX, 0.45, (0, 0, 255), 2)

	resImage = image
	return resImage
在原实现的基础上增加了调用cuda进行图像处理加速,减少了程序对于CPU的占用,一定程度上提升了程序性能。
参考附录
1)opencv_deeplearning实战1:基于深度学习的opencv人脸检测
2)算法优化二——如何提高人脸检测正确率
版权声明:本文内容由互联网用户自发贡献,该文观点仅代表作者本人。本站仅提供信息存储空间服务,不拥有所有权,不承担相关法律责任。如发现本站有涉嫌侵权/违法违规的内容, 请发送邮件至 举报,一经查实,本站将立刻删除。
文章由极客之音整理,本文链接:https://www.bmabk.com/index.php/post/116970.html

