
一、Spring框架
1.spring框架了解
spring框架是一个开源的JavaEE应用程序,主要核心是IOC(控制反转/依赖注入)与AOP(面向切面)两大技术,实现项目在开发过程中的轻松解耦,提高项目开发效率。
2.spring作用
spring基于分布式的应用程序,基于轻量级的框架
配置管理 ,Bean对象实例化-IOC
集成其他的第三方技术
MyBatis、Hibernate框架(持久层框架)
SpringMVC Spring Security权限
Quartz时钟框架(定时任务处理)
自带的服务
Mail邮件处理
定时任务处理-定时调度(定时短信、定时任务)
消息处理(异步处理)
3.spring模块划分
**Spring IOC模块:**Bean对象的实例化 、 Bean的创建
Spring AOP模块:动态代理 、面向切面编程
Spring JDBC+事务模块:由 Spring-jdbc、Spring-tx、Springorm、Spring-jms
和 Spring-oxm 5 个模块组成Spring-jdbc 模块是 Spring 提供的 JDBC
抽象框架的主要实现模块,用于简化 Spring JDBC。**Spring Web模块 :**由 Spring-web、Spring-webmvc、Spring-websocket 和 Spring-webmvc-portlet 4 个模块组成,Web 上下文模块建立在应用程序上下文模块之上,为基于 Web 的应用程序提供了上下文。Web 模块还简化了处理多部分请求以及将请求参数绑定到域对象的工作。
二、Spring框架环境搭建
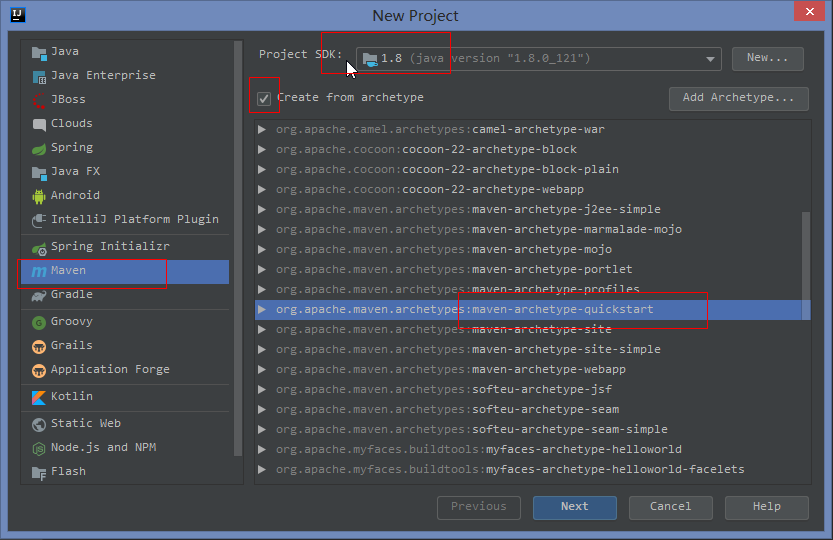
1.创建maven项目
选择“File”——>选择“New”——>选择Maven
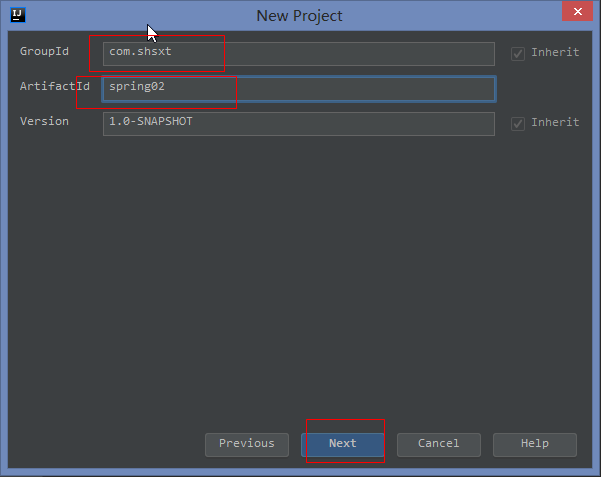
2.设置项目的坐标
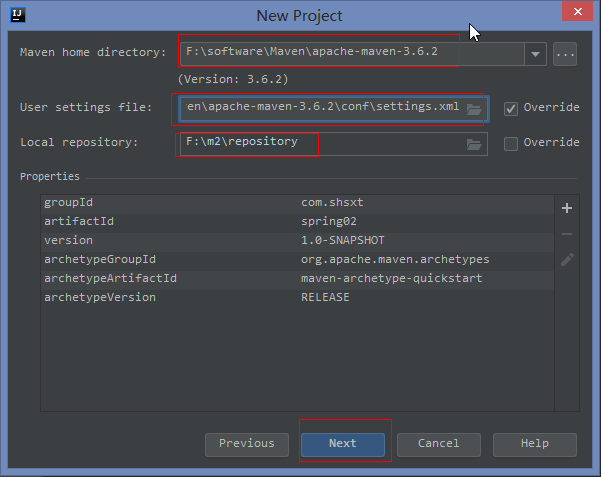
3.设置项目的Maven环境
4.设置项目的名称和存放的工作空间
5.修改项目中pom.xml的配置
1.修改JDK版本1.7修改为1.8
  <properties>
    <project.build.sourceEncoding>UTF8</project.build.sourceEncoding>
    <maven.compiler.source>1.8</maven.compiler.source>
    <maven.compiler.target>1.8</maven.compiler.target>
  </properties>@[TOC](这里写自定义目录标题)
2.修改单元测试的版本4.13修改为4.12
 <dependencies>
    <dependency>
      <groupId>junit</groupId>
      <artifactId>junit</artifactId>
      <version>4.12</version>
      <scope>test</scope>
    </dependency>
  </dependencies>
3.删除build标签中pluginManagement标签
 <!--删除build标签中的pluginManagement标签-->
  <build>
  </build>
4.添加Spring的依赖坐标
Maven仓库:https://mvnrepository.com/
 <!--添加Spring的依赖坐标-->
<!-- https://mvnrepository.com/artifact/org.springframework/spring-context -->
<dependency>
    <groupId>org.springframework</groupId>
    <artifactId>spring-context</artifactId>
    <version>4.3.9.RELEASE</version>
</dependency>
6.添加spring的配置文件 spring.xml
1.在项目的src下创建文件夹(Alt+insert)
2.将文件夹标注为资源目录
3.新建xml文件,将官方文档上的配置拷贝到spring.xml中
<?xml version="1.0" encoding="UTF-8"?>
<beans xmlns="http://www.springframework.org/schema/beans"
    xmlns:xsi="http://www.w3.org/2001/XMLSchema-instance"
    xsi:schemaLocation="http://www.springframework.org/schema/beans
        https://www.springframework.org/schema/beans/spring-beans.xsd">

    <bean id="..." class="...">
        <!-- collaborators and configuration for this bean go here -->
    </bean>

    <bean id="..." class="...">
        <!-- collaborators and configuration for this bean go here -->
    </bean>

    <!-- more bean definitions go here -->

</beans>
7.创建Bean对象
package com.shsxt.service;

public class UserService {
  public void test(){
      System.out.println("hello spring");
  }
}
8.通过spring.xml配置Bean对象
<bean id="userService" class="com.shsxt.service.UserService"></bean>
9.加载配置文件,获取实例化对象
/**
工厂模式:
	BeanFactory 提供了一种配置机制来管理任何种类的 Bean
	ApplicationContext 建立在 BeanFactory 之上,并增加了其他的功能,比如对国际化的支持、获取资源、事件传递等。
*/

public class Test01 {
    public static void main(String[] args) {
        //获取spring上下文环境
        ApplicationContext ac=new ClassPathXmlApplicationContext("spring.xml");
        //通过getBean方法得到Spring容器中实例化好的Bean对象
        UserService userService=(UserService) ac.getBean("userService");
        //调用方法
        userService.test();
    }
}
三、Spring IOC容器对象实例化模拟
1.实现过程
1.定义bean工厂接口,提供获取bean方法
public interface SxtFactory {
    Object getBean(String bean);
}
2.xml解析dom4j坐标依赖添加pom.xml中
<dependency>
	<groupId>dom4j</groupId>
	<artifactId>dom4j</artifactId>
	<version>1.6.1</version>
</dependency>
<dependency>
	<groupId>jaxen</groupId>
	<artifactId>jaxen</artifactId>
	<version>1.1.6</version>
</dependency>
3.Bean属性对象定义
public class SxtBean {

    private String id;
    private String clazz;

    public SxtBean() {
    }

    public SxtBean(String id, String clazz) {
        this.id = id;
        this.clazz = clazz;
    }

    public void setId(String id) {
        this.id = id;
    }

    public void setClazz(String clazz) {
        this.clazz = clazz;
    }

    public String getId() {
        return id;
    }

    public String getClazz() {
        return clazz;
    }
}
4.定义bean工厂接口实现类
/**
 * 模拟Spring的实现
 * 1.通过构造器得到相关配置文件
 * 2.通过dom4j解析xml文件,得到list
 * 3.通过反射实例化得到对象  class.formClass(类的全路径).newInstance(); 通过Map<id,class>存储
 * 4.得到指定的实例化对象
 */
public class SxtClassPathXmlApplicationContext implements SxtFactory {
    //存放xml中解析的bean标签
    private List<SxtBean> beans;
    //存放对象和其实例化的对象
    private Map<String,Object> target=new HashMap<>();

    /*1.通过构造器得到相关配置文件*/
    public SxtClassPathXmlApplicationContext(String fileName) {
        /*2.通过dom4j解析xml文件,得到list*/
        this.parseXml(fileName);

        /* 3.通过反射实例化得到对象  class.formClass(类的全路径).newInstance(); 通过Map<id,class>存储*/
        this.instanceBean();
    }

    /**
     *通过dom4j解析xml文件,得到list
     * 1.获取解析器
     * 2.得到配置文件的URL
     * 3.通过解析器解析xml文件(spring2.xml)
     * 4.通过xpath语法,获取beans标签下的所有bean标签
     * 5.通过指定语法解析文档对象,返回集合
     * 6.判断集合是否为空,遍历集合
     * 7.获取标签元素中的属性
     * 8.得到Bean对象,将Bean对象设置到集合中
     *
     * @param fileName
     */
    private void parseXml(String fileName){
        //1.获取解析器
        SAXReader reader =new SAXReader();
        //2.得到配置文件的URL
        URL url=this.getClass().getClassLoader().getResource(fileName);
        try {
            //3.通过解析器解析xml文件(spring2.xml)
            Document document=reader.read(url);
            //4.通过xpath语法,获取beans标签下的所有bean标签
            XPath xPath=document.createXPath("beans/bean");
            //5.通过指定语法解析文档对象,返回集合
            List<Element> list=xPath.selectNodes(document);
            //6.判断集合是否为空,遍历集合
            if(list !=null && list.size()>0){
                beans=new ArrayList();
                for(Element el :list){
                    //7.获取标签元素中的属性
                    System.out.println(el.attributeValue("id")+","+el.attributeValue("class"));
                    //得到Bean对象
                    SxtBean bean=new SxtBean(el.attributeValue("id"),el.attributeValue("class"));
                    //将Bean对象设置到集合
                    beans.add(bean);

                }
            }

        }catch (DocumentException e){
            e.printStackTrace();
        }

    }

    /**
     * 3.通过反射实例化得到对象  class.formClass(类的全路径).newInstance(); 通过Map<id,class>存储
     */
    private void instanceBean() {
        //判断bean集合是否为空,不为空遍历得到对应Bean对象
        if(beans !=null && beans.size()>0){
            for (SxtBean bean:beans) {
                //通过类的全路径实例化对象
                try {
                    target.put(bean.getId(),Class.forName(bean.getClazz()).newInstance());
                }catch (Exception e){
                    e.printStackTrace();
                }
            }
        }
    }

    @Override
    public Object getBean(String bean) {
        //通过key获取map中的指定value
        return target.get(bean);
    }
}
5.spring2.xml文件
<?xml version="1.0" encoding="UTF-8"?>
<beans>
  <bean id="userService" class="com.shsxt.service.UserService"></bean>
</beans>
6.测试
public class TestDemo {
    public static void main(String[] args) {
        SxtFactory factory=new SxtClassPathXmlApplicationContext("spring2.xml");
        //得到实例化对象
        UserService userService=(UserService) factory.getBean("userService");
        userService.test();
    }
}
2.Spring IOC核心技术
1)工厂设计模式(简单工厂 工厂方法 抽象工厂)
2)XML解析(Dom4J)
3)反射(实例化对象 反射获取方法 反射获取属性 反射获取构造器 反射方法调用)
4)策略模式(加载资源)
5)单例(IOC创建的实例化对象都是单例)
四、Spring IOC配置文件加载&Bean对象实例化
1.根据相对路径加载资源
ApplicationContext ac = new ClassPathXmlApplicationContext("spring.xml");
2.根据绝对路径加载资源
ApplicationContext ac = new FileSystemXmlApplicationContext("E:\\ideaProject\\myspring01\\src\\main\\resources\\spring.xml");
3.同时加载多个资源文件
1)可变参数,传入多个文件名
ApplicationContext ac=new ClassPathXmlApplicationContext("spring.xml","dao.xml");2)通过总的配置文件import其他配置文件
  //加载总的资源文件
        ApplicationContext ac=new ClassPathXmlApplicationContext("service.xml");
service.xml文件
<?xml version="1.0" encoding="utf-8" ?>
<beans xmlns="http://www.springframework.org/schema/beans"
       xmlns:xsi="http://www.w3.org/2001/XMLSchema-instance"
       xsi:schemaLocation="http://www.springframework.org/schema/beans http://www.springframework.org/schema/beans/spring-beans.xsd">
  <!--导入需要包含的资源文件-->
    <import resource="spring.xml" />
    <import resource="dao.xml"/>
</beans>
spring.xml文件
  <bean id="userService" class="com.shsxt.service.UserService">
        <!-- collaborators and configuration for this bean go here -->
   </bean>
dao.xml文件
<?xml version="1.0" encoding="UTF-8"?>
<beans xmlns="http://www.springframework.org/schema/beans"
       xmlns:xsi="http://www.w3.org/2001/XMLSchema-instance"
       xsi:schemaLocation="http://www.springframework.org/schema/beans http://www.springframework.org/schema/beans/spring-beans.xsd">
        <bean id="userDao" class="com.shsxt.dao.UserDao"></bean>
</beans>
五、Spring IOC对象实例化方式
1.构造器实例化
注:通过默认构造器 空构造方法必须存在 否则创建失败
public class Test01 { public static void main(String[] args) { //获取spring上下文环境 ApplicationContext ac=new ClassPathXmlApplicationContext("spring.xml"); //通过getBean方法得到Spring容器中实例化好的Bean对象 UserService userService=(UserService) ac.getBean("userService"); //调用方法 userService.test(); } }<bean id="userService" class="com.shsxt.service.UserService"> </bean>
2.静态工厂实例化
public class StaticFactory {
    public static UserController createUserService(){
        return new UserController();
    }
}
<!--静态工厂--> <bean id="userController" class="com.shsxt.factory.StaticFactory" factory-method="createUserService"></bean>//加载spring资源文件 ApplicationContext ac=new ClassPathXmlApplicationContext("spring.xml"); UserController userController= (UserController) ac.getBean("userController"); userController.test();
3.实例化工厂实例化
public class IntanceFactory {
    public UserController createUser(){
        return new UserController();
    }
}
<!-- factory-method:工厂中的方法 factory-bean:工厂对象 --> <!--实例化工厂--> <bean id="intanceFactory" class="com.shsxt.factory.IntanceFactory"></bean> <bean id="userController" factory-bean="intanceFactory" factory-method="createUser"></bean>//加载spring资源文件 ApplicationContext ac=new ClassPathXmlApplicationContext("spring.xml"); UserController userController= (UserController) ac.getBean("userController"); userController.test();
4.spring三种实例化bean的方式比较
方式一:通过bean的缺省构造函数创建,当各个bean的业务逻辑相互比较独立的时候或者和外界关联较少的时候可以使用。
方式二:利用静态factory方法创建,可以统一管理各个bean的创建,如各个bean在创建之前需要相同的初始化处理,则可用这个factory方法险进行统一的处理等等。
方式三:利用实例化factory方法创建,即将factory方法也作为了业务bean来控制,1可用于集成其他框架的bean创建管理方法,2能够使bean和factory的角色互换。
版权声明:本文内容由互联网用户自发贡献,该文观点仅代表作者本人。本站仅提供信息存储空间服务,不拥有所有权,不承担相关法律责任。如发现本站有涉嫌侵权/违法违规的内容, 请发送邮件至 举报,一经查实,本站将立刻删除。
文章由极客之音整理,本文链接:https://www.bmabk.com/index.php/post/121465.html

