
目录
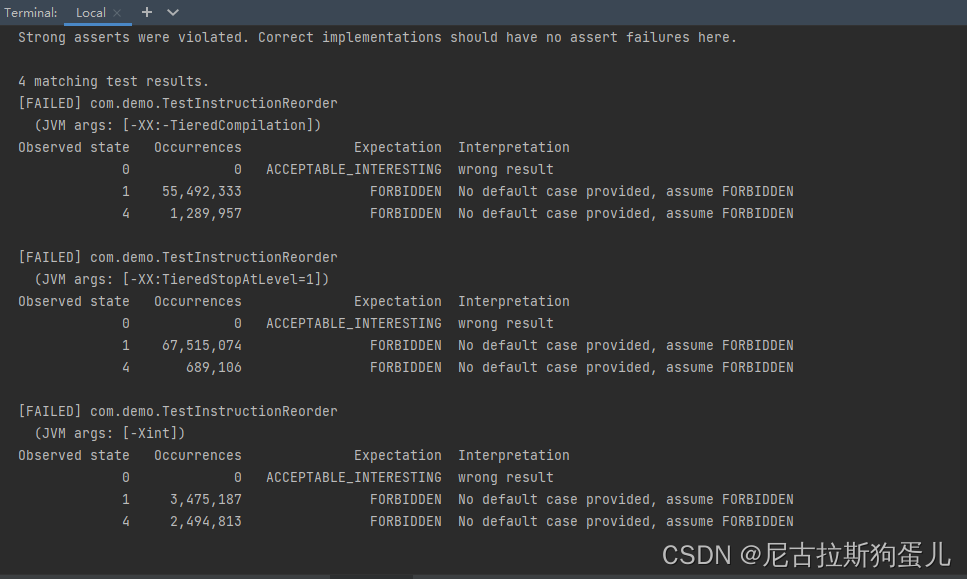
1. 如何演示重排序效果
使用jcstress并发压力测试
1.1 Maven依赖模板
<?xml version="1.0" encoding="UTF-8"?>
<project xmlns="http://maven.apache.org/POM/4.0.0"
         xmlns:xsi="http://www.w3.org/2001/XMLSchema-instance"
         xsi:schemaLocation="http://maven.apache.org/POM/4.0.0 http://maven.apache.org/xsd/maven-4.0.0.xsd">
    <modelVersion>4.0.0</modelVersion>

    <groupId>org.example</groupId>
    <artifactId>demo-jcstress</artifactId>
    <version>1.0-SNAPSHOT</version>


    <prerequisites>
        <maven>3.0</maven>
    </prerequisites>

    <dependencies>
        <dependency>
            <groupId>org.openjdk.jcstress</groupId>
            <artifactId>jcstress-core</artifactId>
            <version>0.3</version>
        </dependency>
    </dependencies>

    <properties>
        <project.build.sourceEncoding>UTF-8</project.build.sourceEncoding>

        <!--
            jcstress version to use with this project.
          -->
        <jcstress.version>0.5</jcstress.version>

        <!--
            Java source/target to use for compilation.
          -->
        <javac.target>1.8</javac.target>

        <!--
            Name of the test Uber-JAR to generate.
          -->
        <uberjar.name>jcstress</uberjar.name>
    </properties>

    <build>
        <plugins>
            <plugin>
                <groupId>org.apache.maven.plugins</groupId>
                <artifactId>maven-compiler-plugin</artifactId>
                <version>3.1</version>
                <configuration>
                    <compilerVersion>${javac.target}</compilerVersion>
                    <source>${javac.target}</source>
                    <target>${javac.target}</target>
                </configuration>
            </plugin>

            <plugin>
                <groupId>org.apache.maven.plugins</groupId>
                <artifactId>maven-shade-plugin</artifactId>
                <version>2.2</version>
                <executions>
                    <execution>
                        <id>main</id>
                        <phase>package</phase>
                        <goals>
                            <goal>shade</goal>
                        </goals>
                        <configuration>
                            <finalName>${uberjar.name}</finalName>
                            <transformers>
                                <transformer
                                        implementation="org.apache.maven.plugins.shade.resource.ManifestResourceTransformer">
                                    <mainClass>org.openjdk.jcstress.Main</mainClass>
                                </transformer>
                                <transformer implementation="org.apache.maven.plugins.shade.resource.AppendingTransformer">
                                    <resource>META-INF/TestList</resource>
                                </transformer>
                            </transformers>
                        </configuration>
                    </execution>
                </executions>
            </plugin>
        </plugins>
    </build>


</project>
1.2 相关测试例子
/**
 * 测试指令重排序
 */
@JCStressTest // 标记此类为一个并发测试类
@Outcome(id = {"0"}, expect = Expect.ACCEPTABLE_INTERESTING, desc = "wrong result") // 描述测试结果
@State //标记此类是有状态的
public class TestInstructionReorder {

    private volatile boolean flag;
    private int num = 0;

    public TestInstructionReorder() {
    }

    @Actor
    public void actor1(I_Result r) {
        if (flag) {
            r.r1 = num * 2;
        } else {
            r.r1 = 1;
        }
    }

    @Actor
    public void actor2(I_Result r) {
        this.num = 2;
        flag = true;
    }
}
1.	mvn clean install
2.	java -jar jcstress.jar
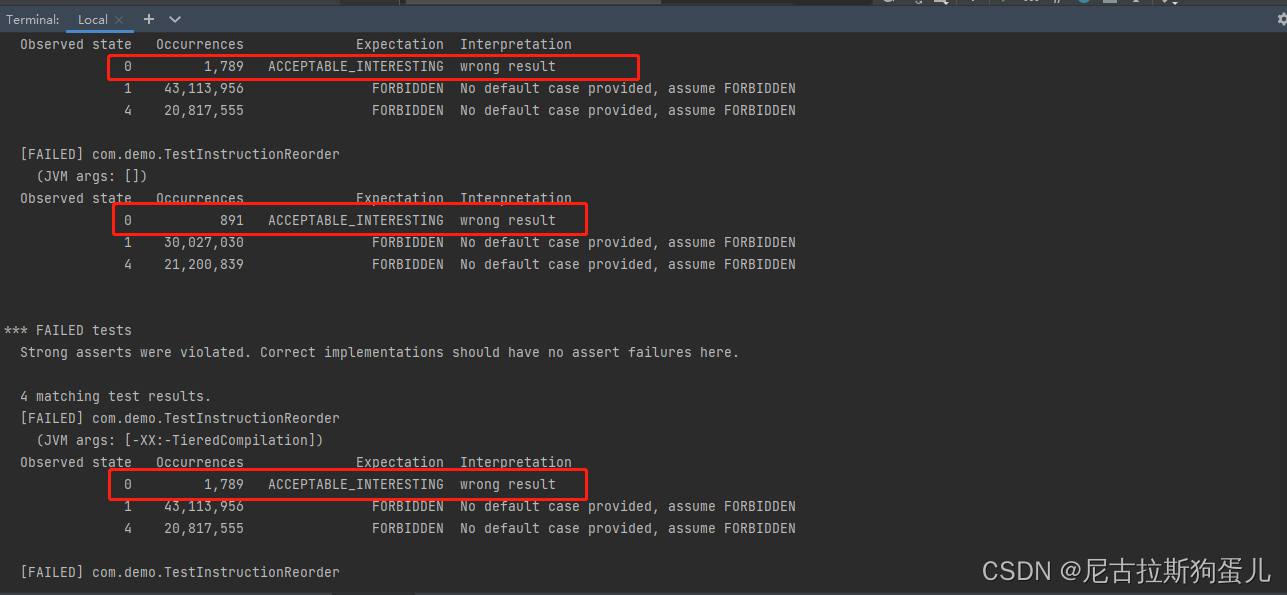
加上volatile 可以禁止重排序
二、双重检验锁缺陷
1. 单例模式
什么是单例模式:jvm中该对象只有一个实例的存在。
2. 单例应用场景
- 项目中定义的配置文件
- Servlet对象默认就是单例
- 线程池、数据库连接池 复用机制 提前创建一个线程一直复用执行 任务
- Spring中Bean对象默认就是单例
- 实现网站计数器
- Jvm内置缓存框架(定义单例HashMap)
- 枚举(单例—最安全单例)
3. 单例优缺点
1.优点:能够节约当前堆内存空间,不需要频繁New对象,能够快速访问;
2.缺点:当多个线程访问同一个单例对象的时候可能会存在线程安全问题;
4. 单例模式特点
1、构造方法私有化;
2、实例化的变量引用私有化;
3、获取实例的方法公有。
5. 单例的(7种)写法
- 懒汉式线程不安全
- 懒汉式线程安全
- 懒汉式双重检验锁
- 饿汉式
- 静态代码块
- 静态内部类
- 枚举实现单例
5.1 懒汉式线程不安全
懒汉式基本概念:当真正需要获取到该对象时,才会创建该对象 该写法存在线程安全性问题
public class Singleton01 {
    //实例化的变量引用私有化
    private static Singleton01 singleton = null;

    /**
     * 私有化构造函数
     */
    private Singleton01() {

    }

    public static Singleton01 getSingleton() {
        if (singleton == null) {
            singleton = new Singleton01();
        }
        return singleton;
    }

    public static void main(String[] args) {
        Singleton01 singleton1 = Singleton01.getSingleton();
        Singleton01 singleton2 = Singleton01.getSingleton();
        System.out.println(singleton1 == singleton2);
    }
}
5.2 懒汉式线程安全
什么情况下需要保证线程安全性问题呢?—-做写操作
懒汉式 第一次 new出该对象已经赋值singleton,后面的所有线程 直接获取该singleton对象,不需要重复new
public class Singleton02 {
    //实例化的变量引用私有化
    private static Singleton02 singleton = null;

    /**
     * 私有化构造函数
     */
    private Singleton02() {

    }

    //  创建和读取对象都需要获取Singleton01 锁
    public static synchronized Singleton02 getSingleton() {
        if (singleton == null) {
            singleton = new Singleton02();
        }
        return singleton;
    }

    public static void main(String[] args) {
        Singleton02 singleton1 = Singleton02.getSingleton();
        Singleton02 singleton2 = Singleton02.getSingleton();
        System.out.println(singleton1 == singleton2);
    }
}
5.3 懒汉式双重检验锁(DCL,即 double-checked locking)
能够保证线程安全,只会创建该单例对象的时候上锁,获取该单例对象不会上锁,效率比较高。
注意:volatile 关键字避免重排序
// t1和t2 同时 判断singleton01 ==null;
if (singleton01 == null) {
// t1和t2 线程都会进入该临界区
// t1线程获取锁成功呢 t2阻塞等待
    synchronized (Singleton01.class) {
// t1线程new  new Singleton01()
		if(singleton01 ==null)
        singleton01 = new Singleton01();
//t1线程 释放锁
    }
}
public class Singleton03 {
    //实例化的变量引用私有化
    private static volatile Singleton03 singleton = null;

    /**
     * 私有化构造函数
     */
    private Singleton03() {

    }

    //  创建和读取对象都需要获取Singleton01 锁
    public static Singleton03 getSingleton() {
        if (singleton == null) {
            synchronized (Singleton03.class) {
                if (singleton == null) {
                    singleton = new Singleton03();
                }
            }
        }
        return singleton;
    }

    public static void main(String[] args) {
        Singleton03 singleton1 = Singleton03.getSingleton();
        Singleton03 singleton2 = Singleton03.getSingleton();
        System.out.println(singleton1 == singleton2);
    }
}
5.4 饿汉式
提前创建单例对象,优点先天性保证线程安全,缺点比较占用内存
public class Singleton04 {
    // 当我们class被加载时,就会提前创建singleton对象
    private static Singleton04 singleton = new Singleton04();

    /**
     * 私有化构造函数
     */
    private Singleton04() {

    }

    public static Singleton04 getSingleton() {
        return singleton;
    }

    public static void main(String[] args) {
        Singleton04 singleton1 = Singleton04.getSingleton();
        Singleton04 singleton2 = Singleton04.getSingleton();
        System.out.println(singleton1 == singleton2);
    }
}
5.5 静态代码块
public class Singleton05 {
    // 当我们class被加载时,就会提前创建singleton对象
    private static Singleton05 singleton = null;

    static {
        singleton = new Singleton05();
        System.out.println("static执行");
    }

    /**
     * 私有化构造函数
     */
    private Singleton05() {

    }

    public static Singleton05 getSingleton() {
        return singleton;
    }

    public static void main(String[] args) {
        Singleton05 singleton1 = Singleton05.getSingleton();
        Singleton05 singleton2 = Singleton05.getSingleton();
        System.out.println(singleton1 == singleton2);
    }
}
5.6 静态内部类
spring框架源码中 经常会发现使用静态内部类单例
懒加载的形式 先天性保证线程安全问题
public class Singleton06 {

    /**
     * 私有化构造函数
     */
    private Singleton06() {

    }

    private static class SingletonHolder {
        private static Singleton06 singleton = new Singleton06();
    }

    public static Singleton06 getSingleton() {
        return SingletonHolder.singleton;
    }

    public static void main(String[] args) {
        Singleton06 singleton1 = Singleton06.getSingleton();
        Singleton06 singleton2 = Singleton06.getSingleton();
        System.out.println(singleton1 == singleton2);
    }
}
5.7 枚举单例
public enum Singleton03 {
    INSTANCE;

    public void getInstance() {
        System.out.println("<<<getInstance>>>");
    }
}
枚举属于目前最安全的单例,不能够被反射 序列化保证单例
6. 创建对象的方式有哪些
1.直接new对象
2.采用克隆对象
3.使用反射创建对象
4.序列化与反序列化
7. 如何破解单例模式
7.1 反射破解单例
7.1.1 反射如何破解单例
public class Singleton01 {
    private static Singleton01 singleton01;

    static {
        /**
         * 静态代码快初始化单例模式
         */
        try {
            singleton01 = new Singleton01();
        } catch (Exception e) {
            e.printStackTrace();
        }
    }

    private Singleton01() throws Exception {
        if (singleton01 != null) {
            throw new Exception("不能够重复初始化对象");
        }
    }

    public static Singleton01 getSingleton01() {
        return singleton01;
    }

    public static void main(String[] args) throws ClassNotFoundException, IllegalAccessException, InstantiationException {
        // 使用反射破解单例
//        Singleton01 singleton01 = Singleton01.getSingleton01();
//        Singleton01 singleton02 = Singleton01.getSingleton01();
//        // 使用反射破解单例
//        Class<?> aClass = Class.forName("com.demo.thread.days15.Singleton01");
//        Singleton01 singleton03 = (Singleton01) aClass.newInstance();
//        System.out.println(singleton02 == singleton03);
    }
}
7.1.2 如何防止单例被反射破解
private Singleton01() throws Exception {
    if (singleton01 != null) {
        throw new Exception("该对象已经创建");
    }
    System.out.println("无参构造函数");
}
Class<?> aClass = Class.forName("com.demo.Singleton01");
Constructor<?> constructor = aClass.getDeclaredConstructor();
constructor.setAccessible(true);
Singleton01 instance02 = Singleton01.getInstance();
Singleton01 singleton01 = (Singleton01) constructor.newInstance();
System.out.println(singleton01==instance02);
7.2 序列化破解单例
序列化概念:将对象转换成二进制的形式直接存放在本地(将该对象持久化存放到硬盘中)
反序列化概念:从硬盘读取二进制变为对象
7.2.1 序列化如何破解单例
public class Singleton02 implements Serializable {
    private static Singleton02 singleton = new Singleton02();


    public static Singleton02 getSingleton() {
        return singleton;
    }

    public static void main(String[] args) throws IOException, ClassNotFoundException {
        // 1.将对象序列化存入到本地文件中
        FileOutputStream fos = new FileOutputStream("d:/code/a.txt");
        ObjectOutputStream oos = new ObjectOutputStream(fos);
        Singleton02 singleton1 = Singleton02.getSingleton();
        oos.writeObject(singleton1);
        oos.close();
        fos.close();
        System.out.println("----------从硬盘中反序列化对象到内存中------------");
        //2.从硬盘中反序列化对象到内存中
        ObjectInputStream ois = new ObjectInputStream(new FileInputStream("d:/code/a.txt"));
        // 从新获取一个新的对象
        Singleton02 singleton2 = (Singleton02) ois.readObject();
        System.out.println(singleton1 == singleton2);
    }

//    private Object readResolve() throws ObjectStreamException {
//        return singleton;
//    }
}
7.2.2 如何防止序列化单例被破解
重写readResolve方法 返回原来对象即可
 private Object readResolve() throws ObjectStreamException {
     return singleton;
 }
原理:
- 调用readObject()
- 执行readObject0();
- Switch 判断 tc=115 object class
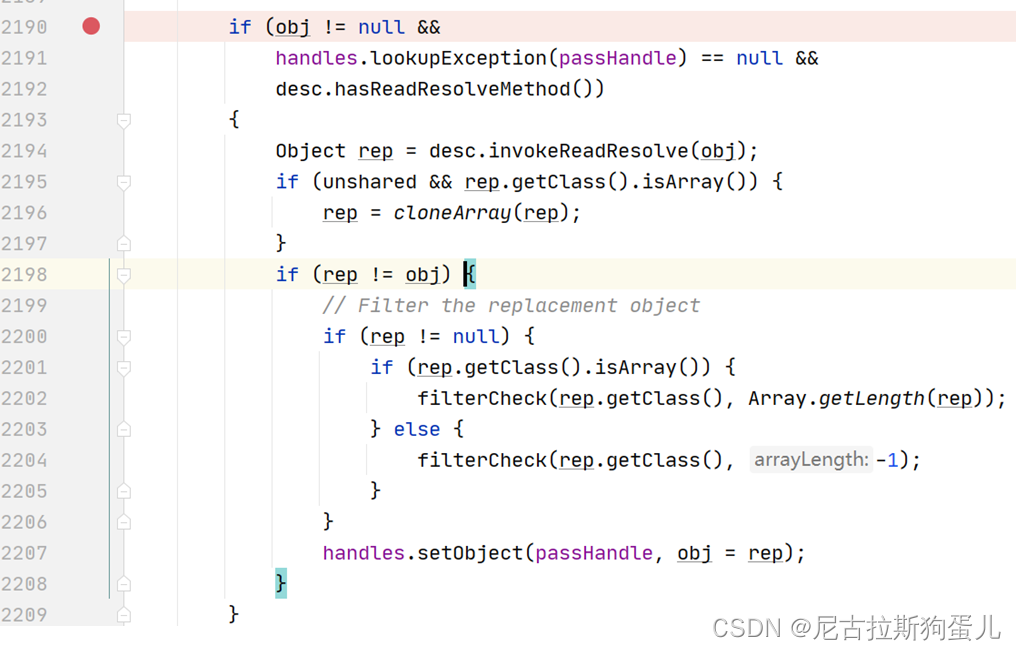
判断反序列化类中如果存在readResolve方法 则通过反射机制调用readResolve方法返回相同的对象
7.3 为什么枚举是最安全的单例
枚举单例不可被反射和序列化
7.3.1 反射攻击枚举
-
使用XJad.exe 反编译枚举 会发现,枚举底层实际上基于类封装的。
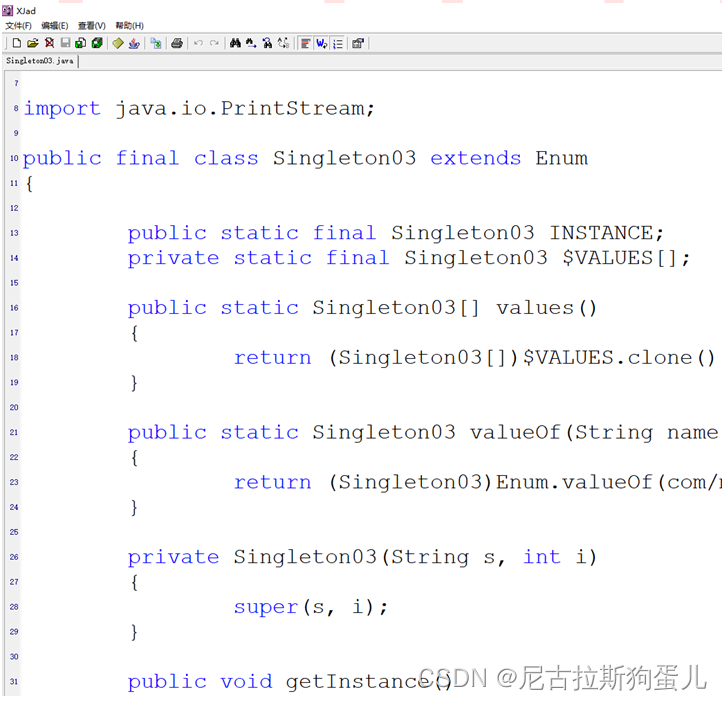

-
枚举底层使用类封装的 没有无参构造函数 所有根据无参构造函数反射 会报错
Singleton03 instance1 = Singleton03.INSTANCE;
Singleton03 instance2 = Singleton03.INSTANCE;
System.out.println(instance1 == instance2);
// 反射攻击枚举
Class<?> aClass = Class.forName("com.demo.thread.days15.Singleton03");
Singleton03 instance3 = (Singleton03) aClass.newInstance();
System.out.println(instance1 == instance3);
报错:
Exception in thread “main” java.lang.InstantiationException: com.demo.thread.days15.Singleton03
at java.lang.Class.newInstance(Class.java:427)
at com.demo.thread.days15.Test01.main(Test01.java:21)
Caused by: java.lang.NoSuchMethodException: com.demo.thread.days15.Singleton03.()
at java.lang.Class.getConstructor0(Class.java:3082)
at java.lang.Class.newInstance(Class.java:412)
-
在根据该返回可以发现 是有参构造函数 第一个参数为String类型 第二参数为int类型
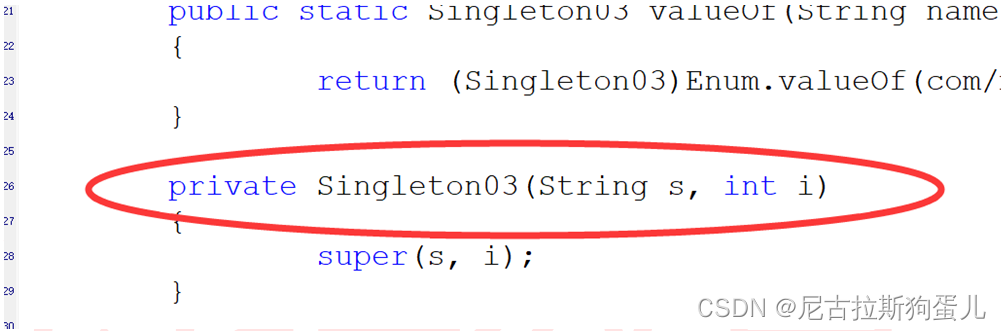
-
使用有参构造函数 调用 继续报错
Class<?> aClass = Class.forName("com.demo.thread.days15.Singleton03");
Constructor<?> declaredConstructor = aClass.getDeclaredConstructor(String.class, int.class);
declaredConstructor.setAccessible(true);
Singleton03 singleton03 = (Singleton03) declaredConstructor.newInstance("1", 0);
Singleton03 instance3 = (Singleton03) aClass.newInstance();
System.out.println(instance3 == instance1);
Exception in thread “main” java.lang.IllegalArgumentException: Cannot reflectively create enum objects
at java.lang.reflect.Constructor.newInstance(Constructor.java:417)
at com.demo.thread.days15.Test01.main(Test01.java:23)
枚举不能够被反射 ,反射底层代码有判断处理

7.3.2 序列化攻击枚举
FileOutputStream fos = new FileOutputStream("d:/code/a.txt");
ObjectOutputStream oos = new ObjectOutputStream(fos);
Singleton03 singleton3 = Singleton03.INSTANCE;
oos.writeObject(singleton3);
oos.close();
fos.close();
System.out.println("----------从硬盘中反序列化对象到内存中------------");
//2.从硬盘中反序列化对象到内存中
ObjectInputStream ois = new ObjectInputStream(new FileInputStream("d:/code/a.txt"));
// 从新获取一个新的对象
Singleton03 singleton4 = (Singleton03) ois.readObject();
System.out.println(instance2 == singleton4);
Enum.valueOf((Class)cl, name),这样实现的现过其实就是EnumClass.name(我代码的体现是Singleton.INSTANCE),这样来看的话无论是EnumClass.name获取对象,还是Enum.valueOf((Class)cl, name)获取对象,它们得到的都是同一个对象,这其实就是枚举保持单例的原理
8. 双重检验锁单例为什么需要加上 Volatile
public class Singleton {
    private static  Volatile  Singleton singleton;

    /**
     * 双重检验证锁单例
     *
     * @return
     */
    public static Singleton getInstance() {
        if (singleton == null) {
            synchronized (Singleton.class) {
                if (singleton == null) {
                    singleton = new Singleton();
                }

            }
        }
        return singleton;
    }

    public static void main(String[] args) {
        Singleton instance1 = Singleton.getInstance();
        Singleton instance2 = Singleton.getInstance();
        System.out.println(instance1==instance2);
    }
}
双重检验锁单例 为什么需要加上:Volatile?
创建对象过程:
(1)分配内存空间
(2)初始化对象
(3)将内存空间的地址赋值给对应的引用
(2)(3)会被处理器优化,发生重排序
A线程singleton = new Singleton()发生重排序,将分配的内存空间引用赋值给了静态属性singleton(即singleton != null),而对象还未初始化(即Integer a == null);
B线程此时调用getInstance()方法,因为singleton != null,直接返回singleton。当B线程使用singleton的a属性时就会空指针。
javap -c -v Singleton.class
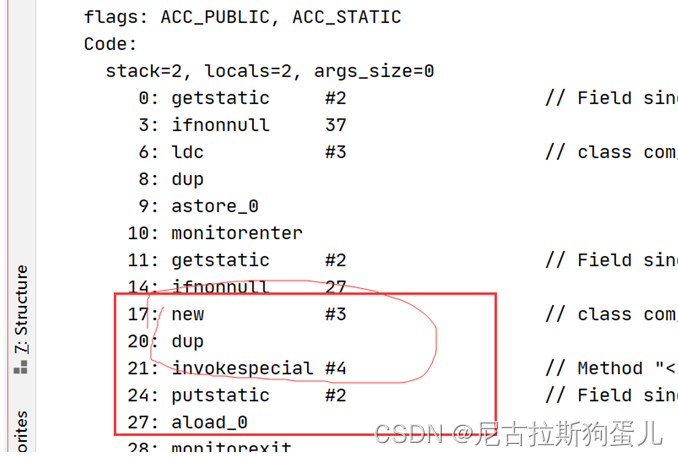
// 创建 Singleton 对象实例,分配内存
0: new //
// 复制栈顶地址,并再将其压入栈顶
3: dup
// 调用构造器方法,初始化 Singleton 对象 对象里面还会有一些成员属性对象
4: invokespecial // Method “<init>”: ()V
// 存入局部方法变量表
7: astore_0
虚拟机实际运行时,以上指令可能发生重排序。以上代码 2,3 可能发生重排序,但是并不会重排序 1 的顺序。也就是说 1 这个指令都需要先执行,因为 2,3 指令需要依托 1 指令执行结果。
懒加载双重检验锁需要加上volatile关键字,目的是为了禁止new对象的操作发生重排序 ,避免另外的线程拿到的对象是一个不完整的对象。单线程的情况下 new操作发生重排序没有任何的影响。
9. 什么是缓存行
Cpu会以缓存行的形式读取主内存中数据,缓存行的大小为2的幂次数字节,一般的情况下是为64个字节。
如果该变量共享到同一个缓存行,就会影响到整体性能。
例如:线程1修改了long类型变量A,long类型定义变量占用8个字节,在由于缓存一致性协议,线程2的变量A副本会失效,线程2在读取主内存中的数据的时候,以缓存行的形式读取,无意间将主内存中的共享变量B也读取到内存中,而主内存中的变量B没有发生变化
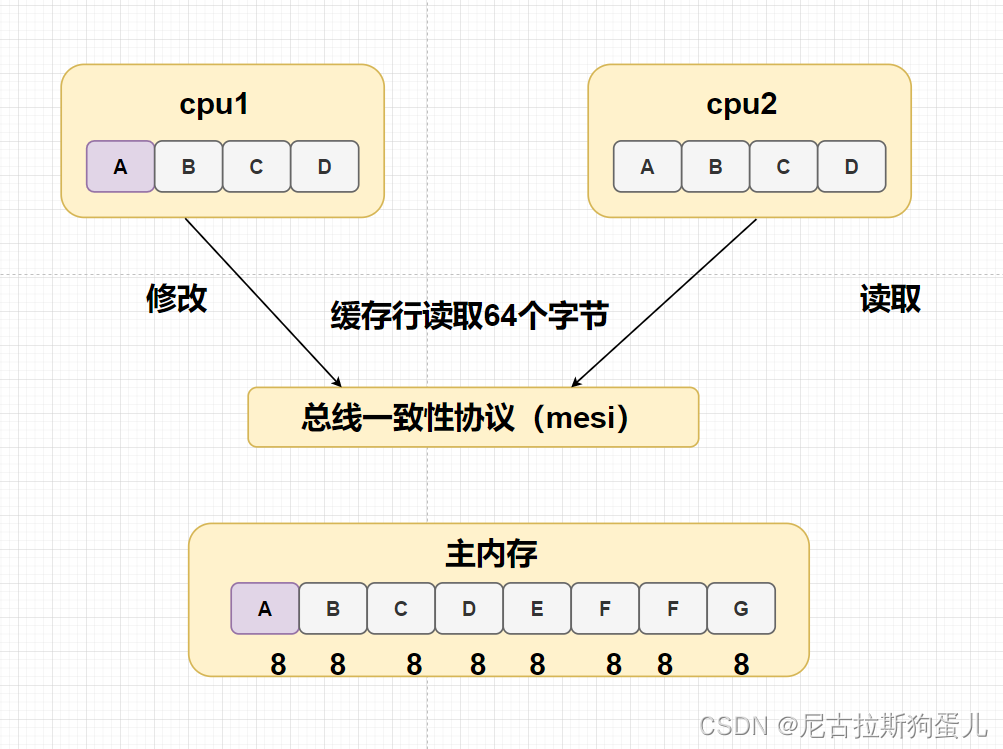
缓存行:
缓存行越大,cpu高速缓存(局域空间缓存)更多的内容,读取时间慢;
缓存行越小,cpu高速缓存局域空间缓存比较少的内容,读取时间快
折中值:64个字节。
10. 缓存行案例演示
import org.omg.PortableInterceptor.INACTIVE;
import org.openjdk.jol.info.ClassLayout;

import java.util.WeakHashMap;
import java.util.concurrent.ConcurrentHashMap;

public class FalseShareTest implements Runnable {
    // 定义4和线程
    public static int NUM_THREADS = 4;
    // 递增+1
    public final static long ITERATIONS = 500L * 1000L * 1000L;
    private final int arrayIndex;
    // 定义一个 VolatileLong数组
    private static VolatileLong[] longs;
    // 计算时间
    public static long SUM_TIME = 0l;

    public FalseShareTest(final int arrayIndex) {
        this.arrayIndex = arrayIndex;
    }

    public static void main(final String[] args) throws Exception {
        for (int j = 0; j < 10; j++) {
            System.out.println(j);
            if (args.length == 1) {
                NUM_THREADS = Integer.parseInt(args[0]);
            }
            longs = new VolatileLong[NUM_THREADS];
            for (int i = 0; i < longs.length; i++) {
                longs[i] = new VolatileLong();
            }
            final long start = System.nanoTime();
            runTest();
            final long end = System.nanoTime();
            SUM_TIME += end - start;
        }
        System.out.println("平均耗时:" + SUM_TIME / 10);
//        VolatileLong volatileLong = new VolatileLong();
//        System.out.println(ClassLayout.parseInstance(volatileLong).toPrintable());

    }


    private static void runTest() throws InterruptedException {
        Thread[] threads = new Thread[NUM_THREADS];
        for (int i = 0; i < threads.length; i++) {
            threads[i] = new Thread(new FalseShareTest(i));
        }
        for (Thread t : threads) {
            t.start();
        }
        for (Thread t : threads) {
            t.join();
        }
    }

    @Override
    public void run() {
        long i = ITERATIONS + 1;
        while (0 != --i) {
            longs[arrayIndex].value = i;
        }

    }


//
//    @sun.misc.Contended
    public final static class VolatileLong {
        public long value = 0L;
    }
}
11. 解决缓存行解为共享问题
11.1 Jdk1.6中实现方案
public final static class VolatileLong {
    public volatile long value = 0L;
    private int p0;
    //        // 伪填充
    public volatile long p1, p2, p3, p4, p5;
}
11.2 Jdk1.7中实现方案
public final static class VolatileLong extends  AbstractPaddingObject {
    public volatile long value = 0L;
}
public class AbstractPaddingObject {
    private int p0;
    //        // 伪填充
    public volatile long p1, p2, p3, p4, p5;
}
11.3 @sun.misc.Contended
@sun.misc.Contended
public final static class VolatileLong {
    public volatile long value = 0L;
}
可以直接在类上加上该注解@sun.misc.Contended ,启动的时候需要加上该参数-XX:-RestrictContended
ConcurrentHashMap中的CounterCell

版权声明:本文内容由互联网用户自发贡献,该文观点仅代表作者本人。本站仅提供信息存储空间服务,不拥有所有权,不承担相关法律责任。如发现本站有涉嫌侵权/违法违规的内容, 请发送邮件至 举报,一经查实,本站将立刻删除。
文章由极客之音整理,本文链接:https://www.bmabk.com/index.php/post/131206.html

