
场景
SpringCloudConfig分布式配置中心介绍与搭建使用以及ConfigClient实现动态刷新配置:
SpringCloudConfig分布式配置中心介绍与搭建使用以及ConfigClient实现动态刷新配置_霸道流氓气质的博客-CSDN博客
在上面实现ConfigClient动态刷新的机制下,是通过post接口调用ConfigClient的方式去进行动态
刷新配置。如果ConfigClient较多的话,需要调用每个的接口进行动态刷新配置。
有没有可以统一通知的方式,让所有的ConfigClient都可以进行刷新配置或者部分ConfigClient刷新配置。
实现思路:
利用消息总线触发一个服务端ConfigServer的/bus/refresh,从而刷新所有客户端的配置。
Bus消息总线
Spring Cloud Bus是用来将分布式系统的节点与轻量级消息系统链接起来的框架。
它整合了Java的事件处理机制和消息中间件的功能。
Bus支持两种消息代理:RabbitMQ和Kafka。
什么是总线?
在微服务架构的系统中,通常会使用轻量级的消息代理来构建一个共用的消息主题,并让系统中
所有微服务实例都连接上来。由于该主题中产生的消息会被所有实例监听和消费,所以称它为消息总线。在总线上的各个实例,都可以方便地广播一些需要让其他连接在该主题上的实例都知道的消息。
基本原理
ConfigClient实例都监听MQ中同一个topic(默认是springCloudBus)。当一个服务刷新数据的时候,它就会把这个信息放入到Topic中,这样其它监听同一个Topic的服务就能得到通知,然后去更新自身的配置。
注:
博客:
霸道流氓气质的博客_CSDN博客-C#,架构之路,SpringBoot领域博主
关注公众号
霸道的程序猿
获取编程相关电子书、教程推送与免费下载。
实现
1、首先搭建RabbitMQ,这里建议将RabbitMQ搭建在本地使用localhost访问,避免使用guest账户远程连接时提示连接被
拒绝等问题,需要进行其他相关配置。
Windows上安装rabbirmq(包括安装erlong环境与配置环境变量):
Windows上安装rabbirmq(包括安装erlong环境与配置环境变量)_霸道流氓气质的博客-CSDN博客_rabbitmq默认安装路径
2、给ConfigServer添加消息总线支持
在上面的3344配置中心服务端的pom文件中添加消息总线支持
        <!--添加消息总线RabbitMQ支持-->
        <dependency>
            <groupId>org.springframework.cloud</groupId>
            <artifactId>spring-cloud-starter-bus-amqp</artifactId>
        </dependency>
注意这里还需要actuator以及其他依赖
<?xml version="1.0" encoding="UTF-8"?>
<project xmlns="http://maven.apache.org/POM/4.0.0"
         xmlns:xsi="http://www.w3.org/2001/XMLSchema-instance"
         xsi:schemaLocation="http://maven.apache.org/POM/4.0.0 http://maven.apache.org/xsd/maven-4.0.0.xsd">
    <parent>
        <artifactId>SpringCloudDemo</artifactId>
        <groupId>com.badao</groupId>
        <version>1.0-SNAPSHOT</version>
    </parent>
    <modelVersion>4.0.0</modelVersion>

    <artifactId>cloud-config-center-3344</artifactId>

    <properties>
        <maven.compiler.source>8</maven.compiler.source>
        <maven.compiler.target>8</maven.compiler.target>
    </properties>

    <dependencies>
        <!--添加消息总线RabbitMQ支持-->
        <dependency>
            <groupId>org.springframework.cloud</groupId>
            <artifactId>spring-cloud-starter-bus-amqp</artifactId>
        </dependency>
        <dependency>
            <groupId>org.springframework.cloud</groupId>
            <artifactId>spring-cloud-config-server</artifactId>
        </dependency>
        <dependency>
            <groupId>org.springframework.cloud</groupId>
            <artifactId>spring-cloud-starter-netflix-eureka-client</artifactId>
        </dependency>
        <dependency>
            <groupId>org.springframework.boot</groupId>
            <artifactId>spring-boot-starter-web</artifactId>
        </dependency>
        <dependency>
            <groupId>org.springframework.boot</groupId>
            <artifactId>spring-boot-starter-actuator</artifactId>
        </dependency>
    </dependencies>
</project>
然后修改配置文件添加rabbitmq的相关配置
#rabbitmq相关配置
rabbitmq:
  host: localhost
  port: 5672
  username: guest
  password: guest

#服务注册到eureka地址
eureka:
  client:
    service-url:
      defaultZone: http://localhost:7001/eureka


##rabbitmq相关配置,暴露bus刷新配置的端点
management:
  endpoints: #暴露bus刷新配置的端点
    web:
      exposure:
        include: 'bus-refresh'
注意这里的rabbitmq是顶格开始的。
完整配置文件
server:
  port: 3344

spring:
  application:
    name:  cloud-config-center #注册进Eureka服务器的微服务名
  cloud:
    config:
      server:
        git:
          uri: https://gitee.com/badaoliumang/springcloud-config.git #Gitee上面的git仓库名字
        ####搜索目录
          search-paths:
            - springcloud-config
          username: 你的用户名
          password: 你的密码
      ####读取分支
      label: master

#rabbitmq相关配置
rabbitmq:
  host: localhost
  port: 5672
  username: guest
  password: guest

#服务注册到eureka地址
eureka:
  client:
    service-url:
      defaultZone: http://localhost:7001/eureka


##rabbitmq相关配置,暴露bus刷新配置的端点
management:
  endpoints: #暴露bus刷新配置的端点
    web:
      exposure:
        include: 'bus-refresh'
3、ConfigClient添加消息总线支持
参考上面博客在搭建完3355ConfigClent之后修改其pom文件添加消息总线支持
        <!--添加消息总线RabbitMQ支持-->
        <dependency>
            <groupId>org.springframework.cloud</groupId>
            <artifactId>spring-cloud-starter-bus-amqp</artifactId>
        </dependency>
完整pom
<?xml version="1.0" encoding="UTF-8"?>
<project xmlns="http://maven.apache.org/POM/4.0.0"
         xmlns:xsi="http://www.w3.org/2001/XMLSchema-instance"
         xsi:schemaLocation="http://maven.apache.org/POM/4.0.0 http://maven.apache.org/xsd/maven-4.0.0.xsd">
    <parent>
        <artifactId>SpringCloudDemo</artifactId>
        <groupId>com.badao</groupId>
        <version>1.0-SNAPSHOT</version>
    </parent>
    <modelVersion>4.0.0</modelVersion>

    <artifactId>cloud-config-client3355</artifactId>

    <properties>
        <maven.compiler.source>8</maven.compiler.source>
        <maven.compiler.target>8</maven.compiler.target>
    </properties>

    <dependencies>
        <!--添加消息总线RabbitMQ支持-->
        <dependency>
            <groupId>org.springframework.cloud</groupId>
            <artifactId>spring-cloud-starter-bus-amqp</artifactId>
        </dependency>
        <dependency>
            <groupId>org.springframework.cloud</groupId>
            <artifactId>spring-cloud-starter-config</artifactId>
        </dependency>
        <dependency>
            <groupId>org.springframework.cloud</groupId>
            <artifactId>spring-cloud-starter-netflix-eureka-client</artifactId>
        </dependency>
        <dependency>
            <groupId>org.springframework.boot</groupId>
            <artifactId>spring-boot-starter-web</artifactId>
        </dependency>
        <dependency>
            <groupId>org.springframework.boot</groupId>
            <artifactId>spring-boot-starter-actuator</artifactId>
        </dependency>
    </dependencies>
</project>
然后修改配置文件,添加rabbitmq相关配置并暴露监控端点
server:
  port: 3355

spring:
  application:
    name: config-client
  cloud:
    #Config客户端配置
    config:
      label: master #分支名称
      name: config #配置文件名称
      profile: dev #读取后缀名称   上述3个综合:master分支上config-dev.yml的配置文件被读取http://localhost:3344/master/config-dev.yml
      uri: http://localhost:3344 #配置中心地址

#rabbitmq相关配置 15672是Web管理界面的端口;5672是MQ访问的端口
  rabbitmq:
    host: localhost
    port: 5672
    username: guest
    password: guest

#服务注册到eureka地址
eureka:
  client:
    service-url:
      defaultZone: http://localhost:7001/eureka

# 暴露监控端点
management:
  endpoints:
    web:
      exposure:
        include: "*"
注意这里的rabbitmq是位于spring的下层。
4、为了演示出广播的效果,这里参考3355ConfigClient再新建一模一样端口为3366的ConfigClient
pom文件为
<?xml version="1.0" encoding="UTF-8"?>
<project xmlns="http://maven.apache.org/POM/4.0.0"
         xmlns:xsi="http://www.w3.org/2001/XMLSchema-instance"
         xsi:schemaLocation="http://maven.apache.org/POM/4.0.0 http://maven.apache.org/xsd/maven-4.0.0.xsd">
    <parent>
        <artifactId>SpringCloudDemo</artifactId>
        <groupId>com.badao</groupId>
        <version>1.0-SNAPSHOT</version>
    </parent>
    <modelVersion>4.0.0</modelVersion>

    <artifactId>cloud-config-client3366</artifactId>

    <properties>
        <maven.compiler.source>8</maven.compiler.source>
        <maven.compiler.target>8</maven.compiler.target>
    </properties>

    <dependencies>
        <!--添加消息总线RabbitMQ支持-->
        <dependency>
            <groupId>org.springframework.cloud</groupId>
            <artifactId>spring-cloud-starter-bus-amqp</artifactId>
        </dependency>
        <dependency>
            <groupId>org.springframework.cloud</groupId>
            <artifactId>spring-cloud-starter-config</artifactId>
        </dependency>
        <dependency>
            <groupId>org.springframework.cloud</groupId>
            <artifactId>spring-cloud-starter-netflix-eureka-client</artifactId>
        </dependency>
        <dependency>
            <groupId>org.springframework.boot</groupId>
            <artifactId>spring-boot-starter-web</artifactId>
        </dependency>
        <dependency>
            <groupId>org.springframework.boot</groupId>
            <artifactId>spring-boot-starter-actuator</artifactId>
        </dependency>
    </dependencies>
</project>
配置文件为
server:
  port: 3366

spring:
  application:
    name: config-client
  cloud:
    #Config客户端配置
    config:
      label: master #分支名称
      name: config #配置文件名称
      profile: dev #读取后缀名称   上述3个综合:master分支上config-dev.yml的配置文件被读取http://localhost:3344/master/config-dev.yml
      uri: http://localhost:3344 #配置中心地址

#rabbitmq相关配置 15672是Web管理界面的端口;5672是MQ访问的端口
  rabbitmq:
    host: localhost
    port: 5672
    username: guest
    password: guest

#服务注册到eureka地址
eureka:
  client:
    service-url:
      defaultZone: http://localhost:7001/eureka

# 暴露监控端点
management:
  endpoints:
    web:
      exposure:
        include: "*"
5、下面将模拟运维人员修改gitee上的配置文件,然后调用ConfigServer3344的post接口,广播通知3355和3366这两个ConfigClient动态刷新配置。
依次启动EurekaServer7001、ConfigServer3344、ConfigClient3355、ConfigClient3366
然后登录Rabbitmq的管理页面
可以看到启动3344、3355、3366时分别有新增的连接。

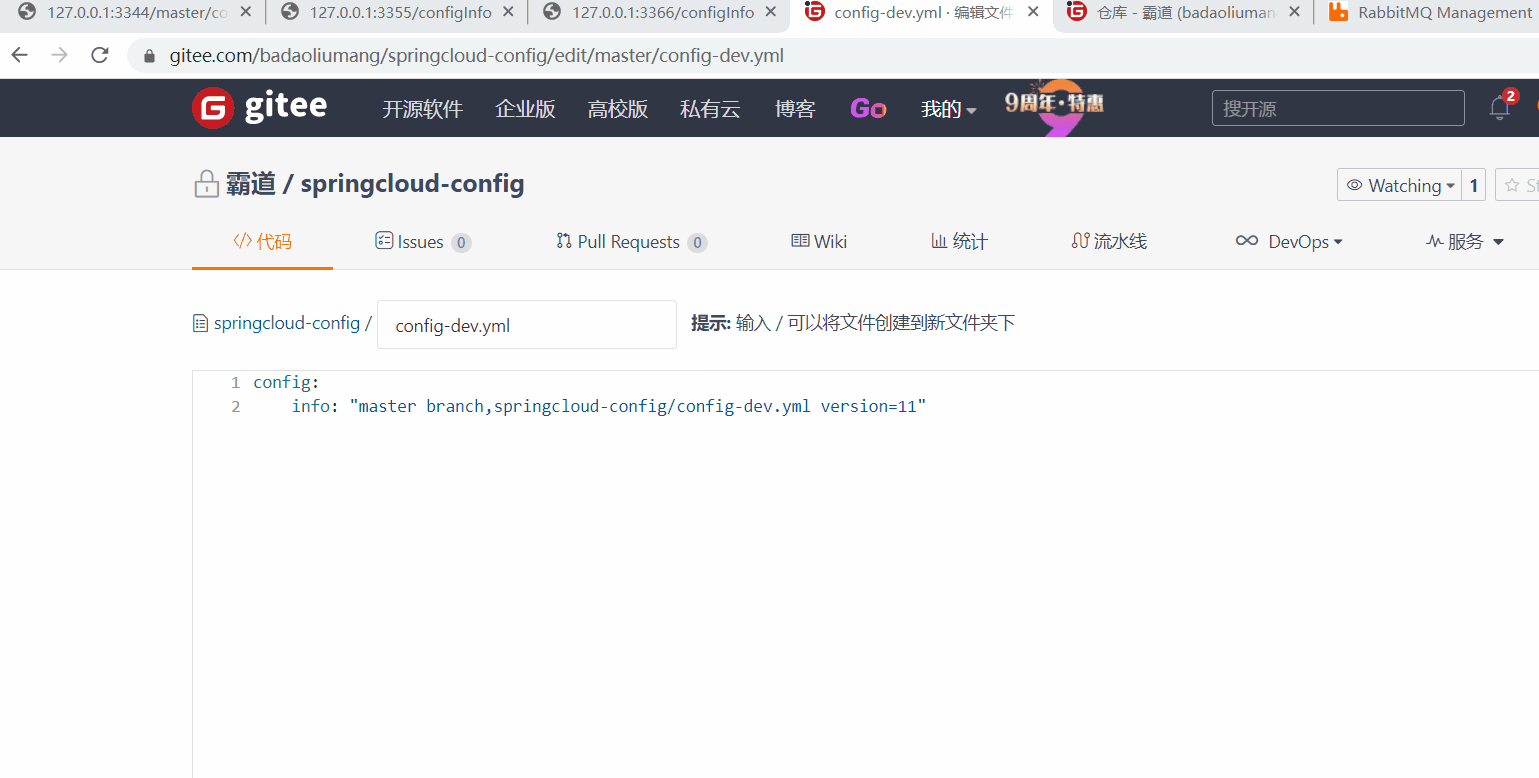
此时修改gitee中的配置文件,然后调用3344的post接口
http://localhost:3344/actuator/bus-refresh
接口没有任何返回则正常,如果返回500或者3344后台有报错则不正常。

此时再查看3355和3366的配置文件都已经实现了广播通知并动态刷新。

6、如果不想通知全部的ConfigClient,只想定点通知部分,比如这里只需要3355动态刷新配置而不需要3366刷新配置。
可以通过如下公式
http://localhost:配置中心的端口号/actuator/bus-refresh/{destination}
/bus/refresh请求不再发送到具体的实例上,而是发给config server并通过destination参数类指定需要更新配置的服务或实例。
比如这里只通知3355,则路径为
http://localhost:3344/actuator/bus-refresh/config-client:3355
这里的destination就是服务名:端口号的格式,是在3355的配置文件中配置的内容
测试效果
版权声明:本文内容由互联网用户自发贡献,该文观点仅代表作者本人。本站仅提供信息存储空间服务,不拥有所有权,不承担相关法律责任。如发现本站有涉嫌侵权/违法违规的内容, 请发送邮件至 举报,一经查实,本站将立刻删除。
文章由极客之音整理,本文链接:https://www.bmabk.com/index.php/post/135943.html

