
一、Thymeleaf模板引擎
官网:Thymeleaf官网地址
Thymeleaf模板文件后缀名就是.html,我之前用过的freemarker,它的文件后缀名是.ftl
1、引入依赖
<dependency>
	<groupId>org.springframework.boot</groupId>
	<artifactId>spring-boot-starter-thymeleaf</artifactId>
</dependency>
引入这个启动类之后,我们可以找到ThymeleafAutoConfiguration这个配置类查看相关配置
@AutoConfiguration(
    after = {WebMvcAutoConfiguration.class, WebFluxAutoConfiguration.class}
)
@EnableConfigurationProperties({ThymeleafProperties.class})
@ConditionalOnClass({TemplateMode.class, SpringTemplateEngine.class})
@Import({ReactiveTemplateEngineConfiguration.class, DefaultTemplateEngineConfiguration.class})
public class ThymeleafAutoConfiguration {
    public ThymeleafAutoConfiguration() {
    }

	...
然后我们跟到ThymeleafProperties这个类,发现这个类配置了Thymeleaf模板文件的前缀和后缀
这就是为什么Thymeleaf模板文件都放在templates文件夹下,而且后缀为.html
@ConfigurationProperties(
    prefix = "spring.thymeleaf"
)
public class ThymeleafProperties {
    private static final Charset DEFAULT_ENCODING;
    public static final String DEFAULT_PREFIX = "classpath:/templates/";
    public static final String DEFAULT_SUFFIX = ".html";
    ...
2、编写测试demo
我们先写一个controller层接口
package com.decade.controller;

import org.springframework.stereotype.Controller;
import org.springframework.ui.Model;
import org.springframework.web.bind.annotation.RequestMapping;

@Controller
@RequestMapping(value = "/test")
public class TestController {

    @RequestMapping(value = "/testPage")
    public String testPage(Model model) {
        model.addAttribute("msg", "<h1>test OK</h1>");
        model.addAttribute("pageContent", "<h1>test OK</h1>");
        model.addAttribute("userList", Arrays.asList("decade", "十年"));
        return "test";
    }
}
然后在templates文件夹下编写一个html文件
<!DOCTYPE html>
<html lang="en" xmlns:th="https://www.thymeleaf.org">
<head>
    <meta charset="UTF-8">
    <title>测试页面</title>
</head>
<body>
<div th:text="${msg}"></div>
<div th:utext="${pageContent}"></div>
<hr/>
<h2 th:each="user:${userList}" th:text="${user}"></h2>
</body>
</html>
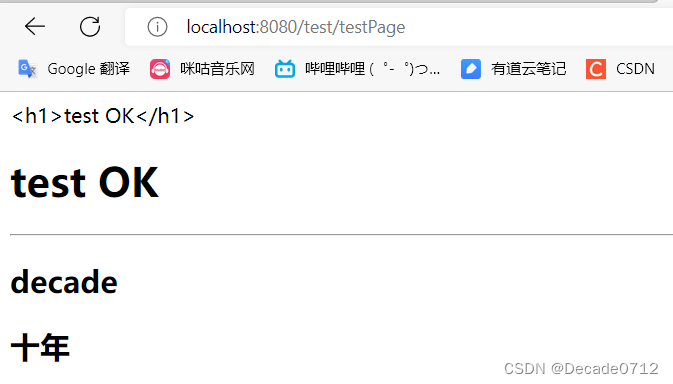
访问接口后我们可以发现,页面可以直接转到我们的html页面,而且也可以直接使用后端返回的变量
我们并不需要像之前Spring MVC中那样配置视图解析器,这是因为thymeleaf模板引擎帮我们做了
3、thymeleaf语法简介
-
thymeleaf官网:https://www.thymeleaf.org/doc/tutorials/3.0/usingthymeleaf.html
-
在使用thymeleaf之前,我们需要在html中声明thymeleaf的命名空间,xmlns:th=“http://www.thymeleaf.org”
-
Thymeleaf 作为一种模板引擎,它拥有自己的语法规则,主要分为
- 标准表达式语法
- 变量表达式:
${...},作用为获取对象的属性和方法,使用内置的基本对象,使用内置的工具对象 - 选择变量表达式:
*{...},选择变量表达式与变量表达式功能基本一致,只是在变量表达式的基础上增加了与 th:object 的配合使用,当使用 th:object 存储一个对象后,我们可以在其后代中使用选择变量表达式*{...}获取该对象中的属性,其中,“*”即代表该对象 - 链接表达式:
@{...},不管是静态资源的引用,还是 form 表单的请求,凡是链接都可以用链接表达式,它会自动拼接上当前项目的访问路径 - 国际化表达式:
#{...},一般用于国际化 - 片段引用表达式:
~{...},片段引用表达式用于在模板页面中引用其他的模板片段
- 变量表达式:
- th 属性(可以理解为在原HTML元素的前面加上th)
- th:text:文本,转义特殊字符
- th:utext:文本替换,不转义特殊字符
- th:each:循环迭代
- th:if:条件判断
- th:href=“@{/index.html}”:链接(注意:这里使用@而不是$)
- th:src=“@{/img/DecadeIcon.jpg}”:图片资源等(注意:这里使用@而不是$)
- 标准表达式语法
版权声明:本文内容由互联网用户自发贡献,该文观点仅代表作者本人。本站仅提供信息存储空间服务,不拥有所有权,不承担相关法律责任。如发现本站有涉嫌侵权/违法违规的内容, 请发送邮件至 举报,一经查实,本站将立刻删除。
文章由极客之音整理,本文链接:https://www.bmabk.com/index.php/post/136748.html

