
Swagger介绍
Swagger是全球最大的OpenAPI规范(OpenAPI Specification 简称OAS)API开发工具框架,支持从设计和文档到测试和部署的整个API生命周期的开发。
Swagger是一款可以快速生成符合RESTful风格API并进行在线调试的插件。
传统请求和RESTful请求的区别
传统请求通过URL来描述行为,如create,delete等;RESTful请求通过URL来描述资源。

RESTful请求通过HTTP请求的方法来描述行为,比如DELETE,POST,PUT等,并且使用HTTP状态码来表示不同的结果。

RESTful请求通过JSON来交换数据。
特点
Swagger通过面向开发人员,架构师和产品所有者的易于使用的工具,使API设计变得轻而易举。

Swagger提供了用于生成,可视化和维护API文档的一系列解决方案,使API文档不再需要人工操作。

Swagger提供了用于快速制作原型和构建API功能的工具。

Swagger工具和ReadyAPI平台使您可以轻松地在管道中快速创建,管理和执行API测试。
Swagger工作原理
1、系统启动,扫描到工程中的Swagger配置类

2、在此类中指定了包路径cn.ybzy.controller,找到在此包下及子包下标记有@RestController注解的controller类

3、根据controller类中的Swagger注解生成接口文档。

4、启动服务,查看接口文档
引入依赖
		<!-- swagger2 配置 -->
		<dependency>
			<groupId>io.springfox</groupId>
			<artifactId>springfox-swagger2</artifactId>
			<version>2.9.2</version>
		</dependency>
		<dependency>
			<groupId>io.springfox</groupId>
			<artifactId>springfox-swagger-ui</artifactId>
			<version>2.9.2</version>
		</dependency>
		<!-- swagger2相关的一个皮肤插件 -->
		<dependency>
			<groupId>com.github.xiaoymin</groupId>
			<artifactId>swagger-bootstrap-ui</artifactId>
			<version>1.9.6</version>
		</dependency>
配置Swagger
@Configuration
@EnableSwagger2
public class Swagger2Configuration {
/**
* 配置swagger2核心配置 docket
* http://localhost:8888/swagger-ui.html 访问swagger的原路径
* http://localhost:8888/doc.html 访问swagger换肤的原路径
* @return
*/
@Bean
public Docket createRestApi() {
// 指定api类型为swagger2
return new Docket(DocumentationType.SWAGGER_2)
// 用于定义api文档汇总信息
.apiInfo(apiInfo())
.select()
.apis(RequestHandlerSelectors
// 指定controller包
.basePackage("cn.ybzy.controller"))
// 所有controller
.paths(PathSelectors.any())
.build();
}
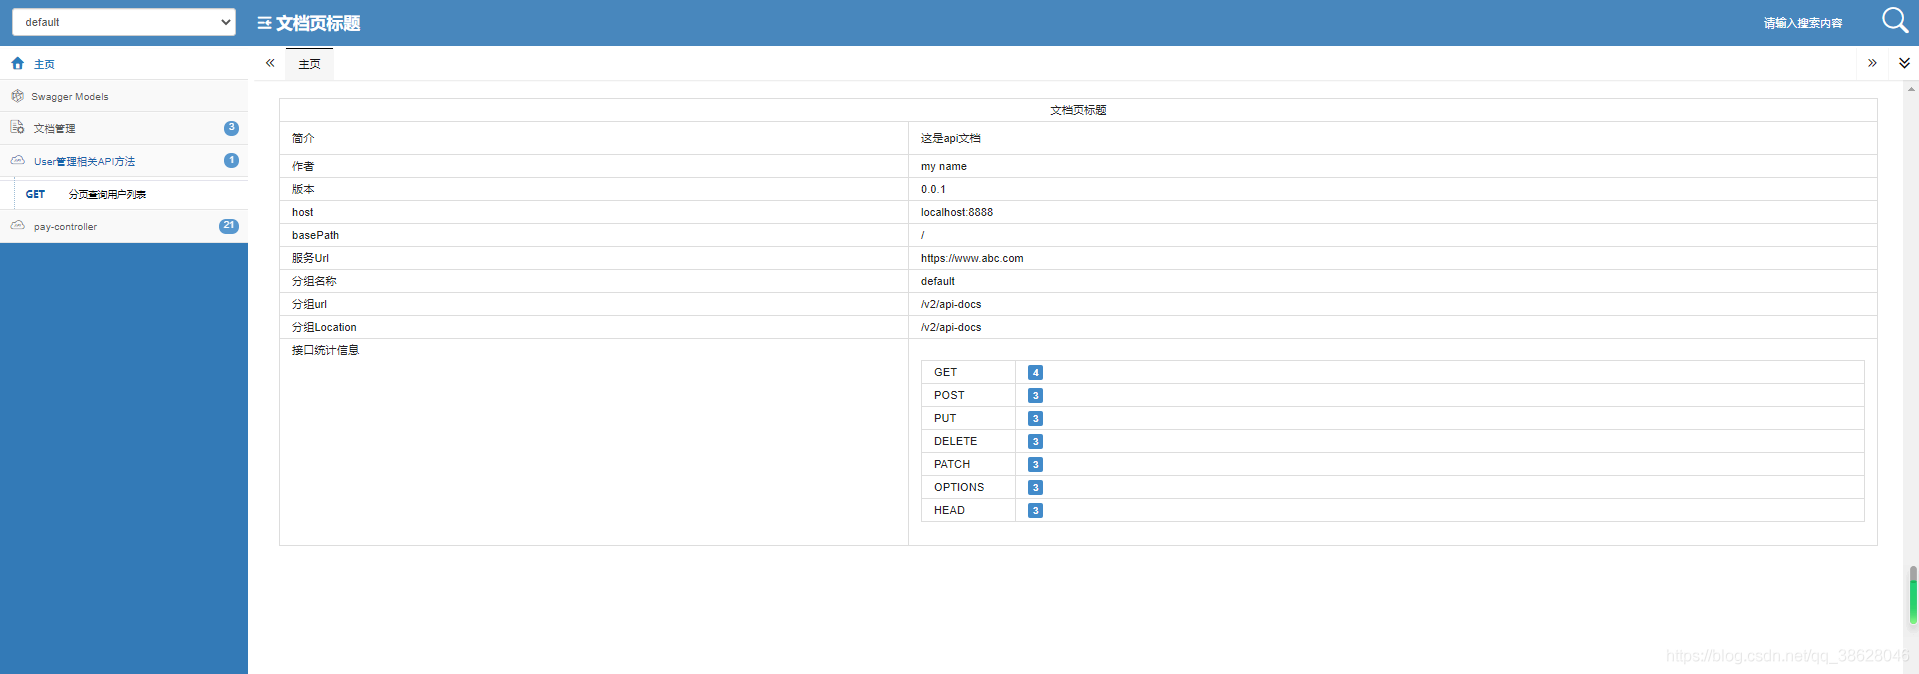
private ApiInfo apiInfo() {
return new ApiInfoBuilder()
// 文档页标题
.title("文档页标题")
// 联系人信息
.contact(new Contact("name",
"url",
"email"))
// 详细信息
.description("这是api文档")
// 文档版本号
.version("0.0.1")
// 网站地址
.termsOfServiceUrl("https://www.abc.com")
.build();
}
}
Swagger常用注解
在Java类中添加Swagger的注解即可生成Swagger接口,常用Swagger注解如下:
@Api:修饰整个类,描述Controller的作用

@description 功能描述

@ApiOperation:描述一个类的一个方法,或者说一个接口

@ApiParam:单个参数描述

@ApiModel:用对象来接收参数

@tags 功能描述

@ApiModelProperty:用对象接收参数时,描述对象的一个字段

@ApiResponse:HTTP响应其中1个描述

@ApiResponses:HTTP响应整体描述

@ApiIgnore:使用该注解忽略这个API

@ApiError :发生错误返回的信息

@ApiImplicitParam:一个请求参数

@ApiImplicitParams:多个请求参数
@ApiImplicitParam属性:
| 属性 | 取值 | 作用 |
|---|---|---|
| paramType | 查询参数类型 | |
| path | 以地址的形式提交数据 | |
| query | 直接跟参数完成自动映射赋值 | |
| body | 以流的形式提交 仅支持POST | |
| header | 参数在request headers 里边提交 | |
| form | 以form表单的形式提交 仅支持POST | |
| dataType | 参数的数据类型 只作为标志说明,并没有实际验证 | |
| Long | ||
| String | ||
| name | 接收参数名 | |
| value | 接收参数的意义描述 | |
| required | 参数是否必填 | |
| true | 必填 | |
| false | 非必填 | |
| defaultValue | 默认值 |
使用Swagger注解
@RestController
@RequestMapping("/user")
@Api(value = "用户管理API", tags = "User管理相关API方法")
public class UserController {
@GetMapping("/list/{page}/{size}")
@ApiOperation("分页查询用户列表")
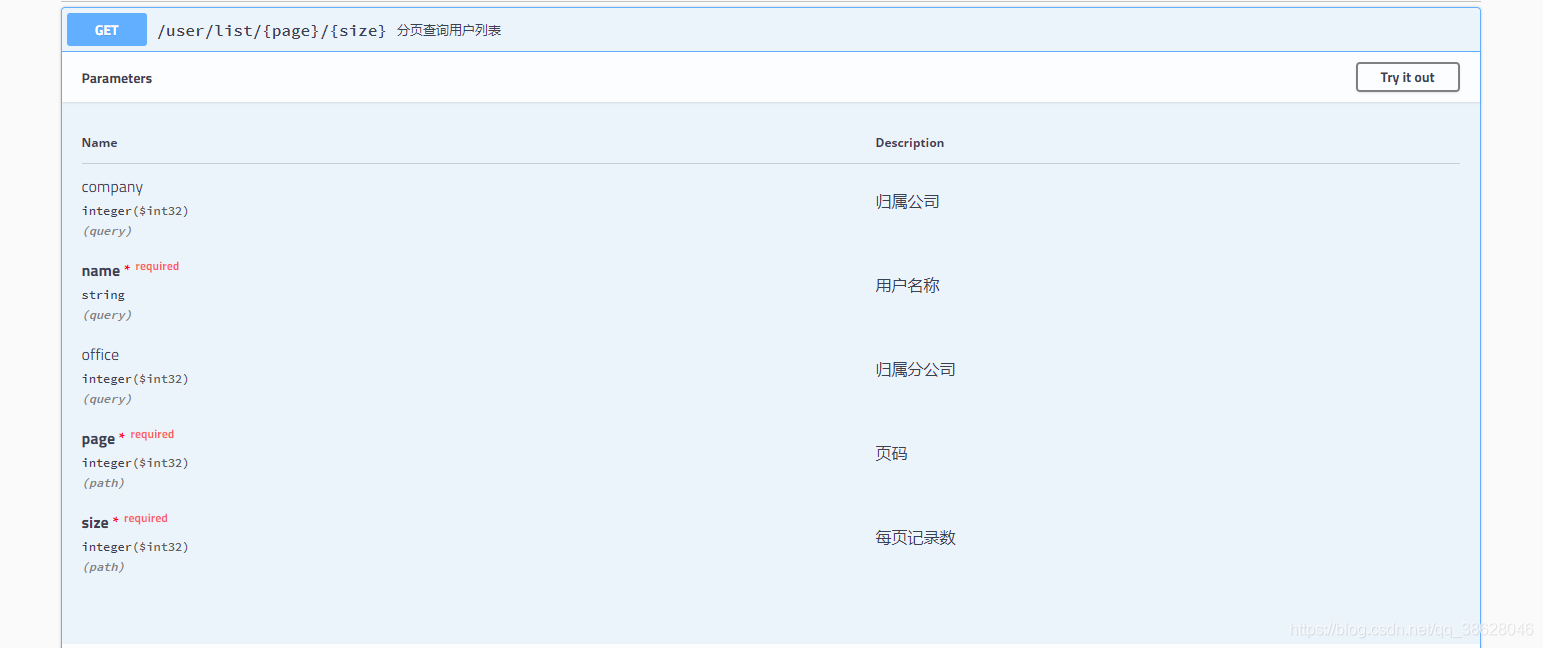
@ApiImplicitParams({
@ApiImplicitParam(name = "page", value = "页码",required=true,paramType="path",dataType="int"),
@ApiImplicitParam(name = "size", value = "每页记录数",required=true,paramType="path",dataType="int")
})
public String findList(@PathVariable("page") int page, @PathVariable("size") int size, SearchParams searchParams) {
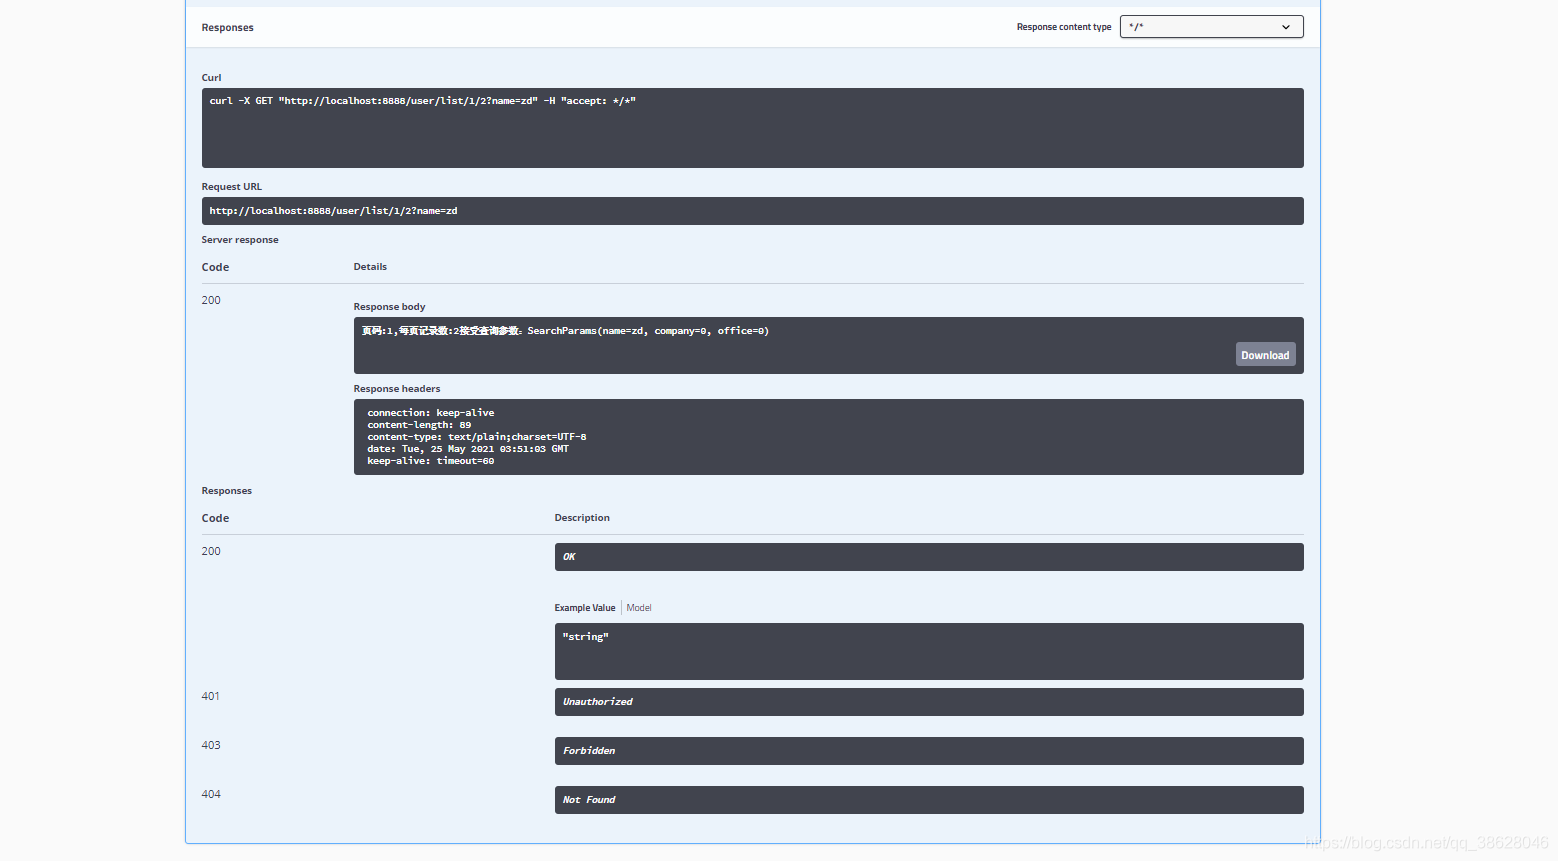
String str="页码:"+page+",每页记录数:"+size+"接受查询参数:"+searchParams;
return str;
}
}
使用注解 ApiModelProperty 对属性注释:
@Data
@ApiModel(value = "用户搜索参数对象BO", description = "从客户端,由用户传入的数据封装在此entity中")
public class SearchParams {
    @ApiModelProperty(value = "用户名称", name = "name", example = "zd", required = true)
    private String name;
    @ApiModelProperty("归属公司")
    private int company;
    @ApiModelProperty("归属分公司")
    private int office;
}
Swagger接口测试
访问swagger的原路径 http://localhost:8888/swagger-ui.html
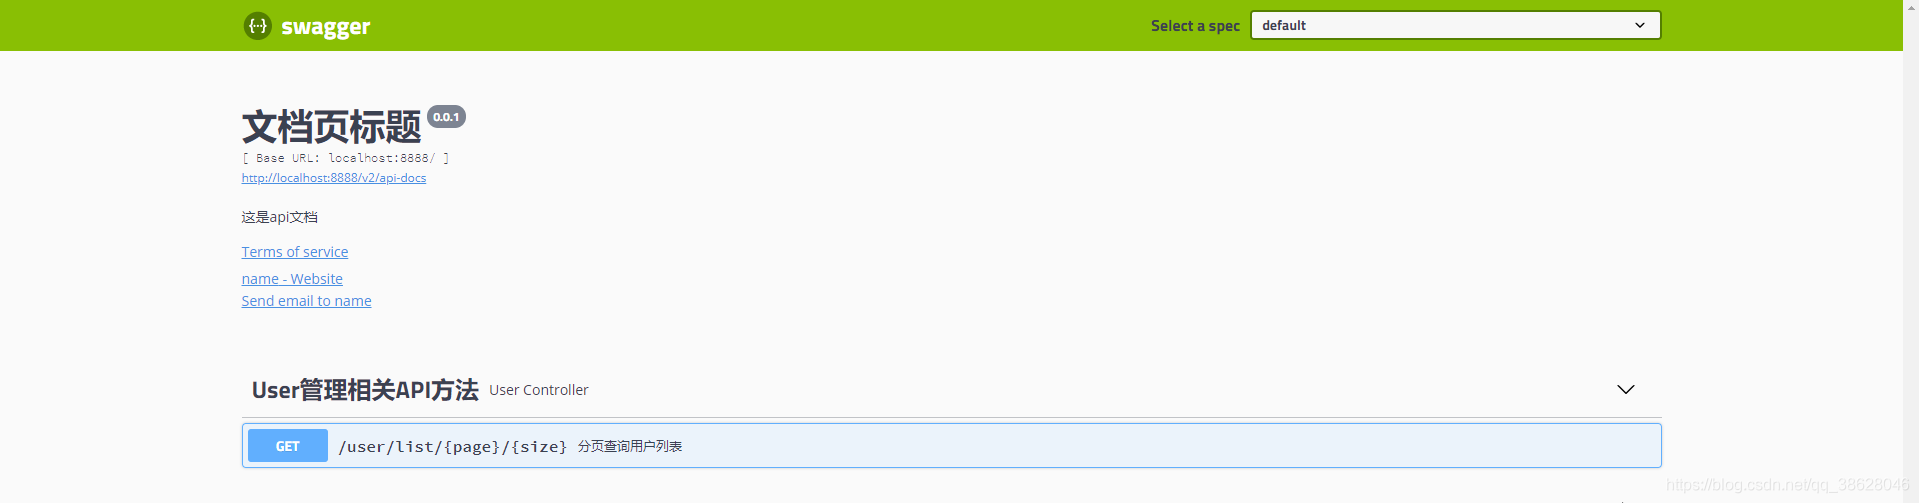
接口参数描述
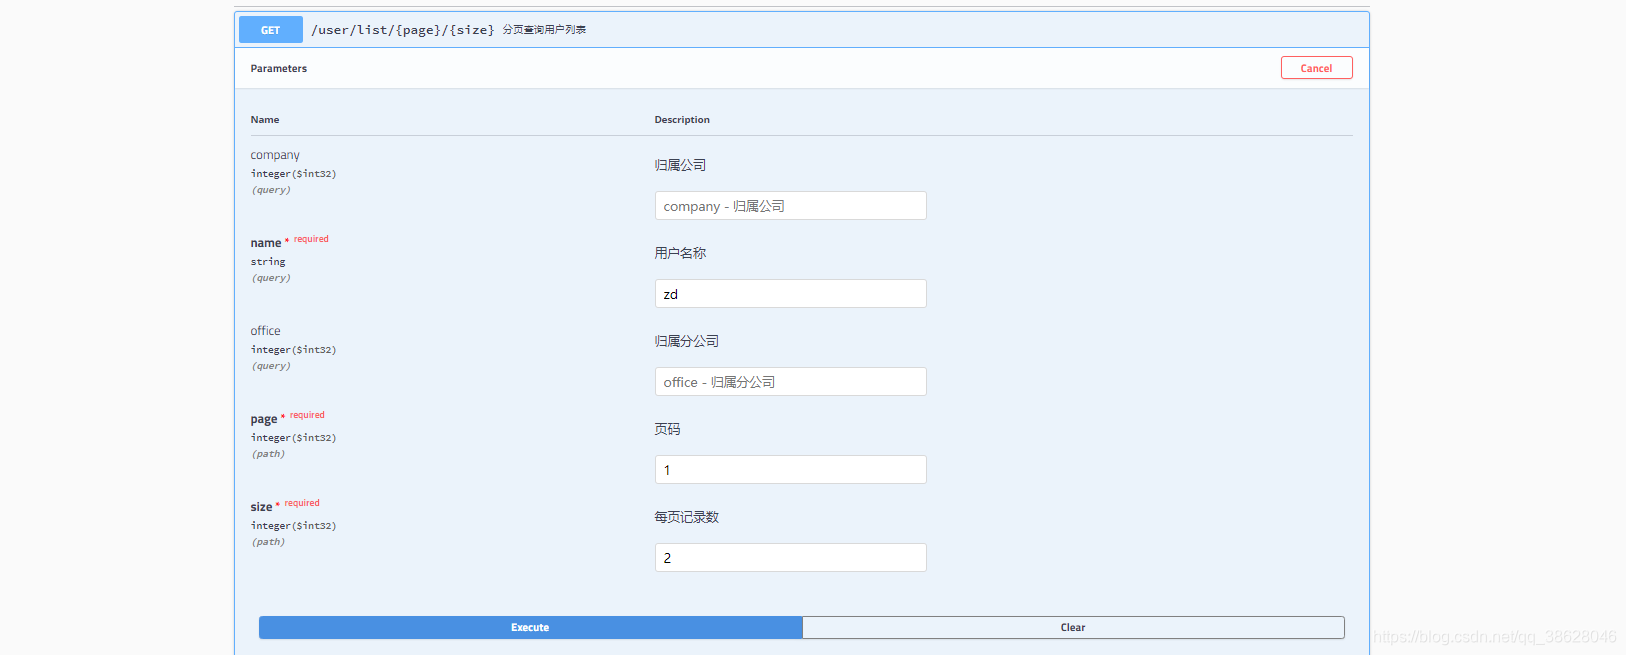
接口测试
接口响应
访问swagger换肤的原路径 http://localhost:8888/doc.html
接口参数描述

接口响应

支持JWT认证
@Configuration
@EnableSwagger2
public class SwaggerConfig {
    @Bean
    public Docket createRestApi() {
        Docket docket = new Docket(DocumentationType.SWAGGER_2);
        // 定义Swagger页面基本信息
        ApiInfoBuilder builder = new ApiInfoBuilder();
        builder.title("EMOS在线办公系统")
                .contact(new Contact("name", "url", "email"))
                .description("这是api文档")
                .version("0.0.1")
                .build();
        ApiInfo info = builder.build();
        docket.apiInfo(info);

		// 指定路径下的类中的指定主键方法出现在Swagger上面
        ApiSelectorBuilder selectorBuilder = docket.select();
        // 所有包所有类
        selectorBuilder.paths(PathSelectors.any());
        // 使用特定注解的方法才能添加到Swagger
        selectorBuilder.apis(RequestHandlerSelectors.withMethodAnnotation(ApiOperation.class));
        docket = selectorBuilder.build();

        // 支持令牌认证

		// 接受参数
        ApiKey apiKey = new ApiKey("token", "token", "header");
        List<ApiKey> apiKeyList = new ArrayList<>();
        apiKeyList.add(apiKey);
        docket.securitySchemes(apiKeyList);

        // JWT认证在Swagger中的作用域
        AuthorizationScope scope = new AuthorizationScope("global", "accessEverything");
        AuthorizationScope[] scopes = {scope};
        // 令牌作用域
        SecurityReference reference = new SecurityReference("token", scopes);
        List refList = new ArrayList();
        refList.add(reference);
        // 令牌上下文
        SecurityContext context = SecurityContext.builder().securityReferences(refList).build();
        List cxtList = new ArrayList();
        cxtList.add(context);
        docket.securityContexts(cxtList);

        return docket;
    }
}
版权声明:本文内容由互联网用户自发贡献,该文观点仅代表作者本人。本站仅提供信息存储空间服务,不拥有所有权,不承担相关法律责任。如发现本站有涉嫌侵权/违法违规的内容, 请发送邮件至 举报,一经查实,本站将立刻删除。
文章由极客之音整理,本文链接:https://www.bmabk.com/index.php/post/137058.html

