
文章目录
一、需求:用户认证
网站主流认证方式有:账号密码认证、手机验证码认证、扫码登录…
1、连接用户中心数据库认证
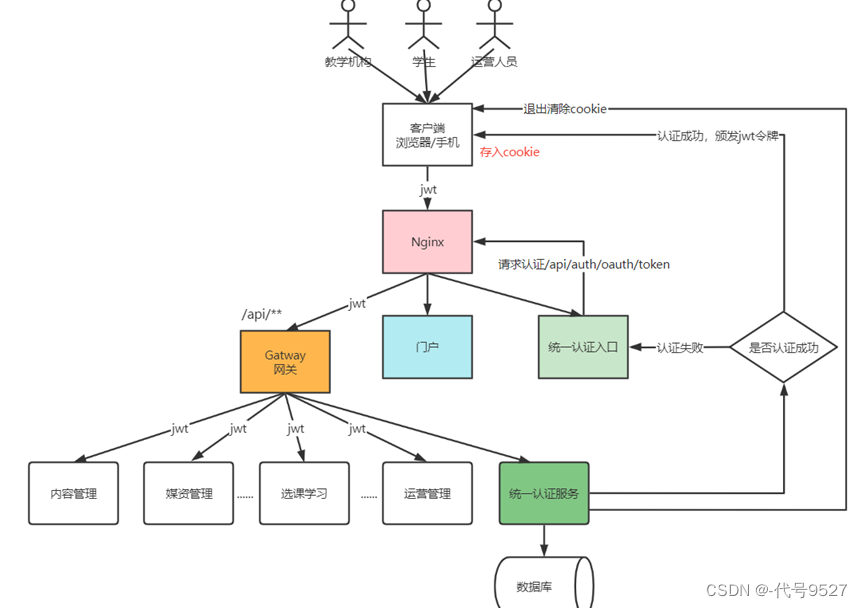
当前实现效果
实际开发中,用户的账户和密码等信息存在数据库表:
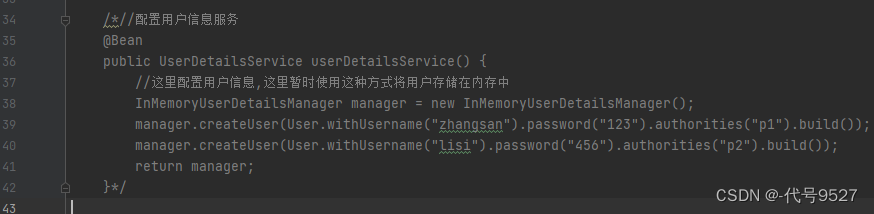
之前测试Spring-security则是使用硬编码将用户暂存在内存中:
@Bean
public  UserDetailService userDetailsService() {
    //这里配置用户信息,这里暂时使用这种方式将用户存储在内存中
    InMemoryUserDetailsManager manager = new InMemoryUserDetailsManager();
    manager.createUser(User.withUsername("zhangsan").password("123").authorities("p1").build());
    manager.createUser(User.withUsername("lisi").password("456").authorities("p2").build());
    return manager;
}
Spring-Security原理与源码
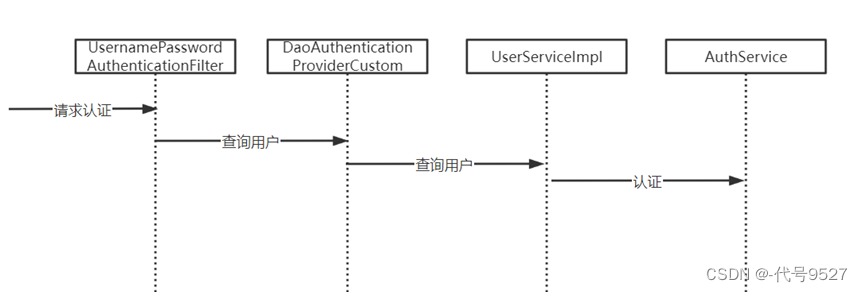
参考Spring-Security的工作原理流程图:
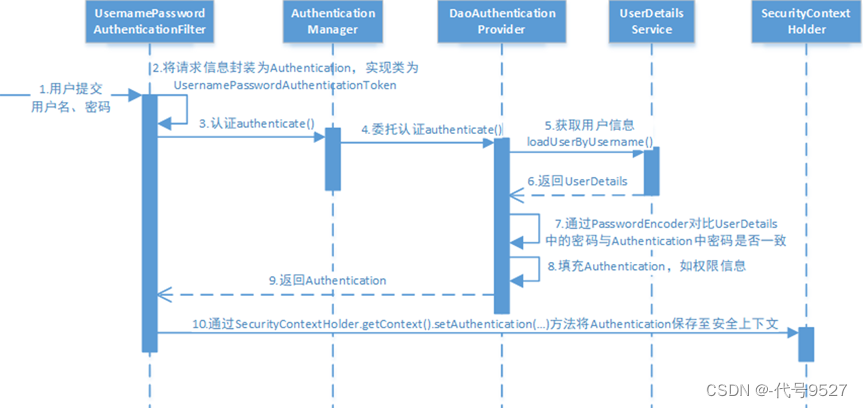
查询用户信息的逻辑是:
- 用户提交用户名密码,经过滤器到认证管理器
- 认证管理器委托
DaoAuthenticationProvider - DaoAuthenticationProvider调用
UserDetailsService的loadUserByUsername()方法获取UserDetails用户信息
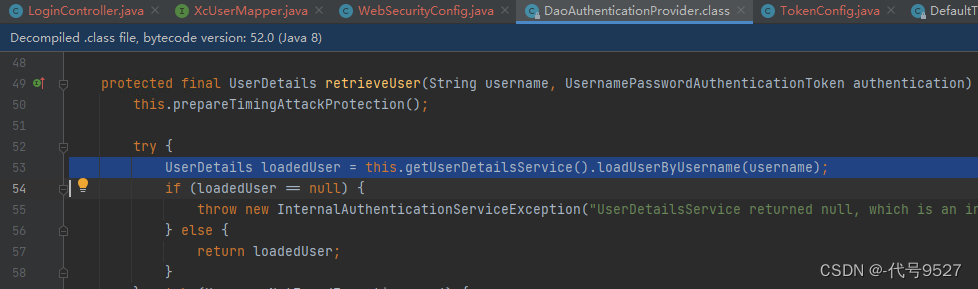
DaoAuthenticationProvider源码:
UserDetailsService是一个接口:
package org.springframework.security.core.userdetails;

public interface UserDetailsService {
    UserDetails loadUserByUsername(String var1) throws UsernameNotFoundException;
}
UserDetails是用户信息接口:
public interface UserDetails extends Serializable {
    Collection<? extends GrantedAuthority> getAuthorities();

    String getPassword();

    String getUsername();

    boolean isAccountNonExpired();

    boolean isAccountNonLocked();

    boolean isCredentialsNonExpired();

    boolean isEnabled();
}
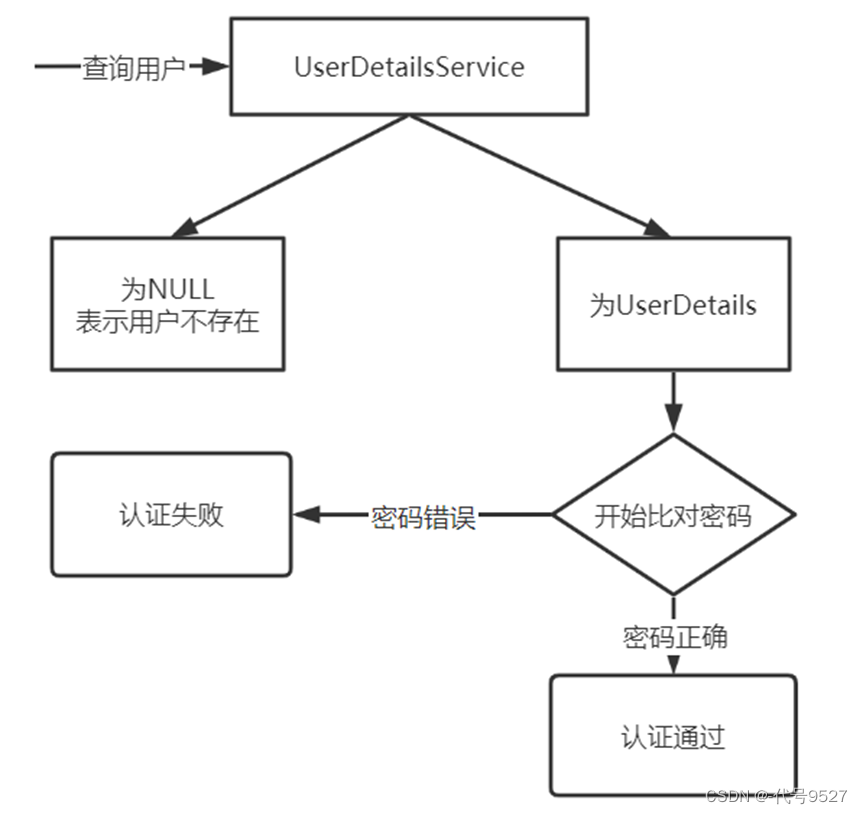
框架调用loadUserByUsername()方法拿到用户信息以后的流程是:
连接数据库认证
梳理完框架的流程,接下来接入自己的认证逻辑:
- 首先之前的userDetailService的Bean屏蔽掉
自定义UserServiceImpl类实现UserDetailService,加@Component注解代替上一步的Bean
import com.baomidou.mybatisplus.core.conditions.query.LambdaQueryWrapper;
import com.xuecheng.ucenter.mapper.XcUserMapper;
import com.xuecheng.ucenter.model.po.XcUser;
import org.springframework.beans.factory.annotation.Autowired;
import org.springframework.security.core.userdetails.User;
import org.springframework.security.core.userdetails.UserDetails;
import org.springframework.security.core.userdetails.UserDetailsService;
import org.springframework.security.core.userdetails.UsernameNotFoundException;
import org.springframework.stereotype.Service;

@Service
public class UserServiceImpl implements UserDetailsService {

    //注入用户表的Mapper对象
    @Autowired
    XcUserMapper xcUserMapper;

    /**
     * @description 根据账号查询用户信息
     * @param s  账号
     * @return org.springframework.security.core.userdetails.UserDetails
    */
    @Override
    public UserDetails loadUserByUsername(String s) throws UsernameNotFoundException {

        XcUser user = xcUserMapper.selectOne(new LambdaQueryWrapper<XcUser>().eq(XcUser::getUsername, s));
        if(user==null){
            //返回空表示用户不存在,null是返回给框架的,别自定义
            return null;
        }
        //取出数据库存储的正确密码,最终要包装成userDetails对象给框架
        //由框架进行密码的比对
        String password  =user.getPassword();
        //给用户权限,如果不加报Cannot pass a null GrantedAuthority collection
        String[] authorities= {"test"};
        //创建UserDetails对象,权限信息待实现授权功能时再向UserDetail中加入
        UserDetails userDetails = User.withUsername(user.getUsername()).password(password).authorities(authorities).build();

        return userDetails;
    }


}
修改密码格式器PasswordEncoder为密文比较,密文格式下,会将用户输入的密码编码为BCrypt格式与数据库中的密码进行比对

关于密文方式BCryptPasswordEncoder的测试:
public static void main(String[] args) {
    String password = "111111";
    PasswordEncoder passwordEncoder = new BCryptPasswordEncoder();
    for(int i=0;i<10;i++) {
        //每个计算出的Hash值都不一样
        String hashPass = passwordEncoder.encode(password);
        System.out.println(hashPass);
        //虽然每次计算的密码Hash值不一样但是校验是通过的
        //match方法
        boolean f = passwordEncoder.matches(password, hashPass);
        System.out.println(f); //true
    }
}
- 修改客户端的密钥为Bcrypt格式
@Override
  public void configure(ClientDetailsServiceConfigurer clients)
          throws Exception {
        clients.inMemory()// 使用in-memory存储
                .withClient("XcWebApp")// client_id
                //.secret("secret") 客户端密钥
                .secret(new BCryptPasswordEncoder().encode("XcWebApp"))//客户端密钥
                .resourceIds("xuecheng-plus")//资源列表
                .authorizedGrantTypes("authorization_code", "password","client_credentials","implicit","refresh_token")// 该client允许的授权类型authorization_code,password,refresh_token,implicit,client_credentials
                .scopes("all")// 允许的授权范围
                .autoApprove(false)//false跳转到授权页面
                //客户端接收授权码的重定向地址
                .redirectUris("http://www.51xuecheng.cn")
   ;
  }
到此,用户账户密码的校验是连接数据库进行认证。调用获取token接口,输入错误密码:
{
  "error": "invalid_grant",
  "error_description": "用户名或密码错误"
}
输入错误的账户:
{
  "error": "unauthorized",
  "error_description": "UserDetailsService returned null, which is an interface contract violation"
}
扩展用户身份信息
用户表中的信息还包括头像、手机号、邮箱等,而UserDetails接口只返回了username和password,源码:
public interface UserDetails extends Serializable {
    Collection<? extends GrantedAuthority> getAuthorities();

    String getPassword();

    String getUsername();

    boolean isAccountNonExpired();

    boolean isAccountNonLocked();

    boolean isCredentialsNonExpired();

    boolean isEnabled();
}
JWT令牌中用户身份信息来源于UserDetails,因此需要扩展用户信息 ====> 将查到的用户信息做为一个json存入username,而不仅仅是username就真只存个username ====>修改我们自定义的对UserDetailsService接口的实现类:
@Service
public class UserServiceImpl implements UserDetailsService {

    @Autowired
    XcUserMapper xcUserMapper;

    @Override
    public UserDetails loadUserByUsername(String s) throws UsernameNotFoundException {

        XcUser user = xcUserMapper.selectOne(new LambdaQueryWrapper<XcUser>().eq(XcUser::getUsername, s));
        if(user==null){
            //返回空表示用户不存在
            return null;
        }

        //取出数据库存储的正确密码
        String password  =user.getPassword();
        //用户权限,如果不加报Cannot pass a null GrantedAuthority collection
        String[] authorities = {"p1"};
       //为了安全在令牌中不放密码
        user.setPassword(null);
        //将user对象转json
        String userString = JSON.toJSONString(user);
        //创建UserDetails对象
        UserDetails userDetails = User.withUsername(userString).password(password).authorities(authorities).build();

        return userDetails;
    }
}
这里注意两点:
user.setPassword(null);置空查到的user对象的密码,不能放tokenString userString = JSON.toJSONString(user);JSON工具类方法将对象转json字符串
此时调用check_token接口,可以得到:
{
  "aud": [
    "res1"
  ],
  "user_name": "{\"birthday\":\"2022-09-28T19:28:46\",\"createTime\":\"2022-09-28T08:32:03\",\"id\":\"50\",\"name\":\"学生1\",\"nickname\":\"大水牛\",\"password\":\"$2a$10$0pt7WlfTbnPDTcWtp/.2Mu5CTXvohnNQhR628qq4RoKSc0dGAdEgm\",\"sex\":\"1\",\"status\":\"1\",\"username\":\"stu1\",\"userpic\":\"http://file.51xuecheng.cn/dddf\",\"utype\":\"101001\"}",
  "scope": [
    "all"
  ],
  "active": true,
  "exp": 1664372184,
  "authorities": [
    "p1"
  ],
  "jti": "73da9f7b-bd8c-45ac-9add-46b711d11fb8",
  "client_id": "c1"
}
此时,user_name存储了用户所有信息,在资源服务中,解析JWT---取用户信息json----json转用户对象,即可。
资源服务获取用户身份
各个微服务都需要获取,所以定义一个工具类,获取当前登录的用户对象。
Java
package com.xuecheng.content.util;

import com.alibaba.fastjson.JSON;
import lombok.Data;
import lombok.extern.slf4j.Slf4j;
import org.springframework.security.core.context.SecurityContextHolder;

import java.io.Serializable;
import java.time.LocalDateTime;

/**
 * @description 获取当前用户身份工具类
 */
@Slf4j
public class SecurityUtil {

    public static XcUser getUser() {
        try {
            //从上下文中拿
            Object principalObj = SecurityContextHolder.getContext().getAuthentication().getPrincipal();
            if (principalObj instanceof String) {
                //取出用户身份信息
                String principal = principalObj.toString();
                //将json转成对象
                XcUser user = JSON.parseObject(principal, XcUser.class);
                return user;
            }
        } catch (Exception e) {
            log.error("获取当前登录用户身份出错:{}", e.getMessage());
            e.printStackTrace();
        }

        return null;
    }


    @Data
    public static class XcUser implements Serializable {

        private static final long serialVersionUID = 1L;

        private String id;

        private String username;

        private String password;

        private String salt;

        private String name;
        private String nickname;
        private String wxUnionid;
        private String companyId;
        /**
         * 头像
         */
        private String userpic;

        private String utype;

        private LocalDateTime birthday;

        private String sex;

        private String email;

        private String cellphone;

        private String qq;

        /**
         * 用户状态
         */
        private String status;

        private LocalDateTime createTime;

        private LocalDateTime updateTime;


    }


}
注意这里写了一个静态内部类。
2、统一认证入口
不同的认证方式,如账户密码、微信扫码、手机号验证码等,提交的数据不一样。先创建一个Dto类表示认证的参数:
//统一入口的第一步,先统一请求参数

package com.xuecheng.ucenter.model.dto;
import lombok.Data;
import java.util.HashMap;
import java.util.Map;

/**
 * @description 认证用户请求参数
 */
@Data
public class AuthParamsDto {

    private String username; //用户名
    private String password; //域  用于扩展
    private String cellphone;//手机号
    private String checkcode;//验证码
    private String checkcodekey;//验证码key
    private String authType; // 认证的类型   password:用户名密码模式类型    sms:短信模式类型
    private Map<String, Object> payload = new HashMap<>();//附加数据,作为扩展,不同认证类型可拥有不同的附加数据。如认证类型为短信时包含smsKey : sms:3d21042d054548b08477142bbca95cfa; 所有情况下都包含clientId


}
再想想最终的loadUserByUsername(String username)方法,查询用户的时候,传参是一个username字符串,所以,不管哪种认证方式,用我定义的AuthParamsDto接收后,转json传入即可。
此时,loadUserByUsername()方法改为:
package com.xuecheng.ucenter.service.impl;

import com.alibaba.fastjson.JSON;
import com.baomidou.mybatisplus.core.conditions.query.LambdaQueryWrapper;
import com.xuecheng.ucenter.mapper.XcUserMapper;
import com.xuecheng.ucenter.model.dto.AuthParamsDto;
import com.xuecheng.ucenter.model.po.XcUser;
import lombok.extern.slf4j.Slf4j;
import org.springframework.beans.factory.annotation.Autowired;
import org.springframework.security.core.userdetails.User;
import org.springframework.security.core.userdetails.UserDetails;
import org.springframework.security.core.userdetails.UserDetailsService;
import org.springframework.security.core.userdetails.UsernameNotFoundException;
import org.springframework.stereotype.Service;

/**
 * @description 自定义UserDetailsService用来对接Spring Security
 */
@Slf4j
@Service
public class UserServiceImpl implements UserDetailsService {

    @Autowired
    XcUserMapper xcUserMapper;

    /**
     * @description 查询用户信息组成用户身份信息
     * @param s  AuthParamsDto类型的json数据
     * @return org.springframework.security.core.userdetails.UserDetails
    */
    @Override
    public UserDetails loadUserByUsername(String s) throws UsernameNotFoundException {

        AuthParamsDto authParamsDto = null;
        try {
            //将认证参数转为AuthParamsDto类型
            authParamsDto = JSON.parseObject(s, AuthParamsDto.class);
        } catch (Exception e) {
            log.info("json和Dto对象不对应,解析错误:{}",s);
            throw new RuntimeException("认证请求数据格式不对");
        }
        //账号
        String username = authParamsDto.getUsername();
        XcUser user = xcUserMapper.selectOne(new LambdaQueryWrapper<XcUser>().eq(XcUser::getUsername, username));
        if(user==null){
            //返回空表示用户不存在
            return null;
        }
        //取出数据库存储的正确密码
        String password  =user.getPassword();
        //用户权限,如果不加报Cannot pass a null GrantedAuthority collection
        String[] authorities = {"p1"};
        //将user对象转json
        String userString = JSON.toJSONString(user);
        //创建UserDetails对象
        UserDetails userDetails = User.withUsername(userString).password(password).authorities(authorities).build();

        return userDetails;
    }

}
返回UserDetails后,DaoAuthenticationProvider 会进行密码校验,而验证码登录方式下并不需要验证密码。因此,定义DaoAuthenticationProviderCustom类,继承后覆盖/重写类的校验密码方法additionalAuthenticationChecks
package com.xuecheng.auth.config;

import lombok.extern.slf4j.Slf4j;
import org.springframework.beans.factory.annotation.Autowired;
import org.springframework.security.authentication.BadCredentialsException;
import org.springframework.security.authentication.UsernamePasswordAuthenticationToken;
import org.springframework.security.authentication.dao.DaoAuthenticationProvider;
import org.springframework.security.core.AuthenticationException;
import org.springframework.security.core.userdetails.UserDetails;
import org.springframework.security.core.userdetails.UserDetailsService;
import org.springframework.stereotype.Component;

/**
 * @description 自定义DaoAuthenticationProvider
 */
@Slf4j
@Component
public class DaoAuthenticationProviderCustom extends DaoAuthenticationProvider {

 //注意这种注入方式
 @Autowired
 public void setUserDetailsService(UserDetailsService userDetailsService) {
  super.setUserDetailsService(userDetailsService);
 }


 //屏蔽密码对比
 protected void additionalAuthenticationChecks(UserDetails userDetails, UsernamePasswordAuthenticationToken authentication) throws AuthenticationException {


 }

}
修改WebSecurityConfig类指定daoAuthenticationProviderCustom,告诉框架用我写的这个
...
@Autowired
DaoAuthenticationProviderCustom daoAuthenticationProviderCustom;


@Override
protected void configure(AuthenticationManagerBuilder auth) throws Exception {
    auth.authenticationProvider(daoAuthenticationProviderCustom);
}

....
到此,可以正常接收认证请求的json,并查询返回一个UserDetails,接下来做认证。
=====>
定义一个认证的Service接口,然后针对不同的认证方式写认证实现类,AuthParamsDto中有一个参数是认证类型authType。传不同的类型,走不同的认证实现类。(一个接口,多个实现类的策略)
//定义用户信息,为了扩展性让它继承XcUser
@Data
public class XcUserExt extends XcUser {
}
定义Service接口:
package com.xuecheng.ucenter.service;

import com.xuecheng.ucenter.model.dto.AuthParamsDto;
import com.xuecheng.ucenter.model.po.XcUser;

/**
 * @description 认证service
 */
public interface AuthService {

   /**
    * @description 认证方法
    * @param authParamsDto 认证参数
    * @return com.xuecheng.ucenter.model.po.XcUser 用户信息
   */
   XcUserExt execute(AuthParamsDto authParamsDto);
针对不同的登录方式,写不同的认证实现类,如微信登录:
@Service("wx_authservice")
public class WxAuthServiceImpl implements AuthService{
	@Override
	public XcUserExt execute(AuthParamsDto authParamsDto){
		return null;//写微信登录的校验逻辑
	}

}
此时,自定义的UserServiceImpl(UserDetailsService)中的loadUserByUsername方法改为:
@Slf4j
@Service
public class UserServiceImpl implements UserDetailsService {

    @Autowired
    XcUserMapper xcUserMapper;

	//注入容器!!!!!
    @Autowired
    ApplicationContext applicationContext;


    /**
     * @description 查询用户信息组成用户身份信息
     * @param s  AuthParamsDto类型的json数据
     * @return org.springframework.security.core.userdetails.UserDetails
    */
    @Override
    public UserDetails loadUserByUsername(String s) throws UsernameNotFoundException {

        AuthParamsDto authParamsDto = null;
        try {
            //将认证参数转为AuthParamsDto类型
            authParamsDto = JSON.parseObject(s, AuthParamsDto.class);
        } catch (Exception e) {
            log.info("认证请求数据和Dto类字段不匹配:{}",s);
            throw new RuntimeException("认证请求数据格式不对");
        }
        //拿认证类型,有password,wx...
        String authType = authParamsDto.getAuthType();
        //根据认证的类型,从Spring容器中取出对应的bean
        String beanName = authType+"_authService";
        //按名称获取bean,bean的名称在不同的实现类中已写好,是认证类型+_authService
        AuthService authService = applicationContext.getBean(beanName,AuthService.class);
        //调用同一的execute方法,
        //到时候authService是哪个bean,就执行哪个实现类的校验,一劳永逸
        authService.execute(authParamsDto);
        .......
写一个接口,对不同的验证方式,写不同的实现类,做为Bean并起名 ===> 从传参中拿到验证方式类型 ====> 从容器中按(验证方式)名称拿不同实现类的Bean ===> 最后一句authService.execute(authParamsDto)就完成了统一认证!!
到此,目前流程如上。
3、实现账号密码认证
实现统一的认证接口AuthService:
package com.xuecheng.ucenter.service.impl;

import com.baomidou.mybatisplus.core.conditions.query.LambdaQueryWrapper;
import com.xuecheng.ucenter.mapper.XcUserMapper;
import com.xuecheng.ucenter.model.dto.AuthParamsDto;
import com.xuecheng.ucenter.model.po.XcUser;
import com.xuecheng.ucenter.service.AuthService;
import org.springframework.beans.factory.annotation.Autowired;
import org.springframework.security.crypto.bcrypt.BCryptPasswordEncoder;
import org.springframework.security.crypto.password.PasswordEncoder;
import org.springframework.stereotype.Service;

/**
 * @description 账号密码认证方式的校验
 */
 @Service("password_authservice")
public class PasswordAuthServiceImpl implements AuthService {

 @Autowired
 XcUserMapper xcUserMapper;

 @Autowired
 PasswordEncoder passwordEncoder;


 @Override
 public XcUserExt execute(AuthParamsDto authParamsDto) {

  //账号
	  String username = authParamsDto.getUsername();
	  XcUser user = xcUserMapper.selectOne(new LambdaQueryWrapper<XcUser>().eq(XcUser::getUsername, username));
	  if(user==null){
	   //返回空表示用户不存在
	   throw new RuntimeException("账号不存在");
	  }
	  XcUserExt xcUserExt = new XcUserExt();
	  BeanUtils.copyProperties(user,xcUserExt);
	  //校验密码
	  //取出数据库存储的正确密码
	  String passwordDb  =user.getPassword();
	  String passwordForm = authParamsDto.getPassword();
	  boolean matches = passwordEncoder.matches(passwordForm, passwordDb);
	  if(!matches){
	   throw new RuntimeException("账号或密码错误");
	  }
	  return xcUserExt;
	 }
}
UserServiceImpl类中再完善一下:将认证返回的XcUserExt对象包装成UserDetails类型
package com.xuecheng.ucenter.service.impl;

import com.alibaba.fastjson.JSON;
import com.baomidou.mybatisplus.core.conditions.query.LambdaQueryWrapper;
import com.xuecheng.ucenter.mapper.XcUserMapper;
import com.xuecheng.ucenter.model.dto.AuthParamsDto;
import com.xuecheng.ucenter.model.po.XcUser;
import com.xuecheng.ucenter.service.AuthService;
import lombok.extern.slf4j.Slf4j;
import org.springframework.beans.factory.annotation.Autowired;
import org.springframework.context.ApplicationContext;
import org.springframework.security.core.userdetails.User;
import org.springframework.security.core.userdetails.UserDetails;
import org.springframework.security.core.userdetails.UserDetailsService;
import org.springframework.security.core.userdetails.UsernameNotFoundException;
import org.springframework.stereotype.Service;

/**
 * @description 自定义UserDetailsService用来对接Spring Security
 */
@Slf4j
@Service
public class UserServiceImpl implements UserDetailsService {

    @Autowired
    XcUserMapper xcUserMapper;

    @Autowired
    ApplicationContext applicationContext;


    /**
     * @description 查询用户信息组成用户身份信息
     * @param s  AuthParamsDto类型的json数据
     * @return org.springframework.security.core.userdetails.UserDetails
    */
    @Override
    public UserDetails loadUserByUsername(String s) throws UsernameNotFoundException {

        AuthParamsDto authParamsDto = null;
        try {
            //将认证参数转为AuthParamsDto类型
            authParamsDto = JSON.parseObject(s, AuthParamsDto.class);
        } catch (Exception e) {
            log.info("认证请求不符合项目要求:{}",s);
            throw new RuntimeException("认证请求数据格式不对");
        }

        //认证方法
        String authType = authParamsDto.getAuthType();
        AuthService authService =  applicationContext.getBean(authType + "_authservice",AuthService.class);
        XcUserExt user = authService.execute(authParamsDto);

        return getUserPrincipal(user);
    }


    /**
     * @description XcUserExt包装成UserDetails
    */
    public UserDetails getUserPrincipal(XcUserExt user){
        //用户权限,如果不加报Cannot pass a null GrantedAuthority collection
        String[] authorities = {"p1"};
        String password = user.getPassword();
        //为了安全在令牌中不放密码
        user.setPassword(null);
        //将user对象转json
        String userString = JSON.toJSONString(user);
        //创建UserDetails对象
        UserDetails userDetails = User.withUsername(userString).password(password ).authorities(authorities).build();
        return userDetails;
    }

}
4、验证码
4.1 验证码
验证码可以防止恶性攻击,如:
- XSS跨站脚本攻击
- CSRF跨站请求伪造攻击
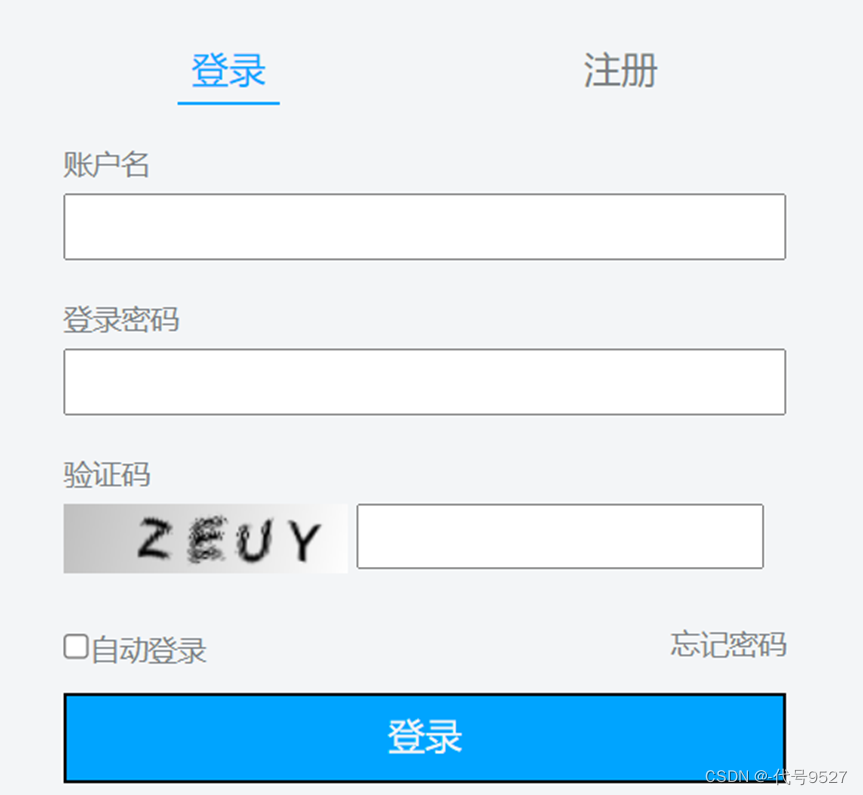
为了保护系统安全,一些重要的操作都需要验证码:
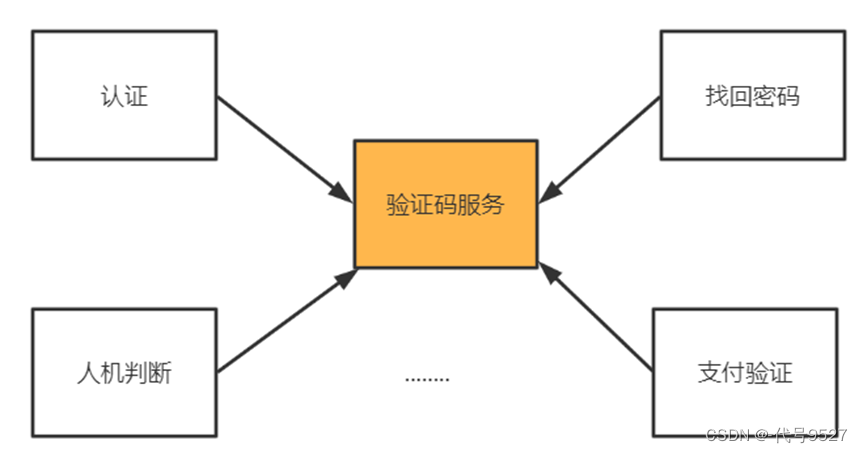
验证码的类型可以选:图片验证码、语音验证码、手机短信验证码等。
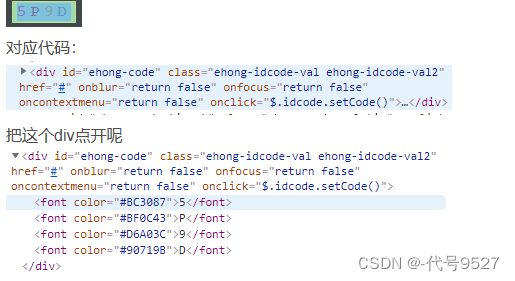
有个问题:验证码是前端生成还是后端生成???
回答:前后端都能做,但前端可能存在安全隐患—防人不防机器。验证码放在前端,安全性不高:比如某网站的验证码放在了前端
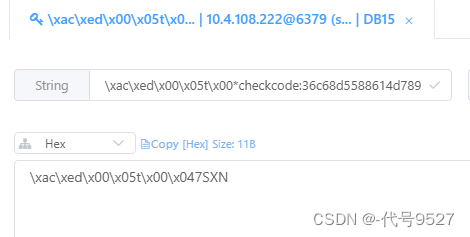
而后端的验证码则是在Redis中通过checkcode来校验。
4.2 部署验证码服务
这里单独创建图片验证码的服务checkcode服务。
# 服务源代码
链接:https://pan.baidu.com/s/1__jCJ_PmhLJzGKi5M3hM6w?pwd=9527
提取码:9527
nacos中,验证码服务的配置文件:
server:
  servlet:
    context-path: /checkcode
  port: 63075
redis公共配置文件:
spring:
  redis:
    host: 127.0.0.1
    port: 6379
    password: redis
    database: 0
    lettuce:
      pool:
        max-active: 20
        max-idle: 10
        min-idle: 0
    timeout: 10000
    #redisson:
      #配置文件目录
      #config: classpath:singleServerConfig.yaml
启动成功后,调用生成图片验证码的接口:
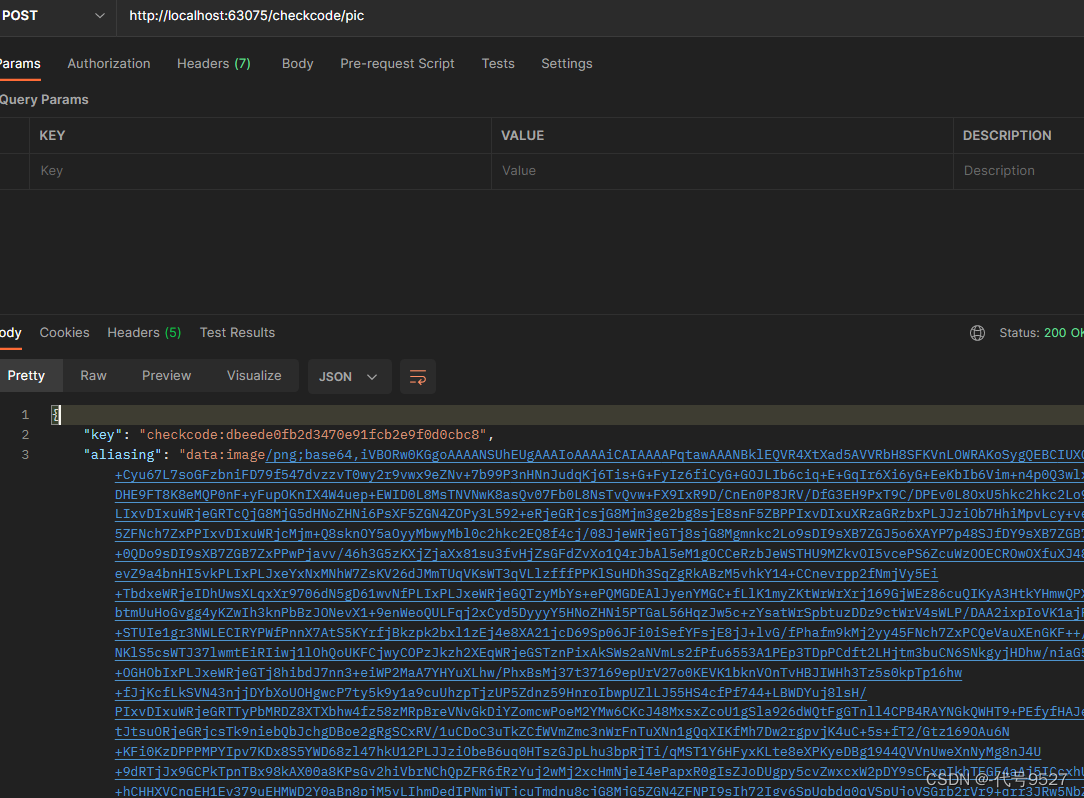
在浏览器中查看(复制alaiasing的值回车):

查看Redis:
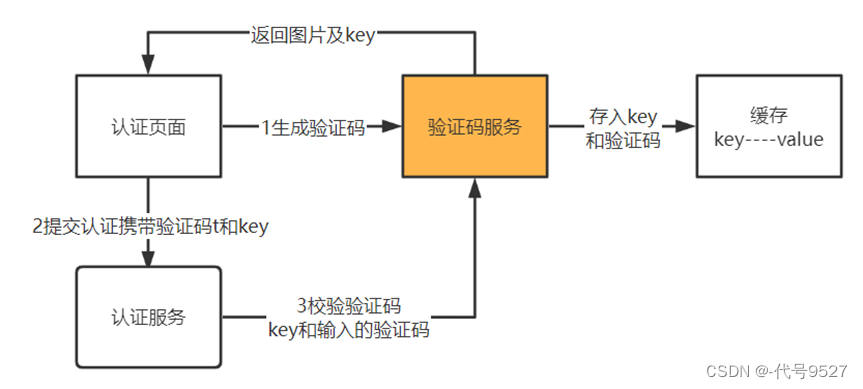
4.3 整体原理流程
- 生成指定位数的数字字母组合(验证码)
- 根据验证码生成一个图片返回给页面
- 给生成的验证码分配一个key,将key和验证码一同存入Redis,并将这个key和图片一同返给页面
- 用户输入验证码,连同key一起提交给认证服务
- 认证服务拿key和输入的验证码请求验证码服务校验
- 验证码服务从Redis中根据key取出正确的验证码,和输入的验证码进行对比
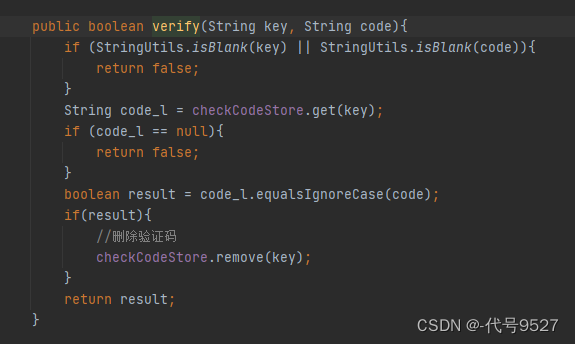
校验验证码的接口实现类逻辑:
5、账号密码认证
根据前面的需求分析,登录时先校验验证码,因此认证服务要调用验证码服务的接口。
- 在调用方(认证服务)中定义远程调用的接口(把被调用方的拿过来就好)
package com.xuecheng.ucenter.feignclient;

import org.springframework.cloud.openfeign.FeignClient;
import org.springframework.web.bind.annotation.PostMapping;
import org.springframework.web.bind.annotation.RequestParam;

/**
 * @description 搜索服务远程接口
 * @FeignClient注解
 * value为远程服务名,fallbackFactory即降级处理类
 */
@FeignClient(value = "checkcode",fallbackFactory = CheckCodeClientFactory.class)
@RequestMapping("/checkcode")
public interface CheckCodeClient {

 @PostMapping(value = "/verify")
 public Boolean verify(@RequestParam("key") String key,@RequestParam("code") String code);

}
- 写熔断降低处理的类
@Slf4j
@Component
public class CheckCodeClientFactory implements FallbackFactory<CheckCodeClient> {
    @Override
    public CheckCodeClient create(Throwable throwable) {
        return new CheckCodeClient() {

            @Override
            public Boolean verify(String key, String code) {
                log.debug("调用验证码服务熔断异常:{}", throwable.getMessage());
                return null;
            }
        };
    }
}
- 在调用方的启动类中加@EnableFeignClients注解
@EnableFeignClients(basePackages={"com.xuecheng.*.feignclient"})
- 在配置中引入feign-dev.yaml的公共配置(feign-dev.yaml内容如下)
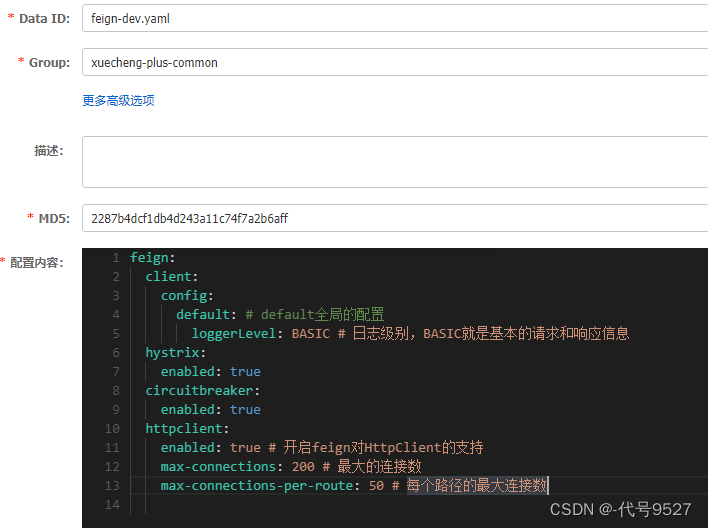

配置完远程调用的东西后,完善登录校验的实现类代码:
package com.xuecheng.ucenter.service.impl;

import com.baomidou.mybatisplus.core.conditions.query.LambdaQueryWrapper;
import com.xuecheng.ucenter.feignclient.CheckCodeClient;
import com.xuecheng.ucenter.mapper.XcUserMapper;
import com.xuecheng.ucenter.model.dto.AuthParamsDto;
import com.xuecheng.ucenter.model.po.XcUser;
import com.xuecheng.ucenter.service.AuthService;
import org.apache.commons.lang.StringUtils;
import org.springframework.beans.factory.annotation.Autowired;
import org.springframework.security.crypto.bcrypt.BCryptPasswordEncoder;
import org.springframework.security.crypto.password.PasswordEncoder;
import org.springframework.stereotype.Service;

/**
 * @description 账号密码认证
 */
 @Service("password_authservice")
public class PasswordAuthServiceImpl implements AuthService {

	 @Autowired
	 XcUserMapper xcUserMapper;

	 @Autowired
	 PasswordEncoder passwordEncoder;
	 @Autowired
	 CheckCodeClient checkCodeClient;

	 @Override
	 public XcUser execute(AuthParamsDto authParamsDto) {

		  //校验验证码
		  String checkcode = authParamsDto.getCheckcode();
		  String checkcodekey = authParamsDto.getCheckcodekey();

		  if(StringUtils.isBlank(checkcodekey) || StringUtils.isBlank(checkcode)){
		   throw new RuntimeException("验证码为空");

		  }
		  Boolean verify = checkCodeClient.verify(checkcodekey, checkcode);
		  if(!verify){
		   throw new RuntimeException("验证码输入错误");
		  }
		  //账号
		  String username = authParamsDto.getUsername();
		  XcUser user = xcUserMapper.selectOne(new LambdaQueryWrapper<XcUser>().eq(XcUser::getUsername, username));
		  if(user==null){
		   //返回空表示用户不存在
		   throw new RuntimeException("账号不存在");
		  }
		  //校验密码
		  //取出数据库存储的正确密码
		  String passwordDb  =user.getPassword();
		  String passwordForm = authParamsDto.getPassword();
		  boolean matches = passwordEncoder.matches(passwordForm, passwordDb);
		  if(!matches){
		   throw new RuntimeException("账号或密码错误");
		  }
		  return user;
	 }
}
版权声明:本文内容由互联网用户自发贡献,该文观点仅代表作者本人。本站仅提供信息存储空间服务,不拥有所有权,不承担相关法律责任。如发现本站有涉嫌侵权/违法违规的内容, 请发送邮件至 举报,一经查实,本站将立刻删除。
文章由极客之音整理,本文链接:https://www.bmabk.com/index.php/post/146050.html

