
文章目录
一、REST
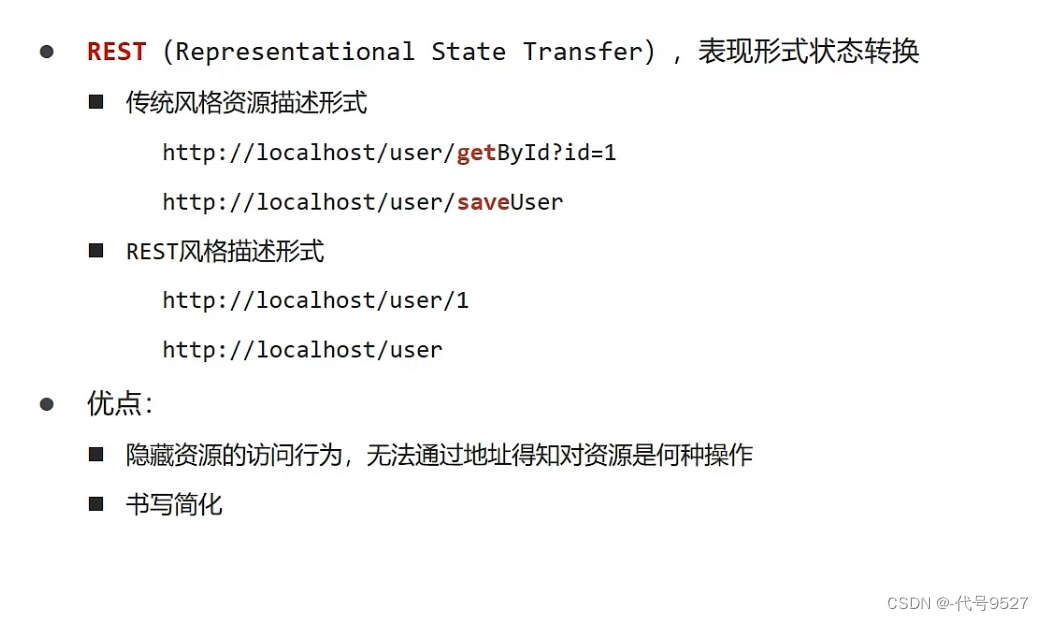
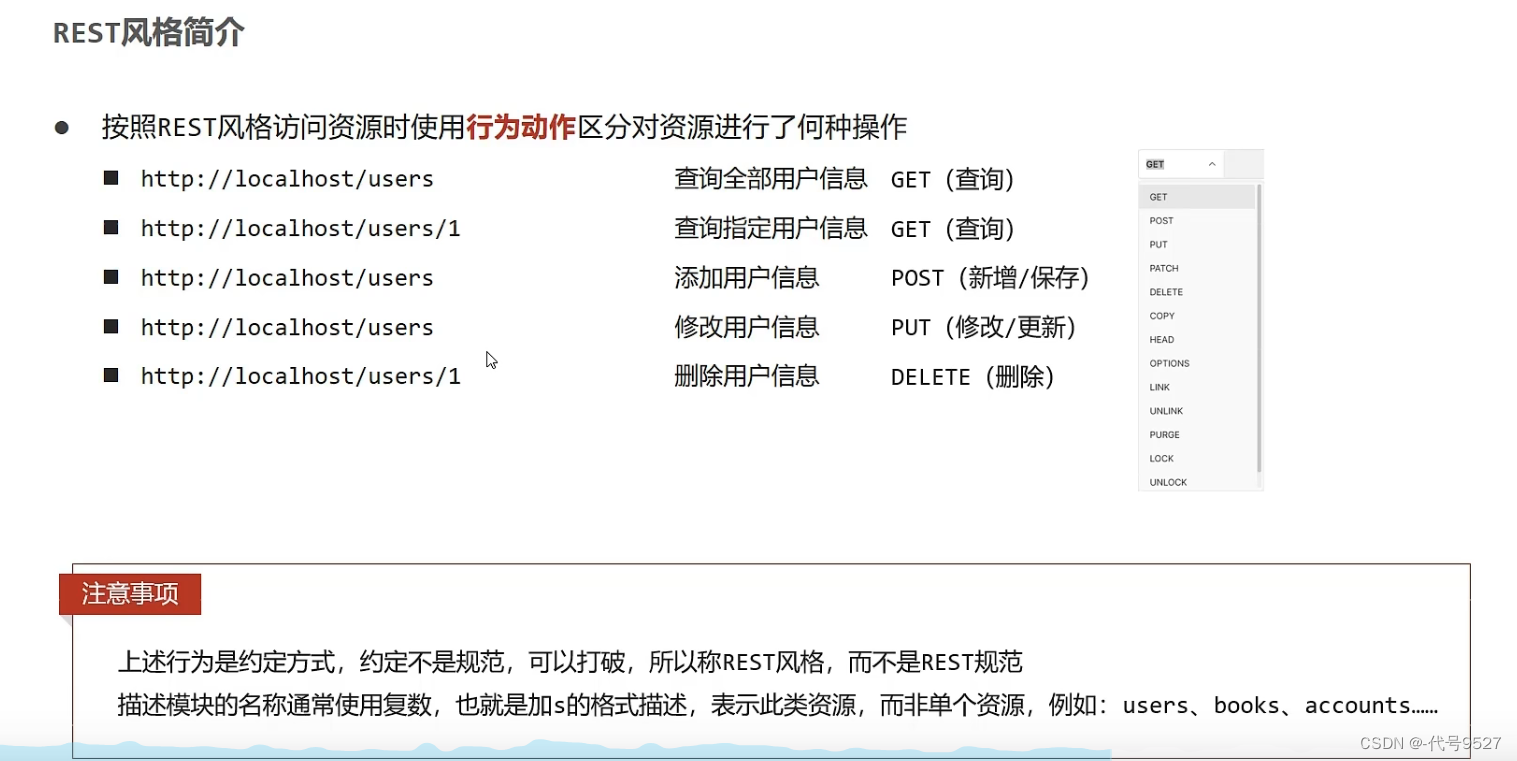
1、REST简介
2、RESTful入门案例
相关步骤:
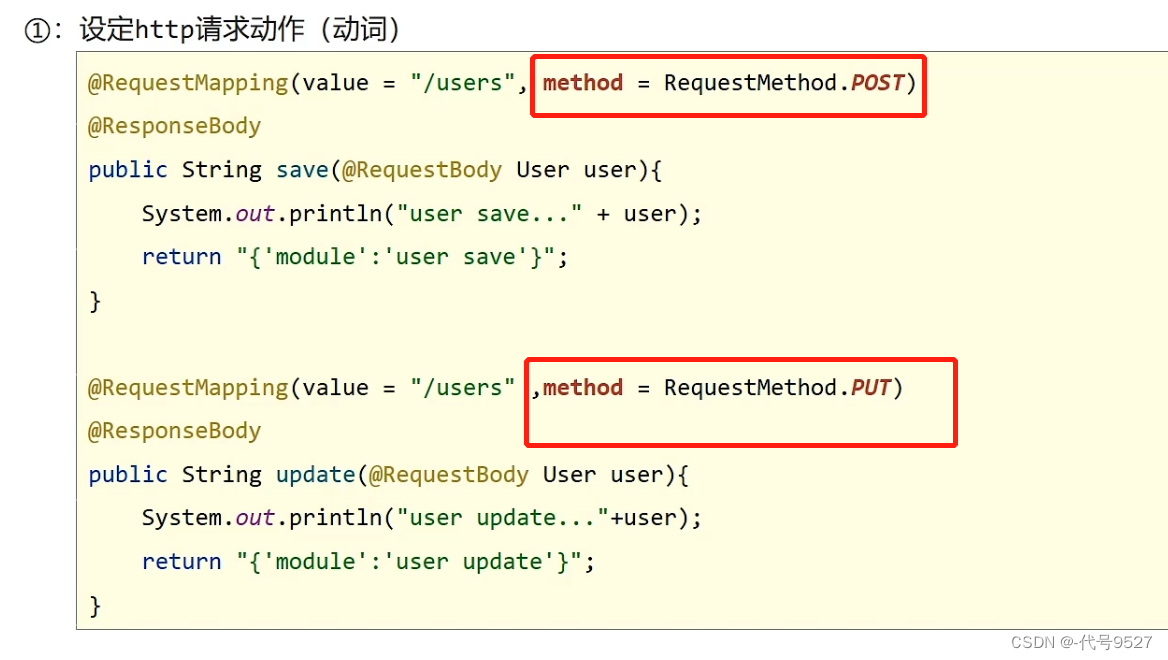
1) 设定HTTP请求动作词
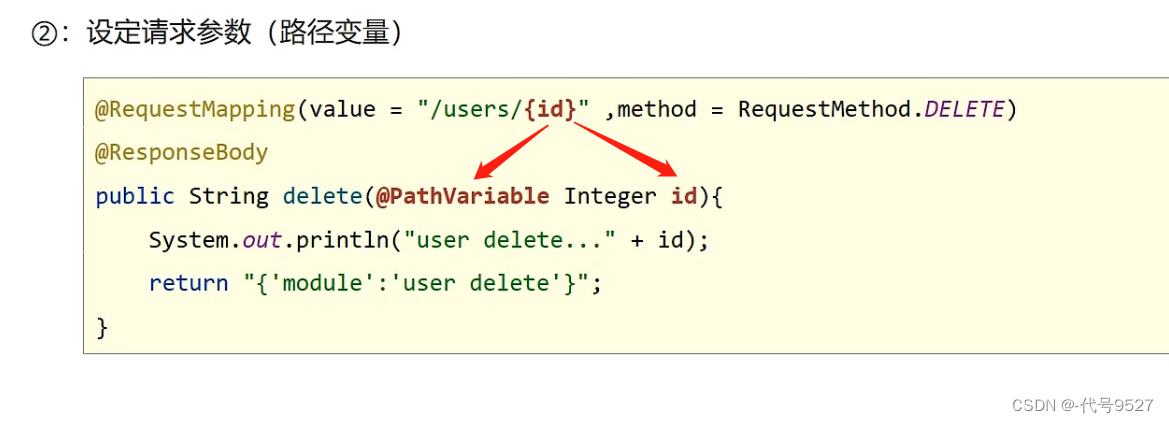
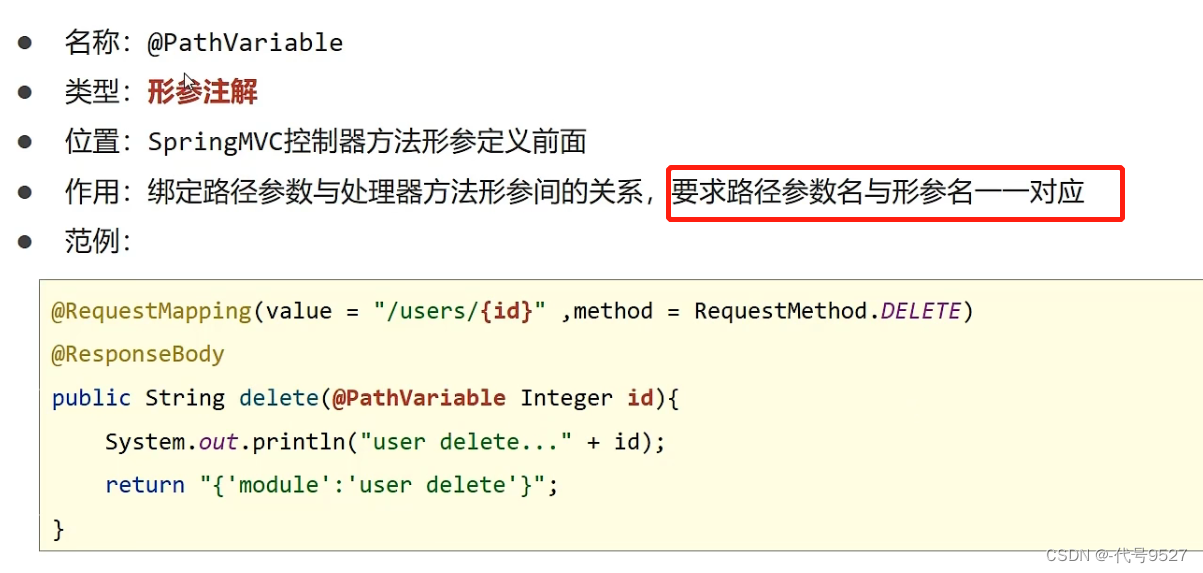
2) 设定路径变量
相关注解:

数据接收的三个注解的对比:
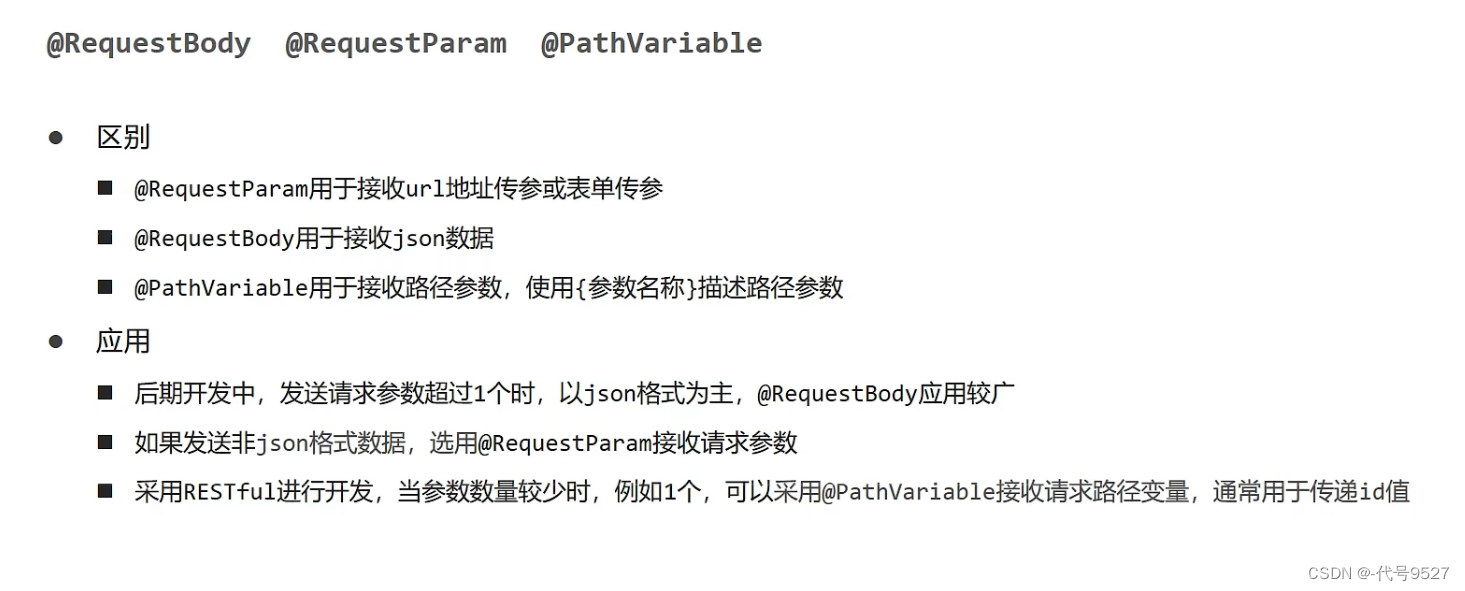
实际开发中,常封装成一个pojo,所以@RequestBody使用的最多。(pojo,即Java普通对象)
实现代码:
@Controller
//@RequestMapping("/user")
public class UserController {

    /**
     * 增
     * @return
     */
    @RequestMapping(value="/users",method = RequestMethod.POST)
    @ResponseBody
    public String save(){
        System.out.println("User save ...");
        return "{'msg':'do user save'}";
    }

    /**
     * 删
     * @param id
     * @return
     */
    @RequestMapping(value="/users/{id}",method = RequestMethod.DELETE)
    @ResponseBody
    public String delete(@PathVariable Integer id){
        System.out.println("do user delete ..." + id);
        return "{'msg':'user delete'}";
    }

    /**
     * 改
     * @param user
     * @return
     */
    @RequestMapping(value="/users",method = RequestMethod.PUT)
    @ResponseBody
    public String update(@RequestBody User user){
        System.out.println("do user update ..." + user);
        return "{'msg':'user update}";
    }

    /**
     * 查
     * @return
     */
    @RequestMapping(value="/users",method = RequestMethod.GET)
    @ResponseBody
    public String select(){
        System.out.println("do user select ...");
        return "{'msg':'use select'}";
    }

    /**
     * 根据id查询
     * @param id
     * @return
     */
    @RequestMapping(value = "/users/{id}", method = RequestMethod.GET)
    @ResponseBody
    public String getById(@PathVariable Integer id){
        System.out.println("select by id..." + id);
        return "{'msg':'use select by id'}";
    }
}
测试:

3、REST快速开发
入门案例中,有一些重复的代码可以继续优化,如每个方法中的RequestMapping中的value,还有@RequestBody
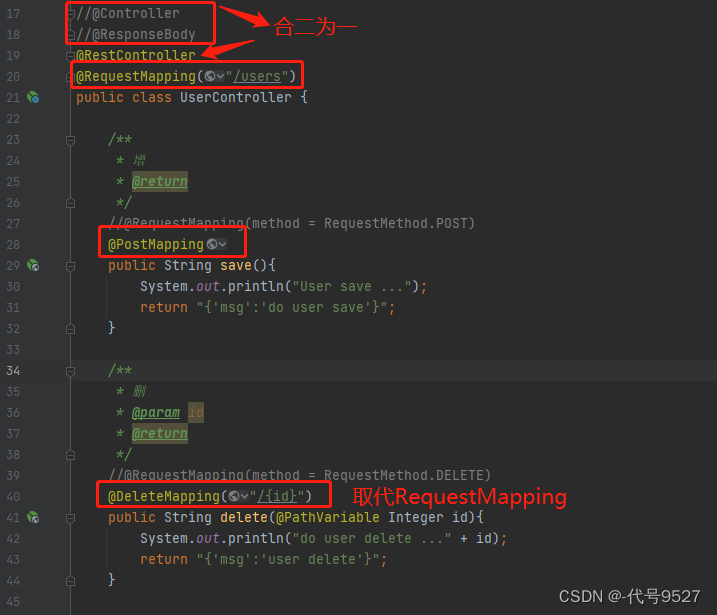
相关注解:
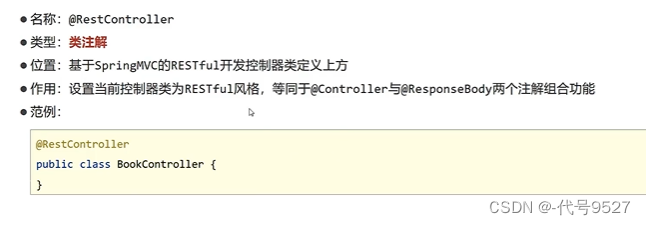
@RestController
@GetMapping
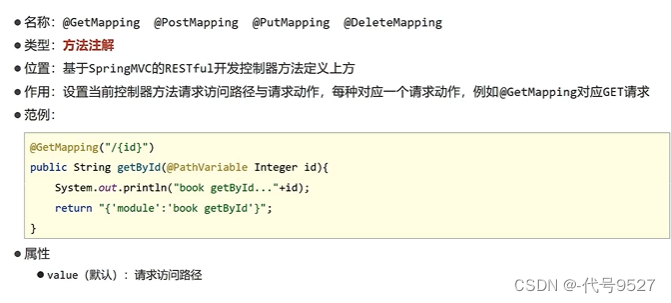
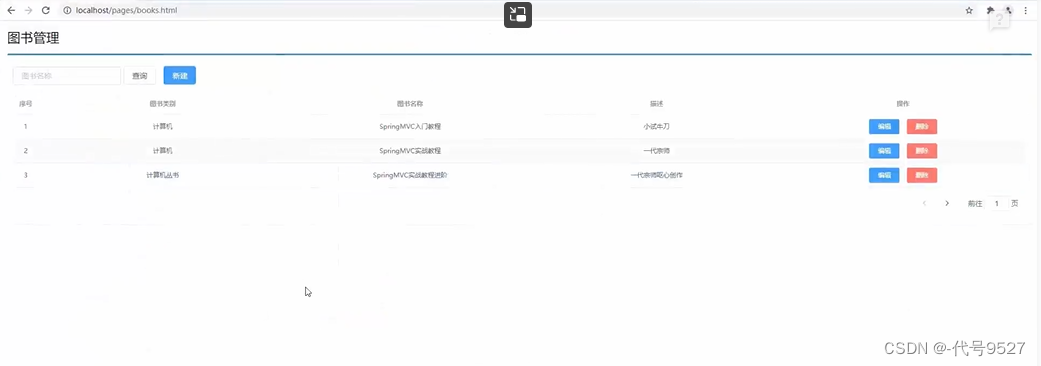
4、案例
案例–基于RESTful页面数据交互
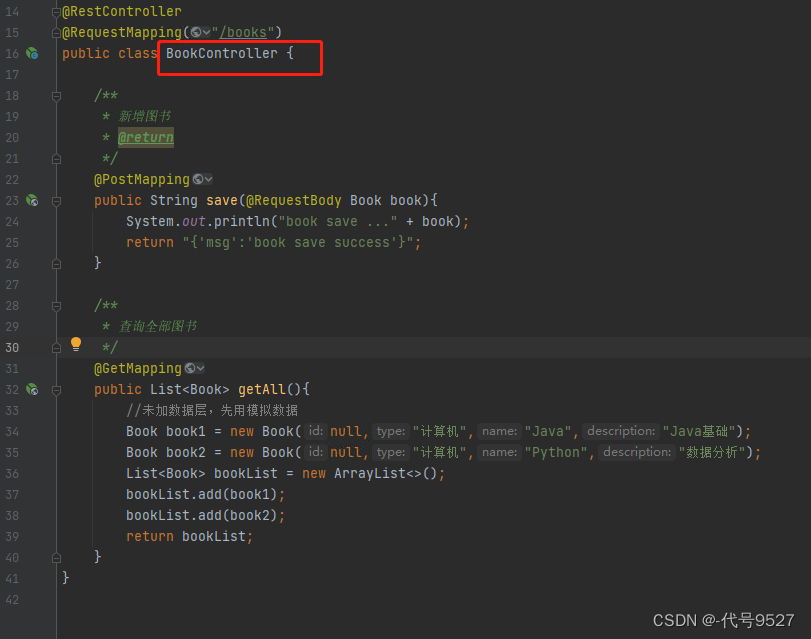
1)制作SpringMvc控制器
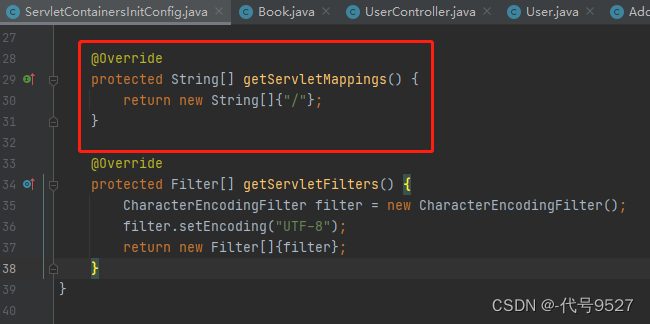
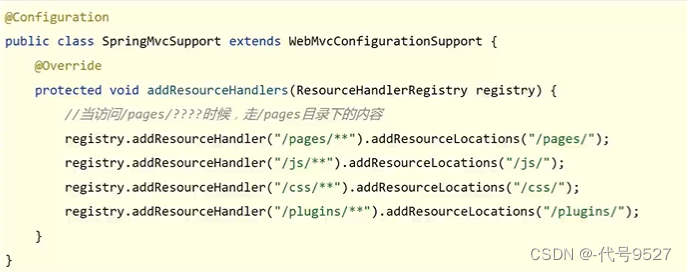
2)设置对静态资源的访问放行
当前设置的所有请求都归SpringMvc处理:
继承WebMvcConfigSupport,对静态资源做放行:
二、SSM整合
整合的思路:
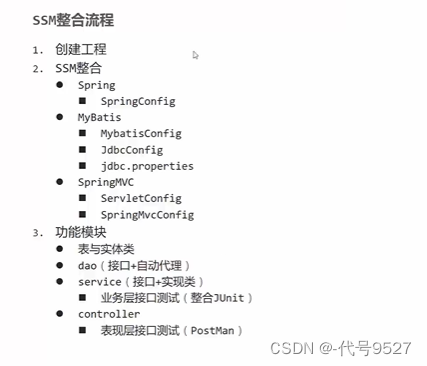
1、配置整合
- pom.xml文件中插件和依赖:
<build>
    <plugins>

      <plugin>
        <groupId>org.apache.tomcat.maven</groupId>
        <artifactId>tomcat7-maven-plugin</artifactId>
        <version>2.1</version>

        <configuration>
          <path>/</path> <!--项目访问路径。当前配置的访问是localhost:8088/, 如果配置是/aa,则访问路径为localhost:8088/aa -->
          <port>8088</port>
        </configuration>
      </plugin>

    </plugins>
  </build>

  <properties>
    <maven.compiler.source>11</maven.compiler.source>
    <maven.compiler.target>11</maven.compiler.target>
  </properties>


    <dependencies>

      <dependency>
        <groupId>org.springframework</groupId>
        <artifactId>spring-webmvc</artifactId>
        <version>5.2.9.RELEASE</version>
      </dependency>
      <!--spring操作与数据库有关的-->
    <dependency>
      <groupId>org.springframework</groupId>
      <artifactId>spring-jdbc</artifactId>
      <version>5.2.10.RELEASE</version>
    </dependency>

    <dependency>
      <groupId>org.springframework</groupId>
      <artifactId>spring-test</artifactId>
      <version>5.2.10.RELEASE</version>
    </dependency>

    <!-- MyBatis核心依赖包 -->
    <dependency>
      <groupId>org.mybatis</groupId>
      <artifactId>mybatis</artifactId>
      <version>3.5.9</version>
    </dependency>

    <!--spring整合mybatis-->
    <dependency>
      <groupId>org.mybatis</groupId>
      <artifactId>mybatis-spring</artifactId>
      <version>1.3.0</version>
    </dependency>

    <!-- MySQL驱动 -->
    <dependency>
      <groupId>mysql</groupId>
      <artifactId>mysql-connector-java</artifactId>
      <version>5.1.47</version>
    </dependency>

    <dependency>
      <groupId>com.alibaba</groupId>
      <artifactId>druid</artifactId>
      <version>1.1.16</version>
    </dependency>
    <dependency>
      <groupId>junit</groupId>
      <artifactId>junit</artifactId>
      <version>4.12</version>
      <scope>test</scope>
    </dependency>
    <dependency>
      <groupId>javax.servlet</groupId>
      <artifactId>javax.servlet-api</artifactId>
      <version>3.1.0</version>
      <scope>provided</scope>
    </dependency>

    <dependency>
      <groupId>com.fasterxml.jackson.core</groupId>
      <artifactId>jackson-databind</artifactId>
      <version>2.9.0</version>
    </dependency>

  </dependencies>
-
新建项目:
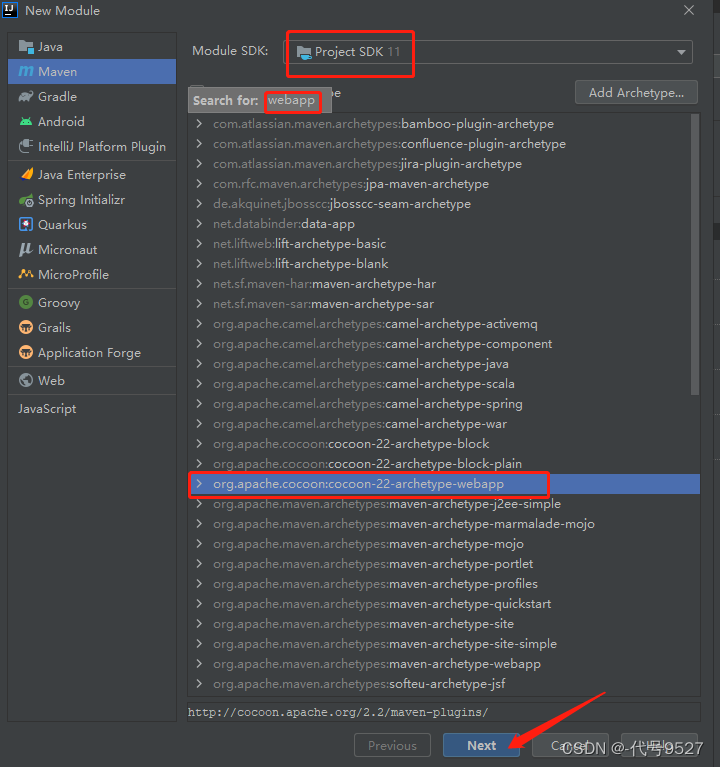


-
Spring配置
@Configuration
@ComponentScan({"com.llg.service","com.llg.config"})
@PropertySource("classpath:jdbc.properties")
@EnableTransactionManagement
@Import({JdbcConfig.class,MyBatisConfig.class})
public class SpringConfig {
}
- SpringMvc配置
@Configuration
@ComponentScan({"com.llg.controller","com.llg.config"})
@EnableWebMvc
public class SpringMvcConfig {
}
- Jdbc数据源和Mybatis配置
public class JdbcConfig {
    @Value("${jdbc.driver}")
    private String driver;
    @Value("${jdbc.url}")
    private String url;
    @Value("${jdbc.username}")
    private String username;
    @Value("${jdbc.password}")
    private String password;

    @Bean
    public DataSource dataSource(){
        DruidDataSource dataSource = new DruidDataSource();
        dataSource.setDriverClassName(driver);
        dataSource.setUrl(url);
        dataSource.setUsername(username);
        dataSource.setPassword(password);
        return dataSource;
    }

    //开启事务管理
    @Bean
    public PlatformTransactionManager transactionManager(DataSource dataSource){
        DataSourceTransactionManager ds = new DataSourceTransactionManager();
        ds.setDataSource(dataSource);
        return ds;
    }
}
public class MyBatisConfig {

    @Bean
    public SqlSessionFactoryBean sqlSessionFactory(DataSource dataSource){
        SqlSessionFactoryBean sqlSessionFactoryBean = new SqlSessionFactoryBean();
        sqlSessionFactoryBean.setDataSource(dataSource);
        sqlSessionFactoryBean.setTypeAliasesPackage("com.llg.domain");
        return sqlSessionFactoryBean;
    }

    @Bean
    public MapperScannerConfigurer mapperScannerConfigurer(){
        MapperScannerConfigurer mapperScannerConfigurer = new MapperScannerConfigurer();
        mapperScannerConfigurer.setBasePackage("com.llg.dao");
        return mapperScannerConfigurer;
    }
}
- 初始化Servlet容器,加载SpringMVC环境,ServletConfig配置
public class ServletConfig extends AbstractAnnotationConfigDispatcherServletInitializer {

    protected Class<?>[] getRootConfigClasses() {
        return new Class[]{SpringConfig.class};
    }

    protected Class<?>[] getServletConfigClasses() {
        return new Class[]{SpringMvcConfig.class};
    }

    protected String[] getServletMappings() {
        return new String[]{"/"};
    }

}
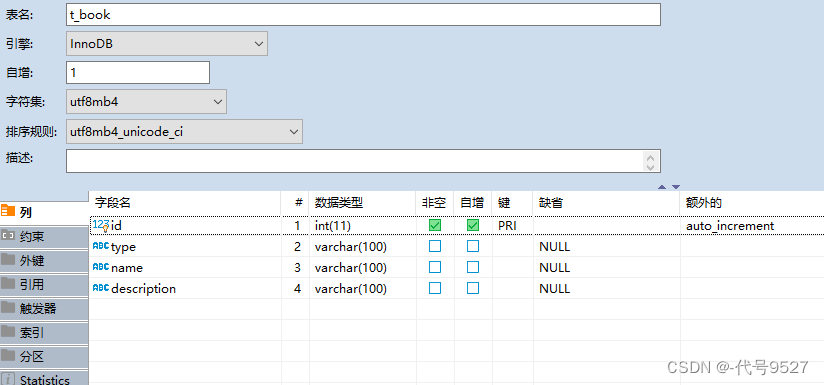
2、功能模块开发
- 表与实体类
//实体类
package com.llg.domain;

public class Book {

    private Integer id;

    private String type;

    private String name;

    private String description;

    public Integer getId() {
        return id;
    }

    public void setId(Integer id) {
        this.id = id;
    }

    public String getType() {
        return type;
    }

    public void setType(String type) {
        this.type = type;
    }

    public String getName() {
        return name;
    }

    public void setName(String name) {
        this.name = name;
    }

    public String getDescription() {
        return description;
    }

    public void setDescription(String description) {
        this.description = description;
    }

    public Book() {
    }

    public Book(Integer id, String type, String name, String description) {
        this.id = id;
        this.type = type;
        this.name = name;
        this.description = description;
    }

    @Override
    public String toString() {
        return "Book{" +
                "id=" + id +
                ", type='" + type + '\'' +
                ", name='" + name + '\'' +
                ", description='" + description + '\'' +
                '}';
    }
}
- dao(接口+自动代理)
数据层dao不用实现类,mybatis自动代理创建对象
package com.llg.dao;

public interface BookDao {
    @Insert("insert into t_book values(null, #{type}, #{name}, #{description})")
    //@Insert("insert into t_book (type,name,description) values(#{type},#{name},#{description})")
    public int save(Book book);

    @Update("update t_book set type = #{type}, name = #{name}, description = #{description} where id = #{id}")
    public int update(Book book);

    @Delete("delete from t_book where id = #{id}")
    public int delete(Integer id);

    @Select("select * from t_book where id = #{id}")
    public Book getById(Integer id);

    @Select("select * from t_book")
    public List<Book> getAllBook();
}
- service(接口+实现类)
package com.llg.service;

@Transactional
public interface BookService {

    /**
     * 新增书籍信息
     * @param book
     * @return
     */
    public boolean saveBook(Book book);

    /**
     * 删除书籍信息
     * @param id
     * @return
     */
    public boolean deleteBook(Integer id);

    /**
     * 更新书籍信息
     * @param book
     * @return
     */
    public boolean updateBook(Book book);

    /**
     * 按照id查询书籍
     * @param id
     * @return
     */
    public Book getBookById(Integer id);

    /**
     * 查询所有书籍信息
     * @return
     */
    public List<Book> getAllBook();
}
package com.llg.service.impl;

@Service
public class BookServiceImpl implements BookService {

    @Autowired
    private BookDao bookDao;

    public boolean saveBook(Book book) {
        return bookDao.save(book) > 0;

    }

    public boolean deleteBook(Integer id) {
        return bookDao.delete(id) > 0;
    }

    public boolean updateBook(Book book) {
        return bookDao.update(book) > 0;

    }

    public Book getBookById(Integer id) {
        if(id == 1){
            throw new BusinessException(Code.BUSINESS_ERR,"执行参数校验时,参数格式不合规");
        }
        return bookDao.getById(id);
    }

    public List<Book> getAllBook() {
        return bookDao.getAllBook();

    }
}
- controller
package com.llg.controller;

@RestController
@RequestMapping("/books")
public class BookController {
    @Autowired
    private BookService bookService;

    @PostMapping
    public boolean saveBook(@RequestBody Book book){
        return bookService.saveBook(book);
    }

    @DeleteMapping("/{id}")
    public boolean deleteBook(@PathVariable Integer id) {
        return bookService.deleteBook(id);
    }

    @PutMapping
    public boolean updateBook(@RequestBody Book book) {
        return bookService.updateBook(book);
    }

    @GetMapping("/{id}")
    public Book getBookById(@PathVariable Integer id) {
        return bookService.getBookById(id);
    }

    @GetMapping
    public List<Book> getAllBook() {
        return bookService.getAllBook();

    }

}
3、接口测试
业务层(service)写完以后,使用junit做测试,表现层(controller)写完以后,用postman做接口测试
- junit测试业务层方法
@RunWith(SpringJUnit4ClassRunner.class)
@ContextConfiguration(classes = SpringConfig.class)
public class BookServiceTest {

    @Autowired
    private BookService bookService;

    @Test
    public void testGetById(){
        Book book = bookService.getBookById(1);
        System.out.println(book);
    }

    @Test
    public void testGetAll(){
        List<Book> bookList = bookService.getAllBook();
        System.out.println(bookList);
    }
}

- postman测试表现层接口

4、表现层与前端数据传输协议定义
当前,后端接口返回的数据格式不一致,前后端对接繁琐:
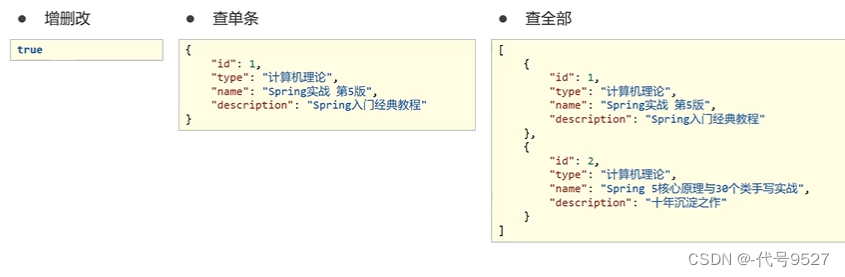
前端接收数据格式:
- 创建结果模型类,封装数据到data属性中
- 使用code区分是增删改查的哪种操作,成功或失败
- 封装特殊消息到message(即msg),告诉用户信息
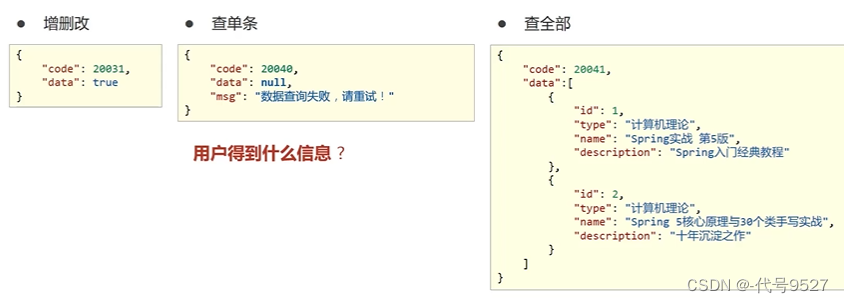
设置统一数据返回结果类:
代码实现:
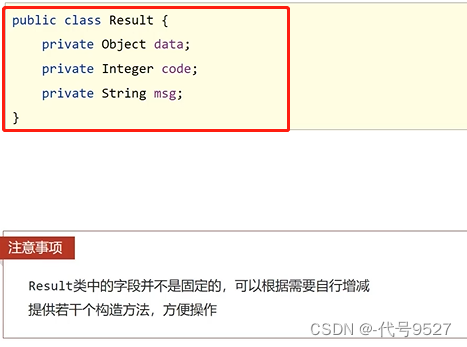
- 设置统一返回的数据结果类,其属性可以根据前端要求适当增减
package com.llg.controller;


public class Result {

    private Object data;

    private Integer code;

    private String msg;

    public Result() {
    }

    public Result(Integer code,Object data,  String msg) {
        this.data = data;
        this.code = code;
        this.msg = msg;
    }

    public Result(Integer code,Object data) {
        this.data = data;
        this.code = code;
    }

    public Result(Integer code, String msg) {
        this.code = code;
        this.msg = msg;
    }

    public Object getData() {
        return data;
    }

    public void setData(Object data) {
        this.data = data;
    }

    public Integer getCode() {
        return code;
    }

    public void setCode(Integer code) {
        this.code = code;
    }

    public String getMsg() {
        return msg;
    }

    public void setMsg(String msg) {
        this.msg = msg;
    }
}
- 定义返回结果编码,code类,自行定制
package com.llg.controller;


public class Code {
    public static final Integer SAVE_OK = 20011;
    public static final Integer DELETE_OK = 20012;
    public static final Integer UPDATE_OK = 20013;
    public static final Integer GET_OK = 20014;

    public static final Integer SAVE_ERR = 20010;
    public static final Integer DELETE_ERR = 20010;
    public static final Integer UPDATE_ERR = 20010;
    public static final Integer GET_ERR = 20010;

    public static final Integer SYSTEM_ERR = 50001;
    public static final Integer SYSTEM_ERR_TIMEOUT = 50003;
    public static final Integer SYSTEM_UNKNOW_ERR = 50003;
    public static final Integer BUSINESS_ERR = 50002;

}
- 根据情况设定合理的Result并返回
package com.llg.controller;

@RestController
@RequestMapping("/books")
public class BookController {
    @Autowired
    private BookService bookService;

    @PostMapping
    public Result saveBook(@RequestBody Book book){
        boolean flag = bookService.saveBook(book);
        return new Result(flag ? Code.SAVE_OK:Code.SAVE_ERR,flag);
    }

    @DeleteMapping("/{id}")
    public Result deleteBook(@PathVariable Integer id) {
        boolean flag = bookService.deleteBook(id);
        return new Result(flag ? Code.DELETE_OK:Code.DELETE_ERR,flag);
    }

    @PutMapping
    public Result updateBook(@RequestBody Book book) {
        boolean flag = bookService.updateBook(book);
        return new Result(flag ? Code.UPDATE_OK:Code.UPDATE_ERR,flag);
    }

    @GetMapping("/{id}")
    public Result getBookById(@PathVariable Integer id) {
        Book book = bookService.getBookById(id);
        Integer code = book != null ? Code.GET_OK : Code.GET_ERR;
        String msg = book != null ? "查询成功" : "数据查询失败,请重试...";
        return new Result(code,book,msg);
    }

    @GetMapping
    public Result getAllBook() {
        List<Book> bookList = bookService.getAllBook();
        Integer code = bookList != null ? Code.GET_OK : Code.GET_ERR;
        String msg = bookList != null ? "查询成功" : "数据查询失败,请重试...";
        return new Result(code,bookList,msg);

    }

}
到此,剩下的交给前端自己拿,自己解析
5、异常处理器
5.1 初识处理器
接口调用过程中,异常难以避免:
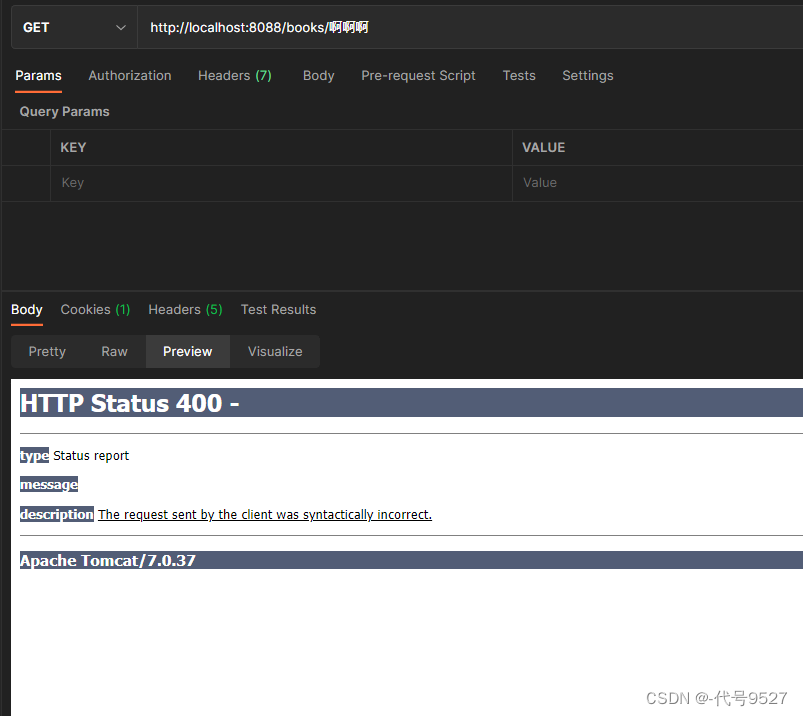
出现异常现场的常见位置与常见诱因如下:
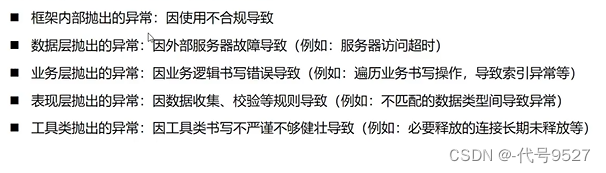
让所有的异常均抛出,直到表现层再进行处理。
声明异常处理器,集中、统一处理项目中出现的异常:
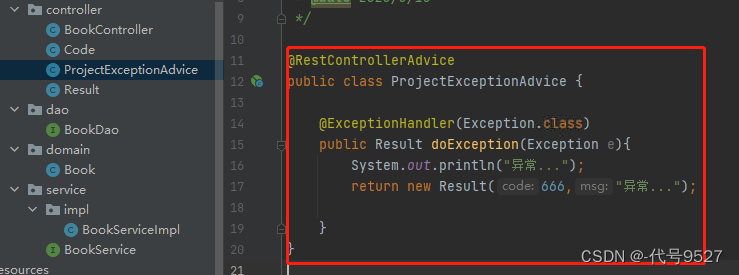
相关注解–@RestControllerAdvice

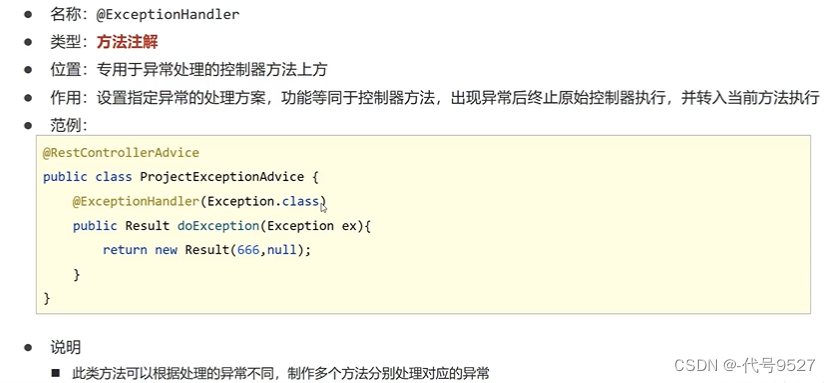
相关注解–@ExceptionHandler
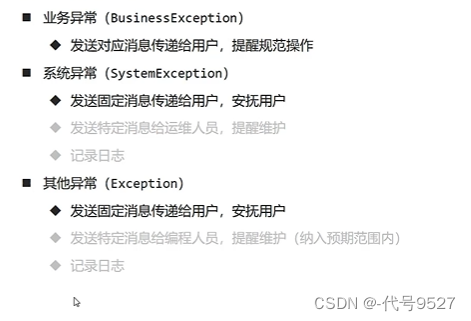
5.2 项目异常处理方案

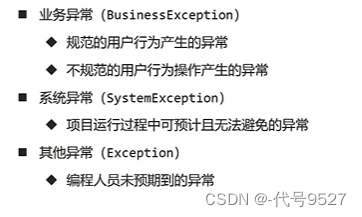
项目异常分类:
项目异常处理方案:
项目异常处理代码实现:
- 自定义项目系统级异常
package com.llg.exception;

/**
 * 继承运行时异常,这种异常,出现以后可以不处理,自动向上抛,以后不用throws
 * @author LLg
 * @date 2023/3/15
 */
public class SystemException extends RuntimeException{

    private Integer code;

    public SystemException(Integer code, String message, Throwable cause) {
        super(message, cause);
        this.code = code;
    }

    public SystemException(Integer code, String message) {
        super(message);
        this.code = code;
    }

    public Integer getCode() {
        return code;
    }

    public void setCode(Integer code) {
        this.code = code;
    }
}
//写法一样,改个名字

package com.llg.exception;

public class BusinessException extends RuntimeException{

    private Integer code;

    public BusinessException(Integer code, String message, Throwable cause) {
        super(message, cause);
        this.code = code;
    }

    public BusinessException(Integer code, String message) {
        super(message);
        this.code = code;
    }

    public Integer getCode() {
        return code;
    }

    public void setCode(Integer code) {
        this.code = code;
    }
}
- 自定义异常码
package com.llg.controller;

public class Code {
    public static final Integer SAVE_OK = 20011;
    public static final Integer DELETE_OK = 20012;
    public static final Integer UPDATE_OK = 20013;
    public static final Integer GET_OK = 20014;

    public static final Integer SAVE_ERR = 20010;
    public static final Integer DELETE_ERR = 20010;
    public static final Integer UPDATE_ERR = 20010;
    public static final Integer GET_ERR = 20010;

    public static final Integer SYSTEM_ERR = 50001;
    public static final Integer SYSTEM_ERR_TIMEOUT = 50003;
    public static final Integer SYSTEM_UNKNOW_ERR = 50003;
    public static final Integer BUSINESS_ERR = 50002;

}
- 包装、触发自定义异常
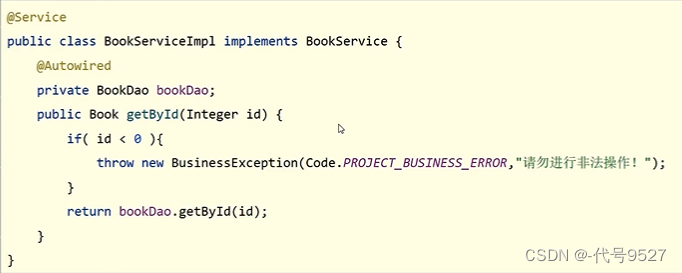
不管是业务层的异常,还是系统的异常,都封装成了我们定义的两种异常,然后到异常处理器类中进行分门别类的处理,返回统一的result
package com.llg.service.impl;

@Service
public class BookServiceImpl implements BookService {

    @Autowired
    private BookDao bookDao;


    public Book getBookById(Integer id) {
        if(id == 1){
            throw new BusinessException(Code.BUSINESS_ERR,"执行参数校验时,参数格式不合规");
        }
        //将可能出现的异常进行包装,转换成自定义异常
        /*try{
            int i = 1/0;
        }catch(Exception e){
            throw new SystemException(Code.SYSTEM_ERR_TIMEOUT,"服务器访问超时,请稍后重试",e);
        }*/
        return bookDao.getById(id);
    }


}
- 处理器拦截并处理异常
在这里插入代码片package com.llg.controller;

@RestControllerAdvice
public class ProjectExceptionAdvice {

    /**
     * 拦截处理系统异常
     * @param e
     * @return
     */
    @ExceptionHandler(SystemException.class)
    public Result doSystemException(SystemException e){
        //记录日志
        //发送消息给运维和开发人员
        return new Result(e.getCode(),null,e.getMessage());
    }

    /**
     * 业务异常
     * @param e
     * @return
     */

    @ExceptionHandler(BusinessException.class)
    public Result doBusinessException(BusinessException e){
        return new Result(e.getCode(),null,e.getMessage());
    }

    @ExceptionHandler(Exception.class)
    public Result doException(Exception e){
        //记录日志
        //发送消息给运维和开发人员
        return new Result(Code.SYSTEM_UNKNOW_ERR,null,"系统繁忙..");
    }
}
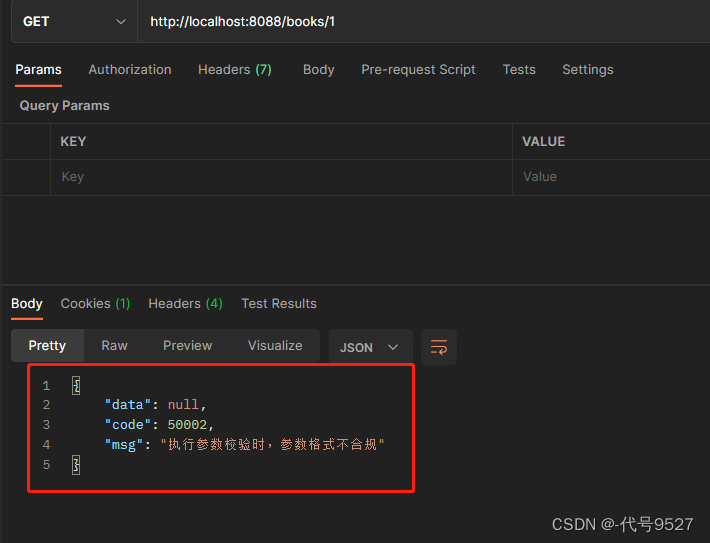
效果测试:
三、拦截器
1、初识拦截器
在不同请求路径,访问到不同controller的不同方法前,增加拦截:
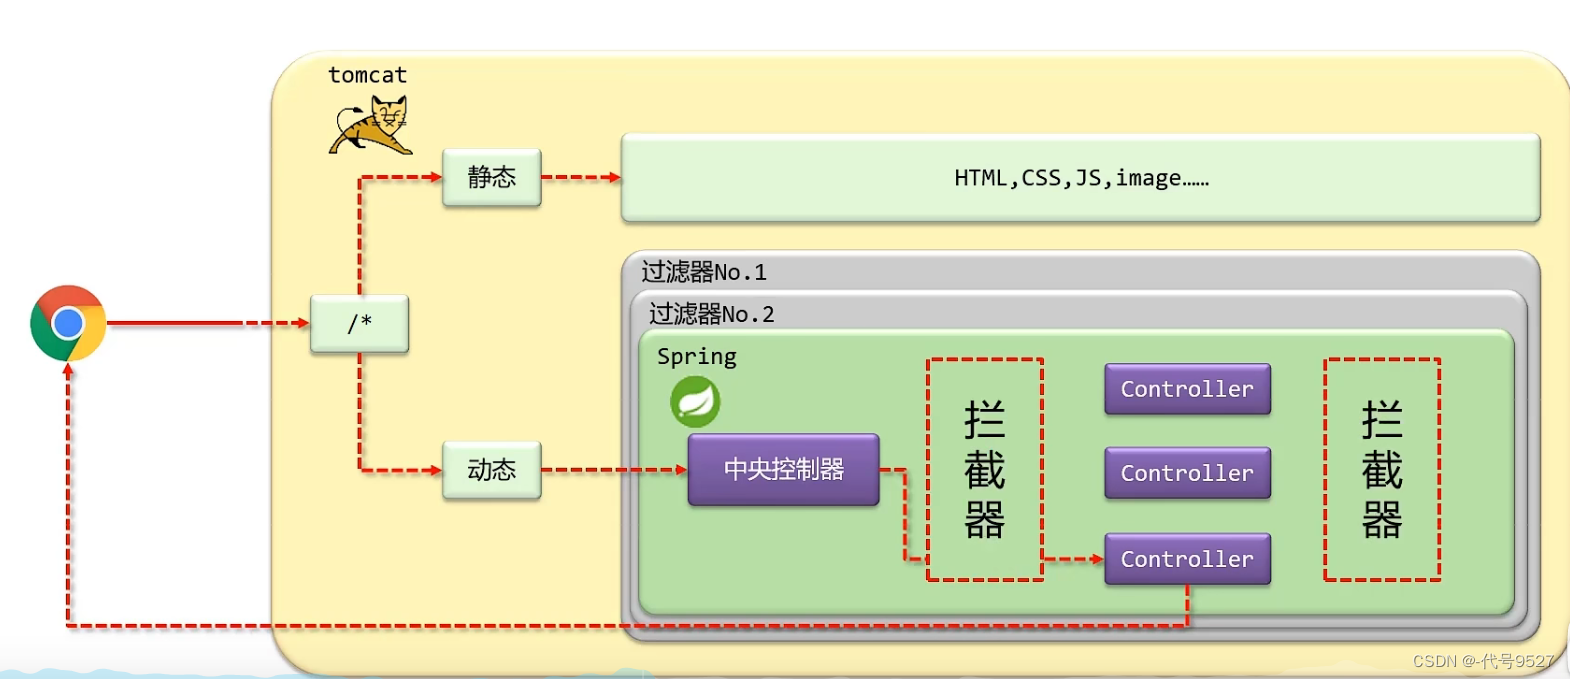
拦截器(Intercptor)是一种动态拦截方法调用的机制,在SpringMVC中动态拦截控制器方法的执行
作用:
- 在指定的方法调用前后执行预设定的代码
- 阻止原始方法执行
类比于进入机房前,层层保安要求你带眼镜、带鞋套、穿防护服:
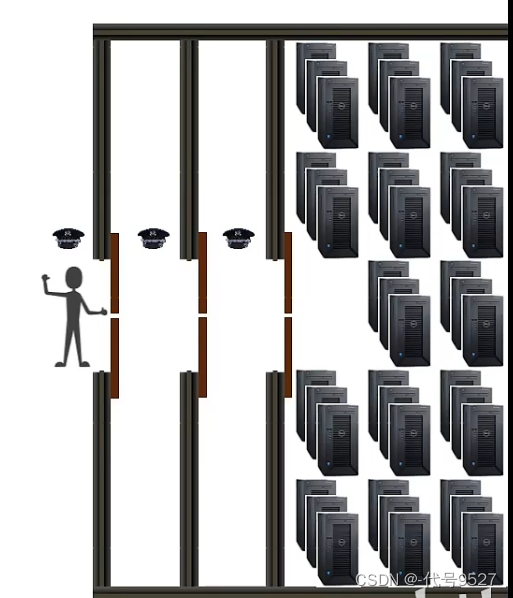
层层拦截:

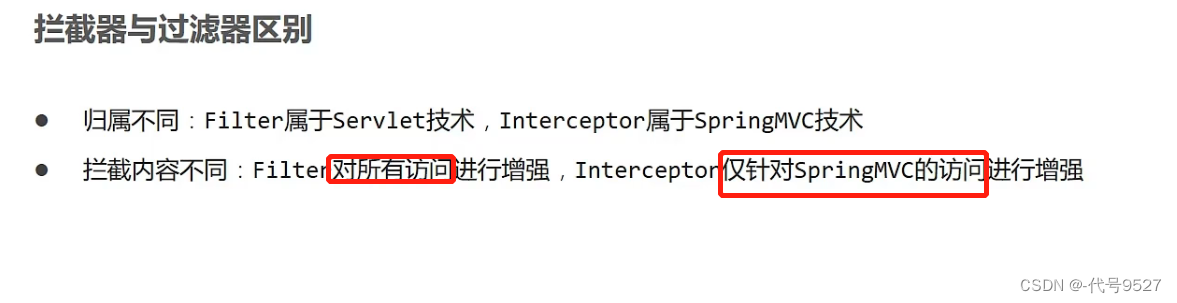
关于拦截器和过滤器:
2、入门案例
- 第一步:制作拦截器的功能类,实现HandlerInterseptor接口,声明拦截器的bean,这个类写在controller,一则是表现层,二则是不用在SpringMvcConfig中再单独写加载的配置了
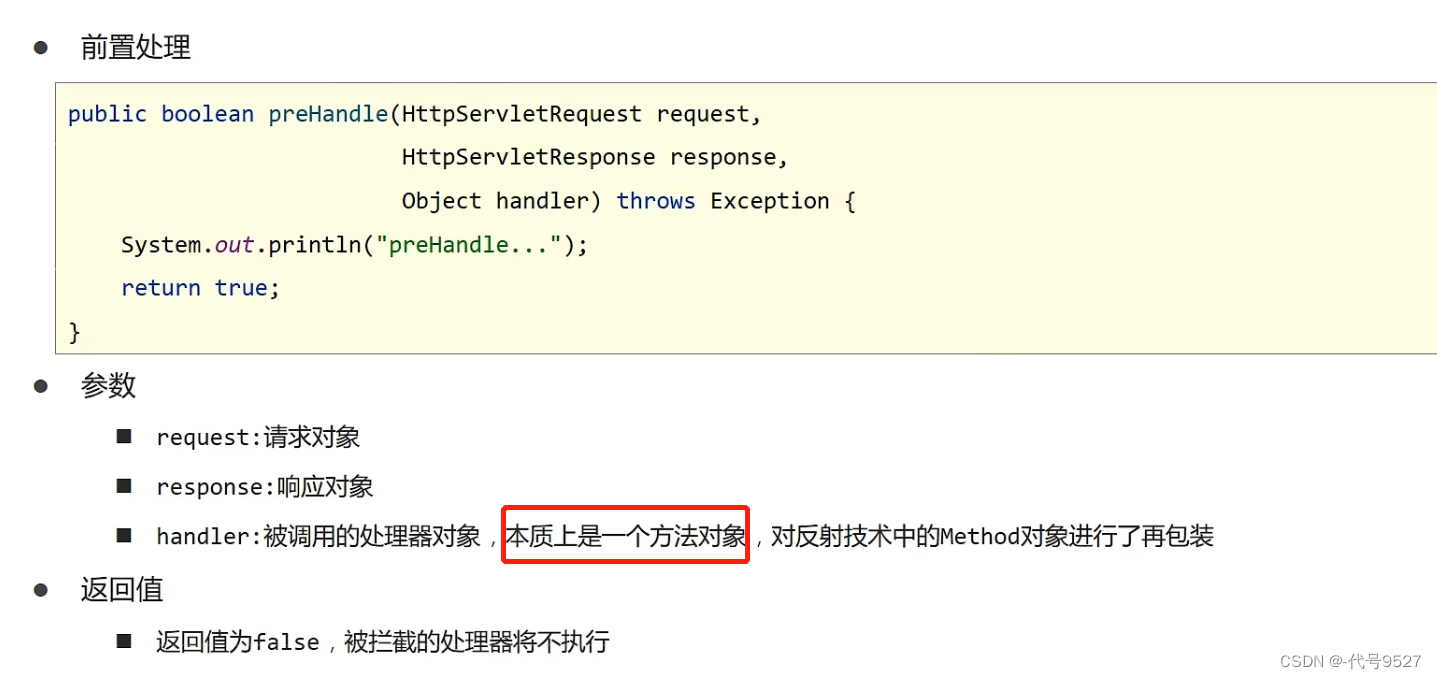
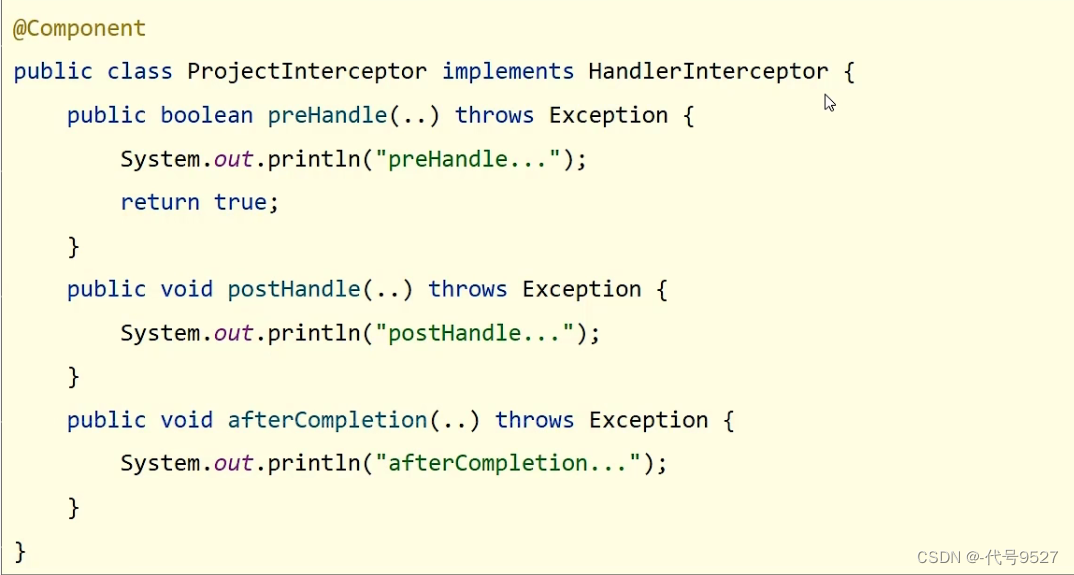 preHandle方法妙在:可以校验一个条件是否满足,满足则返回true,继续执行,不满足则返回false,跳过原始操作。

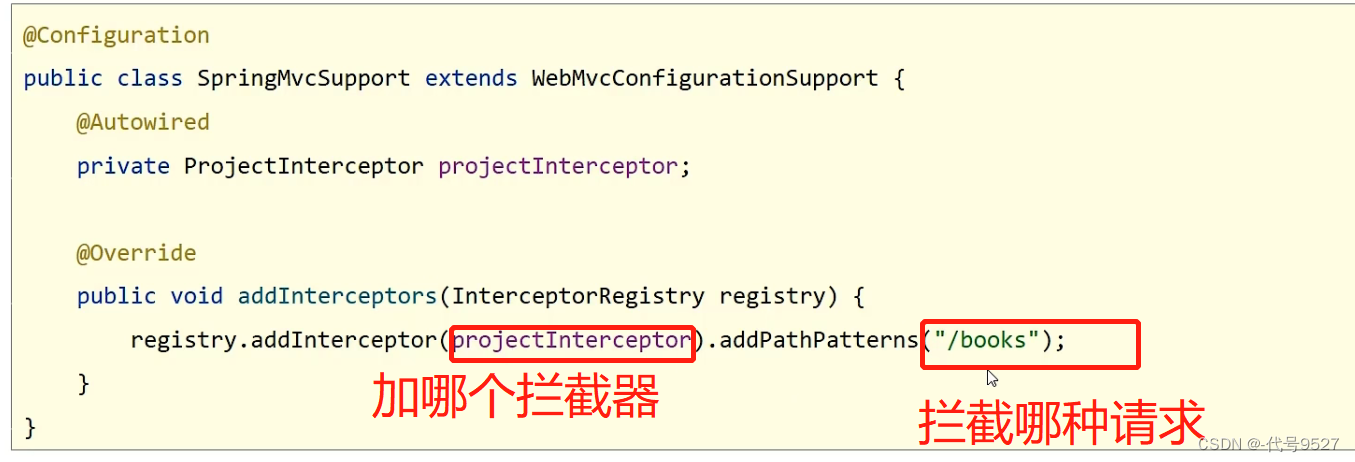
- 第二步:定义配置类,继承WebMvcConfigurationSupport,覆盖addInterceptors方法

- 第三步:添加拦截器,并设定拦截的访问路径,路径的传参是可变长参数,可设置多个
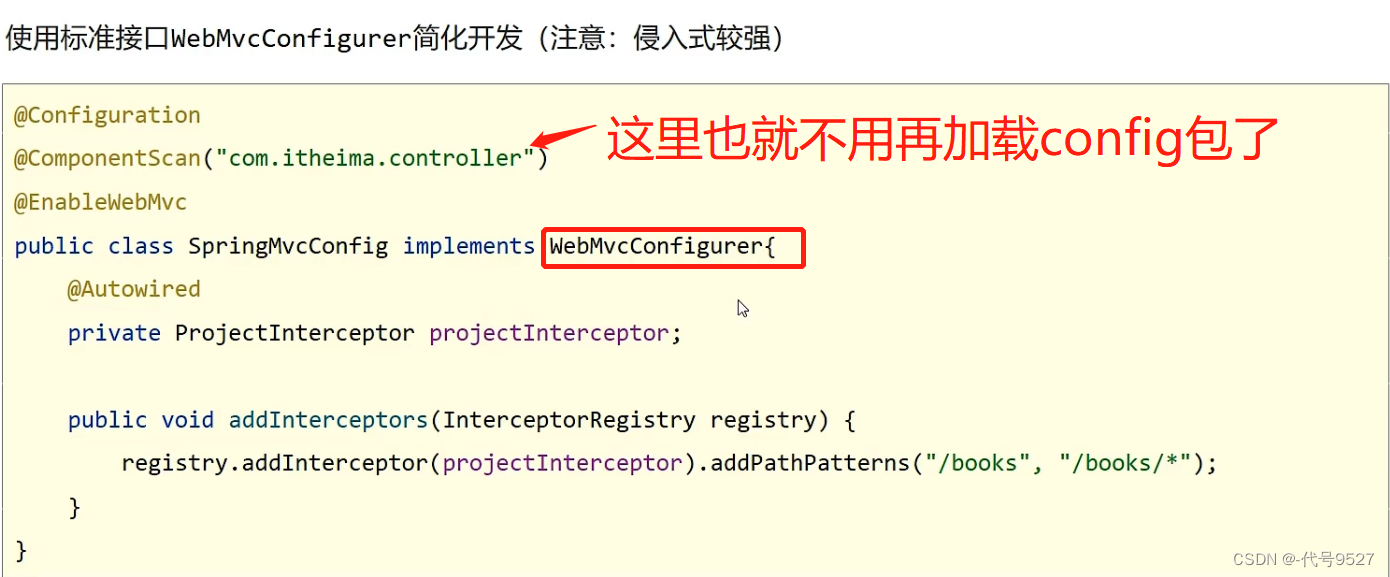
结构优化:
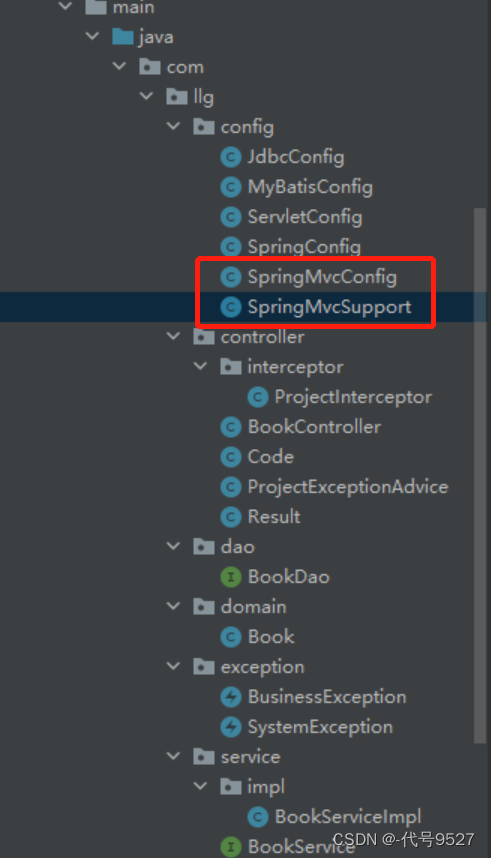
单独写个SpringMvcSupport类,再在SpringMvcConfig中扫描config包来加载,很繁琐,可以直接在SpringMvcConfig类中,实现WebMvcConfig接口:
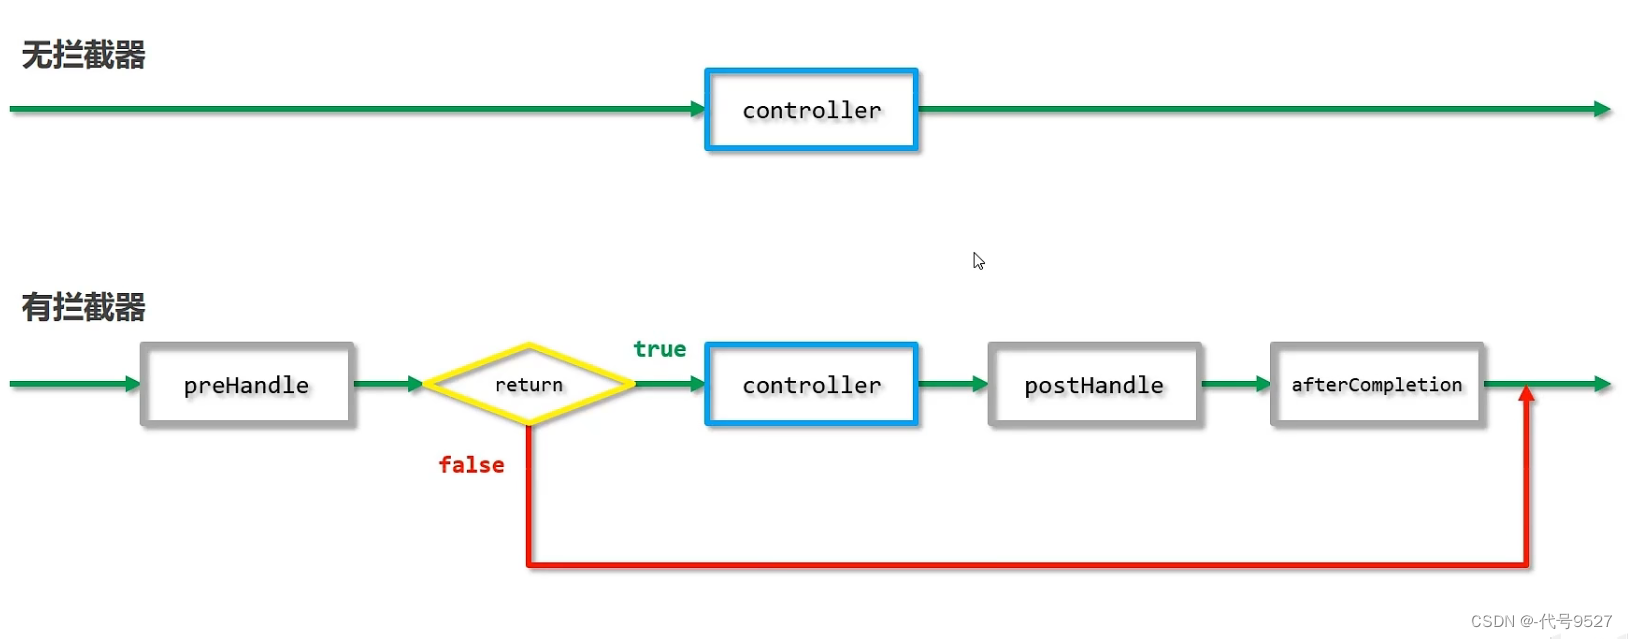
拦截器整体流程:
3、拦截器的参数
-
前置方法
-
后置方法:
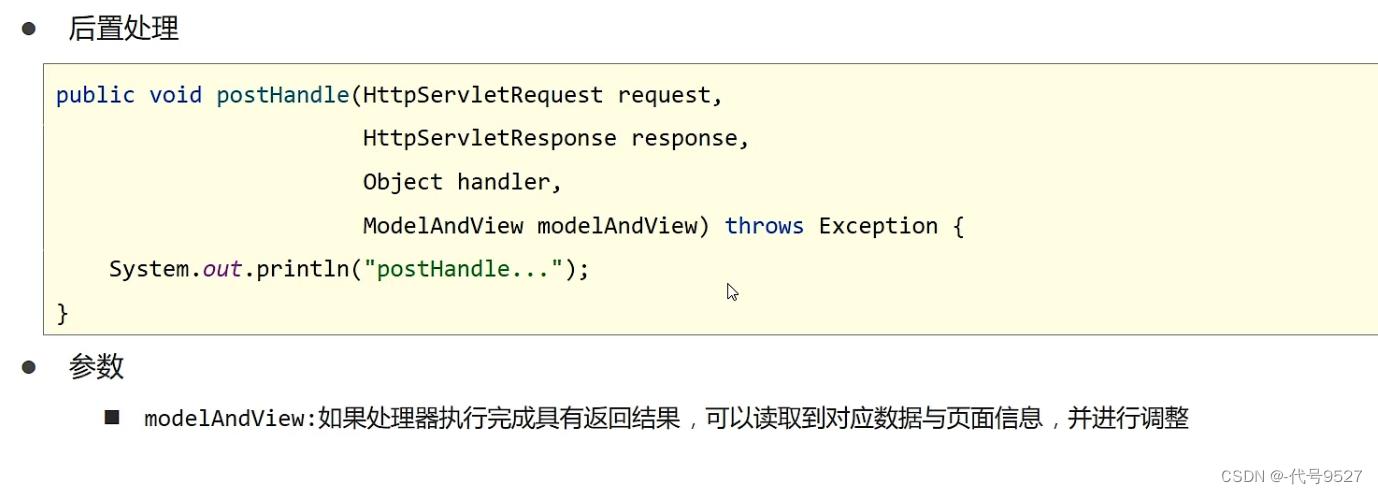
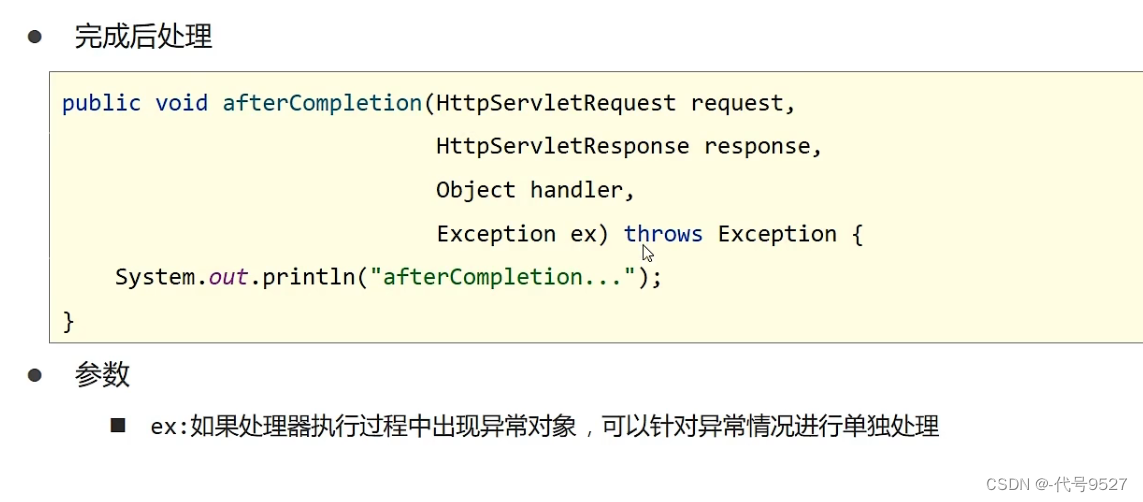
-
完成后处理方法:
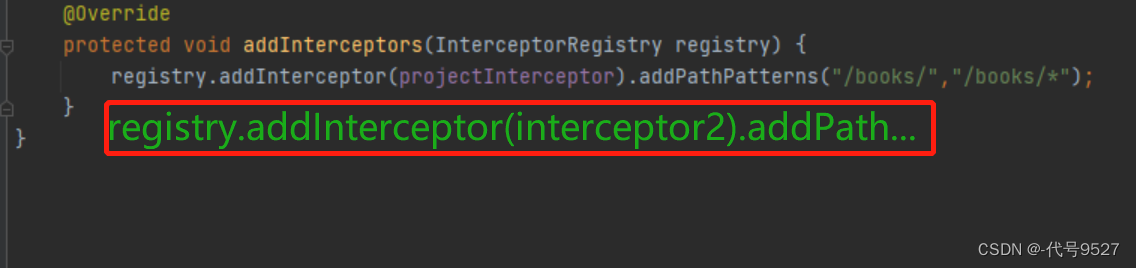
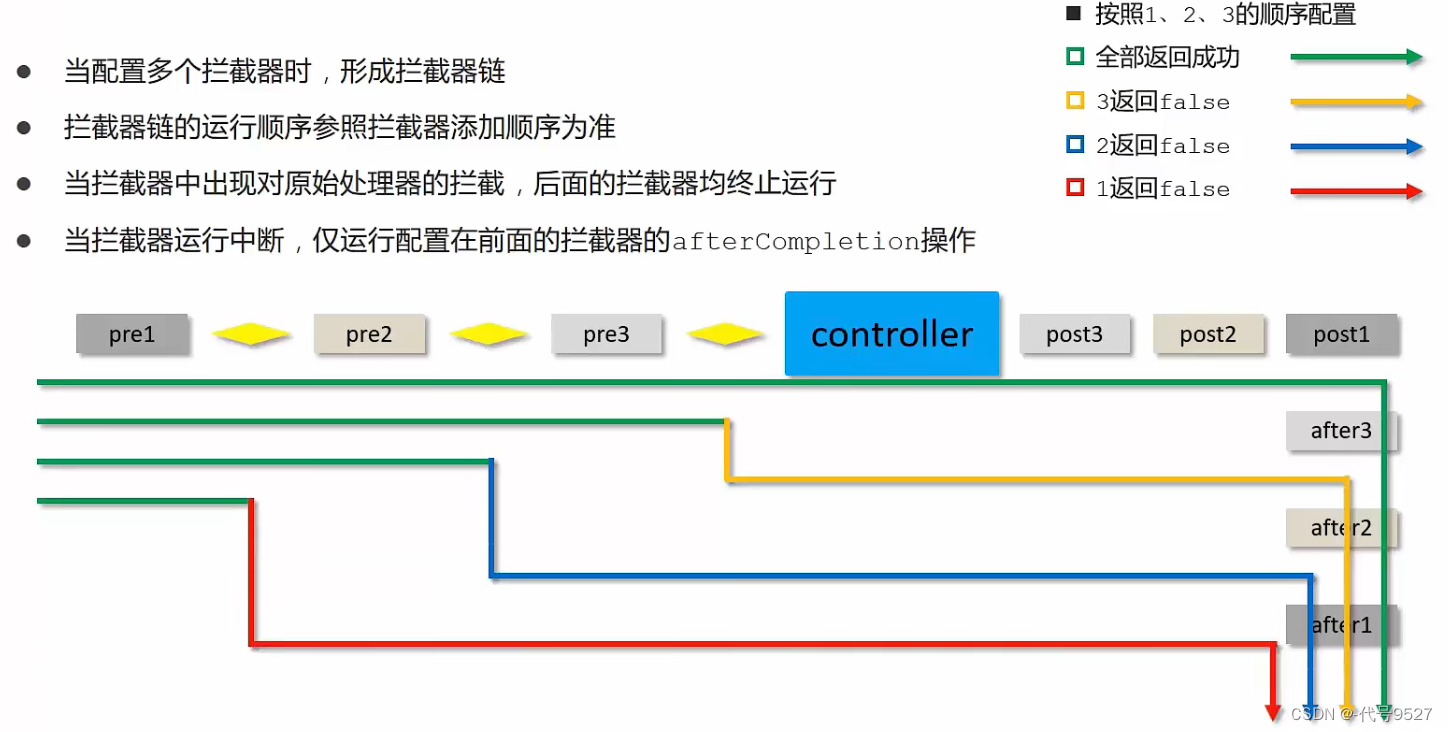
4、拦截器链配置
当配置多个拦截器的时候,形成拦截器链。拦截器的运行顺序参照拦截器的添加顺序:
且,对于每个拦截器中的三个方法的顺序:
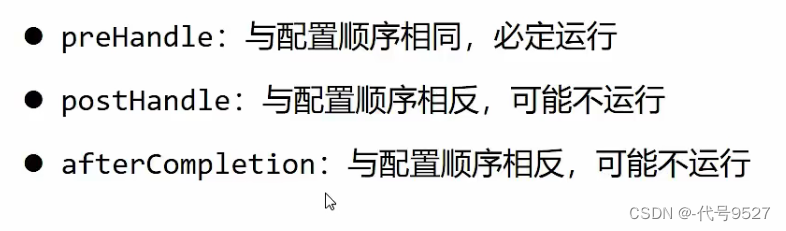
preHandle方法return true的时候,一切就是上面的顺序。有一个return false,则所有的postHandle一概不执行,并且从出现位置开始,后面的preHandle也不再运行,afterCompletion,在这个return false之前的都要运行。
假设有个三个拦截器组成的拦截器链:
版权声明:本文内容由互联网用户自发贡献,该文观点仅代表作者本人。本站仅提供信息存储空间服务,不拥有所有权,不承担相关法律责任。如发现本站有涉嫌侵权/违法违规的内容, 请发送邮件至 举报,一经查实,本站将立刻删除。
文章由极客之音整理,本文链接:https://www.bmabk.com/index.php/post/146078.html

