
文章目录
一、HelloWorld程序
controller
@Controller
public class HelloController {
    @RequestMapping("/")
    public String index(){
        return "index";
    }
    @RequestMapping("/target")
    public String target(){
        return "target";
    }
}
web.xml
<?xml version="1.0" encoding="UTF-8"?>
<web-app xmlns="http://xmlns.jcp.org/xml/ns/javaee"
xmlns:xsi="http://www.w3.org/2001/XMLSchema-instance"
xsi:schemaLocation="http://xmlns.jcp.org/xml/ns/javaee http://xmlns.jcp.org/xml/ns/javaee/web-app_4_0.xsd"
version="4.0">
<!--
默认方法
springmvc的配置文件位于WEB-INF下,默认名称为<servlet-name>-servlet.xml
例如,以下配置对应配置文件位于WEB-INF下,文件名为springMVC-servlet.xml
-->
<!--配置springmvc前端控制器,对浏览器发送的请求统一进行处理-->
<!-- <servlet>
<servlet-name>springMVC</servlet-name>
<servlet-class>org.springframework.web.servlet.DispatcherServlet</servlet-class>
</servlet>
<servlet-mapping>
<servlet-name>springMVC</servlet-name>
<!–
/ 表示拦截所有请求,除了.jsp(jsp属于servlet程序,有专门解析器处理)
/* 表示所有请求,包括.jsp
–>
<url-pattern>/</url-pattern>
</servlet-mapping>-->
<!--配置springmvc前端控制器,对浏览器发送的请求统一进行处理-->
<servlet>
<servlet-name>springMVC</servlet-name>
<servlet-class>org.springframework.web.servlet.DispatcherServlet</servlet-class>
<!--配置spingmvc.xml配置文件的位置和名称-->
<init-param>
<param-name>contextConfigLocation</param-name>
<param-value>classpath:springmvc.xml</param-value>
</init-param>
<!--将前端控制器初始化提前到服务器启动时-->
<load-on-startup>1</load-on-startup>
</servlet>
<servlet-mapping>
<servlet-name>springMVC</servlet-name>
<!--
/ 表示拦截所有请求,除了.jsp(jsp属于servlet程序,有专门解析器处理)
/* 表示所有请求,包括.jsp
-->
<url-pattern>/</url-pattern>
</servlet-mapping>
</web-app>
spring.xml
<?xml version="1.0" encoding="UTF-8"?>
<beans xmlns="http://www.springframework.org/schema/beans"
       xmlns:xsi="http://www.w3.org/2001/XMLSchema-instance"
       xmlns:context="http://www.springframework.org/schema/context"
       xsi:schemaLocation="http://www.springframework.org/schema/beans http://www.springframework.org/schema/beans/spring-beans.xsd
                           http://www.springframework.org/schema/context https://www.springframework.org/schema/context/spring-context.xsd">
    <!--注解扫描包-->
    <context:component-scan base-package="com.xc"/>
    <!--thymeleaf视图解析器-->
    <!-- 模板解析器 -->
    <bean id="templateResolver" class="org.thymeleaf.spring5.templateresolver.SpringResourceTemplateResolver">
        <!-- 模板文件的路径前缀 -->
        <property name="prefix" value="/WEB-INF/templates/" />
        <!-- 模板文件的路径后缀 -->
        <property name="suffix" value=".html" />
        <property name="templateMode" value="HTML" />
        <!-- 配置是否缓存 -->
        <property name="cacheable" value="false" />
        <!-- 默认编码格式 -->
        <property name="characterEncoding" value="UTF-8"/>
    </bean>
    <!-- 模板引擎 -->
    <bean id="templateEngine" class="org.thymeleaf.spring5.SpringTemplateEngine">
        <property name="templateResolver" ref="templateResolver" />
        <property name="enableSpringELCompiler" value="true" />
    </bean>
    <!-- 视图解析器 -->
    <bean class="org.thymeleaf.spring5.view.ThymeleafViewResolver">
        <property name="templateEngine" ref="templateEngine" />
        <property name="characterEncoding" value="UTF-8"/>
    </bean>
</beans>

<!DOCTYPE html>
<html lang="en" xml:th="http://www.thymeleaf.org" xmlns:th="http://www.w3.org/1999/xhtml">
<head>
    <meta charset="UTF-8">
    <title>首页</title>
</head>
<body>
<h1>首页</h1>
<a th:href="@{/target}">访问目标页面target.html</a>
</body>
</html>
http://localhost:8080/springmvc/
总结
- 浏览器发送请求,前端控制器dispatcherServlet拦截请求
- 通过springmvc配置文件的扫描组件@Controller找到控制器
- 与@RequestMapping注解value值匹配,处理相应业务方法
- 返回一个字符串类型的视图名称,该视图名称会被视图解析器解析,加上前缀和后缀组成视图的路径
- 最后对视图进行渲染,转发到视图对应的页面
二、RequestMapping属性
1)基本属性
@Controller
@RequestMapping("/hello")
public class RequestMappingController {
    @RequestMapping(
            value = {"/test1","test2"},
            method = {RequestMethod.GET,RequestMethod.POST},
            params = {"username","password!=123456"}
    )
    public String success(){
        return "success";
    }
}
-
对于处理指定请求方法控制器方法,SpringMVC提供了@RequestMapping的派生注解
处理get请求映射 –> @GetMapping
处理post请求映射 –> @PostMapping
处理put请求映射 –> @PutMapping
处理delete请求映射 –> @DeleteMapping -
常用的请求方式get,post,put,delet
目前浏览器只支持get和post,若form表单提交时,为method设置其他请求方法的字符串(put或delete),按照默认get方法处理
若要发送put和delete请求,需要通过spring提供的过滤器HiddenHttpMethodFilter,restfu风格。
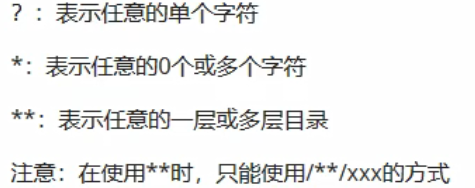
2)springMVC支持ant风格路径
3)springMVC支持路径占位符(restFul)
<a th:href="@{/hello/restFul/admin/123456}">restful风格路径访问</a><br>
@Controller
@RequestMapping("/hello")
public class RequestMappingController {
    @RequestMapping("/restFul/{username}/{password}")
    public String restFul(@PathVariable("username") String username,@PathVariable("password") String password){
        System.out.println("username: "+username+", password: "+password);
        return "success";
    }
}
三、springMVC获取请求参数
1)@RequestParam
@RequestMapping("/testParam")
public String testParam(@RequestParam(value = "user_name",required = false,defaultValue = "admin")
                        String username){
    return "success";
}
2)@RequestHeader
@RequestMapping("/testParam")
public String testParam(@RequestHeader(value = "Host",required = false,defaultValue = "default")
                        String host){
    return "success";
}
3)@CookieValue
@RequestMapping("/testParam")
public String testParam(@CookieValue(value = "JSESSIONID",required = false,defaultValue = "123456")
                        String JSESSIONID){
    return "success";
}
4)乱码设置
<filter>
    <filter-name>CharacterEncodingFilter</filter-name>
    <filter-class>org.springframework.web.filter.CharacterEncodingFilter</filter-class>
    <init-param>
        <param-name>encoding</param-name>
        <param-value>UTF-8</param-value>
    </init-param>
    <init-param>
        <param-name>forceResponseEncoding</param-name>
        <param-value>true</param-value>
    </init-param>
</filter>
<filter-mapping>
    <filter-name>CharacterEncodingFilter</filter-name>
    <url-pattern>/*</url-pattern>
</filter-mapping>
四、域对象共享数据
- 使用servletApi向request域对象共享数据
@RequestMapping("/servletApi")
public String servletApi(HttpServletRequest request){
    request.setAttribute("key","value");
    return "success";
}
- 使用modelAndView向request域对象共享数据
@RequestMapping("/modelAndView")
public ModelAndView modelAndView(){
    ModelAndView mv = new ModelAndView();
    mv.addObject("key","value");
    mv.setViewName("success");
    return mv;
}
- 使用Model向request域对象共享数据
@RequestMapping("/model")
public String model(Model model){
    model.addAttribute("key","value");
    return "success";
}
- 使用map向request域对象共享数据
@RequestMapping("map")
public String map(Map<String,Object> map){
    map.put("key","value");
    return "success";
}
- 使用modelMap向request域对象共享数据
@RequestMapping("modelMap")
public String modelMap(ModelMap modelMap){
    modelMap.addAttribute("key","value");
    return "success";
}
-
Model、ModelMap、Map的关系
三者类型参数其实本质上都是BindingAwareModelMap类型的 -
使用HttpSession向session域对象共享数据
@RequestMapping("session")
public String session(HttpSession session){
    session.addAttribute("key","value");
    return "success";
}
- 使用HttpSession向application域对象共享数据
@RequestMapping("application")
public String application(HttpSession session){
	ServletContext application = session.getServletContext();
    application.addAttribute("key","value");
    return "success";
}
五、springMVC的视图
1) 转发视图
springMVC中默认的转发视图是InternalResourceView
当控制器方法中所设置的视图名称以“forward:”为前缀时,创建InternalResourceView视图,此时的视图名称不会被springmvc配置文件的视图解析器解析,而是通过转发方式实现跳转。
@RequestMapping("/testForward")
public String testForward(){
	return "forward:/testHello";
}
2) 重定向视图
springMVC中默认的重定向视图是RedirectView
当控制器方法中所设置的视图名称以“redirect:”为前缀时,创建RedirectView视图,此时的视图名称不会被springmvc配置文件的视图解析器解析,而是通过重定向方式实现跳转。
@RequestMapping("/testForward")
public String testForward(){
	return "forward:/testHello";
}
3) 视图控制器view-controller
当控制器方法中,仅仅用来实现页面跳转,即只需要视图名称时,可以将处理器方法使用view-controller标签进行表示
<!--
	path:设置处理的请求地址
	view-name:设置请求地址所对应的视图名称
-->
<mvc:view-controller path="/testview" view-name="success" />
六、restful
HTTP协议里面,四个表示操作方式的动词:GET、POST、PUT、DELETE。

@Controller
public class RestFulController {

    @RequestMapping(value = "/user",method = RequestMethod.GET)
    public String getAllUser(){
        System.out.println("查询所有用户信息");
        return "success";
    }

    @RequestMapping(value = "/user/{id}",method = RequestMethod.GET)
    public String getUserById(@PathVariable String id){
        System.out.println("查询用户信息id: "+id);
        return "success";
    }

    @RequestMapping(value = "/user",method = RequestMethod.POST)
    public String insertUser(String username,String password){
        System.out.println("新增用户信息 username:"+username+", password: "+password);
        return "success";
    }

    @RequestMapping(value = "/user",method = RequestMethod.PUT)
    public String updateUser(String username,String password){
        System.out.println("修改用户信息 username:"+username+", password: "+password);
        return "success";
    }

}
<!DOCTYPE html>
<html lang="en" xml:th="http://www.thymeleaf.org" xmlns:th="http://www.w3.org/1999/xhtml">
<head>
    <meta charset="UTF-8">
    <title>首页</title>
</head>
<body>
<h1>首页</h1>
<a th:href="@{/target}">访问目标页面target.html</a><br>
<a th:href="@{/user}">查询所有用户信息</a><br>
<a th:href="@{/user/12}">查询单个用户信息</a><br>
<form th:action = "@{/user}" method="post">
    用户名:<input type="text" name="username"><br>
    密  码:<input type="password" name="password"><br>
    <input type="submit" value="添加">
</form>
<form th:action = "@{/user}" method="post">
    <input type="hidden" name="_method" value="put">
    用户名:<input type="text" name="username"><br>
    密  码:<input type="password" name="password"><br>
    <input type="submit" value="修改">
</form>
</body>
</html>
put和delete请求需要配置过滤器
<filter>
    <filter-name>HiddenHttpMethodFilter</filter-name>
    <filter-class>org.springframework.web.filter.HiddenHttpMethodFilter</filter-class>
</filter>
<filter-mapping>
    <filter-name>HiddenHttpMethodFilter</filter-name>
    <url-pattern>/*</url-pattern>
</filter-mapping>
过滤器源码
protected void doFilterInternal(HttpServletRequest request, HttpServletResponse response, FilterChain filterChain) throws ServletException, IOException {
    HttpServletRequest requestToUse = request;
    //必须是post请求
    if ("POST".equals(request.getMethod()) && request.getAttribute("javax.servlet.error.exception") == null) {
    	//获取key为_method参数
        String paramValue = request.getParameter("_method");
        if (StringUtils.hasLength(paramValue)) {
            String method = paramValue.toUpperCase(Locale.ENGLISH);
            if (ALLOWED_METHODS.contains(method)) {
            	//如果包含请求参数_method包含put、delete,则重新包装request
                requestToUse = new HiddenHttpMethodFilter.HttpMethodRequestWrapper(request, method);
            }
        }
    }
    filterChain.doFilter((ServletRequest)requestToUse, response);
}
//支持put、delete、patch请求
static {
    ALLOWED_METHODS = Collections.unmodifiableList(Arrays.asList(HttpMethod.PUT.name(), HttpMethod.DELETE.name(), HttpMethod.PATCH.name()));
    }
private static class HttpMethodRequestWrapper extends HttpServletRequestWrapper {
    private final String method;
    public HttpMethodRequestWrapper(HttpServletRequest request, String method) {
        super(request);
        this.method = method;
    }
    //将getMethod方法重新。以后获取到的方法就是put或delete了
    public String getMethod() {
        return this.method;
    }
}
七、拦截器
1)拦截器配置
- SpringMVC中拦截控制器方法的执行
@Component
public class InterceptorController implements HandlerInterceptor {
    @Override
    public boolean preHandle(HttpServletRequest request, HttpServletResponse response, Object handler) throws Exception {
        System.out.println("InterceptorController.preHandle");
        return true;
    }
    @Override
    public void postHandle(HttpServletRequest request, HttpServletResponse response, Object handler, ModelAndView modelAndView) throws Exception {
        System.out.println("InterceptorController.postHandle");
    }
    @Override
    public void afterCompletion(HttpServletRequest request, HttpServletResponse response, Object handler, Exception ex) throws Exception {
        System.out.println("InterceptorController.afterCompletion");
    }
}
<mvc:interceptors>
<!--        <bean class="com.xc.InterceptorController" />-->
<!--        <ref bean="interceptorController" />-->
//以上两种配置方式是对dispatcherServlet所处理的请求进行拦截
    <mvc:interceptor>
    	//拦截所有请求
        <mvc:mapping path="/**"/>
        //排除拦截请求
        <mvc:exclude-mapping path="/"/>
        <ref bean="interceptorController" />
    </mvc:interceptor>
</mvc:interceptors>
2)拦截器三个抽象方法
- preHandle:控制器方法执行前执行preHandle(),其boolean类型的返回值表示是否拦截或放行。
- postHandle:控制器方法执行之后执行postHandle()。
- afterComplation:处理完视图和模型数据,渲染视图完毕之后执行afterComplation()。
3)多个拦截器的执行顺序
1、如果每个拦截器preHandle都返回true
此时多个拦截器执行顺序和拦截器在SpringMVC的配置文件的配置顺序有关
preHandle()会按照配置顺序执行,而postHandle()和afterCOnplation()会按照配置的反序执行
2、如果某个拦截器的preHandle返回了false
preHandle()返回false和它之前的拦截器的preHandle()都会执行,postHandle()都不会执行,返回false的拦截器和它之前的拦截器的afterComplation()会执行
4)拦截器源码
//执行控制器方法前拦截器执行
if (!mappedHandler.applyPreHandle(processedRequest, response)) {
    return;
}
//执行控制器方法(Controller方法)
mv = ha.handle(processedRequest, response, mappedHandler.getHandler());
if (asyncManager.isConcurrentHandlingStarted()) {
    return;
}
//默认视图名
this.applyDefaultViewName(processedRequest, mv);
//执行控制器方法后拦截器执行
mappedHandler.applyPostHandle(processedRequest, response, mv);
//执行结果(封装处理)
this.processDispatchResult(processedRequest, response, mappedHandler, mv, (Exception)dispatchException);
boolean applyPreHandle(HttpServletRequest request, HttpServletResponse response) throws Exception {
	//将多个拦截器按顺序一一遍历
    for(int i = 0; i < this.interceptorList.size(); this.interceptorIndex = i++) {
        HandlerInterceptor interceptor = (HandlerInterceptor)this.interceptorList.get(i);
        if (!interceptor.preHandle(request, response, this.handler)) {
            this.triggerAfterCompletion(request, response, (Exception)null);
            return false;
        }
    }
    return true;
}
void applyPostHandle(HttpServletRequest request, HttpServletResponse response, @Nullable ModelAndView mv) throws Exception {
	//i-- 将多个拦截器倒序一一遍历
    for(int i = this.interceptorList.size() - 1; i >= 0; --i) {
        HandlerInterceptor interceptor = (HandlerInterceptor)this.interceptorList.get(i);
        interceptor.postHandle(request, response, this.handler, mv);
    }

}
if (mv != null && !mv.wasCleared()) {
	//视图渲染,将modle和view合并成一个整体(页面上添加数据)
    this.render(mv, request, response);
    if (errorView) {
        WebUtils.clearErrorRequestAttributes(request);
    }
} else if (this.logger.isTraceEnabled()) {
    this.logger.trace("No view rendering, null ModelAndView returned.");
}

if (!WebAsyncUtils.getAsyncManager(request).isConcurrentHandlingStarted()) {
    if (mappedHandler != null) {
    	//视图渲染后拦截器执行
        mappedHandler.triggerAfterCompletion(request, response, (Exception)null);
    }

}
八、异常处理器
1)基于配置的异常处理
<bean class="org.springframework.web.servlet.handler.SimpleMappingExceptionResolver" >
    <property name="exceptionMappings" >
        <props>
            <!--
            properties的键表示处理器方法执行过程中出现的异常
            properties的值表示出现指定异常时候,跳转的视图名称
            -->
            <prop key="java.lang.ArithmeticException">error</prop>
        </props>
    </property>
    <!--exceptionAttribute属性设置一个属性名,将出现的异常信息在请求域中进行共享-->
    <property name="exceptionAttribute" value="ex" />
</bean>
1)基于注解的异常处理
//将当前类标识为异常处理的组件
@ControllerAdvice
public class ExceptionController {
    //用于设置所标识方法处理的异常
    @ExceptionHandler(ArithmeticException.class)
    public String handleArithmeticException(Exception ex, Model model){
        model.addAttribute("ex",ex);
        return "error";
    }
}
版权声明:本文内容由互联网用户自发贡献,该文观点仅代表作者本人。本站仅提供信息存储空间服务,不拥有所有权,不承担相关法律责任。如发现本站有涉嫌侵权/违法违规的内容, 请发送邮件至 举报,一经查实,本站将立刻删除。
文章由极客之音整理,本文链接:https://www.bmabk.com/index.php/post/148673.html

