
在系统开发过程中,大部分系统都会使用到权限和角色控制功能,这种设计方式不但可以对资源进行保护,也可以更好的划分用户职责,减少系统由于误操作导致的数据丢失风险。
在做权限功能时,有很多的设计方案供开发者选择:
- 简单的系统,可以使用过滤器Filter进行路由拦截,简单划分几种权限在代码中实现拦截和放行功能。
- 也可以通过拦截器实现权限控制,这种实现方式很多都是和自定义注解配合使用,对于需要拦截的方法或类,添加相应的注解就可以了,这种方式相对于Filter来说灵活,对于并不复杂的系统比较适用。
- 更加复杂的系统,就有必要引入相关的权限控制框架了,这些框架可以减少我们编写业务不相关的代码,使我们更加专注业务系统的开发,而spring-security就是这方面比较好的解决方案。
万变不离其宗,security核心原理也是一系列Filter过滤器对我们的请求进行拦截,在处理拦截过程中,对于有认证和授权的接口进行放行,对于没有权限的接口进行拦截。下面通过一步步介绍在项目中如何使用security框架:
1、Security框架基本使用
首先需要创建一个springboot项目,在项目中引入如下依赖:
<dependency>
    <groupId>org.springframework.boot</groupId>
    <artifactId>spring-boot-starter-web</artifactId>
</dependency>
<dependency>
    <groupId>org.springframework.boot</groupId>
    <artifactId>spring-boot-starter-security</artifactId>
</dependency>
<dependency>
    <groupId>com.alibaba</groupId>
    <artifactId>fastjson</artifactId>
    <version>1.2.83</version>
</dependency>
<dependency>
    <groupId>commons-io</groupId>
    <artifactId>commons-io</artifactId>
    <version>2.6</version>
</dependency>
<dependency>
    <groupId>org.apache.commons</groupId>
    <artifactId>commons-lang3</artifactId>
    <version>3.12.0</version>
</dependency>
要验证接口权限,这里还需要创建一个接口用于测试:
import org.example.pojo.Result;
import org.springframework.web.bind.annotation.GetMapping;
import org.springframework.web.bind.annotation.RequestMapping;
import org.springframework.web.bind.annotation.RestController;

/**
 * demo接口,测试用户权限
 *
 * @Author xingo
 * @Date 2023/10/12
 */
@RestController
@RequestMapping("/demo")
public class DemoController {

    @GetMapping("/test")
    public Result<String> test() {
        return Result.success("hello,world!test.");
    }
}
对于json数据的统一返回实体类:
import org.springframework.http.HttpStatus;

import java.io.Serializable;

/**
 * 统一json返回实体类
 *
 * @Author xingo
 * @Date 2023/10/12
 */
public class Result<T> implements Serializable {

    /**
     * 返回状态码
     */
    private int code;
    /**
     * 返回消息提示
     */
    private String message;
    /**
     * 数据体
     */
    private T data;
    /**
     * 成功标识
     */
    private boolean success;

    public Result() {
    }

    public Result(int code, String message, T data, boolean success) {
        this.code = code;
        this.message = message;
        this.data = data;
        this.success = success;
    }

    public static <T> Result<T> fail(int code, String message) {
        Result<T> result = new Result<>();
        result.code = code;
        result.message = message;
        result.success = false;
        return result;
    }

    public static <T> Result<T> success() {
        Result<T> result = new Result<>();
        result.code = HttpStatus.OK.value();
        result.message = "ok";
        result.success = true;
        return result;
    }
    public static <T> Result<T> success(T data) {
        Result<T> result = new Result<>();
        result.code = HttpStatus.OK.value();
        result.message = "ok";
        result.success = true;
        result.data = data;
        return result;
    }

    public static <T> Result<T> success(T data, String message) {
        Result<T> result = new Result<>();
        result.code = HttpStatus.OK.value();
        result.message = message;
        result.success = true;
        result.data = data;
        return result;
    }

    public int getCode() {
        return code;
    }

    public Result<T> setCode(int code) {
        this.code = code;
        return this;
    }

    public String getMessage() {
        return message;
    }

    public Result<T> setMessage(String message) {
        this.message = message;
        return this;
    }

    public T getData() {
        return data;
    }

    public Result<T> setData(T data) {
        this.data = data;
        return this;
    }

    public boolean isSuccess() {
        return this.code == 200;
    }

}
以上基础信息准备好了之后,就可以启动项目了:
  .   ____          _            __ _ _
 /\\ / ___'_ __ _ _(_)_ __  __ _ \ \ \ \
( ( )\___ | '_ | '_| | '_ \/ _` | \ \ \ \
 \\/  ___)| |_)| | | | | || (_| |  ) ) ) )
  '  |____| .__|_| |_|_| |_\__, | / / / /
 =========|_|==============|___/=/_/_/_/
 :: Spring Boot ::               (v2.6.11)

2023-10-12 15:56:12.883  INFO 21620 --- [           main] org.example.BootApplication              : Starting BootApplication using Java 1.8.0_161 on L15013317 with PID 21620 (D:\develop_tools\idea_workspace\test-cloud\test-security\target\classes started by 00079095 in D:\develop_tools\idea_workspace\test-cloud)
2023-10-12 15:56:12.885  INFO 21620 --- [           main] org.example.BootApplication              : No active profile set, falling back to 1 default profile: "default"
2023-10-12 15:56:13.523  INFO 21620 --- [           main] o.s.b.w.embedded.tomcat.TomcatWebServer  : Tomcat initialized with port(s): 8080 (http)
2023-10-12 15:56:13.529  INFO 21620 --- [           main] o.apache.catalina.core.StandardService   : Starting service [Tomcat]
2023-10-12 15:56:13.529  INFO 21620 --- [           main] org.apache.catalina.core.StandardEngine  : Starting Servlet engine: [Apache Tomcat/9.0.65]
2023-10-12 15:56:13.597  INFO 21620 --- [           main] o.a.c.c.C.[Tomcat].[localhost].[/]       : Initializing Spring embedded WebApplicationContext
2023-10-12 15:56:13.597  INFO 21620 --- [           main] w.s.c.ServletWebServerApplicationContext : Root WebApplicationContext: initialization completed in 688 ms
2023-10-12 15:56:13.776  WARN 21620 --- [           main] .s.s.UserDetailsServiceAutoConfiguration :

Using generated security password: fd260708-4f42-401c-be4e-fba4a620c04d

This generated password is for development use only. Your security configuration must be updated before running your application in production.

2023-10-12 15:56:13.831  INFO 21620 --- [           main] o.s.s.web.DefaultSecurityFilterChain     : Will secure any request with [org.springframework.security.web.context.request.async.WebAsyncManagerIntegrationFilter@4bafe935, org.springframework.security.web.context.SecurityContextPersistenceFilter@7ea08277, org.springframework.security.web.header.HeaderWriterFilter@4ba380c7, org.springframework.security.web.csrf.CsrfFilter@8ff5094, org.springframework.security.web.authentication.logout.LogoutFilter@af9a89f, org.springframework.security.web.authentication.UsernamePasswordAuthenticationFilter@557eb543, org.springframework.security.web.authentication.ui.DefaultLoginPageGeneratingFilter@11e33bac, org.springframework.security.web.authentication.ui.DefaultLogoutPageGeneratingFilter@87b5b49, org.springframework.security.web.authentication.www.BasicAuthenticationFilter@3fbfbf84, org.springframework.security.web.savedrequest.RequestCacheAwareFilter@4ce14f05, org.springframework.security.web.servletapi.SecurityContextHolderAwareRequestFilter@b965857, org.springframework.security.web.authentication.AnonymousAuthenticationFilter@4a7a965d, org.springframework.security.web.session.SessionManagementFilter@31133b6e, org.springframework.security.web.access.ExceptionTranslationFilter@65f58c6e, org.springframework.security.web.access.intercept.FilterSecurityInterceptor@3f1ddac2]
2023-10-12 15:56:13.887  INFO 21620 --- [           main] o.s.b.w.embedded.tomcat.TomcatWebServer  : Tomcat started on port(s): 8080 (http) with context path ''
2023-10-12 15:56:13.890  INFO 21620 --- [           main] org.example.BootApplication              : Started BootApplication in 1.225 seconds (JVM running for 1.441)
看到上面的输出,表示整个项目启动没有问题,上面的输出内容里有一个很重要的有关密码输出:
Using generated security password: fd260708-4f42-401c-be4e-fba4a620c04d
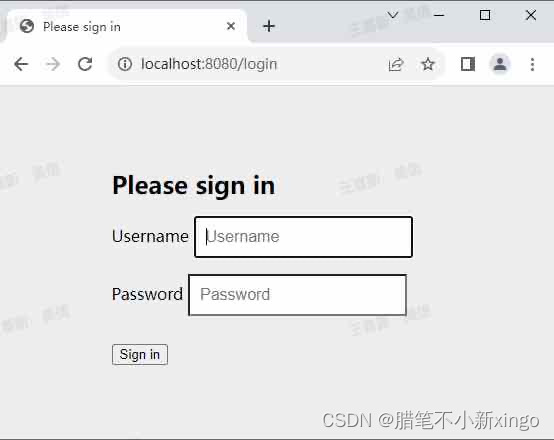
这个密码是我们在没有任何配置的情况下security给我们生成的,这时如果我们访问自定义的demo接口,会发现请求重定向到security的登录页面,登录的用户名默认为:user,使用用户名和上面的密码就可以登录进去。
2、自定义用户名密码
对于线上系统,用户信息都是存储在数据库中,当用户登录时,通过查询数据库中用户信息来校验用户是否有权限登录到系统,用户身份验证成功后,会在系统中存储用户身份信息,每次请求接口都会验证用户身份是否合法,合法用户进行放行,不合法的用户拦截下来进行相关处理。
为了实现上面这种处理逻辑,需要在数据库中存储用户信息,这里的demo为了简单就不引入数据库操作了,在系统中添加几个用户模拟请求数据库的情况,用户登录后的信息也是存储在本地内存中。
这里需要创建一些实体类:
用户信息实体类:
import java.io.Serializable;
import java.util.List;

/**
 * 用户信息
 *
 * @Author xingo
 * @Date 2023/10/12
 */
public class UserResp implements Serializable {

    /**
     * 用户ID
     */
    private int id;
    /**
     * 用户登录名
     */
    private String userName;
    /**
     * 用户登录密码
     */
    private String password;
    /**
     * 用户昵称
     */
    private String nickName;
    /**
     * 角色列表
     */
    private List<String> roles;
    /**
     * 登录时间
     */
    private long loginTime;
    /**
     * 用户登录token
     */
    private String token;

    public UserResp() {
    }

    public UserResp(int id, String userName, String password, String nickName, List<String> roles) {
        this.id = id;
        this.userName = userName;
        this.password = password;
        this.nickName = nickName;
        this.roles = roles;
    }

    public int getId() {
        return id;
    }

    public void setId(int id) {
        this.id = id;
    }

    public String getUserName() {
        return userName;
    }

    public void setUserName(String userName) {
        this.userName = userName;
    }

    public String getPassword() {
        return password;
    }

    public void setPassword(String password) {
        this.password = password;
    }

    public String getNickName() {
        return nickName;
    }

    public void setNickName(String nickName) {
        this.nickName = nickName;
    }

    public List<String> getRoles() {
        return roles;
    }

    public void setRoles(List<String> roles) {
        this.roles = roles;
    }

    public long getLoginTime() {
        return loginTime;
    }

    public void setLoginTime(long loginTime) {
        this.loginTime = loginTime;
    }

    public String getToken() {
        return token;
    }

    public void setToken(String token) {
        this.token = token;
    }
}
创建一个数据库模拟工具类:
import org.example.pojo.UserResp;

import java.util.Arrays;
import java.util.Collections;
import java.util.Map;
import java.util.concurrent.ConcurrentHashMap;
import java.util.stream.Collectors;
import java.util.stream.Stream;

/**
 * 数据库工具类
 *
 * @Author xingo
 * @Date 2023/10/12
 */
public class DbUtils {

    /**
     * 模拟数据库用户
     */
    public static final Map<String, UserResp> DB_USER_MAP = Stream.of(
            new UserResp(1, "test", "123456", "测试", Collections.singletonList("ROLE_TEST"))
    ).collect(Collectors.toMap(UserResp::getUserName, u -> u));

    /**
     * 已登录用户信息缓存
     */
    public static final ConcurrentHashMap<String, UserResp> LOGIN_USER_CACHE = new ConcurrentHashMap<>();
}
用户服务接口和实现类,用于模拟从数据库中查找用户:
import org.example.pojo.UserResp;

/**
 * 用户信息服务
 *
 * @Author xingo
 * @Date 2023/10/12
 */
public interface UserService {

    UserResp getUserByUserName(String userName);
}
import org.example.common.DbUtils;
import org.example.pojo.UserResp;
import org.example.service.UserService;
import org.springframework.stereotype.Service;

/**
 * @Author xingo
 * @Date 2023/10/12
 */
@Service("userService")
public class UserServiceImpl implements UserService {

    @Override
    public UserResp getUserByUserName(String userName) {
        return DbUtils.DB_USER_MAP.get(userName);
    }
}
security实现用户信息查询,需要一个类实现UserDetailsService接口和里面的方法,需要按照方法的返回值UserDetails组织数据返回:
import org.springframework.security.core.GrantedAuthority;
import org.springframework.security.core.authority.SimpleGrantedAuthority;
import org.springframework.security.core.userdetails.UserDetails;

import java.util.Collection;
import java.util.stream.Collectors;

/**
 * security中用户对象
 *
 * @Author xingo
 * @Date 2023/10/12
 */
public class UserDetailsImpl implements UserDetails {

    private UserResp user;

    public UserDetailsImpl() {

    }

    public UserDetailsImpl(UserResp user) {
        this.user = user;
    }

    public UserResp getUser() {
        return user;
    }

    public void setUser(UserResp user) {
        this.user = user;
    }

    @Override
    public Collection<? extends GrantedAuthority> getAuthorities() {
        // 没有权限信息就设置权限,一个用户可以有多个权限
//        if(authorities == null && this.user.getRoles() != null) {
//            authorities = this.user.getRoles().stream().map(SimpleGrantedAuthority::new).collect(Collectors.toList());
//        }
//
//        return authorities;

        return this.user.getRoles().stream().map(SimpleGrantedAuthority::new).collect(Collectors.toList());
    }

    @Override
    public String getPassword() {
        return user.getPassword();
    }

    @Override
    public String getUsername() {
        return user.getUserName();
    }

    @Override
    public boolean isAccountNonExpired() {
        return true;
    }

    @Override
    public boolean isAccountNonLocked() {
        return true;
    }

    @Override
    public boolean isCredentialsNonExpired() {
        return true;
    }

    @Override
    public boolean isEnabled() {
        return true;
    }
}
import org.example.pojo.UserDetailsImpl;
import org.example.pojo.UserResp;
import org.example.service.UserService;
import org.springframework.beans.factory.annotation.Autowired;
import org.springframework.security.core.userdetails.UserDetails;
import org.springframework.security.core.userdetails.UserDetailsService;
import org.springframework.security.core.userdetails.UsernameNotFoundException;
import org.springframework.stereotype.Service;

/**
 * 实现security中查找用户信息方法
 *
 * @Author xingo
 * @Date 2023/10/12
 */
@Service
public class UserDetailsServiceImpl implements UserDetailsService {

    @Autowired
    private UserService userService;

    @Override
    public UserDetails loadUserByUsername(String username) throws UsernameNotFoundException {
        UserResp user = userService.getUserByUserName(username);
        if(user == null) {
            throw new UsernameNotFoundException("用户不存在");
        }

        return new UserDetailsImpl(user);
    }
}
完成上面的几个类,重启项目,会发现控制台不会输出密码了,这是因为我们已经实现了UserDetailsService接口,系统就不会在走默认的密码处理逻辑,刷新一下链接: http://localhost:8080/demo/test 。在登录页面输入设置的用户名(test)和密码(123456),会发现登录失败并且控制台输出了下面的错误
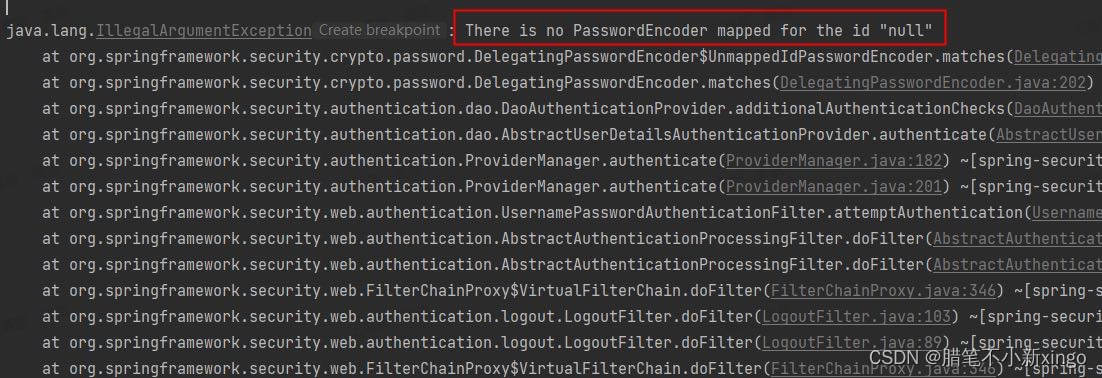
这是因为我们数据库配置的明文密码,并且security框架中也没有配置密码加密规则,对于明文存储密码在数据库中一般是不建议的,这里为了测试,我们可以先在密码前加{noop}前缀,前缀告诉security系统将密码存储为明文,修改DbUtils类如下:
import org.example.pojo.UserResp;

import java.util.Arrays;
import java.util.Collections;
import java.util.Map;
import java.util.concurrent.ConcurrentHashMap;
import java.util.stream.Collectors;
import java.util.stream.Stream;

/**
 * 数据库工具类
 *
 * @Author xingo
 * @Date 2023/10/12
 */
public class DbUtils {

    /**
     * 模拟数据库用户
     */
    public static final Map<String, UserResp> DB_USER_MAP = Stream.of(
            new UserResp(1, "test", "{noop}123456", "测试", Collections.singletonList("ROLE_TEST"))
    ).collect(Collectors.toMap(UserResp::getUserName, u -> u));

    /**
     * 已登录用户信息缓存
     */
    public static final ConcurrentHashMap<String, UserResp> LOGIN_USER_CACHE = new ConcurrentHashMap<>();
}
再次测试接口可以发现登录成功了!!!
对于线上系统,密码都是密文存储的,为了实现密文密码的校验,需要向security系统中注入密码加密组件BCryptPasswordEncoder,这里需要像系统中添加一个配置类:
import org.springframework.context.annotation.Bean;
import org.springframework.context.annotation.Configuration;
import org.springframework.security.config.annotation.web.configuration.WebSecurityConfigurerAdapter;
import org.springframework.security.crypto.bcrypt.BCryptPasswordEncoder;
import org.springframework.security.crypto.password.PasswordEncoder;

/**
 * @Author xingo
 * @Date 2023/10/12
 */
@Configuration
public class SecurityConfig extends WebSecurityConfigurerAdapter {

    @Bean
    public PasswordEncoder passwordEncoder() {
        return new BCryptPasswordEncoder();
    }

}
添加上面的配置后,数据库中的密码也需要改为加密后的形式,可以通过下面的方法进行加密:
public static void main(String[] args) {
    BCryptPasswordEncoder passwordEncoder = new BCryptPasswordEncoder();
    String encode = passwordEncoder.encode("123456");
    System.out.println(encode);
}
调整DbUtils类如下:
import org.example.pojo.UserResp;

import java.util.Arrays;
import java.util.Collections;
import java.util.Map;
import java.util.concurrent.ConcurrentHashMap;
import java.util.stream.Collectors;
import java.util.stream.Stream;

/**
 * 数据库工具类
 *
 * @Author xingo
 * @Date 2023/10/12
 */
public class DbUtils {

    /**
     * 模拟数据库用户
     */
    public static final Map<String, UserResp> DB_USER_MAP = Stream.of(
            new UserResp(1, "test", "$2a$10$QmsxJE5gyHqW7hGVt9wrP.NWA4Elt7RE/efQqmMqJ0wVkuNJ.mXqm", "测试", Collections.singletonList("ROLE_TEST"))
    ).collect(Collectors.toMap(UserResp::getUserName, u -> u));

    /**
     * 已登录用户信息缓存
     */
    public static final ConcurrentHashMap<String, UserResp> LOGIN_USER_CACHE = new ConcurrentHashMap<>();
}
调整完成后,重启系统同样登录成功!!!

3、自定义登录功能和身份验证
我们发现,security提供的登录页面比较简单,正常线上系统都会有一个统一的页面用于登录,这种情况下就需要设计一个接口用于登录系统,这个接口不受权限控制。
要实现上面的功能,首先需要在security中配置AuthenticationManager来进行用户认证,还需要配置configure()方法指定权限拦截和放行规则,调整SecurityConfig配置类如下:
import org.springframework.context.annotation.Bean;
import org.springframework.context.annotation.Configuration;
import org.springframework.security.authentication.AuthenticationManager;
import org.springframework.security.config.annotation.web.builders.HttpSecurity;
import org.springframework.security.config.annotation.web.configuration.WebSecurityConfigurerAdapter;
import org.springframework.security.config.http.SessionCreationPolicy;
import org.springframework.security.crypto.bcrypt.BCryptPasswordEncoder;
import org.springframework.security.crypto.password.PasswordEncoder;

/**
 * security配置类
 *
 * @Author xingo
 * @Date 2023/10/12
 */
@Configuration
public class SecurityConfig extends WebSecurityConfigurerAdapter {

    @Bean
    public PasswordEncoder passwordEncoder() {
        return new BCryptPasswordEncoder();
    }

    @Bean
    @Override
    public AuthenticationManager authenticationManager() throws Exception {
        return super.authenticationManager();
    }

    @Override
    protected void configure(HttpSecurity http) throws Exception {
        http
                // 关闭csrf
                .csrf().disable()
                // 不通过Session获取SecurityContext
               .sessionManagement().sessionCreationPolicy(SessionCreationPolicy.STATELESS)
                .and()
                .authorizeRequests()
                // 对于登录接口 允许匿名访问
                .antMatchers("/login").anonymous()
                // 除上面外的所有请求全部需要鉴权认证
                .anyRequest().authenticated();
    }
}
需要定义一个接口,接收用户登录请求:
import com.alibaba.fastjson.JSONObject;
import org.example.common.DbUtils;
import org.example.pojo.Result;
import org.example.pojo.UserDetailsImpl;
import org.example.pojo.UserResp;
import org.example.pojo.UserTokenResp;
import org.springframework.beans.factory.annotation.Autowired;
import org.springframework.security.authentication.AuthenticationManager;
import org.springframework.security.authentication.UsernamePasswordAuthenticationToken;
import org.springframework.security.core.Authentication;
import org.springframework.security.core.userdetails.UsernameNotFoundException;
import org.springframework.util.DigestUtils;
import org.springframework.web.bind.annotation.PostMapping;
import org.springframework.web.bind.annotation.RestController;

import java.nio.charset.StandardCharsets;

/**
 * 用户登录接口
 *
 * @Author xingo
 * @Date 2023/10/12
 */
@RestController
public class LoginController {

    @Autowired
    private AuthenticationManager authenticationManager;

    /**
     * 用户登录
     * @param userName      用户名
     * @param password      密码
     * @return
     */
    @PostMapping("/login")
    public Result<UserTokenResp> login(String userName, String password) {
        // 通过UsernamePasswordAuthenticationToken获取用户名和密码验证信息
        UsernamePasswordAuthenticationToken authenticationToken = new UsernamePasswordAuthenticationToken(userName, password);
        // AuthenticationManager委托机制对authenticationToken进行用户认证
        Authentication authenticate = authenticationManager.authenticate(authenticationToken);
        if(authenticate == null) {
            throw new UsernameNotFoundException("登录失败");
        }

        // 如果认证通过,拿到这个当前登录用户信息
        Object obj = authenticate.getPrincipal();
        UserResp user = null;
        if(obj instanceof UserDetailsImpl) {
            UserDetailsImpl loginUser = (UserDetailsImpl) obj;
            user = loginUser.getUser();
        } else {
            throw new UsernameNotFoundException("登录失败");
        }
        user.setLoginTime(System.currentTimeMillis());

        // 设置jwt的token字符串,这里简单做md5
        String jwtToken = DigestUtils.md5DigestAsHex(JSONObject.toJSONString(user).getBytes(StandardCharsets.UTF_8));
        UserTokenResp tokenResp = new UserTokenResp(user.getId(), user.getUserName(), user.getNickName(), jwtToken);

        // 将登录用户缓存起来
        user.setToken(jwtToken);
        DbUtils.LOGIN_USER_CACHE.put(jwtToken, user);

        return Result.success(tokenResp);
    }
}
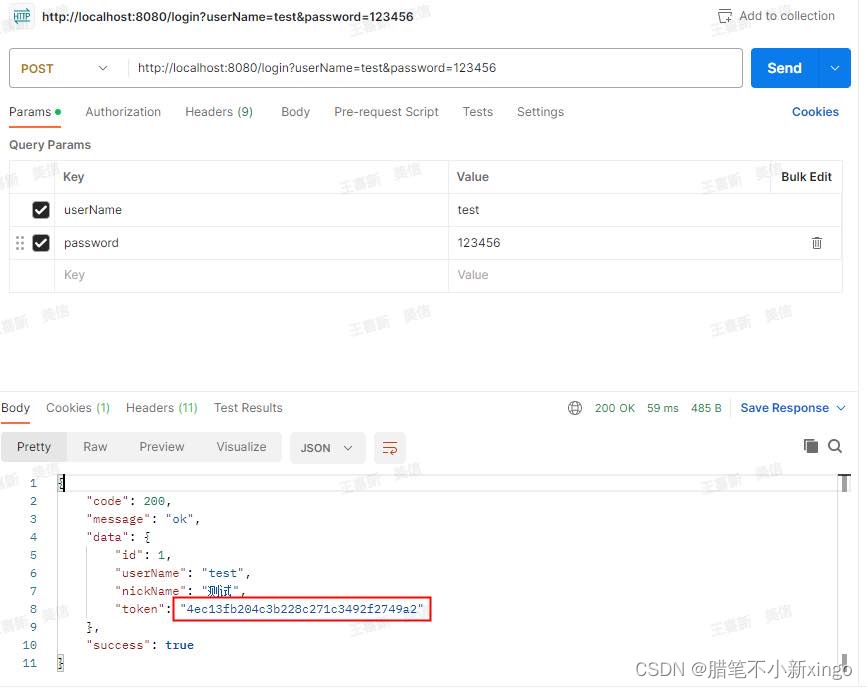
经过上面的改造后,再次访问接口: http://localhost:8080/demo/test 会发现请求被拒绝并且也不会跳转到登录页面,这是因为用户没有权限访问该链接了,而用POST请求 http://localhost:8080/login?userName=xingo&password=123456 可以正常访问,并且返回了相关信息:
{
    "code": 200,
    "message": "ok",
    "data": {
        "id": 5,
        "userName": "xingo",
        "nickName": "新哥",
        "token": "9139bfba4087155171cf22a6041d9869"
    },
    "success": true
}
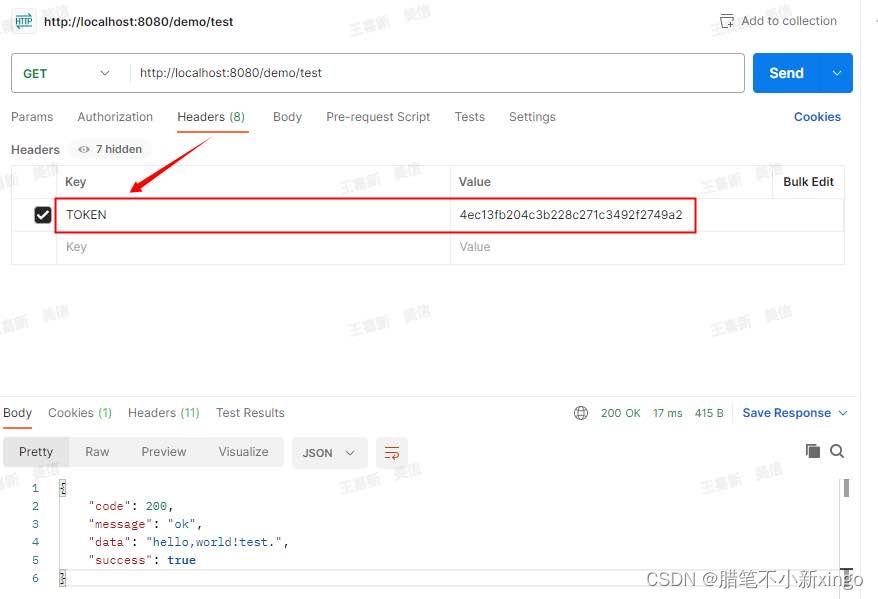
现在要做的是将返回的token信息放入请求头中,每次访问资源受限的接口可以通过头部的TOKEN验证用户是否合法,而验证TOKEN的工作是需要我们自己实现的,我们需要定义一个Filter类,里面实现TOKEN验证工作:
import org.example.common.DbUtils;
import org.example.pojo.UserResp;
import org.springframework.security.authentication.UsernamePasswordAuthenticationToken;
import org.springframework.security.core.authority.SimpleGrantedAuthority;
import org.springframework.security.core.context.SecurityContextHolder;
import org.springframework.stereotype.Component;
import org.springframework.web.filter.OncePerRequestFilter;

import javax.servlet.FilterChain;
import javax.servlet.ServletException;
import javax.servlet.http.HttpServletRequest;
import javax.servlet.http.HttpServletResponse;
import java.io.IOException;
import java.util.List;
import java.util.stream.Collectors;

/**
 * @Author wangxixin
 * @Date 2023/10/12
 */
@Component
public class JwtAuthenticationTokenFilter extends OncePerRequestFilter {

    public static final ThreadLocal<UserResp> AUTHENTICATION = new ThreadLocal<>();

    @Override
    protected void doFilterInternal(HttpServletRequest request, HttpServletResponse response, FilterChain filterChain) throws ServletException, IOException {
        String uri = request.getRequestURI();
        if(uri.startsWith("/login") || uri.startsWith("/register")) {
            filterChain.doFilter(request, response);
            return;
        }

        String token = request.getHeader("TOKEN");
        if(token == null) {
            throw new RuntimeException("token不存在");
        }

        UserResp user = DbUtils.LOGIN_USER_CACHE.get(token);
        if(user == null) {
            throw new RuntimeException("用户未登录");
        }

        // 将用户信息放入上下文中,这样就可以通过 SecurityContextHolder.getContext() 上下文获取到登录的用户信息
        List<SimpleGrantedAuthority> authorities = user.getRoles().stream().map(SimpleGrantedAuthority::new).collect(Collectors.toList());
        UsernamePasswordAuthenticationToken authenticationToken = new UsernamePasswordAuthenticationToken(user, null, authorities);
        SecurityContextHolder.getContext().setAuthentication(authenticationToken);

        //放行
        filterChain.doFilter(request, response);
    }

}
这个Filter中先放行一些url,然后获取头部的TOKEN,如果获取到,在通过本地缓存判断这个TOKEN是否合法,如果合法,构造UsernamePasswordAuthenticationToken放入SecurityContextHolder上下文中,后面的拦截器判断有UsernamePasswordAuthenticationToken信息就会放行。
下面只需要将这个Filter放入security中即可:
import org.example.filter.JwtAuthenticationTokenFilter;
import org.springframework.beans.factory.annotation.Autowired;
import org.springframework.context.annotation.Bean;
import org.springframework.context.annotation.Configuration;
import org.springframework.security.authentication.AuthenticationManager;
import org.springframework.security.config.annotation.web.builders.HttpSecurity;
import org.springframework.security.config.annotation.web.configuration.WebSecurityConfigurerAdapter;
import org.springframework.security.config.http.SessionCreationPolicy;
import org.springframework.security.crypto.bcrypt.BCryptPasswordEncoder;
import org.springframework.security.crypto.password.PasswordEncoder;
import org.springframework.security.web.authentication.UsernamePasswordAuthenticationFilter;

/**
 * security配置类
 *
 * @Author xingo
 * @Date 2023/10/12
 */
@Configuration
public class SecurityConfig extends WebSecurityConfigurerAdapter {

    @Bean
    public PasswordEncoder passwordEncoder() {
        return new BCryptPasswordEncoder();
    }

    @Bean
    @Override
    public AuthenticationManager authenticationManager() throws Exception {
        return super.authenticationManager();
    }

    @Autowired
    private JwtAuthenticationTokenFilter jwtAuthenticationTokenFilter;

    @Override
    protected void configure(HttpSecurity http) throws Exception {
        http
            // 把token校验过滤器添加到过滤器链中并且添加到UsernamePasswordAuthenticationFilter之前
            .addFilterBefore(jwtAuthenticationTokenFilter, UsernamePasswordAuthenticationFilter.class)
            // 关闭csrf
            .csrf().disable()
            // 不通过Session获取SecurityContext
            .sessionManagement().sessionCreationPolicy(SessionCreationPolicy.STATELESS)
            .and()
            .authorizeRequests()
            // 对于登录接口 允许匿名访问
            .antMatchers("/login/submit").anonymous()
            // 除上面外的所有请求全部需要鉴权认证
            .anyRequest().authenticated();
    }
}
将上面两个类进行调整后,重启项目,先访问登录接口获取token,再访问测试接口并将获取到的token放入头部请求,发现可以获取到信息了!!!
4、退出登录
已经登录系统的用户,如果要退出登录状态,只需要提供一个接口给前端,前端访问这个接口的时候,系统将用户登录的缓存信息删除即可,这里为了方便获取用户的信息,设置一个基础类BaseController,在这个controller中可以获取到当前登录的客户信息,这里就会用到SecurityContextHolder类,这个类会在请求的上下文中缓存用户信息,使用的是ThreadLocal,所以在当前线程中可以很方便的获取到用户身份,分别添加两个类如下:
import org.example.pojo.UserResp;
import org.springframework.security.core.Authentication;
import org.springframework.security.core.context.SecurityContextHolder;
import org.springframework.web.bind.annotation.RestController;

/**
 * controller基础类
 *
 * @Author xingo
 * @Date 2023/10/12
 */
@RestController
public class BaseController {

    /**
     * 获取当前登录用户
     * @return
     */
    public UserResp getUser() {
        Authentication authentication = SecurityContextHolder.getContext().getAuthentication();
        if(authentication != null) {
            Object obj = authentication.getPrincipal();
            if(obj instanceof UserResp) {
                return (UserResp) obj;
            }
            return null;
        }
        return null;
    }

    /**
     * 获取用户ID
     * @return
     */
    public int getUserId() {
        UserResp user = this.getUser();
        return user == null ? 0 : user.getId();
    }

    /**
     * 获取用户登录名
     * @return
     */
    public String getUserName() {
        UserResp user = this.getUser();
        return user == null ? null : user.getUserName();
    }
}
import org.example.common.DbUtils;
import org.example.pojo.Result;
import org.springframework.web.bind.annotation.GetMapping;
import org.springframework.web.bind.annotation.RestController;

/**
 * 用户退出接口
 *
 * @Author xingo
 * @Date 2023/10/12
 */
@RestController
public class LogoutController extends BaseController {

    /**
     * 退出登录
     * @return
     */
    @GetMapping("/logout")
    public Result logout() {
        if(this.getUser() != null) {
            DbUtils.LOGIN_USER_CACHE.remove(this.getUser().getToken());
            return Result.success(null, "退出登录");
        }
        return Result.fail(10003, "用户未登录");
    }
}
重启服务先登录系统,这时可以访问接口获取到数据,再访问退出系统接口,再请求接口发现已经没有权限了。
5、权限控制
之前的全部内容都是基于身份认证的管理,如果要分角色管理用户,对于不同角色的用户对访问接口进行管理,security中也可以很好的实现。
之前的用户身份那部分内容已经设置了角色,只不过在接口上面没有使用,下面在用户表中再添加几个用户,设置不同的角色:
import org.example.pojo.UserResp;

import java.util.Arrays;
import java.util.Collections;
import java.util.Map;
import java.util.concurrent.ConcurrentHashMap;
import java.util.stream.Collectors;
import java.util.stream.Stream;

/**
 * 数据库工具类
 *
 * @Author xingo
 * @Date 2023/10/12
 */
public class DbUtils {

    /**
     * 模拟数据库用户
     */
    public static final Map<String, UserResp> DB_USER_MAP = Stream.of(
            new UserResp(1, "test", "$2a$10$QmsxJE5gyHqW7hGVt9wrP.NWA4Elt7RE/efQqmMqJ0wVkuNJ.mXqm", "测试", Collections.singletonList("ROLE_TEST")),
            new UserResp(2, "zhangsan", "$2a$10$QmsxJE5gyHqW7hGVt9wrP.NWA4Elt7RE/efQqmMqJ0wVkuNJ.mXqm", "张三", Collections.singletonList("ROLE_TEST")),
            new UserResp(3, "lisi", "$2a$10$QmsxJE5gyHqW7hGVt9wrP.NWA4Elt7RE/efQqmMqJ0wVkuNJ.mXqm", "李四", Arrays.asList("ROLE_GUEST", "ROLE_TEST")),
            new UserResp(4, "wangwu", "$2a$10$QmsxJE5gyHqW7hGVt9wrP.NWA4Elt7RE/efQqmMqJ0wVkuNJ.mXqm", "王五", Collections.singletonList("ROLE_GUEST")),
            new UserResp(5, "xingo", "$2a$10$QmsxJE5gyHqW7hGVt9wrP.NWA4Elt7RE/efQqmMqJ0wVkuNJ.mXqm", "新哥", Collections.singletonList("ROLE_ADMIN"))
    ).collect(Collectors.toMap(UserResp::getUserName, u -> u));

    /**
     * 已登录用户信息缓存
     */
    public static final ConcurrentHashMap<String, UserResp> LOGIN_USER_CACHE = new ConcurrentHashMap<>();
}
调整demo接口,添加身份角色校验:
import org.example.pojo.Result;
import org.springframework.security.access.prepost.PreAuthorize;
import org.springframework.web.bind.annotation.GetMapping;
import org.springframework.web.bind.annotation.RequestMapping;
import org.springframework.web.bind.annotation.RestController;

/**
 * demo接口,测试用户权限
 *
 * @Author xingo
 * @Date 2023/10/12
 */
@RestController
@RequestMapping("/demo")
public class DemoController {

    @GetMapping("/test")
    @PreAuthorize("hasAuthority('ROLE_TEST')")
    public Result<String> test() {
        return Result.success("hello,world!test.");
    }

    @GetMapping("/all")
    @PreAuthorize("hasAnyAuthority('ROLE_TEST', 'ROLE_GUEST', 'ROLE_ADMIN')")
    public Result<String> all() {
        return Result.success("hello,world!all.");
    }

    @GetMapping("/admin")
    @PreAuthorize("hasAuthority('ROLE_ADMIN')")
    public Result<String> admin() {
        return Result.success("hello,world!admin.");
    }

    @GetMapping("/everyone")
    public Result<String> everyone() {
        return Result.success("hello,world!everyone.");
    }

}
角色判断就是通过 @PreAuthorize 注解实现的,只有注解中配置的角色才可以访问接口,其他角色访问会被拒绝。要使用角色判断功能,需要在配置类SecurityConfig上面开启该功能的注解:
@EnableGlobalMethodSecurity(securedEnabled = true, prePostEnabled = true)
6、自定义访问失败处理
目前如果身份认证失败或没有权限时,前端直接返回403状态码,这种方式并不友好,对于json接口,我们更希望返回统一的json失败信息,前端根据返回报文做相应的处理,在这里需要自定义AuthenticationEntryPoint和AccessDeniedHandler,然后配置给SpringSecurity就可以实现该功能。
import com.alibaba.fastjson.JSONObject;
import org.example.pojo.Result;
import org.springframework.http.HttpStatus;
import org.springframework.security.core.AuthenticationException;
import org.springframework.security.web.AuthenticationEntryPoint;
import org.springframework.stereotype.Component;

import javax.servlet.ServletException;
import javax.servlet.http.HttpServletRequest;
import javax.servlet.http.HttpServletResponse;
import java.io.IOException;

/**
 * 认证过程中出现的异常,封装统一的认证失败返回信息
 *
 * @Author xingo
 * @Date 2023/10/12
 */
@Component
public class AuthenticationEntryPointImpl implements AuthenticationEntryPoint {

    @Override
    public void commence(HttpServletRequest request, HttpServletResponse response, AuthenticationException authException) throws IOException, ServletException {
        Result<Object> result = Result.fail(HttpStatus.UNAUTHORIZED.value(), "用户身份认证失败");

        try {
            response.setContentType("application/json");
            response.setCharacterEncoding("utf-8");
            response.getWriter().print(JSONObject.toJSONString(result));
            response.setStatus(200);
        } catch (IOException e) {
            e.printStackTrace();
        }
    }
}
import com.alibaba.fastjson.JSONObject;
import org.example.pojo.Result;
import org.springframework.http.HttpStatus;
import org.springframework.security.access.AccessDeniedException;
import org.springframework.security.web.access.AccessDeniedHandler;
import org.springframework.stereotype.Component;

import javax.servlet.ServletException;
import javax.servlet.http.HttpServletRequest;
import javax.servlet.http.HttpServletResponse;
import java.io.IOException;

/**
 * 授权过程中出现的异常,封装权限不足返回信息
 *
 * @Author xingo
 * @Date 2023/10/12
 */
@Component
public class AccessDeniedHandlerImpl implements AccessDeniedHandler {
    @Override
    public void handle(HttpServletRequest request, HttpServletResponse response, AccessDeniedException accessDeniedException) throws IOException, ServletException {
        Result<Object> result = Result.fail(HttpStatus.FORBIDDEN.value(), "用户权限不足");

        try {
            response.setContentType("application/json");
            response.setCharacterEncoding("utf-8");
            response.getWriter().print(JSONObject.toJSONString(result));
            response.setStatus(200);
        } catch (IOException e) {
            e.printStackTrace();
        }
    }
}
调整配置类如下:
import org.example.filter.JwtAuthenticationTokenFilter;
import org.springframework.beans.factory.annotation.Autowired;
import org.springframework.context.annotation.Bean;
import org.springframework.context.annotation.Configuration;
import org.springframework.security.authentication.AuthenticationManager;
import org.springframework.security.config.annotation.method.configuration.EnableGlobalMethodSecurity;
import org.springframework.security.config.annotation.web.builders.HttpSecurity;
import org.springframework.security.config.annotation.web.configuration.WebSecurityConfigurerAdapter;
import org.springframework.security.config.http.SessionCreationPolicy;
import org.springframework.security.crypto.bcrypt.BCryptPasswordEncoder;
import org.springframework.security.crypto.password.PasswordEncoder;
import org.springframework.security.web.AuthenticationEntryPoint;
import org.springframework.security.web.access.AccessDeniedHandler;
import org.springframework.security.web.authentication.UsernamePasswordAuthenticationFilter;

/**
 * security配置类
 *
 * @Author xingo
 * @Date 2023/10/12
 */
@Configuration
@EnableGlobalMethodSecurity(securedEnabled = true, prePostEnabled = true)
public class SecurityConfig extends WebSecurityConfigurerAdapter {

    @Bean
    public PasswordEncoder passwordEncoder() {
        return new BCryptPasswordEncoder();
    }

    @Bean
    @Override
    public AuthenticationManager authenticationManager() throws Exception {
        return super.authenticationManager();
    }

    @Autowired
    private JwtAuthenticationTokenFilter jwtAuthenticationTokenFilter;

    @Autowired
    private AuthenticationEntryPoint authenticationEntryPoint;

    @Autowired
    private AccessDeniedHandler accessDeniedHandler;

    @Override
    protected void configure(HttpSecurity http) throws Exception {
        http
            // 把token校验过滤器添加到过滤器链中并且添加到UsernamePasswordAuthenticationFilter之前
            .addFilterBefore(jwtAuthenticationTokenFilter, UsernamePasswordAuthenticationFilter.class)
            // 关闭csrf
            .csrf().disable()
            // 不通过Session获取SecurityContext
            .sessionManagement().sessionCreationPolicy(SessionCreationPolicy.STATELESS)
            .and()
            .authorizeRequests()
            // 对于登录接口 允许匿名访问
            .antMatchers("/login").anonymous()
            // 除上面外的所有请求全部需要鉴权认证
            .anyRequest().authenticated();

        // 添加权限和身份验证
        http
            .exceptionHandling()
            // 认证失败处理器
            .authenticationEntryPoint(authenticationEntryPoint)
            // 权限不足处理器
            .accessDeniedHandler(accessDeniedHandler);

    }
}
通过上面的调整后,当用户身份验证失败或权限不足时就统一的返回了json格式数据。
以上内容包含了security的基本使用,很多原理性的内容并没有涉及,更深入的知识需要详细阅读源码。
版权声明:本文内容由互联网用户自发贡献,该文观点仅代表作者本人。本站仅提供信息存储空间服务,不拥有所有权,不承担相关法律责任。如发现本站有涉嫌侵权/违法违规的内容, 请发送邮件至 举报,一经查实,本站将立刻删除。
文章由极客之音整理,本文链接:https://www.bmabk.com/index.php/post/181853.html

